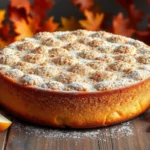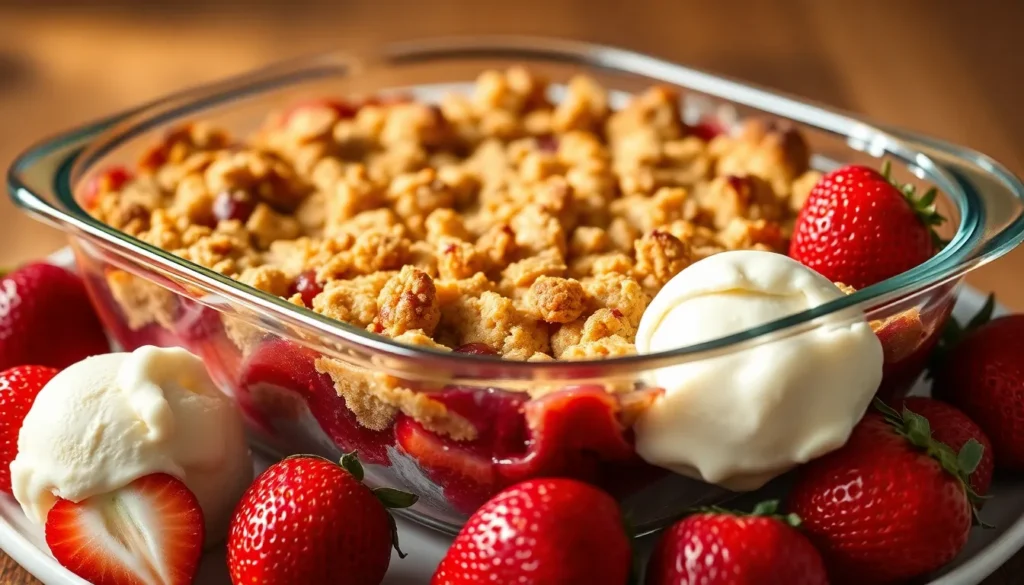
Summer’s sweetest treasure meets comfort food perfection in this irresistible strawberry crumble. We’ve transformed simple, juicy strawberries into a dessert that’ll have your kitchen smelling like pure heaven. The combination of tender, caramelized berries topped with a golden, buttery crumble creates the ultimate crowd-pleaser that works for everything from casual weeknight dinners to special occasions.
What makes our strawberry crumble truly special is the perfect balance of textures – soft, jammy fruit beneath a crispy, cinnamon-kissed topping that practically melts in your mouth. We’ve fine-tuned this recipe to bring out the strawberries’ natural sweetness while adding just enough warmth from vanilla and spices to create depth without overpowering the star ingredient.
Whether you’re using fresh berries from your garden or frozen ones from the store, this foolproof recipe delivers bakery-quality results every single time. Serve it warm with a scoop of vanilla ice cream and watch as it becomes your new go-to dessert that everyone will be begging you to make again.
Ingredients
We’ve crafted this strawberry crumble recipe with simple pantry staples that create extraordinary flavors. Our ingredient list separates into two distinct components that work harmoniously together.
For the Strawberry Filling
- 2 pounds fresh strawberries, hulled and quartered
- 1/3 cup granulated sugar
- 2 tablespoons cornstarch
- 1 tablespoon fresh lemon juice
- 1 teaspoon vanilla extract
- 1/4 teaspoon salt
For the Crumble Topping
- 1 cup all-purpose flour
- 3/4 cup old-fashioned rolled oats
- 2/3 cup packed brown sugar
- 1/2 cup cold unsalted butter, cubed
- 1 teaspoon ground cinnamon
- 1/2 teaspoon salt
- 1/4 teaspoon nutmeg
Equipment Needed

Creating this perfect strawberry crumble requires just a few essential tools that most home kitchens already have. We recommend gathering all your equipment before starting to ensure a smooth baking process.
Essential Baking Equipment:
- Baking Dish: A ceramic or Pyrex dish with approximately 1.5L capacity works best for our standard recipe. You can also use a 9×13-inch baking dish as an alternative option.
- Mixing Bowls: We need both large and medium bowls for combining the strawberry filling and preparing our buttery crumble topping separately.
- Chef’s Knife and Cutting Board: These tools are necessary for hulling and slicing fresh strawberries to the perfect size.
- Measuring Cups and Spoons: Accurate measurements ensure consistent results every time we make this crumble.
Preparation Equipment:
Your standard oven preheated to 375°F (190°C) provides the ideal temperature for achieving that golden brown crumble top while keeping the strawberries perfectly tender underneath.
Scaling and Storage Considerations:
| Recipe Aspect | Details |
|---|---|
| Recipe Scaling | Easily adjustable based on baking dish size |
| Storage Options | Refrigerate leftovers or freeze for later |
| Freezing Method | Can freeze unbaked or baked crumble |
| Thawing Time | Overnight in refrigerator before serving |
The beauty of this recipe lies in its flexibility. We can scale the ingredients up or down depending on our baking dish size, making it perfect for intimate dinners or larger gatherings. Having the right equipment ready makes the entire process effortless and enjoyable.
Instructions

Now that we have our ingredients ready and equipment prepared, let’s walk through the simple steps to create this irresistible strawberry crumble. We’ll break down the process into manageable stages to ensure perfect results every time.
Prep the Strawberries
Core and Slice Strawberries: We begin by removing the stems from our 2 pounds of ripe strawberries and slicing them into uniform pieces. This ensures even cooking throughout the baking process.
Mix with Sugar and Cornstarch: In a large bowl, we combine the sliced strawberries with sugar, cornstarch, and vanilla extract. The cornstarch helps thicken the natural juices while the sugar enhances the berries’ sweetness. We gently toss everything together until the strawberries are evenly coated.
Make the Crumble Topping
Mix Dry Ingredients: We combine flour, sugar, salt, and cinnamon in a separate bowl. This creates our base mixture for the crispy topping that will crown our strawberries.
Add Butter: Using our fingers or a pastry cutter, we work the cold butter into the dry mixture until it forms a crumbly texture. The butter should be distributed evenly throughout, creating small pea-sized pieces. For extra texture and flavor, we can fold in oats or coconut flakes at this stage.
Assemble the Crumble
Transfer Strawberries: We place our prepared strawberry mixture into an 8-inch baking dish or deep pie dish. The fruit should be spread evenly across the bottom of the dish.
Add Crumble Topping: We sprinkle the crumble topping evenly over the strawberries, ensuring complete coverage. The topping should form a generous layer that will create our signature golden crust.
Bake the Strawberry Crumble
Preheat Oven: We set our oven to 350°F (180°C) and allow it to fully preheat before baking.
Bake: We place the assembled dish in the oven and bake for 40-50 minutes. The crumble is ready when the topping turns golden brown and the strawberry juices bubble around the edges.
Prevent Overbrowning: If we notice the topping darkening too quickly, we cover it with aluminum foil after 30 minutes of baking. This protects the surface while allowing the fruit to finish cooking perfectly.
Serving Suggestions

We recommend allowing our strawberry crumble to cool for 5 to 15 minutes after baking before serving. This brief resting period helps the filling set properly and ensures a more pleasant eating experience while maintaining that perfect warm temperature.
Temperature and Timing
Serving our crumble warm delivers the best results. The golden brown topping should be crisp and the strawberry filling bubbling and syrupy when we spoon it into individual bowls.
Classic Accompaniments
Vanilla Ice Cream stands as the most popular pairing for strawberry crumble. We love how the softened vanilla ice cream melts slightly over the warm dessert, creating a delightful contrast of temperatures and textures that enhances every bite.
Whipped Cream offers another excellent choice for topping our crumble. Fresh whipped cream adds lightness to the dessert and balances the rich, buttery crumble perfectly. For those seeking dairy-free alternatives, whipped coconut cream works beautifully as a substitute.
Dietary Adaptations
Plant-based options expand our serving possibilities significantly. We can offer soy ice cream or avocado ice cream for guests following vegan diets. These alternatives maintain the creamy texture that complements our crumble’s crispy topping.
Our strawberry crumble adapts easily to various dietary needs. We can make it gluten-free by substituting gluten-free flour or create a vegan version using plant-based butter without any additional preparation steps.
Storage Guidelines
| Storage Method | Duration | Temperature |
|---|---|---|
| Room Temperature | Up to 1 day | Ambient |
| Refrigerated | 3-4 days | 35-40°F |
We store leftovers at room temperature for up to one day or refrigerate them for longer freshness. This flexibility allows us to prepare the dessert ahead of time for entertaining or save portions for later enjoyment.
Storage and Make-Ahead Tips

Proper storage techniques help us maintain our strawberry crumble’s delightful texture and fresh flavor for days after baking. We can store our freshly baked crumble at room temperature for one day, though we recommend refrigerating it when house temperatures exceed 75°F to prevent spoilage.
Refrigeration Storage
Our strawberry crumble stays fresh in the refrigerator for up to four days when stored properly. We transfer cooled crumble portions into airtight containers to maintain optimal freshness and preserve the crispy topping texture. Adding a paper towel to the container absorbs excess moisture and prevents the crumble from becoming soggy.
| Storage Method | Duration | Temperature Requirements |
|---|---|---|
| Room Temperature | 1 day | Under 75°F |
| Refrigerated | 4 days | 35-40°F |
| Frozen | 3 months | 0°F or below |
Freezing for Long Term Storage
We can extend our crumble’s shelf life to three months through proper freezing techniques. After the crumble cools completely, we wrap it in a double layer of plastic wrap and place it inside a freezer safe bag. Thawing occurs naturally at room temperature or through gentle oven reheating for best results.
Make Ahead Preparation
Planning ahead streamlines our baking process significantly. We prepare the crumble topping up to one week in advance and store it in the refrigerator until needed. Fresh strawberries can be washed and sliced the day before, then refrigerated in covered containers to save time on baking day.
Assembly Timing
We assemble our strawberry crumble just before baking to achieve optimal texture and prevent soggy bottoms. Fresh strawberries work best for our recipe since frozen berries release excess moisture that can compromise the crumble’s structure. This timing strategy ensures our dessert maintains its perfect balance of crispy topping and tender fruit filling.
Recipe Variations

Our strawberry crumble serves as the perfect foundation for countless delicious adaptations. These variations allow you to customize the dessert to match seasonal fruit availability and dietary preferences.
Mixed Berry Crumble
We transform our classic strawberry crumble into a vibrant mixed berry version by combining strawberries with blueberries, raspberries, or peaches. Replace half the strawberries with your chosen berries to create exciting flavor combinations and varied textures throughout each bite. The preparation method remains identical to our original recipe: mix the fruits together with the same amount of thickener and sugar before adding the crumble topping.
Blueberries add bursts of sweetness while raspberries contribute tartness that balances the overall flavor profile. Peaches introduce a soft, honeyed element that pairs beautifully with the berry medley. Each combination requires the same baking time and temperature as our original strawberry version.
Gluten-Free Option
Our gluten-free adaptation replaces all-purpose flour in the crumble topping with almond flour or certified gluten-free oat flour. We recommend using almond flour combined with certified gluten-free oats for enhanced texture and nutty flavor depth. Chopped nuts like pecans or walnuts provide additional crunch when mixed into the topping.
Coconut oil works perfectly as a substitute for butter in this version, creating a dairy-free option that maintains the same rich, crumbly texture. Verify that all ingredients including oats and any baking powder are certified gluten-free to ensure complete dietary compliance. The baking process and timing remain unchanged from our original recipe.
Reduced Sugar Version
We create a naturally sweetened version by reducing the granulated sugar content by one-third to one-half in both the fruit mixture and crumble topping. Rely on the natural sweetness of perfectly ripe strawberries to provide most of the dessert’s sweetness. Lower-sugar natural sweeteners can replace traditional sugar if additional sweetness is desired.
Cornstarch becomes particularly important in this variation as it compensates for the extra moisture released from the fruit when less sugar is present. The reduced sugar allows the strawberry flavor to shine more prominently while still creating that beloved jammy texture. Baking time may need slight adjustment as the fruit mixture may bubble more vigorously due to increased moisture content.
Troubleshooting Tips

Even with our foolproof recipe, we occasionally encounter issues that can affect the final result. Understanding these common problems and their answers helps ensure your strawberry crumble turns out perfectly every time.
Preventing Runny Filling
When strawberries release excessive juice during baking, the filling becomes too runny. Overly ripe strawberries are typically the culprit since they contain more natural juices than firmer fruit. We recommend selecting strawberries that feel firm to the touch and show minimal soft spots.
If you’re working with ripe strawberries, add an extra tablespoon of cornstarch to the filling mixture. This additional starch helps absorb excess moisture and creates the perfect consistency. Always ensure the filling bubbles vigorously before removing the crumble from the oven, as this activates the cornstarch’s thickening properties.
Avoiding Mushy Strawberries
Strawberries that are too soft before cooking will break down completely during baking. We suggest using these overly soft berries for strawberry syrup or jam instead of the crumble filling. Fresh strawberries should maintain some structure even after baking to provide pleasant texture contrast.
Coating your strawberries with a light dusting of flour before mixing with other ingredients helps create an additional barrier against moisture loss. This technique works particularly well when using frozen strawberries that naturally release more liquid during thawing.
Achieving the Perfect Texture Timing
Serving your crumble too soon after baking results in a liquidy consistency that lacks the ideal texture. We always let our crumble rest for 4 to 6 hours before serving. This resting period allows the juices to set properly and the topping to develop its characteristic crunch.
| Resting Time | Texture Result |
|---|---|
| 0-1 hours | Liquidy filling, soft topping |
| 2-3 hours | Slightly set filling, firming topping |
| 4-6 hours | Perfectly set filling, crispy topping |
Ensuring Crunchy Topping
A soggy or soft crumble topping usually indicates problems with butter integration or insufficient baking time. Cold butter must be thoroughly mixed into the dry ingredients using a rubbing motion with your fingertips or a food processor. The mixture should resemble coarse breadcrumbs with some larger butter pieces visible.
Bake the crumble until the topping achieves a golden brown color and the filling bubbles actively around the edges. Underbaked toppings will soften as they cool, while properly baked ones maintain their crunch even after resting.
Quick Fixes for Common Issues
Excessive browning occurs when the oven temperature runs too hot or the crumble bakes too long. Cover the dish with aluminum foil during the last 10 to 15 minutes of baking if the topping browns too quickly. Position your oven rack in the center to ensure even heat distribution.
Frozen strawberries require slightly longer baking times and may release more liquid than fresh ones. Add an extra half tablespoon of cornstarch when using frozen berries and expect the baking time to increase by 5 to 10 minutes.
Conclusion
This strawberry crumble recipe truly delivers everything we love about homemade desserts – it’s simple yet impressive and works beautifully for any gathering. We’ve shared all our best tips to help you create that perfect balance of tender fruit and crispy topping every single time.
The beauty of this dessert lies in its versatility. Whether you’re adapting it for dietary needs experimenting with seasonal fruits or preparing it ahead of time you’ll find countless ways to make it your own.
Now it’s time to preheat that oven and experience the magic yourself. We’re confident this strawberry crumble will become a cherished recipe in your kitchen just as it has in ours.
Frequently Asked Questions
What ingredients do I need for strawberry crumble?
For the strawberry filling, you’ll need fresh strawberries, sugar, cornstarch, lemon juice, vanilla extract, and salt. The crumble topping requires flour, rolled oats, brown sugar, cold unsalted butter, cinnamon, salt, and nutmeg. These simple pantry staples create extraordinary flavors when combined together.
Can I use frozen strawberries instead of fresh ones?
Yes, you can use frozen strawberries! The recipe works with both fresh and frozen berries, yielding bakery-quality results either way. When using frozen strawberries, you may need to add extra cornstarch to prevent a runny filling and extend the baking time slightly.
How long should I bake the strawberry crumble?
Bake the strawberry crumble at 350°F (180°C) for 40-50 minutes, or until the topping is golden brown and the filling is bubbling. If the topping browns too quickly, cover it with foil and continue baking until the filling is properly set.
How should I store leftover strawberry crumble?
Store leftover crumble at room temperature for up to one day or refrigerate for 3-4 days in an airtight container with a paper towel to absorb moisture. For long-term storage, wrap in plastic wrap and freeze for up to three months.
Can I make strawberry crumble ahead of time?
Yes! You can prepare the crumble topping up to a week in advance and slice strawberries the day before. However, assemble the crumble just before baking to maintain the best texture, especially when using fresh strawberries to prevent excess moisture.
What’s the best way to serve strawberry crumble?
Serve the crumble warm after letting it cool for 5-15 minutes. Classic accompaniments include vanilla ice cream, which melts beautifully over the warm dessert, or whipped cream. The contrast between the warm, crispy topping and cold ice cream creates an irresistible treat.
How do I prevent my strawberry crumble from being runny?
Select firm strawberries and add extra cornstarch if your berries are very juicy. Coat the strawberries with a light dusting of flour before mixing with other ingredients. Let the assembled crumble rest for 10-15 minutes before baking to allow the cornstarch to absorb excess moisture.
Can I make gluten-free strawberry crumble?
Absolutely! Substitute the regular flour with almond flour or gluten-free oat flour in the crumble topping. The preparation method and baking process remain the same, ensuring you still get delightful flavors and textures while accommodating dietary restrictions.
What other fruits can I use in this crumble recipe?
You can create a mixed berry crumble using strawberries, blueberries, raspberries, and blackberries. The recipe is adaptable to seasonal fruit availability, and you can customize based on your preferences while maintaining the same preparation method and baking process.
Why should I let the crumble rest after baking?
Allowing the crumble to rest for 5-15 minutes after baking helps the filling set properly and makes serving easier. For the ideal texture, some bakers recommend resting it for 4-6 hours, which allows the flavors to meld and the consistency to perfect.