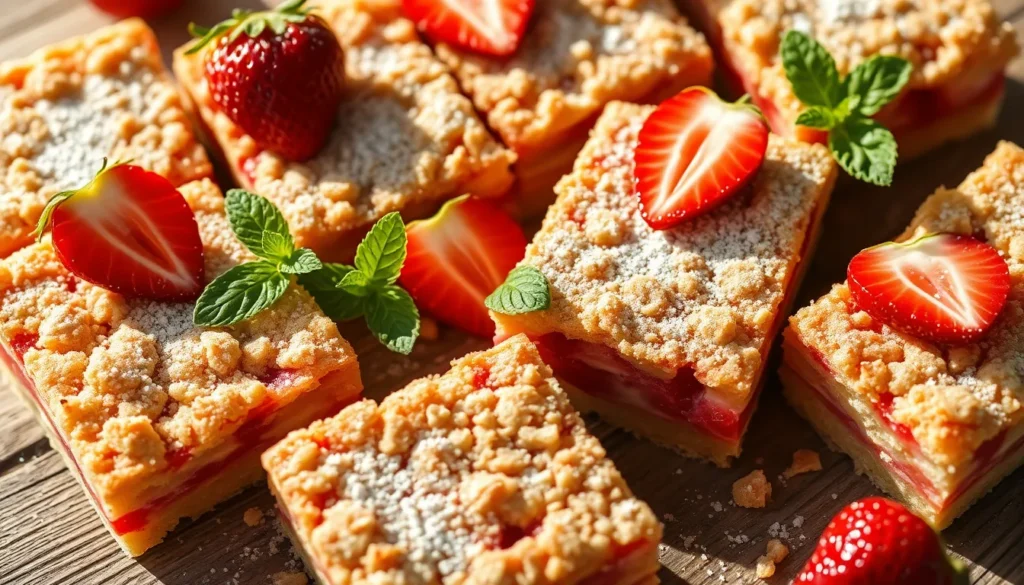
We all know that perfect moment when summer strawberries reach their peak sweetness and we’re scrambling to use them before they spoil. That’s exactly when these irresistible strawberry bars come to the rescue! These delightful treats combine a buttery shortbread crust with a luscious strawberry filling that captures all the bright flavors of the season.
What sets our strawberry bars apart is their incredible versatility – they’re equally at home at a backyard barbecue as they are packed in a lunchbox. The sweet-tart balance hits just right while the crumbly topping adds that satisfying texture contrast we all crave.
Ingredients
We’ve organized our strawberry bars recipe into three distinct components to ensure perfect results every time. Each layer contributes its own unique texture and flavor to create these irresistible summer treats.
For the Crust
- 2 cups all-purpose flour
- 1/2 cup granulated sugar
- 1/2 teaspoon salt
- 1 cup cold unsalted butter, cubed
- 1 large egg yolk
- 2 tablespoons cold water
For the Strawberry Filling
- 4 cups fresh strawberries, hulled and diced
- 3/4 cup granulated sugar
- 3 tablespoons cornstarch
- 2 tablespoons fresh lemon juice
- 1 teaspoon vanilla extract
- 1/4 teaspoon salt
For the Crumb Topping
- 1 cup all-purpose flour
- 1/2 cup old-fashioned rolled oats
- 1/2 cup packed light brown sugar
- 1/4 cup granulated sugar
- 1/2 teaspoon ground cinnamon
- 1/4 teaspoon salt
- 6 tablespoons cold unsalted butter, cubed
Equipment Needed

Making these delicious strawberry bars requires several essential tools that ensure smooth preparation and perfect results. We recommend gathering all equipment before starting to streamline your baking process.
Essential Baking Equipment:
- Large mixing bowls – We need at least two bowls for preparing the crust mixture and strawberry filling separately
- 8×8 inch or 9×9 inch baking pan – Either size works perfectly for achieving the ideal bar thickness
- Baking paper or parchment paper – This lines the pan and makes removal effortless
- Electric mixer – While optional, this tool makes blending the dough components much easier
- Whisk or wooden spoon – Essential for combining ingredients when mixing by hand
Preparation and Serving Tools:
- Small saucepan – Useful if you choose to reduce jam or create a strawberry syrup enhancement
- Spatula or large spoon – Perfect for mixing ingredients and spreading layers evenly in the pan
- Oven mitts – Safety equipment for handling hot baking pans during the 35 to 55 minute baking process
Additional Helpful Items:
- Sharp knife – Needed for slicing fresh strawberries uniformly
- Measuring cups and spoons – Accuracy matters for achieving the perfect texture balance
- Wire cooling rack – Allows proper air circulation during the cooling process
Having these tools ready transforms the baking experience from chaotic to organized. The right equipment helps us achieve those perfectly golden bars with bubbly strawberry filling that make this recipe so irresistible.
Instructions

We’ll walk through each step to create these delicious strawberry bars with perfect layers and textures. Follow our systematic approach to ensure bakery-quality results every time.
Prep the Pan and Oven
Position your oven rack in the center and preheat to 375°F. Line your 8×8 or 9×9 inch baking pan with parchment paper, leaving 2 inches of overhang on all sides for easy removal. Lightly grease the parchment with butter or cooking spray to prevent sticking.
Make the Crust
Combine 1½ cups all-purpose flour, ½ cup granulated sugar, and ¼ teaspoon salt in a large mixing bowl. Cut 6 tablespoons cold butter into small cubes and work into the flour mixture using a pastry cutter or your fingertips until the mixture resembles coarse crumbs. Mix 1 egg yolk with 2 tablespoons cold water in a small bowl, then drizzle over the flour mixture. Stir gently until the dough just comes together. Reserve ¾ cup of this mixture for the topping, then press the remaining dough firmly into your prepared pan to form an even base layer.
Prepare the Strawberry Filling
Hull and slice 3 cups fresh strawberries into ¼-inch thick pieces for optimal texture. Toss the strawberries with ½ cup granulated sugar, 2 tablespoons cornstarch, 1 tablespoon fresh lemon juice, ½ teaspoon vanilla extract, and a pinch of salt in a medium bowl. Let the mixture sit for 10 minutes to allow the strawberries to release their natural juices and create a syrupy coating.
Create the Crumb Topping
Take the reserved ¾ cup crust mixture and add ¼ cup rolled oats, 2 tablespoons brown sugar, ¼ teaspoon cinnamon, and 1 tablespoon cold butter cut into small pieces. Mix with your fingers until you have chunky crumbs that hold together when squeezed but still break apart easily.
Assemble the Bars
Spread the strawberry filling evenly over the pressed crust, distributing both the fruit and accumulated juices uniformly. Sprinkle the crumb topping over the strawberries, covering the surface completely while leaving some gaps for the fruit to peek through during baking.
Bake the Strawberry Bars
Place the pan in the preheated oven and bake for 40-45 minutes until the topping turns golden brown and the strawberry filling bubbles around the edges. Remove from the oven and place on a wire cooling rack. Allow the bars to cool completely in the pan for at least 2 hours before lifting out using the parchment overhang and cutting into squares.
Cooling and Cutting

Achieving perfectly cut strawberry bars requires patience during the cooling process. We recommend allowing your freshly baked bars to cool in the pan for 30 to 45 minutes after removing them from the oven. This initial cooling period helps the bars begin to set while still maintaining some warmth.
Refrigeration becomes crucial for clean cuts and professional presentation. After the initial cooling phase we place our bars in the refrigerator for at least 30 minutes to one hour. This additional chilling time firms up the strawberry filling and crumb topping making them much easier to slice without crumbling or falling apart.
| Cooling Stage | Time Required | Purpose |
|---|---|---|
| Initial Cooling | 30-45 minutes | Allows bars to start setting |
| Refrigeration | 30-60 minutes | Firms texture for clean cutting |
Removing the bars from the pan requires a gentle approach. We use the parchment paper as handles to lift the entire slab out of the baking pan and transfer it to a wire rack or clean cutting board. This technique prevents breaking and maintains the integrity of our carefully crafted layers.
Sharp knives work best for achieving clean precise cuts through the firm cooled bars. We typically cut our strawberry bars into 9 large squares or 16 smaller portions depending on serving preferences and occasion requirements. The key lies in ensuring the bars remain completely firm and cool throughout the cutting process.
Proper timing transforms potentially messy bars into bakery quality squares that hold their shape beautifully. Each slice should reveal distinct layers of golden crust vibrant strawberry filling and textured crumb topping ready for serving and enjoying.
Storage Instructions

Our strawberry bars maintain their delicious flavor and texture when stored properly using the right methods for each timeframe. We recommend following these exact storage guidelines to ensure your bars stay fresh and enjoyable.
Room Temperature Storage
We can keep freshly baked strawberry bars at room temperature for optimal short-term storage. Place the completely cooled bars in an airtight container where they will stay fresh for up to 2 days. Environmental conditions play a crucial role in storage duration since warm temperatures may reduce this timeframe to just 1 day.
| Storage Method | Duration | Container Type |
|---|---|---|
| Room Temperature | 1-2 days | Airtight container |
| Refrigerator | Up to 5 days | Airtight container |
| Freezer | Up to 3 months | Wrapped + airtight container |
Refrigerator Storage
Refrigeration extends the life of our strawberry bars significantly while maintaining their quality. We store the bars in the refrigerator for up to 5 days in an airtight container. The base and crumble topping may soften slightly over time but the bars remain perfectly edible and delicious.
Freezing for Long-Term Storage
Freezing provides the longest storage option for our strawberry bars when properly prepared. We wrap each bar tightly in plastic wrap or aluminum foil before placing them in an airtight container or freezer bag. Properly frozen bars maintain their quality for up to 3 months in the freezer.
When ready to enjoy frozen bars we allow them to thaw at room temperature or reheat them in the oven for a warm treat. This thawing process restores much of the original texture and flavor.
Essential Storage Tips
We always ensure our strawberry bars cool completely before any storage method to maintain their shape and prevent condensation. Using fresh in-season strawberries enhances both the flavor and storage life of our bars. Complete cooling prevents the bars from becoming soggy and helps them hold their distinct layers during storage.
Serving Suggestions

We recommend serving these strawberry bars at room temperature or slightly chilled for the best texture and flavor experience. The bars taste exceptional when allowed to sit for about 15 minutes after removing them from the refrigerator, as this brings out the full strawberry flavor while maintaining the perfect firmness.
A light dusting of powdered sugar transforms these bars into bakery-style treats that look absolutely stunning on any dessert table. We suggest using a fine-mesh sieve to achieve an even, professional coating that highlights the golden crumb topping beneath.
Our favorite enhancement involves drizzling a simple powdered sugar glaze over the cooled bars for extra sweetness and visual appeal. Mix 1 cup powdered sugar with 2-3 tablespoons milk and 1/2 teaspoon vanilla extract until smooth, then drizzle in zigzag patterns across the surface.
Fresh whipped cream or vanilla ice cream makes an excellent accompaniment that balances the sweet-tart strawberry filling. We find that a dollop of lightly sweetened whipped cream particularly complements the buttery shortbread crust and creates a delightful contrast in temperatures.
These bars shine as afternoon tea treats, picnic desserts, or casual dinner party finales. We often cut them into smaller 16-piece portions for gatherings where guests prefer bite-sized sweets, or stick with 9 larger squares for more substantial servings.
Garnishing with fresh strawberry slices or mint leaves adds an elegant touch for special occasions. The natural colors create beautiful presentation while hinting at the delicious strawberry flavor within each bar.
For optimal serving, we always use a sharp knife wiped clean between cuts to maintain those crisp, defined edges that showcase the distinct layers of crust, filling, and crumb topping.
Tips for Perfect Strawberry Bars

Keep Your Butter Ice Cold for the Best Texture
We cannot emphasize enough how crucial cold butter is for achieving that perfect crumbly crust. When butter stays very cold during mixing, it creates small pockets of fat that result in a tender, flaky texture rather than a dense one. We recommend cutting your butter into small cubes and chilling them in the freezer for 10 minutes before incorporating them into your flour mixture.
Master the Art of Gentle Mixing
Overworking your crumb topping will lead to tough, chewy bars instead of the light, crumbly texture we want. We mix our ingredients just until they come together and form loose clumps. The mixture should look rough and uneven rather than smooth and uniform. This technique ensures each bite delivers that satisfying crumbly contrast against the smooth strawberry filling.
Line Your Pan with Parchment Paper
Parchment paper becomes your best friend when making strawberry bars. We always line our baking dish with parchment, leaving some overhang on the sides to create handles. This simple step makes removing the bars from the pan effortless and prevents any sticking that could ruin your beautiful layers.
Allow Proper Cooling Time
Temperature control plays a vital role in achieving clean cuts and maintaining structural integrity. We let our bars cool completely in the pan at room temperature before transferring them to the refrigerator for at least two hours. This cooling process allows the filling to set properly and prevents the bars from falling apart when cut.
Use Room Temperature Ingredients When Specified
While we keep butter cold for the crust, other ingredients like eggs should reach room temperature before mixing. Room temperature ingredients blend more easily and create a smoother, more cohesive mixture. We take eggs out of the refrigerator about 30 minutes before baking to achieve the ideal temperature.
Variations

Our strawberry bars recipe adapts beautifully to different flavor combinations and dietary preferences. We love experimenting with these delicious variations that maintain the same beloved texture while offering exciting new taste experiences.
Mixed Berry Strawberry Bars
We often combine fresh strawberries with blueberries and raspberries for a more complex flavor profile. Replace half the strawberries with equal amounts of mixed berries. The combination creates beautiful color variations and adds tartness that balances perfectly with our buttery crust.
Strawberry Rhubarb Bars
Adding diced rhubarb to our strawberry filling creates the classic spring combination that many bakers adore. We recommend using 2 cups strawberries and 1 cup diced rhubarb. The rhubarb’s tartness enhances the strawberry sweetness while maintaining our bars’ signature texture.
Strawberry Kiwi Bars
For a tropical twist we incorporate diced kiwi fruit with our strawberries. Use 2½ cups strawberries and ½ cup peeled diced kiwi. The kiwi adds subtle tartness and creates attractive green flecks throughout the filling.
Coconut Strawberry Bars
We transform our crumb topping by adding ½ cup unsweetened shredded coconut to the oat mixture. This variation provides tropical flavor notes and extra texture that complements the strawberry filling beautifully.
Gluten-Free Strawberry Bars
Our recipe converts easily for gluten-free diets by substituting the all-purpose flour with a 1:1 gluten-free flour blend in both the crust and topping. We ensure the blend contains xanthan gum for proper binding.
Strawberry Shortcake Style Bars
We create a more dessert-focused version by adding 2 tablespoons of vanilla extract to our crust mixture and increasing the sugar by ¼ cup. This variation mimics the beloved flavors of traditional strawberry shortcake.
Reduced Sugar Strawberry Bars
For those watching sugar intake we reduce the granulated sugar in the filling to ½ cup and add 1 tablespoon of honey or maple syrup. The natural fruit sugars still provide plenty of sweetness while creating a more health-conscious treat.
Conclusion
These strawberry bars represent everything we love about summer baking – they’re simple enough for beginners yet impressive enough for special occasions. With their perfect balance of buttery crust sweet-tart filling and crumbly topping they’ll quickly become a staple in your recipe collection.
The versatility of this recipe means you’ll never run out of ways to enjoy it. Whether you stick with the classic version or experiment with our suggested variations there’s a combination that’ll suit every taste preference and dietary need.
We’re confident that once you try these bars you’ll understand why they’re such a beloved treat. They capture the essence of fresh strawberries in every bite making them the perfect way to celebrate the season’s bounty.
Frequently Asked Questions
What are the main ingredients needed for strawberry bars?
The recipe requires three components: a shortbread crust made with flour, sugar, salt, cold butter, egg yolk, and water; a strawberry filling with fresh strawberries, sugar, cornstarch, lemon juice, vanilla, and salt; and a crumb topping containing flour, oats, brown sugar, granulated sugar, cinnamon, salt, and cold butter.
How long do strawberry bars need to bake?
Bake the strawberry bars for 40-45 minutes at the recommended temperature until the topping is golden brown and the filling is bubbly. The exact time may vary depending on your oven, so watch for visual cues like golden coloring and bubbling edges.
How should I store strawberry bars?
Store at room temperature for 1-2 days, refrigerate for up to 5 days, or freeze for up to 3 months. Always cool completely before storing. For best results, cover tightly or store in an airtight container to maintain freshness and prevent the bars from drying out.
Can I make variations of the basic strawberry bar recipe?
Yes! Popular variations include Mixed Berry, Strawberry Rhubarb, Strawberry Kiwi, Coconut Strawberry, Gluten-Free, Strawberry Shortcake Style, and Reduced Sugar versions. Each variation maintains the original texture while offering different flavor combinations to suit various tastes and dietary needs.
What’s the best way to serve strawberry bars?
Serve at room temperature or slightly chilled for optimal flavor. Dust with powdered sugar or add a simple glaze for enhanced appearance. Consider pairing with fresh whipped cream or vanilla ice cream. Garnish with fresh strawberry slices or mint leaves for an elegant presentation.
How do I achieve the perfect texture for strawberry bars?
Use ice-cold butter for a flaky crust, mix gently to avoid tough bars, and line your pan with parchment paper for easy removal. Allow proper cooling time to maintain structural integrity, and use room temperature ingredients when specified for smoother mixing.
What equipment do I need to make strawberry bars?
Essential equipment includes mixing bowls, a baking pan, baking paper, measuring cups, a small saucepan, spatula, oven mitts, and a sharp knife. Optional tools like an electric mixer can make preparation easier, but aren’t strictly necessary for successful results.
How do I know when strawberry bars are properly cooled?
Allow bars to cool completely in the pan first, then refrigerate for cleaner cuts. Proper cooling prevents the bars from falling apart when cut and helps maintain their layered structure. This process typically takes several hours but ensures the best presentation.