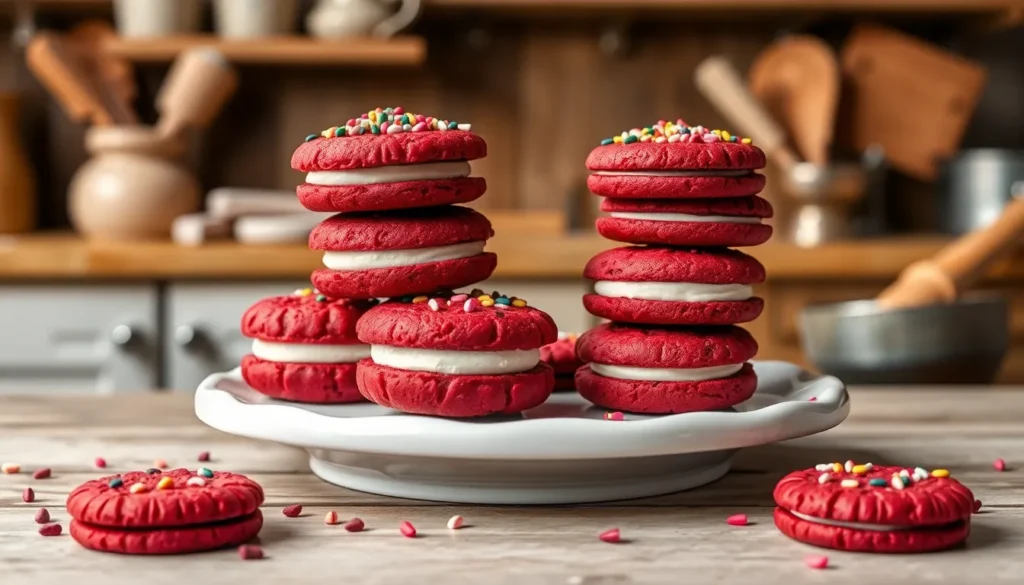
We’ve taken everyone’s favorite sandwich cookie and transformed it into something absolutely irresistible – Red Velvet Oreos! These stunning crimson-colored treats combine the classic tangy sweetness of red velvet cake with the beloved crunch of homemade Oreo cookies. The result? A show-stopping dessert that’ll have your family and friends begging for the recipe.
What makes these cookies truly special isn’t just their gorgeous deep red color – it’s the perfect balance of cocoa richness and cream cheese frosting sandwiched between two tender cookie layers. We’ve perfected this recipe to capture that signature red velvet flavor while maintaining the satisfying texture that makes Oreos so addictive.
Whether you’re planning a Valentine’s Day surprise or simply want to elevate your cookie game, these Red Velvet Oreos deliver both visual impact and incredible taste. They’re surprisingly simple to make and guaranteed to become your new go-to impressive dessert.
Ingredients
We’ll need two sets of ingredients to create these stunning red velvet Oreos. Our shopping list divides into components for the vibrant cookies and the rich cream cheese filling.
For the Red Velvet Cookies
- 2 cups all-purpose flour
- 1/4 cup unsweetened cocoa powder
- 1 teaspoon baking soda
- 1/2 teaspoon salt
- 1/2 cup unsalted butter, softened
- 3/4 cup granulated sugar
- 1 large egg
- 1/4 cup buttermilk
- 2 tablespoons red food coloring
- 1 teaspoon vanilla extract
- 1 teaspoon white vinegar
For the Cream Cheese Filling
- 4 oz cream cheese, softened
- 1/4 cup unsalted butter, softened
- 2 cups powdered sugar
- 1 teaspoon vanilla extract
- Pinch of salt
Equipment Needed

Creating perfect Red Velvet Oreos requires the right tools to ensure our cookies bake evenly and our filling achieves the ideal consistency. We’ve compiled a comprehensive list of essential equipment that will make our baking process smooth and successful.
Baking sheets form the foundation of our cookie making process. We recommend using heavy-duty aluminum or stainless steel sheets that distribute heat evenly across the surface. Light-colored sheets work best as they prevent the bottoms of our red velvet cookies from browning too quickly.
Parchment paper becomes our best friend when lining those baking sheets. This non-stick surface ensures our delicate red velvet cookies release easily without breaking or sticking. We always keep extra sheets on hand since we’ll likely be baking multiple batches.
Medium cookie scoop helps us achieve uniform cookies every time. This tool portions out consistent amounts of dough so all our Red Velvet Oreos bake at the same rate and look professionally made. A 1.5-tablespoon scoop works perfectly for sandwich cookies of this size.
Electric mixer proves essential for both our cookie dough and cream cheese filling. We use it to cream the butter and sugar together properly and to whip our filling to the perfect light and fluffy texture. A stand mixer works best but a hand mixer will also do the job.
Food processor or blender comes in handy if we decide to incorporate crushed Oreos into our recipe variation. This equipment quickly reduces whole cookies to the perfect crumb size for mixing into our dough.
Cooling rack allows air to circulate around our freshly baked cookies. This prevents condensation from forming on the bottom and keeps our cookies crisp as they cool to room temperature before we add the filling.
Instructions

Now we’ll walk through the step-by-step process to create these irresistible Red Velvet Oreos. The key to success lies in proper preparation and careful attention to each stage of the baking process.
Prep
Preheat your oven to 350°F and position the racks in the center. Line two heavy-duty baking sheets with parchment paper to prevent sticking and ensure easy removal. This preparation step saves time and creates better results.
Measure all ingredients before beginning the mixing process. Bring the butter and cream cheese to room temperature approximately 30 minutes before baking. Room temperature ingredients blend more easily and create a smoother texture in both the cookies and filling.
Make the Red Velvet Cookies
Combine the dry ingredients in a medium bowl by whisking together 1½ cups all-purpose flour and 2 tablespoons cocoa powder. Set this mixture aside for later use.
Cream the butter and sugars using an electric mixer on medium speed for 2-3 minutes. Beat ½ cup unsalted butter with ¾ cup granulated sugar and ¼ cup packed light brown sugar until the mixture becomes light and fluffy.
Add the wet ingredients by beating in 1 large egg until fully incorporated. Mix in 1 teaspoon vanilla extract, ½ teaspoon vinegar, and 1-2 teaspoons red food coloring until the batter achieves your desired vibrant red color.
Fold in the flour mixture gradually using a wooden spoon or spatula until just combined. Avoid overmixing to prevent tough cookies. Gently fold in 1 cup chopped Oreos and ½ cup white chocolate chips for added texture and flavor.
Scoop the dough using a medium cookie scoop or tablespoon onto the prepared baking sheets. Space cookies 2 inches apart to allow for spreading during baking.
Bake for 10 minutes until the edges appear set but centers remain slightly soft. Remove from oven and let cookies cool on the baking sheet for 5 minutes before transferring to a cooling rack.
Prepare the Cream Cheese Filling
Beat the cream cheese and butter using an electric mixer until smooth and creamy. Use 8 ounces softened cream cheese and ¼ cup unsalted butter for the perfect consistency.
Add the powdered sugar gradually while continuing to beat the mixture. Incorporate 1 cup powdered sugar slowly to prevent lumps from forming.
Finish the filling by adding 1-2 tablespoons milk as needed to achieve a spreadable consistency. The filling should hold its shape but spread easily without being too thick.
Assemble the Red Velvet Oreos
Select matching cookie pairs by choosing cookies of similar size for the best appearance. This creates uniform sandwich cookies that look professionally made.
Apply the filling by spreading approximately 1 tablespoon of cream cheese filling onto the flat bottom of one cookie. Use an offset spatula or knife for even distribution.
Create the sandwich by gently pressing another cookie on top with the flat side down. Apply gentle pressure to secure the filling without squeezing it out the sides.
Chill if desired by placing assembled cookies in the refrigerator for 15-20 minutes. This step helps set the filling and creates a better texture for serving.
Baking Tips for Perfect Red Velvet Oreos

Success with these stunning red velvet cookies depends on mastering a few essential techniques. We’ve gathered our most effective tips to ensure your cookies turn out perfectly every time.
Preparing Ingredients and Equipment
Temperature control makes all the difference when preparing our ingredients. We always bring eggs and buttermilk to room temperature about 30 minutes before mixing to ensure proper blending with other components.
Our equipment setup includes these essential tools:
| Equipment | Purpose |
|---|---|
| Electric hand mixer or stand mixer | Creaming butter and sugar |
| Medium cookie scoop | Uniform cookie sizing |
| Silicone spatula | Folding in add-ins |
| Parchment paper lined baking sheets | Even baking surface |
Quality ingredients create superior results. We use all-purpose flour combined with unsweetened cocoa powder for the perfect chocolatey base. Unsalted butter provides better flavor control than salted varieties. Red food coloring should be gel-based rather than liquid for more vibrant color without affecting dough consistency.
Baking Instructions
Oven temperature accuracy ensures consistent results every time. We preheat our oven to 350°F and verify the temperature with an oven thermometer for precision.
Our mixing technique follows this exact order. We combine flour, cocoa powder, baking soda, and salt in a medium bowl first. Creaming butter with both granulated and brown sugars until light and fluffy takes about 3-4 minutes with an electric mixer. Adding eggs one at a time followed by vanilla extract and white vinegar creates the proper base.
Folding technique protects our cookie texture. We gently incorporate the dry ingredients alternating with buttermilk to prevent overmixing. Chopped Oreos and white chocolate chips get folded in last using a silicone spatula with gentle motions.
Portioning ensures uniform baking. We use a medium cookie scoop to create consistent 2-tablespoon portions spaced 2 inches apart on our prepared baking sheets.
Critical Baking Guidelines
Timing prevents overbaking disasters. We bake for exactly 10-12 minutes until edges appear set while centers remain slightly soft and underbaked.
| Baking Stage | Time | Visual Cue |
|---|---|---|
| Initial bake | 10 minutes | Edges barely set |
| Full bake | 12 minutes maximum | Centers slightly underbaked |
| Cooling on sheet | 5 minutes | Cookies firm up |
Cooling technique preserves texture. We allow cookies to rest on the baking sheet for 5 minutes before transferring to wire racks. This prevents breaking while ensuring they don’t continue cooking from residual heat.
Visual cues guide our timing decisions. Properly baked cookies show set edges with centers that appear slightly underdone. We never wait for centers to look fully baked since carryover cooking completes the process during cooling.
Storage maintains freshness when we keep cooled cookies in airtight containers at room temperature. Our assembled sandwich cookies benefit from 30 minutes of chilling to set the cream cheese filling before serving.
Storage Instructions

We’ve perfected our Red Velvet Oreos, and now proper storage ensures they maintain their delicious flavor and texture for days to come. Different storage methods work best depending on how long we plan to keep these treats.
Room Temperature Storage
Store our completely cooled Red Velvet Oreos in an airtight container at room temperature for up to 5 days. The cream cheese filling stays perfectly creamy while the cookies maintain their ideal texture during this timeframe.
Freezer Storage for Assembled Cookies
Place our finished Red Velvet Oreos in freezer bags for extended storage up to 2 months. We recommend wrapping individual cookies in plastic wrap before placing them in the freezer bag to prevent freezer burn. Allow the cookies to thaw at room temperature for 15-20 minutes before serving.
Cookie Storage Without Filling
Store unfilled Red Velvet cookie rounds in an airtight container for up to 5 days at room temperature. This method works perfectly when we want to assemble fresh sandwiches later or prepare components ahead of time.
Unbaked Dough Storage
Freeze our Red Velvet cookie dough balls for up to 2 months when we want to bake fresh cookies later. Place the dough balls on a parchment-lined baking sheet until almost frozen, then transfer them to a ziplock bag. Bake directly from frozen, adding 1-2 extra minutes to the original baking time.
| Storage Method | Duration | Container Type |
|---|---|---|
| Room Temperature (Assembled) | 5 days | Airtight container |
| Room Temperature (Cookies only) | 5 days | Airtight container |
| Freezer (Assembled) | 2 months | Freezer bags |
| Freezer (Unbaked dough) | 2 months | Ziplock bag |
Refrigerator Storage
Keep assembled Red Velvet Oreos in the refrigerator for up to 5 days when we prefer a firmer cream cheese filling. Store them in a large airtight container to prevent the cookies from absorbing other flavors and maintain optimal freshness.
Variations and Customizations

We love exploring creative ways to personalize our Red Velvet Oreos to match different occasions and taste preferences. These customization options allow us to transform our basic recipe into unique treats that suit various celebrations and flavor profiles.
Different Filling Options
Cream Cheese Filling remains our top choice for authentic red velvet flavor. This tangy and creamy option perfectly complements the cocoa cookies while maintaining the traditional red velvet cake experience. We recommend this filling for special occasions when we want to capture the classic taste profile.
Chocolate Ganache offers a richer alternative for chocolate lovers. We create this luxurious filling by heating heavy cream and pouring it over chopped dark chocolate. This option works beautifully when we want to intensify the chocolate notes in our cookies.
Nutella Filling brings a hazelnut twist to our Red Velvet Oreos. We simply soften Nutella at room temperature and spread it between cookie layers. This variation appeals to those who enjoy nutty flavors paired with the red velvet base.
Peanut Butter Filling creates an unexpected but delicious combination. We mix creamy peanut butter with powdered sugar and a touch of vanilla extract. This option satisfies both red velvet and peanut butter enthusiasts in our household.
Marshmallow Fluff provides a lighter texture option. We can use it straight from the jar or mix it with cream cheese for added stability. This filling works particularly well for children’s parties or when we want a sweeter taste profile.
Decorating Ideas
Sprinkles enhance the visual appeal of our Red Velvet Oreos significantly. We use pink and red sprinkles to match the red velvet theme or choose colors that coordinate with exact celebrations. White pearl sprinkles create an elegant look for wedding dessert tables.
Frosting Colors allow us to customize our cream cheese filling for different occasions. We tint the filling with food coloring to match party themes or seasonal celebrations. Pastel colors work beautifully for spring events while deeper hues suit autumn gatherings.
Oreo Pieces provide texture and visual interest to our decorated cookies. We crush extra Red Velvet Oreos and press the pieces into the filling around the edges. This technique creates a professional bakery appearance while adding delightful crunch.
Drizzled Chocolate elevates our cookies to gourmet status. We melt white or dark chocolate and drizzle it over assembled cookies using a fork or piping bag. This decoration works especially well for gift giving or special occasions.
Edible Glitter adds sparkle for celebratory events. We lightly dust assembled cookies with edible glitter in complementary colors. This finishing touch makes our Red Velvet Oreos perfect for birthday parties or holiday celebrations.
Make-Ahead Instructions

Planning ahead transforms your red velvet oreo baking experience into a stress-free process. We recommend preparing components in advance to streamline your cookie-making session and ensure optimal results.
Freezing Cookie Dough
Cookie dough preparation offers the most flexibility for advance planning. We can prepare the red velvet cookie dough completely and freeze it for up to 2 months without compromising flavor or texture. Transfer the shaped dough balls into a ziplock bag and store them in your freezer until ready to bake.
Baking frozen dough requires minimal adjustments to our standard process. Add an extra minute or two to the original baking time to account for the frozen temperature. The cookies will emerge with the same vibrant color and tender crumb as freshly made dough.
Storing Baked Cookies
Baked red velvet cookies maintain their quality when stored properly at room temperature. Place unfilled cookies in an airtight container or ziplock bag where they will stay fresh for 3 to 4 days. This storage method preserves the cookies’ signature texture and prevents them from becoming stale.
| Storage Method | Duration | Container Type |
|---|---|---|
| Room Temperature (Unfilled) | 3-4 days | Airtight container or ziplock bag |
| Frozen Dough | 2 months | Ziplock bag |
| Cake Layers (Refrigerated) | 1-2 days | Plastic wrap |
Cream Cheese Filling Preparation
Cream cheese filling can be prepared ahead of time to save effort on assembly day. We suggest making the filling in advance but recommend filling the cookies just before serving to maintain optimal freshness and prevent the cookies from becoming soggy.
Red Velvet Oreo Cake Layers
Red velvet oreo cake layers benefit from advance preparation when planning layered desserts. Cool the cake layers completely before wrapping them tightly in plastic wrap. Store wrapped layers in the refrigerator for 1 to 2 days before assembling your final cake.
Chilling cake layers in the freezer for approximately 20 minutes before assembly makes stacking and frosting significantly easier. This brief freezing period firms the layers without affecting their moisture content or flavor profile.
Troubleshooting Common Issues

Even experienced bakers encounter challenges when making Red Velvet Oreos. We’ve identified the most common problems our readers face and provide practical answers to ensure your cookies turn out perfectly every time.
Overly Rich or Sweet Taste
Red Velvet Oreos can taste significantly sweeter than traditional Oreos due to their cream cheese filling. This richness often overwhelms after eating just a few cookies. We recommend reducing the powdered sugar in our cream cheese filling by 1/4 cup if you prefer less sweetness. Adding an extra pinch of salt also helps balance the flavors and cuts through the richness.
Another effective solution involves serving smaller portions. Instead of creating full-sized sandwich cookies, try making mini versions using a small cookie scoop. This approach allows people to enjoy the flavor without feeling overwhelmed by the sweetness.
Food Additive Concerns
Our homemade version eliminates concerns about commercial additives like Red 40 Lake found in store-bought variants. We use natural red food coloring alternatives such as beet juice powder or gel-based food coloring with fewer artificial ingredients. These natural options provide vibrant color without the moderate health concerns associated with synthetic dyes.
For those avoiding all food coloring, consider creating “naked” red velvet cookies that rely on cocoa powder for color. While they won’t achieve the signature deep red appearance, they maintain the distinctive red velvet flavor profile.
Color-Related Effects
The red dye in homemade Red Velvet Oreos may temporarily alter the color of bodily excretions. This harmless but sometimes startling effect occurs when consuming multiple cookies with red food coloring. We always inform our readers about this possibility to prevent unnecessary concern.
Using less food coloring reduces this effect while still maintaining an appealing pink or light red color. Natural alternatives like beet powder typically produce less dramatic color changes in the body.
Texture and Assembly Problems
Cream cheese filling that’s too soft creates messy assembly and cookies that slide apart. We ensure our cream cheese and butter reach room temperature gradually rather than using the microwave. Overly warm ingredients create a filling that won’t hold its shape.
If your filling becomes too soft during assembly, refrigerate it for 15-20 minutes until it firms up. Working in a cool kitchen also prevents the filling from becoming too warm during the cookie sandwich process.
Baking Inconsistencies
Uneven cookie sizes lead to mismatched sandwich pairs and poor presentation. We always use a cookie scoop to ensure uniform portions and consistent baking times. Rotating baking sheets halfway through baking prevents uneven browning from hot spots in your oven.
Overbaked cookies become too crispy for proper sandwich assembly. We watch for visual cues rather than relying solely on timer settings, looking for cookies that spring back lightly when touched and have set edges without being hard.
Conclusion
These Red Velvet Oreos offer the perfect marriage of classic cookie comfort and elegant cake sophistication. We’ve shown you how to create these stunning treats that’ll become the star of any dessert table.
With proper storage techniques you can enjoy these cookies for days or even freeze them for future celebrations. The versatility in fillings and decorations means you can customize them for any occasion.
Whether you’re planning ahead with our make-ahead tips or troubleshooting common baking challenges we’ve covered everything you need for success. These homemade cookies deliver that perfect balance of rich cocoa flavor and tangy cream cheese filling that makes red velvet desserts so irresistible.
Now you’re ready to impress family and friends with these bakery-quality treats made right in your own kitchen.
Frequently Asked Questions
What makes Red Velvet Oreos different from regular Oreos?
Red Velvet Oreos feature a rich cocoa-flavored cookie with vibrant red color and tangy cream cheese filling, unlike regular Oreos’ chocolate cookies with vanilla cream. They capture the essence of red velvet cake in cookie form, offering a more complex flavor profile with the characteristic slight tanginess from buttermilk and vinegar.
How long do Red Velvet Oreos stay fresh?
Assembled Red Velvet Oreos stay fresh for up to 5 days at room temperature in an airtight container, or up to 5 days refrigerated for firmer filling. For longer storage, wrap individually and freeze for up to 2 months. Unfilled cookie rounds can be stored at room temperature for 5 days.
Can I make Red Velvet Oreos ahead of time?
Yes! Cookie dough can be frozen for up to 2 months, and baked cookies stay fresh for 3-4 days at room temperature. The cream cheese filling can be prepared in advance but should be added just before serving. Assembled cookies benefit from 30 minutes of chilling before serving.
What’s the best red food coloring to use?
Gel-based red food coloring is recommended over liquid varieties for achieving vibrant red color without affecting the cookie dough’s consistency. Gel coloring provides more intense color with less product, ensuring your cookies achieve that signature deep red velvet appearance without altering texture.
Can I customize the filling in Red Velvet Oreos?
Absolutely! While cream cheese filling is traditional, you can substitute with chocolate ganache, Nutella, peanut butter, or marshmallow fluff for different flavor profiles. Each alternative offers a unique twist while maintaining the cookie’s visual appeal and satisfying sandwich structure.
Why are my Red Velvet Oreos turning out too sweet?
Reduce the powdered sugar in the cream cheese filling by 1/4 cup, or serve smaller portions. The sweetness can be balanced by ensuring your cream cheese is properly tangy and adding a pinch more salt to the filling to create better flavor contrast.
Do I need special equipment to make Red Velvet Oreos?
Basic baking equipment works fine: heavy-duty baking sheets, parchment paper, medium cookie scoop for uniform sizes, and an electric mixer for creaming. A cooling rack helps maintain crispness. No specialized equipment is required, making this recipe accessible for most home bakers.
How do I prevent my Red Velvet Oreos from overbaking?
Watch for visual cues rather than relying solely on time. Cookies are done when edges are set but centers still look slightly soft. They’ll continue cooking on the hot pan after removal. Overbaked cookies become hard and lose their tender texture.