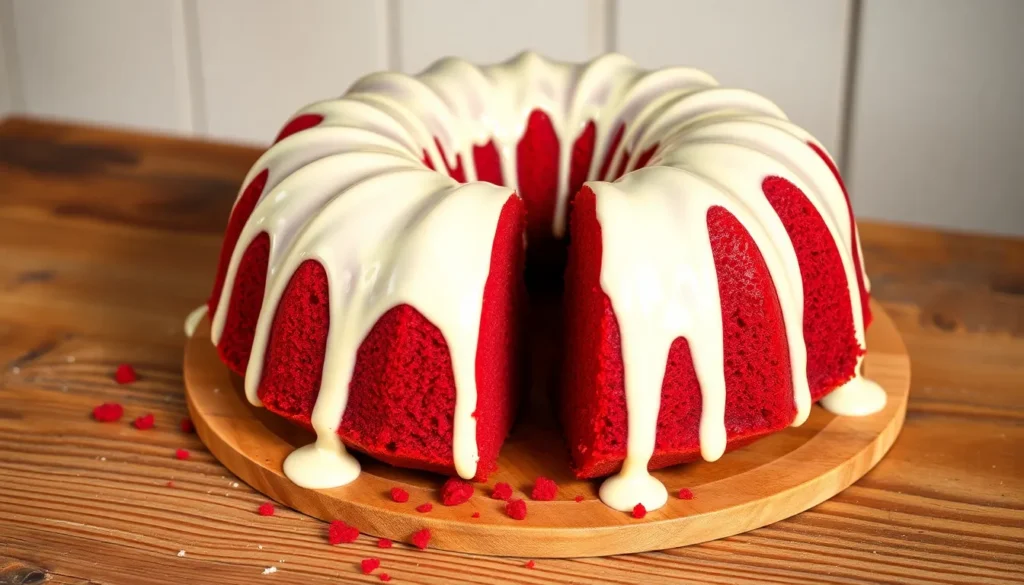
We’ve discovered the perfect way to elevate the classic red velvet cake – transforming it into an elegant bundt that’s both stunning and incredibly moist. This red velvet bundt cake combines the beloved tangy-sweet flavor profile with a sophisticated presentation that’ll make any gathering feel special.
The gorgeous crimson color and velvety texture that make red velvet so irresistible shine even brighter in bundt form. We love how the distinctive ring shape creates beautiful slices that showcase the cake’s vibrant hue while the cream cheese glaze cascades down those signature ridges.
What makes this recipe truly exceptional is how the bundt pan’s design actually enhances the cake’s moisture retention while creating an impressive centerpiece. Whether you’re planning a birthday celebration or simply craving that perfect balance of cocoa and vanilla flavors we all adore, this red velvet bundt cake delivers bakery-quality results right from your home kitchen.
Ingredients
We’ve carefully selected each ingredient to deliver the perfect balance of rich chocolate undertones and vibrant red color that makes this bundt cake unforgettable. Our ingredient list includes everything needed for both the tender cake and the luscious cream cheese glaze.
For the Cake
- 2½ cups all-purpose flour
- 1½ cups granulated sugar
- 1 teaspoon baking soda
- 1 teaspoon salt
- 1 teaspoon cocoa powder
- 1½ cups vegetable oil
- 1 cup buttermilk at room temperature
- 2 large eggs at room temperature
- 2 tablespoons red food coloring
- 1 teaspoon white vinegar
- 1 teaspoon vanilla extract
For the Cream Cheese Glaze
- 8 oz cream cheese softened
- 4 tablespoons butter softened
- 2 cups powdered sugar sifted
- 1 teaspoon vanilla extract
- 2-3 tablespoons milk as needed for consistency
Equipment Needed

Creating our perfect red velvet bundt cake requires exact equipment to achieve professional bakery results. We need the right tools to ensure proper mixing, baking, and finishing of this stunning dessert.
Essential Baking Tools
Our bundt pan serves as the foundation for this recipe’s success. We recommend using either a 10-cup or 12-cup capacity bundt pan to achieve the signature ring shape that makes this cake so visually appealing.
Multiple large mixing bowls become crucial for our preparation process. We use separate bowls to combine dry ingredients and wet ingredients before bringing them together for the final batter.
Mixing Equipment
A hand mixer or electric mixer handles the heavy lifting in our recipe. We rely on this tool for creaming butter and sugar together, as well as combining all ingredients until our batter reaches the perfect smooth consistency. Some recipes benefit from using a whisk attachment during initial mixing steps.
Both a whisk and rubber spatula play important roles in our baking process. The whisk helps us combine dry ingredients evenly and assists with initial mixing of wet ingredients. Our rubber spatula becomes essential for folding ingredients together and scraping bowl sides to ensure no ingredients get left behind.
Measuring and Finishing Tools
Accurate measurements require both liquid and dry measuring cups along with measuring spoons. Precision in measuring ensures our cake achieves the perfect texture and flavor balance every time.
For our finishing touches, we need either a Ziploc bag, pastry bag, or piping bag with tips. These tools allow us to apply our cream cheese glaze in beautiful decorative patterns across the cooled cake surface.
A cooling rack provides even air circulation around our cake after we remove it from the pan. This equipment prevents soggy bottoms and ensures proper cooling throughout.
Optional but Helpful Items
| Equipment | Purpose | Necessity Level |
|---|---|---|
| Pastry Brush | Spreading oil and flour in pan crevices | Optional |
| Blender/Food Processor | Certain recipe components | Optional |
| Sifter or Sieve | Extra smooth ingredient mixing | Optional |
| Extra Bowls | Icing preparation | Optional |
A pastry brush helps us spread oil and flour evenly in our bundt pan’s intricate crevices, ensuring clean release after baking. While some recipes mention blenders or food processors, we can complete most preparations without these appliances.
Instructions

Let’s transform our ingredients into this stunning red velvet bundt cake by following these carefully tested steps. We’ll guide you through each stage to ensure bakery-quality results every time.
Prep the Pan and Oven
We start by preheating our oven to 350°F (175°C) to ensure even baking temperature. Next we thoroughly grease our 10-cup or 12-cup bundt pan with butter or cooking spray. We dust the greased pan with flour, tapping out any excess to create a perfect release surface. For extra insurance against sticking, we can use a light coat of oil combined with flour nonstick spray.
Make the Cake Batter
We begin by whisking together our dry ingredients: flour, cocoa powder, baking soda, and salt in a large bowl. In a separate mixing bowl, we combine the oil, melted butter, and granulated sugar. Using our electric mixer, we beat this mixture for about 2 minutes until well combined and slightly fluffy. We add our eggs one at a time, ensuring each is fully incorporated before adding the next.
Now we mix in our buttermilk, white vinegar, and vanilla extract until smooth. We add the red food coloring gradually until we achieve that signature vibrant red color. We add half of our dry ingredient mixture to the wet ingredients, mixing until just combined. Finally, we fold in the remaining dry ingredients gently until our batter is smooth and no flour streaks remain.
Bake the Cake
We pour our batter into the prepared bundt pan, spreading it evenly with a spatula. We tap the pan gently on the counter to remove any air bubbles that could create holes in our finished cake. Our cake bakes for 45 minutes in a 10-cup pan or 50-60 minutes in a 12-cup pan. We test for doneness by inserting a toothpick into the center – it should come out with just a few moist crumbs.
| Pan Size | Baking Time |
|---|---|
| 10-cup | 45 minutes |
| 12-cup | 50-60 minutes |
We allow our cake to cool in the pan for 10 minutes before inverting it onto a wire cooling rack. Complete cooling takes about 1 hour before we can add our glaze.
Prepare the Cream Cheese Glaze
We ensure our cream cheese and butter are at room temperature for the smoothest glaze. Using our mixer, we beat the softened cream cheese and butter together until light and fluffy. We add the vanilla extract and gradually incorporate the powdered sugar, beating until completely smooth. We add milk one tablespoon at a time until we reach our desired glaze consistency – it should be thick enough to coat the cake but thin enough to drizzle smoothly.
Glaze and Serve
Once our cake is completely cool, we position it on our serving plate. We drizzle our cream cheese glaze over the top, allowing it to cascade down the sides naturally. We can serve our red velvet bundt cake immediately at room temperature or chill it for 30 minutes to set the glaze. Each slice reveals the beautiful red interior contrasted against the white glaze, creating an impressive presentation for any occasion.
Pro Tips for Perfect Red Velvet Bundt Cake

Achieving bakery-quality results requires attention to exact techniques that make the difference between a good cake and an exceptional one. We’ve gathered essential tips based on proven methods to ensure your red velvet bundt cake turns out perfectly every time.
Pan Preparation Excellence
Thoroughly greasing and flouring your bundt pan is absolutely critical for success. We recommend using butter or shortening to coat every ridge and crevice of the pan, then dusting with flour to create a non-stick barrier. Pay special attention to the intricate details of the bundt pan since these decorative areas are most likely to cause sticking issues.
Fat Balance for Superior Texture
The combination of oil and butter creates the ideal texture profile for red velvet bundt cake. Oil provides long-lasting moisture that keeps the cake tender for days, while butter contributes rich flavor and helps the cake maintain its structure after cooling. This dual-fat approach ensures your cake stays moist without becoming dense or greasy.
Leavening Chemistry
Buttermilk and vinegar work together with baking soda to create the signature fluffy, silky texture that defines red velvet cake. The acid in buttermilk and vinegar reacts with baking soda to produce carbon dioxide bubbles that lift the batter and create a tender crumb. Never substitute regular milk for buttermilk, as this chemical reaction is essential for proper rise and texture.
Mixing Methodology
Avoid overmixing the batter once you combine wet and dry ingredients. We recommend mixing just until the ingredients are incorporated to prevent developing too much gluten, which would result in a tough, dense cake. Stop mixing as soon as you no longer see streaks of flour in the batter.
Baking Precision
Set your oven to 350°F and plan for 40 to 60 minutes of baking time, depending on your exact recipe and pan size. Test for doneness by inserting a toothpick or skewer into the center of the cake. The tester should come out clean or with just a few moist crumbs attached. Overbaking will result in a dry cake, so check for doneness at the minimum time recommended.
Cooling Strategy
Allow the cake to cool in the pan for exactly 10 minutes before attempting to remove it. This brief cooling period lets the cake set enough to hold its shape while still being warm enough to release from the pan easily. After turning out onto a wire rack, let the cake cool completely before glazing to prevent the glaze from melting and running off.
| Factor | Recommendation |
|---|---|
| Fat | Use a mix of oil and butter |
| Leavening | Buttermilk, vinegar, and baking soda |
| Color | Red food coloring |
| Pan Preparation | Grease and flour thoroughly |
| Baking | 350°F, 40–60 minutes, test for doneness |
| Cooling | Cool 10 minutes in pan, then completely on rack |
Color Consistency
Red food coloring is essential for achieving the signature bright red hue that makes red velvet cake so visually striking. Liquid food coloring works well, but gel food coloring provides more intense color with less liquid added to the batter. Start with the recommended amount and adjust as needed to achieve your desired shade.
Moisture Enhancement
Consider adding sour cream to your recipe for extra moisture and a more tender crumb. This ingredient works alongside the buttermilk to create an incredibly moist cake that stays fresh longer. The slight tanginess of sour cream also complements the mild cocoa flavor beautifully.
Make-Ahead Instructions

One of the greatest advantages of our red velvet bundt cake is its flexibility for advance preparation. This stunning dessert accommodates busy schedules while maintaining its exceptional taste and texture.
Preparing the Cream Cheese Glaze in Advance
We recommend making the cream cheese glaze days before your event. Beat the cream cheese, butter, powdered sugar, vanilla extract, and milk until smooth, then store in an airtight container. Refrigerate the glaze for up to one week or freeze for up to three months. Allow frozen glaze to thaw completely in the refrigerator before use, then rewhip to restore its smooth consistency.
Advance Cake Preparation Options
Our red velvet bundt cake can be prepared a full day ahead without compromising quality. Bake the cake completely and allow it to cool to room temperature. Store the unfrosted cake wrapped tightly in plastic wrap at room temperature overnight, or refrigerate for extended freshness.
For frosted advance preparation, apply the cream cheese glaze after the cake has cooled completely. Store the glazed cake in the refrigerator, covered with a cake dome or loose plastic wrap to prevent the glaze from sticking.
Storage Guidelines
| Storage Method | Duration | Location |
|---|---|---|
| Refrigerated cake (frosted or unfrosted) | Up to 5 days | Refrigerator |
| Frozen cake (frosted or unfrosted) | Up to 3 months | Freezer |
| Frozen cream cheese glaze | Up to 3 months | Freezer |
Freezing Instructions
Wrap the completely cooled cake tightly in plastic wrap, then aluminum foil to prevent freezer burn. Label with the date and contents for easy identification. Thaw frozen cake overnight in the refrigerator before serving. Apply fresh glaze after thawing if the cake was frozen unglazed, or allow the previously glazed cake to come to room temperature for optimal flavor and texture.
Storage and Serving

Proper Storage Methods
We recommend storing your red velvet bundt cake using the following methods to maintain its freshness and flavor:
| Storage Method | Duration | Temperature | Container Requirements |
|---|---|---|---|
| Refrigeration | Up to 5 days | 35-40°F | Airtight container |
| Freezing (whole cake) | Up to 3 months | 0°F | Plastic wrap + foil |
| Freezing (slices) | Up to 3 months | 0°F | Individual wrapping |
Refrigerator Storage: Place your finished cake in an airtight container and store it in the refrigerator for optimal freshness. This method works particularly well when your cake includes cream cheese icing since dairy-based frostings require consistent cool temperatures.
Freezer Storage: Wrap the entire cake tightly in plastic wrap followed by aluminum foil to prevent freezer burn. We suggest freezing individual slices for convenient serving since you can thaw only what you need without compromising the remaining cake.
Serving Guidelines
Room Temperature Service: Remove your refrigerated cake approximately 30 minutes to one hour before serving to achieve the ideal texture and flavor profile. Cold cake tends to feel dense and muted in taste compared to room temperature cake.
Moisture Preservation: Wrap your cake thoroughly when storing it in the refrigerator to prevent the surface from drying out. Exposed cake develops a tough exterior that detracts from the tender crumb we worked to achieve.
Essential Storage Tips
Container Selection: Use a cake carrier or airtight container specifically designed for baked goods to maintain proper humidity levels around your cake. Standard food storage containers work effectively if they provide a tight seal.
Baking Prevention: Avoid over-baking your cake initially since properly baked cake maintains moisture longer during storage. We recommend testing for doneness with a toothpick rather than relying solely on timing.
Icing Considerations: Apply cream cheese glaze only after your cake has cooled completely to room temperature. Warm cake causes the glaze to melt and slide off rather than creating the beautiful coating we desire.
Conclusion
We’ve covered everything you need to create a stunning red velvet bundt cake that rivals any bakery’s version. From selecting the right ingredients to mastering the perfect cream cheese glaze this recipe delivers consistent results every time.
The beauty of this bundt cake lies in its versatility and impressive presentation. Whether you’re planning ahead for a special occasion or satisfying a spontaneous craving the make-ahead options and proper storage techniques ensure you’ll always have a delicious dessert ready.
With our detailed guide and pro tips you’re well-equipped to bake a red velvet bundt cake that’s both visually striking and irresistibly moist. Get ready to enjoy compliments on your baking skills and watch this elegant cake become a favorite in your recipe collection.
Frequently Asked Questions
What makes red velvet bundt cake different from regular red velvet cake?
The bundt shape enhances moisture retention and creates beautiful, elegant slices with a stunning presentation. The cake maintains the classic tangy-sweet flavor and rich chocolate undertones but offers improved texture and visual appeal as an impressive centerpiece for any occasion.
What ingredients do I need for the cream cheese glaze?
You’ll need softened cream cheese, butter, powdered sugar, vanilla extract, and milk for consistency. Make sure all ingredients are at room temperature for the smoothest glaze texture that drizzles perfectly over the cooled bundt cake.
What size bundt pan should I use for this recipe?
Use either a 10-cup or 12-cup bundt pan for the signature shape. The pan size will affect baking time, so adjust accordingly. Proper pan preparation with thorough greasing is essential to ensure the cake releases perfectly from the intricate bundt design.
Can I make this red velvet bundt cake ahead of time?
Yes, this cake is perfect for advance preparation. You can bake the cake a day ahead and store it unfrosted at room temperature or refrigerated. The cream cheese glaze can be made up to a week in advance and stored in the refrigerator.
How should I store the finished red velvet bundt cake?
Store the glazed cake covered in the refrigerator for up to 5 days in an airtight container. For longer storage, freeze whole cakes or slices for up to 3 months. Allow the cake to reach room temperature before serving for optimal flavor and texture.
What’s the secret to achieving the perfect red color?
Use quality red food coloring and don’t skimp on the amount specified in the recipe. The combination of cocoa powder and red coloring creates the signature deep red hue. Some recipes benefit from gel food coloring for more vibrant results without affecting texture.
Why do I need both buttermilk and vinegar in the recipe?
Buttermilk and vinegar work together as leavening agents, creating the cake’s tender, moist texture. This combination also enhances the tangy flavor profile that’s characteristic of red velvet cake and helps activate the baking soda for proper rise.
How do I prevent the cake from sticking to the bundt pan?
Thoroughly grease every crevice of the bundt pan with butter or cooking spray, then dust with flour or cocoa powder. This double coating ensures clean release. Allow the cake to cool for 10-15 minutes before inverting to prevent breaking.