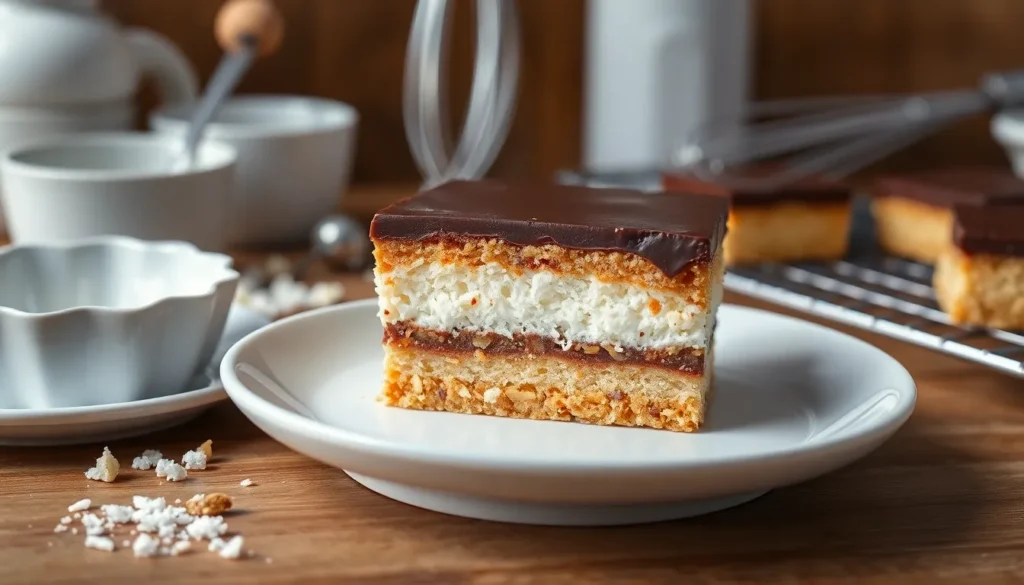
When chocolate meets coconut in perfect harmony, magic happens in the kitchen. Our decadent chocolate coconut slice delivers that irresistible combination of rich cocoa and tropical coconut that’ll have everyone asking for seconds. This no-bake treat captures the essence of classic coconut bars while adding that luxurious chocolate twist we all crave.
We’ve perfected this recipe to give you that ideal balance – a chewy coconut base topped with smooth, glossy chocolate that melts in your mouth. It’s the kind of dessert that looks impressive but requires minimal effort, making it perfect for last-minute gatherings or when you need a sweet pick-me-up.
The best part? You don’t need any fancy equipment or complicated techniques. With just a few pantry staples and about 20 minutes of prep time, you’ll have a crowd-pleasing dessert that rivals any bakery creation. Let’s jump into making this showstopper that’ll become your new go-to treat.
Ingredients
We need just a few simple ingredients to create this irresistible chocolate coconut slice. Our recipe divides into three distinct layers that come together beautifully.
For the Base
- 1½ cups graham cracker crumbs
- ⅓ cup unsalted butter, melted
- 2 tablespoons granulated sugar
- ¼ teaspoon salt
For the Coconut Layer
- 1 can (14 oz) sweetened condensed milk
- 3 cups shredded coconut (unsweetened)
- 1 teaspoon vanilla extract
- ¼ teaspoon almond extract
- Pinch of salt
For the Chocolate Topping
- 8 oz dark chocolate, chopped (70% cocoa)
- 3 tablespoons heavy cream
- 2 tablespoons unsalted butter
- 1 tablespoon corn syrup
- ¼ teaspoon vanilla extract
Equipment Needed
 2")
Creating the perfect chocolate coconut slice requires minimal equipment that most home bakers already have in their kitchen. We’ve organized our essential tools to ensure you can prepare this delightful dessert without any unexpected surprises.
Essential Baking Equipment
- Oven for baking the coconut base layer
- 8×8 inch or 9×9 inch baking tin for the perfect slice thickness
- Parchment paper to prevent sticking and ensure easy removal
- Cooling rack for proper temperature control between layers
Mixing and Preparation Tools
- Large mixing bowls for combining base and coconut layer ingredients
- Medium mixing bowl for chocolate topping preparation
- Whisk for achieving smooth consistency in each layer
- Wooden spoons or rubber spatulas for gentle folding and mixing
- Measuring cups and spoons for accurate ingredient portions
Finishing Equipment
- Sharp knife for clean slice cuts
- Offset spatula for spreading chocolate topping evenly
- Small saucepan if melting chocolate on stovetop instead of microwave
The beauty of this recipe lies in its simplicity. We don’t need specialized equipment or professional tools to achieve bakery-quality results. Most home kitchens already contain everything necessary for creating these irresistible chocolate coconut slices that will impress family and friends alike.
Instructions
 4")
Creating this chocolate coconut slice requires following five essential steps that build each layer systematically. We’ll guide you through the complete process from pan preparation to final assembly.
Prep the Pan
Preheat your oven to 350°F (180°C) or 320°F (160°C) for fan-forced ovens. Line your 8×8 or 9×9 inch baking tin with parchment paper, leaving overhang on the sides for easy removal. Lightly grease the parchment paper with butter or cooking spray to prevent sticking.
Make the Base
Combine the graham cracker crumbs, melted butter, granulated sugar, and salt in a large mixing bowl. Mix thoroughly until the mixture resembles wet sand and holds together when pressed. Press this mixture firmly into the bottom of your prepared baking tin using the back of a spoon or measuring cup. Create an even, compact layer that will serve as the foundation for your slice. Bake for 10 minutes until the base is set and lightly golden.
Prepare the Coconut Layer
Remove the baked base from the oven and let it cool for 5 minutes. Whisk together the sweetened condensed milk, shredded coconut, vanilla extract, almond extract, and salt in a medium bowl until well combined. The mixture should be thick and sticky. Spread this coconut mixture evenly over the cooled base using an offset spatula. Return to the oven and bake for 15-20 minutes until the coconut layer is golden brown and set.
Create the Chocolate Topping
Heat the heavy cream in a small saucepan over medium heat until it begins to simmer. Place the dark chocolate, butter, corn syrup, and vanilla extract in a heatproof bowl. Pour the hot cream over the chocolate mixture and let it sit for 2 minutes. Whisk gently from the center outward until the mixture becomes smooth and glossy. The ganache should coat the back of a spoon when ready.
Assembly and Chilling
Remove the baked coconut layer from the oven and cool completely on a wire rack for 30 minutes. Pour the chocolate ganache over the cooled coconut layer, spreading it evenly with an offset spatula to cover the entire surface. Refrigerate the assembled slice for at least 2 hours or until the chocolate topping is firm to the touch. Lift the slice from the pan using the parchment paper overhang and cut into squares with a sharp knife wiped clean between cuts.
Directions for Serving
 6")
We recommend serving our chocolate coconut slice at room temperature for the best texture and flavor balance. The contrast between the chewy coconut layer and smooth chocolate topping creates an optimal eating experience when the slice isn’t too cold.
Presentation Options
We suggest cutting the slice into perfect squares using a sharp knife for clean edges. Wipe the blade between cuts to maintain neat presentation. Each square should showcase the distinct layers beautifully.
Pairing Recommendations
Serve each square with a glass of cold milk to complement the rich chocolate and coconut flavors. The cool milk helps balance the sweetness while improving the overall dessert experience. Coffee lovers will appreciate how well this slice pairs with a strong espresso or cappuccino.
Storage and Freshness
We recommend consuming the chocolate coconut slice fresh for optimal taste and texture. Store any remaining pieces in an airtight container to maintain freshness. The slice stays delicious for several days when properly stored.
Portion Guidelines
| Serving Size | Recommended Portions | Occasion |
|---|---|---|
| Small squares (2×2 inches) | 1-2 pieces | Coffee break or light dessert |
| Medium squares (2.5×2.5 inches) | 1 piece | Standard dessert serving |
| Large squares (3×3 inches) | 1 piece | Generous dessert portion |
Temperature Considerations
We find that removing the slice from refrigeration 15-20 minutes before serving allows the chocolate to soften slightly. This timing ensures the perfect balance between firmness and creaminess in every bite.
Storage Tips
 8")
We recommend storing your chocolate coconut slice properly to maintain its delicious texture and flavor for days or even months. The storage method you choose depends on when you plan to enjoy this delectable treat.
Room Temperature Storage
Our chocolate coconut slice stays fresh at room temperature for up to 5 days when stored in an airtight container. This method works perfectly if you plan to consume the slice within a few days of making it. Place the cut squares in a sealed container to prevent moisture and other odors from affecting the taste and texture.
Refrigerator Storage
For longer freshness we store the slice in the refrigerator where it maintains its quality for up to one week in an airtight container. Some variations with higher moisture content such as those made with coconut milk or rich ganache may actually require refrigeration to extend their shelf life up to two weeks. The cool temperature helps preserve the chocolate topping’s smooth consistency while keeping the coconut layer perfectly chewy.
Freezer Storage
We freeze chocolate coconut slice for extended storage lasting anywhere from 1 to 3 months depending on your recipe’s exact ingredients. This method proves ideal when you want to prepare the dessert well in advance for special occasions or when you have leftover portions to save for later enjoyment.
| Storage Method | Duration | Container Type |
|---|---|---|
| Room Temperature | Up to 5 days | Airtight container |
| Refrigerator | 1-2 weeks | Airtight container |
| Freezer | 1-3 months | Airtight container |
Essential Storage Guidelines
Airtight containers remain crucial for all storage methods as they prevent moisture absorption and protect against unwanted flavors from other foods. We always ensure the slice has cooled completely before storing to avoid condensation buildup inside the container. When freezing we recommend wrapping individual portions in plastic wrap before placing them in the airtight container for extra protection against freezer burn.
Make-Ahead Instructions
 10")
We understand that preparing desserts ahead of time can be a game changer for busy schedules and special occasions. This chocolate coconut slice is particularly well suited for advance preparation due to its excellent storage properties and improved flavor development over time.
Complete Preparation Timeline
We recommend preparing the entire slice up to 3 days before serving for optimal results. The flavors meld beautifully during this resting period and the texture becomes perfectly set. Start by following all preparation steps through the final chocolate layer application. Allow the slice to cool completely at room temperature before transferring to refrigerated storage.
Freezer Preparation Method
Our freezer method allows preparation up to one month in advance. After completing all layers and achieving room temperature cooling we wrap the entire uncut slice tightly in plastic wrap followed by aluminum foil. This double wrapping prevents freezer burn and maintains the chocolate coconut balance we worked to achieve.
Individual Portion Freezing
We often prepare individual portions for convenient serving later. Cut the cooled slice into desired squares and wrap each piece individually in plastic wrap. Place wrapped portions in an airtight freezer container with parchment paper between layers. This method provides grab and go convenience while preserving the distinct texture of each layer.
Thawing Instructions
| Method | Time Required | Best For |
|---|---|---|
| Room Temperature | 2-3 hours | Same day serving |
| Refrigerator | 8-12 hours | Next day planning |
| Individual portions | 30-45 minutes | Quick serving |
We find that gradual thawing produces the best texture results. Remove frozen slices from the freezer and transfer to the refrigerator the night before serving. For room temperature thawing place the slice on the counter 2 to 3 hours before your planned serving time.
Base Layer Advance Prep
Our base layer can be prepared and baked up to 5 days ahead of final assembly. Store the cooled base layer covered with plastic wrap at room temperature. This approach allows you to complete the remaining layers when your schedule permits while ensuring the foundation maintains its intended texture.
Chocolate Topping Preparation
We prepare the chocolate ganache topping separately when making components ahead of time. Store the finished ganache in the refrigerator for up to one week. Gently reheat the ganache in the microwave using 15 second intervals with stirring between each interval until it reaches spreading consistency. This reheating method prevents the chocolate from seizing while restoring its smooth application properties.
Variations and Substitutions
 12")
We love how adaptable this chocolate coconut slice recipe is for different dietary needs and flavor preferences. Our extensive testing has shown that simple ingredient swaps can completely transform the texture and taste profile of this beloved dessert.
Base Layer Modifications
Butter Substitutions: We typically use salted butter for enhanced flavor depth, but unsalted butter works perfectly if you prefer to control the salt content yourself. For dairy-free versions, we recommend using coconut oil or vegan butter substitutes in equal amounts.
Sugar Texture Control: Brown sugar creates our preferred chewy texture, while white sugar produces a noticeably crispier base. We’ve found that combining both sugars in equal parts delivers an ideal balance of chewiness and structure.
Flour Alternatives: Plain all-purpose flour serves as our standard choice, but gluten-free plain flour substitutes seamlessly for those avoiding gluten. We recommend adding an extra tablespoon of gluten-free flour to achieve the same binding properties.
Coconut Layer Customizations
Coconut Varieties: Desiccated coconut provides our favorite fine texture that distributes evenly throughout each bite. Shredded coconut creates a coarser texture that some prefer for added visual appeal and texture contrast.
Flavor Enhancements: We often mix sultanas and glacé cherries into the coconut layer for bursts of sweetness and delightful texture variations. These additions work particularly well during holiday seasons.
Chocolate Component Options
Chocolate Types: Dark chocolate remains our go-to choice for rich, sophisticated flavor, but milk chocolate or semisweet chocolate creates milder profiles that appeal to different palates. We’ve successfully used cocoa powder mixed with additional butter for budget-friendly alternatives.
No-Flour Variations: Some of our most popular versions omit flour entirely, using melted chocolate, butter, sugar, egg, and coconut to create an incredibly fudgy and chewy texture that feels more indulgent.
Topping and Finishing Touches
Ganache Alternatives: Beyond our standard chocolate ganache, we often prepare simple chocolate icing using powdered sugar and cocoa powder for lighter sweetness levels.
Decorative Elements: Extra desiccated coconut sprinkled on top adds visual appeal, while chopped almonds or walnuts provide satisfying crunch that complements the soft layers beneath.
| Variation Type | Standard Option | Alternative Options |
|---|---|---|
| Butter | Salted butter | Unsalted butter, coconut oil, vegan butter |
| Sugar | Brown sugar (chewy) | White sugar (crispy), combination of both |
| Flour | All-purpose flour | Gluten-free flour, omit entirely |
| Coconut | Desiccated coconut | Shredded coconut |
| Chocolate | Dark chocolate | Milk chocolate, semisweet, cocoa powder |
| Mix-ins | None | Sultanas, glacé cherries, nuts |
| Toppings | Chocolate ganache | Chocolate icing, extra coconut, chopped nuts |
These modifications allow us to create countless variations while maintaining the essential character that makes chocolate coconut slice so irresistible. We encourage experimenting with different combinations to discover your perfect version.
Troubleshooting Tips
 14")
Even the most straightforward chocolate coconut slice recipe can present challenges, but we’ve got you covered with answers to common issues. Our years of testing have revealed the most frequent problems and their fixes to ensure your dessert turns out perfectly every time.
Base Layer Problems
Crumbly or Falling Apart Base: We often see this when the base mixture lacks enough moisture. Add melted butter one tablespoon at a time until the mixture holds together when pressed. The graham cracker crumbs should feel like wet sand and stick together when squeezed.
Base Too Hard or Dense: Overpacking the base creates a rock-hard foundation that’s difficult to cut. Press the mixture firmly but don’t compress it with excessive force. We recommend using the bottom of a measuring cup to create even pressure without overdoing it.
Uneven Base Thickness: An uneven base leads to inconsistent baking and texture. Use an offset spatula to smooth the surface, then check for level spots by looking across the surface from different angles before baking.
Coconut Layer Issues
Coconut Layer Not Setting: Insufficient baking time usually causes this problem. The coconut layer should appear golden brown and feel firm to the touch. Continue baking in 5-minute intervals until it reaches the proper consistency.
Burnt Coconut on Top: High oven temperatures or incorrect rack positioning can cause burning. Verify your oven temperature with a separate thermometer and position the rack in the center of the oven. Cover with foil if browning occurs too quickly.
Coconut Layer Too Sweet: Sweetened condensed milk can make the layer overpowering. Balance the sweetness by adding a pinch of salt or reducing the condensed milk slightly while increasing the coconut proportion.
Chocolate Topping Challenges
Ganache Too Thick: Heavy cream that’s not hot enough prevents proper mixing with chocolate. Reheat the cream until it just begins to simmer, then pour it over the chocolate again. Stir gently until smooth and glossy.
Ganache Too Thin: This occurs when the cream is too hot or the ratio is off. Allow the mixture to cool slightly at room temperature, stirring occasionally until it thickens to the desired consistency.
Chocolate Topping Not Spreading Evenly: Cold chocolate ganache becomes difficult to spread. Warm the ganache slightly in the microwave using 10-second intervals, stirring between each heating until it reaches spreadable consistency.
Assembly and Cutting Problems
Slice Falls Apart When Cut: Cutting too soon after assembly creates messy squares. Allow the slice to chill for at least 2 hours in the refrigerator before attempting to cut. Use a sharp knife wiped clean between cuts.
Knife Sticking During Cutting: Chocolate and coconut residue builds up on the blade. Dip the knife in warm water and wipe it clean between each cut. This technique ensures clean edges and prevents dragging ingredients.
Uneven Squares: Measuring and marking before cutting prevents irregular pieces. Use a ruler to mark cutting lines lightly with a knife tip, then follow these guides for uniform squares.
Temperature and Storage Answers
| Issue | Cause | Solution |
|---|---|---|
| Oven temperature inaccuracy | Faulty oven calibration | Use oven thermometer for verification |
| Baking time variations | Different oven types | Adjust time in 5-minute increments |
| Storage texture changes | Improper container sealing | Use airtight containers exclusively |
| Freezer burn appearance | Inadequate wrapping | Double wrap in plastic and foil |
We recommend keeping detailed notes about your exact oven’s behavior and timing adjustments needed for consistent results. Each oven performs differently, and understanding yours leads to better outcomes every time you make this chocolate coconut slice.
Conclusion
This chocolate coconut slice proves that impressive desserts don’t require complicated techniques or professional skills. We’ve shown you how simple ingredients can transform into a bakery-quality treat that’ll have everyone asking for the recipe.
The beauty of this dessert lies in its flexibility. Whether you’re making it ahead for a special occasion or need a last-minute crowd-pleaser you can customize it to suit any dietary preference or flavor craving.
With proper storage techniques this slice stays fresh for days and even freezes beautifully for future indulgence. The three distinct layers create the perfect balance of textures that make each bite absolutely irresistible.
Now it’s time to gather your ingredients and create this delightful treat. Your family and friends will be amazed by what you’ve accomplished with such a straightforward recipe.
Frequently Asked Questions
What are the main ingredients needed for chocolate coconut slices?
The recipe requires three layers of ingredients: graham cracker crumbs, melted butter, sugar, and salt for the base; sweetened condensed milk, shredded coconut, vanilla and almond extracts for the coconut layer; and dark chocolate, heavy cream, butter, corn syrup, and vanilla for the chocolate topping. All ingredients are basic pantry staples that most home bakers already have.
How long does it take to make chocolate coconut slices?
The prep time is just 20 minutes, making this a quick and easy dessert option. However, you’ll need additional time for baking the layers and chilling the final product. The recipe involves minimal active preparation time, with most of the process being hands-off baking and cooling periods.
What equipment do I need to make this dessert?
You’ll need basic kitchen tools: an 8×8 or 9×9 inch baking tin, parchment paper, mixing bowls, a whisk, measuring cups and spoons, a sharp knife, an offset spatula, and a cooling rack. Most home bakers will already have these items, making this recipe accessible without specialized equipment.
How should I store chocolate coconut slices?
Store at room temperature for up to 5 days, in the refrigerator for 1-2 weeks, or freeze for 1-3 months. Always use airtight containers to prevent moisture and unwanted flavors. For freezing, wrap individual portions in plastic wrap before placing in containers to prevent freezer burn.
Can I make chocolate coconut slices ahead of time?
Yes! The slices can be prepared up to 3 days in advance for optimal flavor development. For longer storage, freeze the uncut slice wrapped in plastic and foil for up to one month. Individual components can also be prepared separately – the base up to 5 days ahead and chocolate ganache up to one week in advance.
What are some common substitutions I can make?
You can use coconut oil instead of butter for dairy-free options, substitute different types of chocolate, or use various coconut varieties. The base can be made with different crackers, and sugar alternatives can be used. Toppings can be customized with nuts, extra coconut, or different chocolate types while maintaining the dessert’s essential character.
How do I achieve clean, even cuts when serving?
Use a sharp knife and wipe it clean between cuts. Remove the slice from refrigeration 15-20 minutes before cutting to achieve the ideal balance of firmness and creaminess. Cut into small, medium, or large squares depending on the occasion, and serve at room temperature for the best texture and flavor.
What should I do if my chocolate ganache is too thick or thin?
If the ganache is too thick, gently reheat it or add a small amount of warm cream. If it’s too thin, let it cool longer or add more melted chocolate. The ganache should spread smoothly over the coconut layer. Proper temperature control is key to achieving the perfect consistency.