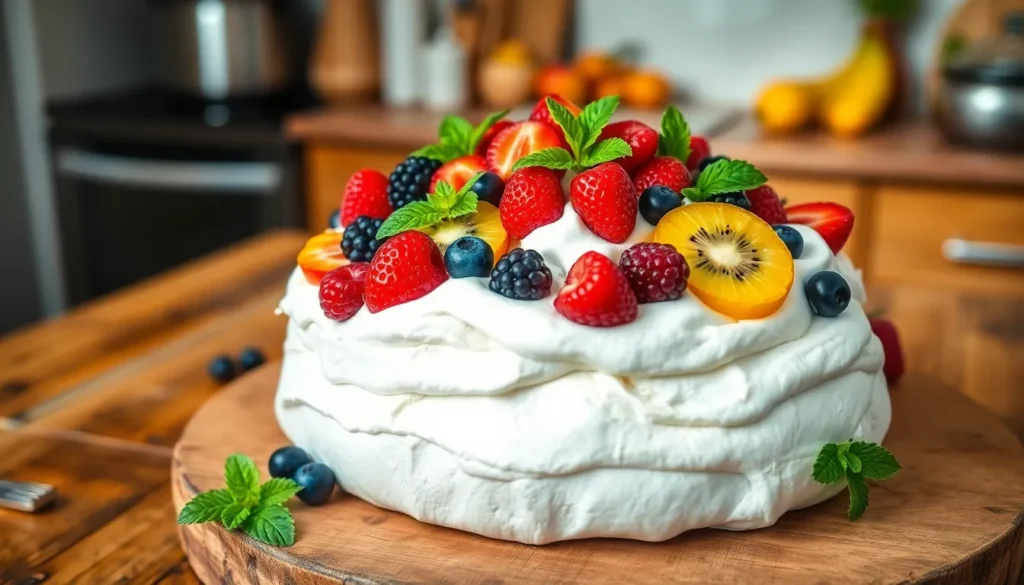
We’ve all encountered that magical moment when someone places a pavlova on the table – crispy meringue shell giving way to pillowy marshmallow interior, crowned with billowing whipped cream and vibrant fresh fruit. This show-stopping dessert transforms any gathering into something extraordinary.
Named after Russian ballerina Anna Pavlova, this iconic dessert has sparked friendly rivalry between Australia and New Zealand for decades. Both countries claim it as their own, and honestly, we’re just grateful someone invented this heavenly combination of textures and flavors.
What makes pavlova truly irresistible is its perfect contrast – that satisfying crack when your spoon breaks through the crispy exterior, revealing the cloud-like center beneath. We’ll show you exactly how to achieve that coveted texture, plus share our foolproof tips for creating a pavlova that’ll have everyone asking for your secret.
Ingredients
We’ve carefully selected these ingredients to create the perfect balance of crispy meringue and luscious toppings. Each component plays a crucial role in achieving that signature pavlova texture and flavor.
For the Meringue Base
- 4 large egg whites, at room temperature
- 1 cup superfine sugar (caster sugar)
- 1 teaspoon white vinegar
- 1 teaspoon vanilla extract
- 1 tablespoon cornstarch
For the Topping
- 1 cup heavy cream
- 2 tablespoons powdered sugar
- 1 teaspoon vanilla extract
- 2 cups mixed fresh berries (strawberries, blueberries, raspberries)
- 2 kiwi fruits, peeled and sliced
- 1 cup passion fruit pulp (optional)
- Fresh mint leaves for garnish
Equipment Needed

Creating the perfect pavlova requires exact tools that ensure success with this temperamental dessert. We recommend gathering all equipment before starting to guarantee smooth preparation.
Electric mixer stands as the most crucial tool for pavlova making. Whether you choose a hand mixer or stand mixer, this equipment is essential for whipping egg whites to the stiff, glossy consistency that forms the foundation of our meringue. Manual whisking remains possible but extremely difficult and time consuming, making it impractical for achieving the correct texture.
Mixing bowl must be completely clean and grease free for proper egg white foam formation. Any traces of fat or residue will prevent the whites from reaching their full volume and stability.
Baking sheet or cookie sheet provides the base for our pavlova during the baking process. We always line this sheet with parchment paper or a silicone baking mat to ensure easy removal and help the meringue maintain its shape throughout baking.
Parchment paper or silicone mat serves dual purposes in pavlova preparation. Beyond preventing sticking, we trace an 8 inch circle on the parchment using a cake pan as our guide to create perfect shaping boundaries for the meringue.
Rubber spatula becomes indispensable for gently folding ingredients without deflating our carefully whipped egg whites. This tool also helps transfer the delicate meringue mixture to the prepared baking sheet.
Measuring tools including cups, spoons, and a kitchen scale ensure accuracy with ingredients, particularly for sugar and egg white ratios that determine the final texture of our pavlova.
| Essential Equipment | Purpose | Alternative Options |
|---|---|---|
| Electric mixer | Whips egg whites to stiff peaks | Hand whisk (not recommended) |
| Clean mixing bowl | Contains egg whites during whipping | Glass or stainless steel only |
| Baking sheet | Supports pavlova during baking | Cookie sheet with parchment |
| Measuring tools | Ensures accurate ingredient ratios | Kitchen scale preferred |
Optional tools like an icing spatula help smooth the meringue surface for professional presentation. The beauty of pavlova lies in its accessibility since no specialized pans or molds are required for shaping this elegant dessert by hand.
Instructions

Creating pavlova requires careful attention to temperature and timing to achieve that perfect crispy shell with a marshmallow center. We’ll guide you through each essential step to ensure your pavlova turns out beautifully every time.
Prep the Oven and Pan
Preheat your oven to 350°F (177°C) to begin the process. Line a large baking sheet with parchment paper or a silicone mat to prevent sticking. Position the rack in the center of your oven for even heat distribution. We recommend drawing an 8-9 inch circle on the parchment paper as a guide then flipping it over so the ink doesn’t touch your meringue.
Make the Meringue
Beat the 4 egg whites in your clean mixing bowl until soft peaks form, which takes approximately 5 minutes with an electric mixer. Gradually add the superfine sugar one tablespoon at a time while continuing to beat the mixture. Continue beating until glossy stiff peaks form and the meringue feels smooth when rubbed between your fingers. Add the vanilla extract, white vinegar, and cornstarch then beat for another 30 seconds to incorporate completely.
Shape the Pavlova Base
Spoon the meringue mixture onto your prepared baking sheet within the circle guide you drew earlier. Spread the mixture into an 8-9 inch circle using a spatula or large spoon. Create a shallow divot in the center by building up the edges slightly higher than the middle. Smooth the sides and top gently to create an even surface that will bake uniformly.
Bake the Pavlova
Place the baking sheet in the preheated oven then immediately reduce the temperature to 200°F (93°C). Bake for approximately 1.5 hours until the pavlova feels firm and dry to the touch. The exterior should sound hollow when gently tapped and appear pale cream colored rather than white.
Cool Completely
Turn off the oven and allow the pavlova to cool inside with the door closed for best results. This gradual cooling process prevents cracking from sudden temperature changes. Alternatively, crack the oven door slightly open for faster cooling if you’re short on time. The pavlova should cool for at least 1 hour before removing from the oven.
Prepare the Toppings
Whip the heavy cream with powdered sugar and vanilla extract until soft peaks form. Wash and slice your fresh fruits including strawberries, kiwi, and any other berries you’re using. Pat the fruit dry with paper towels to prevent excess moisture from making the pavlova soggy. Prepare the passion fruit pulp if using and have fresh mint leaves ready for garnish.
Assemble the Pavlova
Carefully transfer the cooled pavlova to your serving plate using a large spatula. Spread the whipped cream evenly over the top, filling the center divot you created. Arrange the fresh fruits attractively over the cream, starting with larger pieces and filling in with smaller berries. Drizzle passion fruit pulp over the top if desired and garnish with fresh mint leaves just before serving.
Make-Ahead Instructions

Our pavlova preparation strategy allows us to create this stunning dessert ahead of time while maintaining its signature texture and appearance. The meringue base serves as the foundation for our make-ahead approach since it stores exceptionally well when properly handled.
We can bake the meringue shell up to 24 hours before serving without compromising its crispy exterior or soft interior. After baking our pavlova base we need to let it cool completely in the oven with the door slightly ajar. This gradual cooling process prevents cracking and ensures our meringue maintains its perfect texture.
Storage requires careful attention to moisture control since humidity can soften our crispy shell. We should keep the cooled meringue base covered at room temperature in a dry environment. Airtight containers work best for protecting our pavlova from moisture absorption during storage.
| Storage Timeline | Method | Storage Location |
|---|---|---|
| Up to 24 hours | Covered at room temperature | Dry environment |
| Up to 2 days | Airtight container | Room temperature |
Temperature management during the make-ahead process involves storing our meringue base away from heat sources and humid areas. Kitchen counters work perfectly as long as we avoid placing the container near the stove or dishwasher where steam might affect the texture.
Assembly timing becomes crucial for optimal results. We should add our whipped cream and fresh fruit toppings only when ready to serve since these components can make the meringue soggy if applied too early. The cream and fruit preparation can happen while our guests arrive but the final assembly should wait until serving time.
Our make-ahead timeline allows us to focus on other menu items while ensuring our pavlova remains the perfect finale to any meal. The meringue base maintains its structural integrity and flavor profile throughout the storage period making this dessert ideal for entertaining.
Storage Tips

We recommend storing your completed pavlova in a cool dry environment to preserve that perfect crispy texture we’ve worked so hard to achieve. Moisture becomes the enemy of our meringue shell after baking, so keeping pavlova away from humidity prevents the dreaded soggy bottom that can ruin this elegant dessert.
Our undecorated pavlova base stores beautifully in an airtight container for optimal freshness. Place the cooled meringue shell carefully in a container with a tight fitting lid to maintain its signature crispiness. Adding desiccant packets provides extra protection against moisture infiltration if you live in a particularly humid climate.
Advanced preparation becomes effortless when we understand proper storage techniques. The meringue base keeps perfectly for 3 to 4 days when stored correctly in dry conditions. This extended storage window allows us to prepare the foundation of our pavlova well ahead of entertaining schedules.
| Storage Method | Duration | Best For |
|---|---|---|
| Room temperature (airtight) | 3-4 days | Undecorated meringue |
| Assembled with toppings | 24 hours | Complete pavlova |
| Frozen (undecorated) | 1 month | Long-term storage |
Freezing offers another storage solution for our undecorated meringue shells. Wrap the pavlova base carefully before freezing and defrost slowly to prevent condensation from forming on the surface. We find this method particularly useful for batch preparation or when making pavlovas for special occasions.
Assembly timing plays a crucial role in maintaining structural integrity. Add whipped cream and fresh fruit toppings no more than 2 hours before serving to prevent moisture from softening our crisp meringue base. Once we’ve decorated our pavlova with cream and fruit, consumption within 24 hours ensures the best texture and food safety since these perishable toppings require refrigeration.
Temperature control during storage protects both the meringue structure and fresh toppings. Store assembled pavlovas in the refrigerator but bring them to room temperature 15 minutes before serving for optimal flavor development and texture contrast.
Serving Suggestions

Once we’ve mastered the perfect pavlova base, the real creativity begins with our toppings and presentation choices. The classic combination features whipped cream generously spread across the meringue surface, topped with an abundance of fresh strawberries, kiwifruit, and blueberries for a vibrant color palette that never fails to impress.
Classic Toppings
We recommend starting with the traditional approach that highlights the dessert’s natural elegance. Fresh berries create the foundation of most pavlova presentations, with their natural acidity balancing the sweet meringue perfectly. Lemon curd paired with mixed berries offers another timeless option, where the sharp citrus notes cut through the rich cream and provide a sophisticated flavor profile.
Creative Combinations
For those seeking tropical flair, we suggest combining mango chunks, passion fruit pulp, fresh pineapple, and sliced kiwi to transport guests to warmer climates. Dark chocolate shavings scattered over fresh or jarred cherries evoke the beloved Black Forest gateau while maintaining pavlova’s signature lightness.
Seasonal variations work beautifully too, particularly our autumn pavlova featuring warm, cinnamon-spiced poached pears that create an elegant temperature contrast against the cool cream and crisp meringue.
Presentation Ideas
We love creating a pavlova grazing board that allows guests to customize their portions. Set out bowls of simple chocolate ganache, freshly whipped cream, and an array of seasonal fruits alongside the pavlova base for an interactive dessert experience.
Slab-style pavlovas work particularly well for larger gatherings, where we can arrange peaches and raspberries in beautiful geometric patterns across the extended meringue surface.
Flavor Enhancement Tips
| Enhancement | Method | Result |
|---|---|---|
| Citrus Kick | Mix lime zest into whipped cream | Bright, fresh flavor |
| Extra Crunch | Add crushed meringue nests | Enhanced texture contrast |
| Indulgent Finish | Drizzle salted caramel | Rich, complex sweetness |
| Elegant Touch | Add cherry liqueur drizzle | Sophisticated adult flavor |
These serving suggestions transform our carefully crafted pavlova base into a dessert that suits any occasion, from casual family dinners to elegant dinner parties where presentation matters most.
Troubleshooting Common Issues

Even experienced bakers encounter challenges when making pavlova. We’ll walk you through the most common problems and provide proven answers to ensure your next pavlova turns out perfectly.
Cracked Pavlova
Temperature fluctuations cause the majority of pavlova cracks. Rapid temperature changes stress the delicate meringue structure and create unsightly fissures across the surface. Over-mixing egg whites beyond stiff peaks or baking at temperatures exceeding 250°F also contributes to cracking issues.
We recommend maintaining a consistent low temperature between 200-250°F throughout the baking process. Allow your pavlova to cool gradually in the oven with the door slightly ajar rather than removing it immediately. This gentle cooling prevents thermal shock that leads to surface cracks.
Prevention starts with proper mixing technique. Add sugar gradually to stabilized egg whites and avoid whipping at maximum speed for extended periods. Monitor your oven temperature with a reliable thermometer and resist opening the door during baking.
Weeping Meringue
Liquid seeping from your pavlova indicates sugar dissolution problems or environmental factors. Granulated sugar that hasn’t fully dissolved creates unstable meringue that releases moisture during and after baking. High humidity conditions compound this issue by preventing proper evaporation.
Switch to superfine (caster) sugar for better dissolution and mix on medium speed until no grittiness remains between your fingers. Store completed pavlovas in airtight containers within cool dry environments to prevent moisture absorption.
| Factor | Impact on Weeping | Solution |
|---|---|---|
| Sugar type | Granulated dissolves poorly | Use superfine sugar |
| Mixing speed | High speed creates instability | Use medium speed |
| Humidity | High moisture causes weeping | Bake on dry days |
| Storage | Moisture exposure ruins texture | Airtight containers |
Adding cornflour and vinegar may help stabilize egg whites though results vary depending on other factors. Focus on proper sugar dissolution as your primary defense against weeping meringue.
Collapsed Base
Insufficient structure causes pavlova bases to sink or collapse completely. Underbaking prevents the meringue from setting properly while inadequate sugar ratios fail to provide necessary stability. Egg whites that weren’t whipped to stiff peaks before sugar addition also lack the foundation for a sturdy base.
Maintain a ratio of 50-60g sugar per egg white for optimal structure. Whip egg whites to firm stiff peaks before slowly incorporating sugar over several minutes. Bake until the base feels firm when gently pressed and sounds hollow when tapped.
Avoid opening your oven door during the first hour of baking as temperature drops can cause immediate collapse. Complete cooling inside the turned-off oven allows the internal structure to set fully before exposure to room temperature.
Recipe Variations

We can transform our classic pavlova into exciting variations that showcase different flavors and presentation styles. These adaptations maintain the signature crispy meringue base while offering fresh takes on this beloved dessert.
Chocolate Pavlova
Chocolate lovers will appreciate our rich chocolate pavlova variations that elevate the traditional recipe. Our chocolate and peanut butter pavlova combines decadent chocolate meringue with creamy peanut butter elements for an indulgent twist on the classic. We can also create a sophisticated chocolate and walnut pavlova with Madeira and tangerines by incorporating dark chocolate ripples throughout the meringue base and pairing it with toasted nuts and bright citrus flavors.
For winter gatherings, we recommend our mini chocolate and blood orange pavlovas, which require just six ingredients and assemble quickly. These individual portions pair the richness of chocolate with the bright acidity of blood oranges, creating a perfect balance of flavors that guests will remember.
Mini Individual Pavlovas
Mini pavlovas offer exceptional versatility for entertaining and allow us to create variety across each table setting. We can create individual portions that showcase different flavor combinations, giving guests the opportunity to sample multiple variations in one sitting. These smaller versions maintain all the textural elements of our full-sized pavlova while providing perfect portion control.
Our mini chocolate and blood orange pavlovas work particularly well for winter celebrations, offering a sophisticated presentation that impresses without overwhelming. Each mini pavlova can feature unique toppings, making them ideal for dinner parties where we want to showcase culinary creativity.
Seasonal Fruit Combinations
We can adapt our pavlova toppings throughout the year to highlight the best seasonal produce available. Summer pavlovas shine with brown sugar meringue bases topped with passion fruit, strawberries, raspberries, and pineapple for a tropical burst of flavor. Our watermelon, lime, and mint sugar pavlova provides a refreshing light dessert perfect for hot weather gatherings.
Winter celebrations call for our clementine, cranberry, and pistachio meringue wreath, which transforms the traditional pavlova shape into a festive centerpiece. We also love Yotam Ottolenghi’s sunset pavlova with orange syrup for special occasions, as it brings vibrant colors and citrus brightness to cold weather menus.
| Season | Flavor Combination | Key Ingredients |
|---|---|---|
| Summer | Brown Sugar Tropical | Passion fruit, strawberries, raspberries, pineapple |
| Summer | Watermelon Mint | Watermelon, lime, fresh mint |
| Winter | Clementine Cranberry | Clementines, cranberries, pistachios |
| Winter | Chocolate Blood Orange | Dark chocolate, blood oranges |
Conclusion
We’ve covered everything you need to create the perfect pavlova that’ll wow your guests every time. From mastering the crispy-soft texture to exploring creative flavor combinations this iconic dessert truly offers endless possibilities for both novice and experienced bakers.
The beauty of pavlova lies in its versatility – whether you’re making classic berry-topped versions for summer gatherings or trying our chocolate variations for winter celebrations. With our make-ahead tips and troubleshooting guidance you’ll have the confidence to tackle this impressive dessert without stress.
Remember that patience is key when working with meringue and don’t be afraid to experiment with different toppings and presentations. Your pavlova journey starts now and we’re confident you’ll create memorable desserts that celebrate this beloved treat’s unique charm and delicious appeal.
Frequently Asked Questions
What is pavlova and where does it come from?
Pavlova is a delightful dessert featuring a crispy meringue shell with a soft marshmallow center, topped with whipped cream and fresh fruit. Named after Russian ballerina Anna Pavlova, this dessert is claimed by both Australia and New Zealand as their national creation, leading to a friendly rivalry over its true origins.
What ingredients do I need to make pavlova?
For the meringue base, you’ll need 4 large egg whites, 1 cup superfine sugar, 1 teaspoon each of white vinegar and vanilla extract, plus 1 tablespoon cornstarch. For toppings, use 1 cup heavy cream, 2 tablespoons powdered sugar, 1 teaspoon vanilla, mixed fresh berries, sliced kiwi, and optional passion fruit pulp with mint garnish.
What equipment is essential for making pavlova?
You’ll need an electric mixer to achieve stiff peaks, a clean glass or stainless steel mixing bowl for proper foam formation, a lined baking sheet, and accurate measuring tools. An icing spatula is optional for presentation, but no specialized pans are required, making pavlova accessible to all home bakers.
Can I make pavlova ahead of time?
Yes! You can prepare the meringue base up to 24 hours in advance. Store the undecorated pavlova base in an airtight container for 3-4 days in a cool, dry environment. However, add whipped cream and fruit toppings no more than 2 hours before serving to prevent sogginess and maintain the crispy texture.
How do I prevent my pavlova from cracking?
Maintain a consistent low baking temperature and avoid opening the oven door during baking. Use superfine sugar and proper mixing techniques to achieve stiff peaks. Allow the pavlova to cool gradually in the oven to prevent sudden temperature changes that cause cracking. Proper cooling is essential for texture integrity.
What are some creative pavlova variations I can try?
Try chocolate adaptations like chocolate peanut butter pavlova or mini chocolate blood orange versions. Create seasonal combinations using tropical fruits for summer or clementines and cranberries for winter. Mini pavlovas work great for entertaining, allowing individual flavor combinations while maintaining the signature crispy meringue base.
How should I store assembled pavlova?
Store assembled pavlova in the refrigerator and bring to room temperature before serving for optimal flavor and texture. The completed dessert should be kept in a cool, dry environment to prevent moisture from compromising the meringue shell. Consume within a few hours of assembly for best results.