These chocolate coconut truffles combine two of our favorite flavors into one irresistible bite-sized treat that’ll have everyone asking for the recipe. We’ve perfected this simple yet elegant dessert that requires no baking and delivers maximum flavor with minimal effort.
Rich dark chocolate meets creamy coconut in these luxurious truffles that taste like they came straight from a high-end chocolatier. The beauty lies in their simplicity – just a handful of quality ingredients transform into something truly special. Whether you’re planning a romantic evening, hosting a dinner party, or simply craving something indulgent, these truffles deliver every time.
What makes our version special is the perfect balance of textures and flavors. The smooth chocolate ganache center gives way to a delicate coconut coating that melts on your tongue. Best of all, you can make these ahead of time, making them perfect for entertaining or gift-giving during the holidays.
Ingredients
We’ve carefully selected premium ingredients to create these luxurious chocolate coconut truffles. Each component plays a crucial role in achieving the perfect balance of rich chocolate and tropical coconut flavors.
For the Truffle Base
- 8 oz dark chocolate (70% cocoa), finely chopped
- 1/2 cup heavy cream
- 2 tablespoons unsalted butter, room temperature
- 1/4 cup coconut cream (thick part from chilled coconut milk can)
- 1 tablespoon coconut rum or vanilla extract
- 1/4 teaspoon fine sea salt
For the Coating
- 1 1/2 cups unsweetened shredded coconut
- 2 tablespoons powdered sugar
- 1/4 teaspoon vanilla extract
- Pinch of sea salt
- 2 oz dark chocolate, melted (optional for drizzling)
Equipment Needed
 2")
Gathering the right tools ensures we can create these luxurious chocolate coconut truffles with ease and precision. We need essential mixing equipment to combine our premium ingredients smoothly and achieve that perfect truffle texture.
Large mixing bowl serves as our primary workspace for combining the shredded coconut, sugar, condensed milk, and vanilla extract. A wooden spoon or spatula helps us thoroughly mix these ingredients without breaking down the delicate coconut shreds.
Baking tray lined with parchment or baking paper provides the perfect surface for placing our formed truffle balls during the chilling process. We recommend using a teaspoon or small cookie scoop for portioning consistent truffle sizes that will coat evenly with chocolate.
For melting our dark chocolate coating, we have two excellent options. A microwave paired with a heatproof bowl offers quick convenience, while a double boiler setup gives us more precise temperature control. Both methods ensure our chocolate melts smoothly without seizing or burning.
Fork becomes our dipping tool for coating each truffle in melted chocolate while allowing excess to drip off cleanly. This simple utensil creates that professional finish we want for our elegant truffles.
Food processor proves invaluable if we choose to make variations using crushed biscuits or creating homemade coconut butter for richer texture. This optional equipment expands our truffle making possibilities significantly.
Each piece of equipment serves a exact purpose in creating these no bake treats that rival any professional confection. Having these tools ready before we start ensures smooth preparation from mixing to final coating.
Instructions
 4")
We’ll guide you through creating these luxurious chocolate coconut truffles with precision and care. Each step builds upon the last to achieve that perfect balance of creamy coconut and rich chocolate.
Prep the Coconut Mixture
We start by combining 2 to 3 cups of shredded or desiccated coconut with ½ to ⅔ cup of sweetened condensed milk in our large mixing bowl. The mixture should form a sticky and workable consistency that holds together when pressed.
Add 1 teaspoon of vanilla extract or coconut extract to enhance the aromatic profile of our truffles. For a finer texture, we pulse the coconut in a food processor before mixing to eliminate any stringy pieces.
Once combined, we chill the mixture for at least 15 minutes in the refrigerator. This firming step makes the rolling process much more manageable.
Make the Chocolate Ganache
We melt our 8 oz of high-quality dark or semi-sweet chocolate in a microwave-safe bowl using short 30-second bursts. Between each interval, we stir the chocolate until it becomes smooth and glossy.
The dark chocolate provides the perfect balance against our sweet coconut base. We ensure the chocolate reaches a completely smooth consistency before proceeding to the next step.
Combine and Chill
Using our teaspoon or small cookie scoop, we portion the chilled coconut mixture into heaping spoonfuls. We roll each portion between our palms to form uniform balls, adding more coconut if the mixture feels too sticky.
Each truffle gets placed on our parchment-lined baking sheet with adequate spacing between pieces. We refrigerate the formed balls for at least 1 hour until they set firmly and hold their shape.
Shape the Truffles
We remove the chilled coconut balls from the refrigerator and gently reshape any that may have flattened. If the mixture still feels sticky to handle, we return them to the refrigerator for additional chilling time.
Rolling each piece between our palms creates smooth and uniform spheres. This consistent shaping ensures even chocolate coating and professional presentation.
Apply the Coating
We dip each truffle individually into our melted chocolate using a fork or dipping tool for complete coverage. The fork allows excess chocolate to drip off cleanly before we return each truffle to the lined tray.
For enhanced texture and appearance, we can sprinkle additional desiccated coconut over the chocolate coating while it remains wet. We refrigerate the coated truffles for at least 30 minutes until the chocolate hardens completely and creates that satisfying snap when bitten.
Make-Ahead Instructions
 6")
We love preparing these chocolate coconut truffles ahead of time for stress-free entertaining and gift giving. The beauty of this recipe lies in its flexibility for advance preparation at multiple stages.
Preparing the Truffle Mixture
Our truffle mixture can be prepared up to 2 days in advance and stored in the refrigerator. After combining the coconut mixture with the chocolate ganache, we transfer it to an airtight container and refrigerate until ready to shape. This advance preparation actually improves the texture as the flavors meld together beautifully.
Shaping and Storing Uncoated Truffles
Once we roll the mixture into balls, these uncoated truffles can be refrigerated or frozen until we’re ready for the chocolate dipping process. For short term storage, we place them on a parchment lined baking tray and refrigerate for up to one week. When freezing is preferred, we arrange the shaped truffles on the same parchment lined tray and freeze until solid before transferring to freezer safe containers. These frozen truffles maintain their quality for up to three months.
Final Storage Options
After coating our truffles in chocolate, proper storage ensures optimal freshness and texture. We store the finished truffles in an airtight container in the refrigerator for up to one week. The cool temperature maintains the chocolate coating’s snap while keeping the coconut center perfectly creamy.
For longer storage, we can freeze coated truffles for several days, though we recommend consuming them within this timeframe for the best chocolate texture. When serving frozen truffles, we allow them to come to room temperature for about 10 minutes to achieve the ideal eating consistency.
| Storage Method | Duration | Container Type |
|---|---|---|
| Refrigerated mixture | 2 days | Airtight container |
| Shaped uncoated truffles (refrigerated) | 1 week | Covered tray |
| Shaped uncoated truffles (frozen) | 3 months | Freezer safe container |
| Coated truffles (refrigerated) | 1 week | Airtight container |
Storage Tips
 8")
We recommend storing your freshly made chocolate coconut truffles properly to maintain their luxurious texture and rich flavor. Our research shows that proper storage techniques can extend the shelf life of these delicate treats significantly while preserving their quality.
Refrigerator Storage
Place your truffles in an airtight container immediately after they have fully set. We always use sealable containers to prevent exposure to air and moisture, which can compromise the chocolate coating and coconut filling. Store the container in your refrigerator at a consistent cold temperature to maintain the truffles’ shape and prevent softening.
Keep your truffles away from strong-smelling foods in the refrigerator since chocolate readily absorbs surrounding odors. We find that properly stored truffles maintain their peak quality for 3 to 4 weeks when refrigerated, depending on the freshness of your original ingredients.
Allow the truffles to come to room temperature for 10 to 15 minutes before serving. This step ensures optimal texture and allows the flavors to fully develop on your palate.
Freezer Storage for Extended Preservation
Wrap your truffles in an airtight container or freezer-safe bag when planning longer storage periods. We recommend this method for preserving truffles up to 3 to 6 months, with dairy-free versions lasting closer to the 6-month mark.
Defrost frozen truffles slowly in the refrigerator to prevent condensation from forming on the chocolate surface. This gradual thawing process maintains the truffle’s appearance and prevents the chocolate from developing a white bloom.
Room Temperature Guidelines
Serve your truffles at room temperature for the best eating experience, but limit their time outside refrigeration. We suggest keeping them at room temperature only during active serving periods to prevent melting and spoilage.
Storage Best Practices
| Storage Method | Duration | Container Type | Temperature |
|---|---|---|---|
| Refrigerator | 3-4 weeks | Airtight container | Consistent cold |
| Freezer | 3-6 months | Freezer-safe bag/container | 0°F or below |
| Room Temperature | 2-4 hours | Serving plate | 65-70°F |
Ensure your truffles are completely cool before sealing them in storage containers. We always check that condensation has not formed on the chocolate surface, as moisture can affect both texture and shelf life. Using fresh, high-quality ingredients from the start maximizes your storage success and maintains the exceptional taste these truffles deserve.
Serving Suggestions
 10")
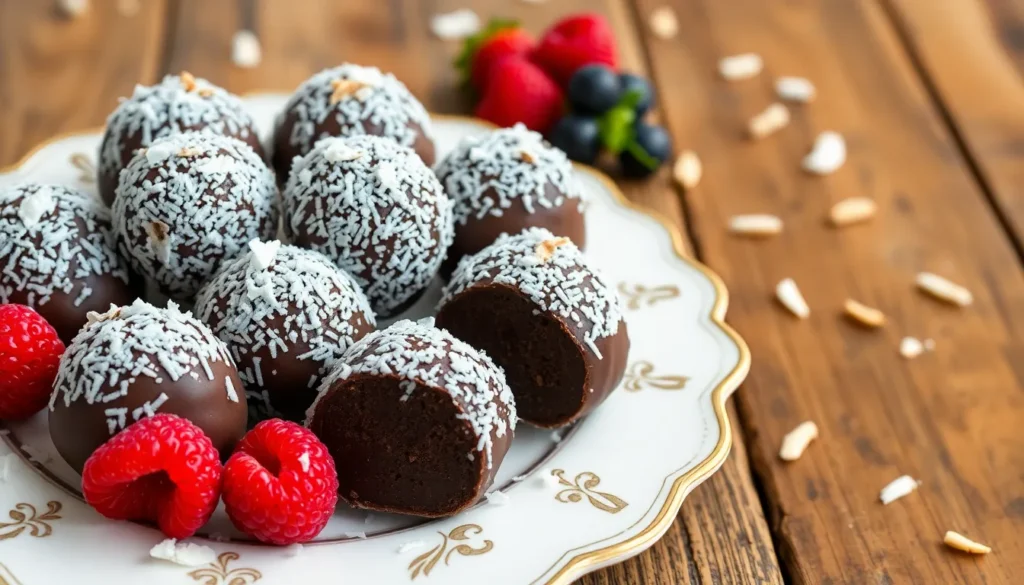
We recommend presenting these chocolate coconut truffles on a decorative plate or elegant platter to showcase their beautiful appearance. The contrast between the dark chocolate coating and delicate coconut garnish creates an impressive visual display that guests will appreciate.
Fresh whipped cream makes an excellent accompaniment to our truffles. We suggest dolloping small amounts alongside each truffle to add a light and airy texture that balances the rich chocolate and coconut flavors. Additional toasted coconut flakes scattered around the serving plate provide extra tropical flair and enhance the overall presentation.
Pairing these truffles with complementary desserts elevates the entire experience. We love serving them alongside fresh berries such as strawberries or raspberries for a refreshing contrast to the decadent chocolate. Vanilla ice cream also works wonderfully as it provides a cool and creamy element that complements the truffle’s intensity.
Coffee and tea service pairs beautifully with these treats. We find that a rich espresso or bold coffee enhances the chocolate notes while herbal teas like chamomile or mint provide a gentle cleansing effect between bites. The combination creates a sophisticated dessert course perfect for dinner parties.
Room temperature serving brings out the best flavors and textures in our chocolate coconut truffles. We allow them to sit at room temperature for 15 to 20 minutes before serving to achieve the ideal consistency. This timing ensures the chocolate coating maintains its snap while the interior becomes perfectly creamy.
Gift presentation adds special meaning to these homemade treats. We arrange the truffles in decorative boxes lined with parchment paper or place them in clear containers tied with ribbon for elegant gift giving. Individual paper cups or mini cupcake liners make portion control easy while maintaining an upscale appearance for special occasions.
Recipe Variations
 12")
We love experimenting with different flavors and textures to create unique truffle experiences. These variations offer exciting twists on our classic chocolate coconut truffles while maintaining the same elegant simplicity.
Dark Chocolate Version
Dark chocolate lovers will appreciate this rich and intense variation that uses just three simple ingredients. We combine dark chocolate with coconut cream and shredded coconut to create a more sophisticated flavor profile with deeper chocolate notes.
Ingredients:
- 8 oz high-quality dark chocolate (70% cacao or higher)
- 1/2 cup coconut cream
- 2 cups unsweetened shredded coconut
Instructions:
Start by heating the coconut cream in a small saucepan until it just begins to simmer. Pour the hot cream over chopped dark chocolate and let it sit for 2 minutes before stirring until smooth. Mix in 1 cup of shredded coconut and refrigerate the mixture for 2 hours. Form the chilled mixture into balls and roll in the remaining coconut. Chill for another 30 minutes before serving.
Rum-Infused Truffles
We elevate our basic truffle recipe with a splash of rum flavor that adds warmth and complexity to each bite. This adult-friendly variation brings tropical island vibes to your dessert table.
Ingredients:
- Our basic truffle mixture
- 1 teaspoon rum extract
- 1/4 cup golden raisins or dried cranberries (optional)
- 2 tablespoons dark rum for soaking
Instructions:
Add the rum extract directly to our coconut truffle mixture before forming into balls. For extra flavor depth, soak the raisins or cranberries in dark rum for 30 minutes, then drain and fold them into the coconut mixture. The rum-soaked fruit adds bursts of flavor and interesting texture. Form into balls as usual and dip in melted chocolate.
Toasted Coconut Coating
We create an irresistible crunchy exterior by rolling our chocolate-dipped truffles in golden toasted coconut. This variation adds a delightful textural contrast and enhances the coconut flavor with nutty, caramelized notes.
Ingredients:
- 1 cup unsweetened shredded coconut
- Completed chocolate-dipped truffles
Instructions:
Spread the shredded coconut on a baking sheet and toast in a 325°F oven for 5-8 minutes, stirring every 2 minutes until golden brown. Watch carefully to prevent burning. Let the toasted coconut cool completely before use. After dipping our truffles in chocolate, immediately roll them in the toasted coconut while the chocolate is still tacky. The warm chocolate will help the coconut adhere perfectly for a beautiful golden coating.
Troubleshooting Tips
 14")
Even the most experienced bakers encounter challenges when crafting perfect chocolate coconut truffles. We’ve compiled answers to the most common issues to ensure your truffles turn out beautifully every time.
Mixture Consistency Problems
Too Soft or Too Dry: When our truffle mixture doesn’t achieve the right consistency, we can easily adjust it. Adding a bit more icing sugar or cocoa powder helps firm up soft mixtures. For overly dry mixtures, we incorporate a small amount of melted butter or coconut oil to restore the proper texture.
Chocolate Melting Issues
Chocolate Not Melting Properly: We ensure success by chopping chocolate into very small pieces before melting. The cream should be warm enough to melt the chocolate completely. If needed, we place the bowl over simmering water to achieve smooth melting.
Ganache Consistency Challenges
Ganache Not Thickening: Quality chocolate and heavy cream make all the difference in achieving proper thickness. We pour the mixture into a shallow dish to speed up the thickening process. Refrigerating the ganache until it firms up ensures the right consistency for rolling.
Greasy or Separating Chocolate: Avoiding overly hot heavy cream prevents this common problem. We let the cream cool slightly before mixing it with chocolate to maintain smooth texture.
Coating and Appearance Issues
Unattractive Final Results: Tapping off excess chocolate when coating creates a smooth, professional finish. We avoid scraping too hard during the coating process, which can damage the delicate truffle shape.
Liquid Additions
Adding Liqueurs or Extracts: We add either a important amount of liquid or none at all to prevent chocolate from seizing. This approach maintains the smooth texture essential for quality truffles.
Coconut Oil Handling
Using Coconut Oil: We melt coconut oil completely and allow it to cool before mixing with chocolate. This technique helps maintain proper texture and prevents unwanted separation in our finished truffles.
| Issue | Primary Cause | Solution | Prevention Tip |
|---|---|---|---|
| Soft mixture | Too much liquid | Add icing sugar or cocoa powder | Measure liquids precisely |
| Dry mixture | Insufficient moisture | Add melted butter or coconut oil | Don’t over-mix ingredients |
| Chocolate won’t melt | Pieces too large | Chop finely, use warm cream | Heat cream to proper temperature |
| Greasy ganache | Cream too hot | Cool cream before mixing | Test cream temperature first |
| Rough coating | Excess chocolate | Tap off excess gently | Use proper dipping technique |
Conclusion
These chocolate coconut truffles prove that the most impressive desserts often come from the simplest recipes. We’ve shown you how just a handful of quality ingredients can transform into an elegant treat that rivals any expensive confection.
What makes this recipe truly special isn’t just its incredible flavor – it’s the confidence it gives you as a home cook. Whether you’re preparing them for a last-minute gathering or planning ahead for the holidays these truffles deliver every time.
The beauty lies in their versatility. You can stick to our classic version or experiment with the variations we’ve shared. Either way you’ll have a dessert that looks professionally made and tastes absolutely divine.
Now it’s time to get into your kitchen and experience the magic of homemade chocolate coconut truffles for yourself.
Frequently Asked Questions
How long do chocolate coconut truffles last?
Chocolate coconut truffles can be stored in an airtight container in the refrigerator for 3-4 weeks. For longer storage, wrap them carefully and freeze for 3-6 months. Dairy-free versions typically last closer to the 6-month mark when frozen. Always allow frozen truffles to thaw gradually in the refrigerator before serving.
Can I make chocolate coconut truffles ahead of time?
Yes, these truffles are perfect for make-ahead preparation. The truffle mixture can be prepared up to 2 days in advance and refrigerated. Uncoated truffles can be stored for up to one week in the refrigerator or frozen for up to three months. After coating, they’ll keep for one week refrigerated.
What equipment do I need to make chocolate coconut truffles?
Essential equipment includes a large mixing bowl, baking tray lined with parchment paper, and a teaspoon or small cookie scoop for portioning. You’ll also need a microwave or double boiler for melting chocolate, and a fork for dipping. A food processor is optional but helpful for variations.
Do chocolate coconut truffles need to be refrigerated?
Yes, chocolate coconut truffles should be stored in the refrigerator in an airtight container to maintain their texture and prevent spoilage. However, for the best eating experience, allow them to come to room temperature for 15-20 minutes before serving to achieve the ideal creamy consistency.
Can I make variations of chocolate coconut truffles?
Absolutely! Popular variations include dark chocolate truffles using coconut cream, rum-infused truffles with rum extract, and versions with toasted coconut coating for extra crunch. You can also experiment with different coatings like cocoa powder or chopped nuts while maintaining the same basic preparation method.
What should I do if my truffle mixture is too soft or too dry?
If the mixture is too soft, refrigerate it for 30-60 minutes to firm up before shaping. If it’s too dry, add small amounts of coconut cream or melted chocolate gradually until you achieve the right consistency. Always make adjustments slowly to avoid overcompensating.
How should I serve chocolate coconut truffles?
Serve truffles on a decorative plate at room temperature for optimal texture. They pair beautifully with fresh berries, vanilla ice cream, or whipped cream. Coffee and tea complement the flavors perfectly. For gifts, arrange them in decorative boxes or clear containers for an elegant presentation.