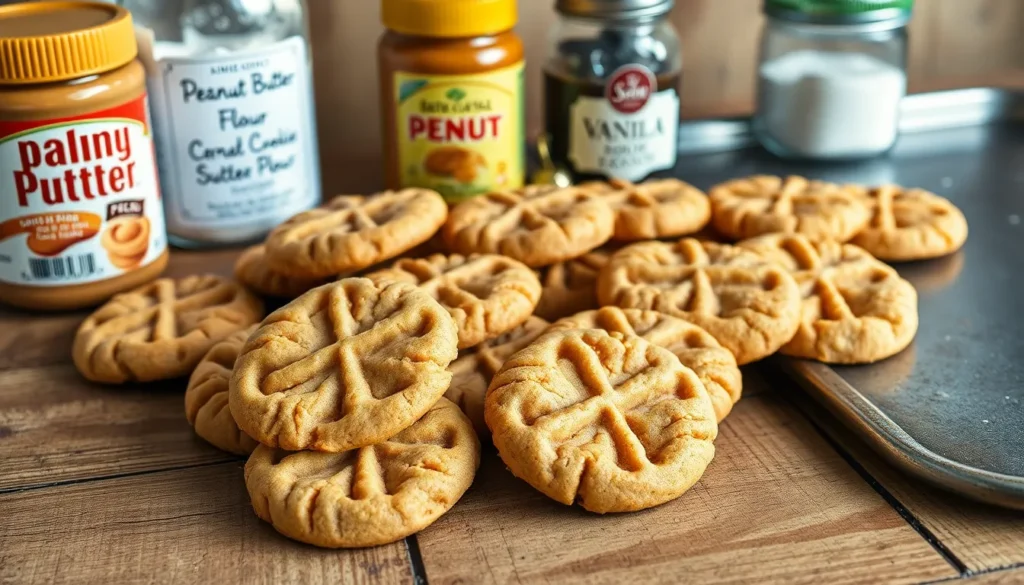
Nothing beats the irresistible aroma of classic peanut butter cookies baking in your oven. These beloved treats have been winning hearts since the 1930s when peanut butter became a household staple across America. With their signature crisscross pattern and rich nutty flavor, they’re the ultimate comfort food that brings back childhood memories.
We’ve perfected this timeless recipe to deliver cookies with the ideal balance of chewy centers and slightly crispy edges. The secret lies in using the right combination of creamy and crunchy peanut butter, creating layers of texture that’ll make your taste buds dance.
Ingredients
We’ve carefully selected each ingredient to deliver the perfect balance of flavor and texture in our classic peanut butter cookies. Our recipe combines pantry staples with quality peanut butter to create cookies that embody the traditional taste we all remember.
Essential Cookie Base
- 1 cup creamy peanut butter (natural or regular)
- 1/2 cup crunchy peanut butter (for added texture)
- 1/2 cup unsalted butter (softened to room temperature)
- 1/2 cup granulated sugar
- 1/2 cup packed light brown sugar
- 1 large egg (room temperature)
- 1 teaspoon vanilla extract
Dry Ingredients
- 1 1/4 cups all-purpose flour
- 1/2 teaspoon baking soda
- 1/2 teaspoon salt
For Finishing
- 1/4 cup granulated sugar (for rolling)
The combination of both creamy and crunchy peanut butter creates our signature texture contrast. Room temperature ingredients blend more easily and produce a smoother dough consistency. We recommend using natural peanut butter for the most authentic flavor profile.
Brown sugar contributes moisture and creates the characteristic chewy center while granulated sugar provides structure. The small amount of vanilla extract enhances the overall peanut flavor without overpowering the star ingredient.
Equipment Needed
 2")
Gathering the right tools before we start baking ensures our classic peanut butter cookies turn out perfectly every time. We recommend having these essential pieces of equipment ready in your kitchen.
Electric Mixer or Large Spoon – An electric mixer makes quick work of creaming the peanut butter and sugars together until light and fluffy. A sturdy wooden spoon works just as well if you prefer mixing by hand.
Cookie Scoop (1¼-inch) – This specialized tool creates uniform cookie portions that bake evenly. We can substitute a measuring tablespoon if a cookie scoop isn’t available.
Cookie Sheet (Shiny Metal Preferred) – Shiny metal baking sheets reflect heat and prevent the bottoms from browning too quickly. Dark pans tend to overbake the cookie bottoms.
Large Mixing Bowl – We need ample space for combining all our ingredients without making a mess. A bowl with high sides works best for preventing flour from flying everywhere.
Dry Measuring Cups and Measuring Spoons – Accurate measurements are crucial for consistent results. We use these for flour, sugars, baking powder, and other dry ingredients.
Rubber Spatula – This flexible tool helps us scrape down bowl sides and fold ingredients together without overmixing the dough.
Plastic Wrap – Covering our dough during the chilling process prevents it from drying out and absorbing refrigerator odors.
Small Bowl and Fork – We use the small bowl for our sugar dipping station and the fork to create those signature crisscross patterns on top of each cookie.
Cookie Spatula and Cooling Rack – The thin spatula transfers warm cookies without breaking them, while the cooling rack allows air circulation for proper cooling.
Instructions
 4")
Now we’ll walk through the straightforward process of creating these beloved cookies. Follow these detailed steps to achieve perfectly balanced peanut butter cookies with that signature texture and flavor.
Prep the Dough
Combine Wet Ingredients: Beat together 1 cup unsalted butter, 1 cup crunchy peanut butter, 1 cup white sugar, and 1 cup packed brown sugar until the mixture becomes smooth and creamy. Add 2 large eggs one at a time and mix thoroughly after each addition.
Add Dry Ingredients: Whisk together flour, baking soda, and salt in a separate bowl. Gradually incorporate this dry mixture into the wet ingredients, mixing until just combined. Avoid overmixing to prevent tough cookies.
Chill the Dough: Cover the prepared dough with plastic wrap and refrigerate for approximately 2 hours until firm. This chilling step ensures the cookies hold their shape during baking and prevents excessive spreading.
Shape the Cookies
Portion Dough: Use a cookie scoop to create uniform 1-inch balls from the chilled dough. This ensures even baking and consistent cookie size.
Press with Fork: Take a fork and create the classic crisscross pattern on each dough ball. Press gently but firmly to create distinct lines while slightly flattening each cookie.
Space Properly: Arrange the shaped cookies about 3 inches apart on your prepared baking sheet to allow for proper spreading during baking.
Bake the Cookies
Preheat Oven: Set your oven temperature to 375°F and allow it to fully preheat before baking.
Bake: Place the cookie sheet in the preheated oven and bake for 10 minutes or until the edges become lightly golden brown. The centers should still appear slightly soft.
Cool: Allow cookies to rest on the baking sheet for 5 minutes before carefully transferring them to a wire rack. This resting period prevents the cookies from breaking while they finish setting.
Directions for Perfect Results
 6")
We’ve perfected our technique through countless batches to bring you the most reliable method for classic peanut butter cookies. These detailed steps ensure consistent results every time you bake.
Achieving the Right Texture
We start by preheating our oven to 375°F (190°C) to ensure even baking throughout. Beat the peanut butter, butter, white sugar, and brown sugar together until the mixture becomes light and fluffy. Add the eggs one at a time and mix well after each addition to create a smooth base.
Next, we stir in the flour, baking soda, baking powder, and salt until just combined. Overmixing at this stage can result in tough cookies, so we fold the dry ingredients gently into the wet mixture. The dough should hold together without being sticky.
Chilling the dough for about 2 hours or until firm is crucial for preventing excessive spreading. This step helps our cookies maintain their shape and achieve the perfect balance between a chewy center and slightly crispy edges. We’ve found that adding shortening can result in softer cookies if that’s your preferred texture.
Creating the Classic Fork Pattern
We form the chilled dough into balls about 1¼ inches in diameter for uniform baking. Place these dough balls 3 inches apart on our baking sheet to allow for proper spreading during baking.
Before pressing each cookie, we dip our fork in sugar to prevent sticking to the dough. This simple trick ensures clean lines every time. Press the fork gently into each dough ball to create the signature crisscross pattern that makes these cookies instantly recognizable.
Bake the cookies for 9 to 10 minutes or until the edges become lightly golden brown. The centers may appear slightly underbaked, but they will continue cooking on the hot pan after removal from the oven. This timing produces our ideal texture with tender centers and perfectly set edges.
Storage Instructions
 8")
We know you’ll want to savor these delicious classic peanut butter cookies long after they’ve cooled. Proper storage ensures our homemade treats maintain their perfect texture and rich peanut butter flavor for days or even months.
Room Temperature Storage
Fresh cookies stay perfectly soft and chewy when stored at room temperature. We recommend placing completely cooled cookies in an airtight container where they’ll maintain their quality for 5 to 7 days. Make sure the cookies have cooled entirely before sealing them to prevent condensation from making them soggy.
Freezer Storage
Our classic peanut butter cookies freeze beautifully for longer storage. Place the cookies in an airtight freezer-safe container or freezer bag where they’ll stay fresh for up to 2 to 3 months. This method works perfectly when we want to bake ahead for special occasions or simply keep a stash of homemade cookies on hand.
| Storage Method | Container Type | Duration |
|---|---|---|
| Room Temperature | Airtight container | 5-7 days |
| Freezer | Freezer-safe container or bag | 2-3 months |
Thawing and Reheating
Frozen cookies return to their original texture quickly with proper thawing. Remove the desired number of cookies from the freezer and place them in a single layer on a plate or tray. Let them stand uncovered for about 10 minutes to thaw completely at room temperature.
We can also warm our cookies for that fresh-from-the-oven taste. Place a room temperature or thawed cookie on a microwave-safe plate and heat on low power (30%) for 15 seconds or until warm. This gentle heating method prevents the cookies from becoming tough while restoring their comforting warmth.
Freezing Cookie Dough
Planning ahead becomes easier when we freeze unbaked cookie dough. Roll the prepared dough into balls and place them in a ziplock freezer bag where they’ll keep for up to 3 months. When we’re ready to bake fresh cookies simply place the frozen dough balls on a baking sheet and bake according to our original recipe instructions without thawing first.
Make-Ahead Tips
 10")
Planning ahead transforms cookie baking from a last-minute scramble into a relaxed experience. We love preparing these classic peanut butter cookies in advance because the dough holds beautifully and the flavors actually improve with time.
Refrigerating Cookie Dough
Fresh cookie dough stores exceptionally well in the refrigerator for up to 2 days. We wrap the dough tightly in plastic wrap or store it in an airtight container to prevent it from drying out. The chilled dough becomes firmer and easier to handle while developing deeper peanut butter flavors.
Our make-ahead cookie mix can be prepared and refrigerated for up to 4 weeks when stored properly. This extended storage option works perfectly for busy households that want fresh cookies without the full preparation time.
Freezing for Long-Term Storage
Cookie dough freezes beautifully for up to 3 months without losing quality or flavor. We recommend rolling the dough into individual balls before freezing since this makes baking more convenient later.
| Storage Method | Duration | Storage Tips |
|---|---|---|
| Refrigerated dough | Up to 2 days | Wrap tightly in plastic wrap |
| Make-ahead mix | Up to 4 weeks | Store in airtight container |
| Frozen dough balls | Up to 3 months | Flash freeze on baking sheet first |
Place the dough balls on a parchment-lined baking sheet and freeze them solid before transferring to an airtight container or freezer bag. This prevents the balls from sticking together and allows us to bake exactly the number of cookies we need.
Baking from Frozen
Frozen cookie dough requires minimal adjustment to our standard baking process. We bake the frozen dough balls directly from the freezer without thawing at 375°F for 12 to 15 minutes. The slightly extended baking time ensures the centers cook through while maintaining that perfect chewy texture.
Temperature consistency remains crucial when baking from frozen. We allow a few extra minutes for the oven to fully preheat and avoid opening the door frequently during the first 10 minutes of baking.
Serving Suggestions
 12")
Classic peanut butter cookies shine brightest when paired with the perfect accompaniments that complement their rich nutty flavor. We recommend serving these golden treasures with a tall glass of cold milk, which creates an ideal contrast to the cookies’ dense texture while helping to cleanse the palate between bites. Hot chocolate serves as another exceptional pairing that enhances the warm, comforting qualities of these beloved treats.
Vanilla ice cream transforms our peanut butter cookies into an elevated dessert experience. The creamy coolness of the ice cream balances the cookies’ sweetness while creating a delightful temperature contrast. We often sandwich a scoop between two cookies for an indulgent treat that appeals to both children and adults.
Cookie trays benefit significantly from including our peanut butter cookies alongside other varieties. Their distinctive crisscross pattern and golden color provide visual interest while their familiar flavor appeals to diverse preferences. The cookies’ sturdy texture makes them ideal for gift giving and holiday celebrations.
Special occasions call for creative presentation options that showcase these classic cookies. Rolling the shaped dough in colored sugar before baking creates festive variations perfect for holidays and celebrations. Sparkling sugar adds an elegant touch that transforms simple cookies into sophisticated treats.
| Serving Option | Pairing Details | Occasion |
|---|---|---|
| Cold Milk | Complements rich nutty flavor | Everyday snacking |
| Hot Chocolate | Enhances warm comfort qualities | Winter evenings |
| Vanilla Ice Cream | Creates temperature contrast | Dessert course |
| Cookie Trays | Provides variety in texture and color | Entertaining |
| Colored Sugar | Adds festive visual appeal | Holiday celebrations |
We also suggest experimenting with almond butter variations for guests with different taste preferences. This simple substitution maintains the cookies’ beloved texture while introducing subtle flavor variations that surprise and delight. The same serving suggestions apply beautifully to these alternative versions.
Conclusion
These classic peanut butter cookies represent more than just a sweet treat – they’re a timeless connection to comfort and tradition. We’ve equipped you with everything needed to create bakery-quality cookies that’ll have your kitchen smelling absolutely incredible.
The beauty of this recipe lies in its simplicity and reliability. Whether you’re baking for a special occasion or simply craving that perfect combination of chewy centers and crispy edges you can count on consistent results every time.
We encourage you to make this recipe your own and share it with loved ones. After all the best cookies are the ones that bring people together and create lasting memories around the kitchen table.
Frequently Asked Questions
What makes these peanut butter cookies different from other recipes?
This recipe uses both creamy and crunchy peanut butter to create a unique texture contrast. The combination of both types provides the signature peanut flavor while adding delightful texture variation with crunchy pieces throughout the cookie.
How long should I chill the cookie dough before baking?
The article doesn’t specify an exact chilling time, but emphasizes that chilling the dough is crucial for helping cookies maintain their shape during baking. Chill until the dough is firm enough to handle and shape into balls.
What temperature should I bake these cookies at?
Preheat your oven to 375°F (190°C) for even baking. This temperature ensures the cookies develop golden brown edges while maintaining tender, chewy centers without overbaking.
How do I create the classic crisscross pattern on top?
After rolling the dough into balls and placing them on the baking sheet, use a fork to gently press down on each cookie, creating a crisscross pattern. This traditional technique also helps flatten the cookies slightly for even baking.
How long do these cookies stay fresh?
Store completely cooled cookies in an airtight container at room temperature for 5-7 days. For longer storage, freeze them in a freezer-safe container for 2-3 months while maintaining their texture and flavor.
Can I make the cookie dough ahead of time?
Yes! Fresh cookie dough can be refrigerated for up to 2 days, allowing flavors to deepen. For longer storage, freeze rolled dough balls for up to 3 months and bake directly from frozen with minimal adjustments.
What’s the best way to serve these peanut butter cookies?
These cookies pair perfectly with cold milk or hot chocolate for a comforting treat. For an elevated dessert, serve them alongside vanilla ice cream or arrange them on cookie trays for special occasions.
Can I substitute almond butter for peanut butter?
Yes, the article mentions experimenting with almond butter as a variation to cater to different taste preferences while maintaining the beloved chewy texture and overall cookie structure.