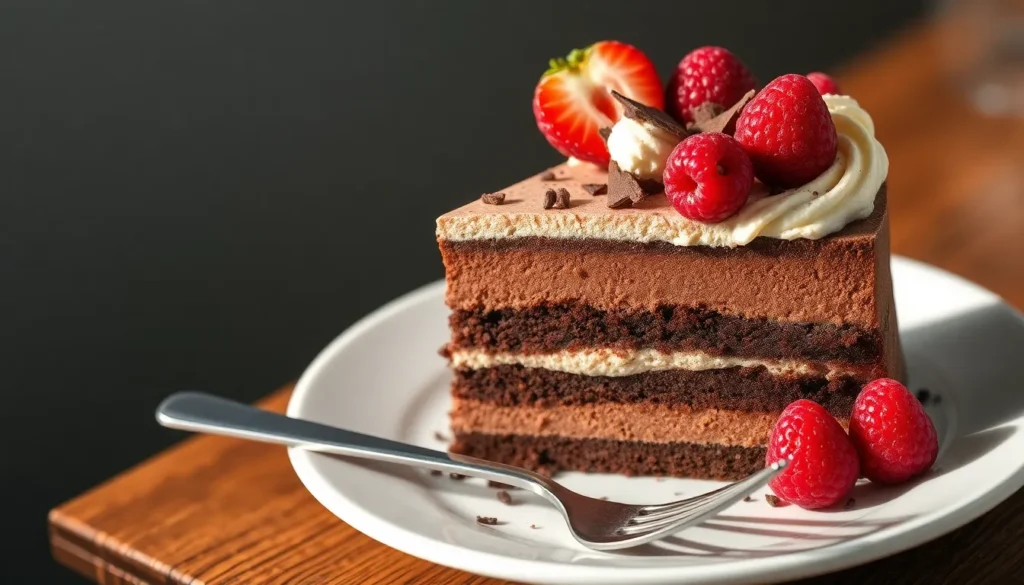
We’ve all dreamed of that perfect dessert that combines rich chocolate cake with silky smooth mousse – and this chocolate mousse cake delivers exactly that fantasy. This show-stopping dessert layers moist chocolate sponge with an incredibly light and airy chocolate mousse that practically melts on your tongue.
What makes this recipe truly special is how it transforms simple ingredients into pure elegance. The contrast between the dense cake base and the cloud-like mousse creates a textural experience that’ll have your guests asking for seconds before they’ve finished their first bite.
Whether you’re celebrating a special occasion or simply treating yourself to something extraordinary this chocolate mousse cake proves that homemade desserts can rival any fancy restaurant creation. We’ll walk you through each step to ensure your cake turns out perfectly balanced and absolutely irresistible.
Ingredients
Creating this chocolate mousse cake requires quality ingredients that work together to build layers of rich flavor. We’ve organized the ingredients by component to help you prepare each element efficiently.
For the Chocolate Cake Base
- 1 cup all-purpose flour
- 3/4 cup unsweetened cocoa powder
- 1 1/2 cups granulated sugar
- 1 1/2 teaspoons baking powder
- 1 teaspoon baking soda
- 1 teaspoon salt
- 2 large eggs, room temperature
- 1 cup whole milk
- 1/2 cup vegetable oil
- 2 teaspoons vanilla extract
- 1 cup hot coffee or hot water
For the Chocolate Mousse
- 8 ounces dark chocolate (70% cocoa), chopped
- 4 large eggs, separated
- 1/4 cup granulated sugar
- 2 cups heavy cream, cold
- 1 teaspoon vanilla extract
- 1/4 teaspoon salt
For the Chocolate Ganache
- 8 ounces dark chocolate (70% cocoa), finely chopped
- 1 cup heavy cream
- 2 tablespoons unsalted butter, room temperature
- 1 tablespoon light corn syrup
- 1 teaspoon vanilla extract
Equipment Needed

Creating our chocolate mousse cake requires the right tools to achieve professional results. We recommend gathering these essential pieces of equipment before starting the baking process.
Springform Pan: A 9-inch springform pan serves as our primary baking vessel for assembling the cake components. The removable bottom makes it easy to release our finished cake without damaging the delicate layers.
Mixing Bowls: Multiple mixing bowls allow us to prepare different cake components simultaneously. We suggest having at least three bowls of varying sizes to keep ingredients organized.
Electric Mixer or Whisk: Whipping heavy cream for the mousse requires either an electric mixer or a sturdy whisk. An electric mixer delivers consistent results and saves considerable time during preparation.
Rubber Spatula: Gentle folding techniques preserve the airy texture of our mousse layer. A flexible rubber spatula helps us incorporate ingredients without deflating the mixture.
Heavy-Bottomed Saucepan: Heating cream for the ganache demands even heat distribution. A quality saucepan prevents scorching and ensures smooth ganache consistency.
Sharp Knife: Clean slicing showcases our cake’s beautiful layers. A sharp knife creates precise cuts that highlight the contrast between cake and mousse.
Clear Acetate Cake Collar Roll (Optional): Professional presentation benefits from this specialty tool. The acetate collar creates clean edges and enhances the overall appearance of our finished cake.
These tools work together to streamline our baking process and deliver restaurant-quality results at home.
Instructions

We’ll guide you through creating this stunning chocolate mousse cake step by step. Our comprehensive approach ensures each layer contributes to the perfect final dessert.
Preparing the Chocolate Cake Base
We begin by preheating our oven to 350°F and greasing our 9-inch springform pan. In a large mixing bowl, we whisk together the oil, granulated sugar, eggs, vanilla extract, and sour cream until smooth and well combined. Next, we add the all-purpose flour, cocoa powder, baking powder, baking soda, and salt to create our dry ingredient mixture. We fold the dry ingredients into the wet mixture using gentle strokes to avoid overmixing.
Once our batter is smooth, we pour it into the prepared springform pan and spread it evenly. We bake for 25-30 minutes, testing doneness by inserting a toothpick into the center—it should come out with just a few moist crumbs. After removing from the oven, we allow the cake to cool completely in the pan before proceeding to assembly.
Making the Chocolate Mousse
We start our mousse by chopping the dark chocolate into small, uniform pieces for even melting. In a heavy-bottomed saucepan, we heat the heavy cream until it just begins to simmer, then pour it over the chopped chocolate in a separate bowl. We let this mixture sit for 2-3 minutes to allow the chocolate to melt naturally.
After the resting period, we whisk the chocolate and cream mixture until it becomes smooth and glossy. We set this aside to cool to room temperature, stirring occasionally to prevent a skin from forming. In another bowl, we whip the remaining heavy cream with vanilla extract until soft peaks form. Once our chocolate mixture has cooled, we gently fold it into the whipped cream using a rubber spatula to maintain the airy texture.
Assembling the Cake
We level our cooled cake base if necessary using a sharp knife to create an even surface. The cake remains in the springform pan as we wrap a clear acetate cake collar around the inside edge to create clean sides and contain our mousse layer. This collar extends above the cake rim to accommodate the mousse.
We pour our prepared chocolate mousse over the cake base, using an angled spatula to spread it evenly and smooth the surface. The mousse should reach the top of our acetate collar, creating a uniform layer that will set beautifully during chilling.
Creating the Chocolate Ganache
We chop our dark chocolate for the ganache into small pieces and place them in a heatproof bowl. In our heavy-bottomed saucepan, we heat the heavy cream until it just reaches a simmer. We pour the hot cream over the chopped chocolate and let it sit undisturbed for 2-3 minutes.
After the resting period, we whisk the mixture from the center outward until it becomes smooth and glossy. We add the butter, corn syrup, and vanilla extract, whisking until completely incorporated. Our ganache should have a pourable consistency—if it’s too thick, we can reheat it gently or add a tablespoon of warm cream.
Final Assembly and Chilling
We place our assembled cake in the refrigerator for at least 6 hours, though overnight chilling produces the best results for properly set mousse. Once fully chilled, we carefully remove the springform collar and gently peel away the acetate, revealing clean edges.
We pour our cooled ganache onto the center of the cake, using an angled spatula to spread it evenly across the surface. The ganache can extend to the edges for a clean finish or drip slightly over the sides for a more dramatic presentation. We return the finished cake to the refrigerator for 30 minutes to set the ganache before slicing and serving.
Make-Ahead Instructions

Our chocolate mousse cake becomes the perfect entertaining dessert when we plan ahead and prepare components in advance. We can break down the preparation into manageable steps that actually improve the final result.
Preparing the Chocolate Cake Base
We recommend baking the chocolate cake layers up to two days before assembly. After cooling completely at room temperature, we wrap each layer tightly in plastic wrap and store them at room temperature for optimal texture. For longer storage periods, we can refrigerate the wrapped cake layers for up to five days.
Making the Chocolate Mousse in Advance
The chocolate mousse benefits from advance preparation and can be made up to five days ahead of serving. We store the prepared mousse in an airtight container in the refrigerator, where it maintains its perfect texture and flavor. Before using the chilled mousse, we gently fold it with a rubber spatula to restore its smooth consistency without deflating the airy texture.
Assembly Timeline Strategy
We can assemble the complete cake with mousse layers up to two days before serving. Once assembled, the cake requires refrigeration for at least 30 minutes to allow the flavors to meld properly. This chilling period also helps the mousse set and makes slicing much cleaner.
Storage Guidelines
| Component | Storage Method | Duration |
|---|---|---|
| Chocolate Cake | Room temperature, wrapped | 2 days |
| Chocolate Cake | Refrigerated, wrapped | 5+ days |
| Chocolate Mousse | Refrigerated, covered | 5 days |
| Assembled Cake | Refrigerated | 2 days |
Final Assembly Tips
We suggest placing parchment paper around the cake base during assembly to catch any frosting drips and keep our work surface clean. Before applying the final chocolate ganache, we chill the assembled cake thoroughly to ensure the ganache sets smoothly and creates that professional finish we desire.
Storage and Serving Tips

Refrigerated Storage Requirements
We must keep our assembled chocolate mousse cake refrigerated at all times due to the perishable nature of mousse and whipped cream components. Store the cake in an airtight container or cover tightly with plastic wrap or aluminum foil to maintain freshness. Our completed cake will remain fresh for 3–5 days in the refrigerator when stored properly.
Component Storage Guidelines
Individual cake layers offer flexibility for advance preparation. We can wrap our baked layers tightly in plastic wrap and store them at room temperature for up to 2 days or refrigerate for up to 2 days. For longer storage, we freeze cake layers wrapped in plastic and aluminum foil or placed in freezer-safe containers for up to 2–3 months.
| Component | Storage Method | Duration |
|---|---|---|
| Assembled cake | Refrigerated, covered | 3-5 days |
| Cake layers (room temp) | Wrapped in plastic | 2 days |
| Cake layers (refrigerated) | Wrapped in plastic | 2 days |
| Cake layers (frozen) | Wrapped in plastic + foil | 2-3 months |
| Chocolate mousse | Airtight container, refrigerated | 2 days |
| Chocolate ganache | Refrigerated | 2-14 days |
Our chocolate mousse can be prepared up to 2 days in advance and stored in an airtight container in the refrigerator. Chocolate ganache keeps well refrigerated for 2–14 days depending on the exact recipe and ingredients used.
Freezing Options
Fully assembled chocolate mousse cake freezes beautifully for up to 3 months. We wrap the cake tightly in plastic wrap followed by aluminum foil or place it in a freezer-safe container. Always thaw overnight in the refrigerator before serving to maintain proper texture.
Serving Techniques
We bring frozen cake to serving temperature by thawing it in the refrigerator overnight. Serve the cake straight from the fridge for a firmer mousse texture or allow individual slices to reach room temperature for a softer consistency.
Clean slicing requires a sharp, warm knife for professional presentation. We keep our cake chilled as long as possible before serving to maintain the mousse structure and prevent melting.
Presentation Tips
Fresh berries, chocolate shavings, or whipped cream make excellent toppings when added just before serving for optimal appearance and taste. We avoid leaving mousse cakes at room temperature for extended periods to prevent spoilage and maintain food safety standards.
Variations and Substitutions

We love experimenting with different flavor profiles to create unique chocolate mousse cake experiences. Our dark chocolate mousse cake variation uses unsweetened natural cocoa powder combined with dark cocoa powder for an intensely rich flavor that chocolate purists adore. The depth of flavor achieved through this combination creates a more sophisticated dessert perfect for special occasions.
For those seeking adventurous flavor combinations, we recommend trying our peanut butter dark chocolate mousse cake. Adding peanut butter to the mousse creates a delightful nutty twist that balances the chocolate’s intensity. The creamy peanut butter adds richness while complementing the chocolate’s natural bitterness.
Coffee lovers will appreciate our chocolate coffee and caramel tart variation. Incorporating coffee elements into the mousse cake enhances the chocolate flavor while adding complexity. The caramel component provides sweetness that creates a perfect harmony of bitter, sweet, and aromatic flavors.
We also enjoy creating seasonal variations like our strawberry and pistachio mousse cake. Replacing traditional chocolate elements with strawberry and pistachio flavors offers a refreshing alternative that showcases how versatile this cake structure can be. Fresh strawberry puree and ground pistachios create vibrant colors and complementary flavors.
Cake Base Substitutions
Instead of traditional chocolate cake, we often substitute a chocolate genoise sponge for a lighter texture. The genoise creates an airier foundation that allows the mousse to be the star while still providing structural support. This substitution works particularly well when serving the cake as an elegant dinner party dessert.
Mousse Component Adjustments
Our mousse relies heavily on quality ingredients for optimal results. Semi-sweet chocolate chips serve as our standard base, but we substitute different chocolate types to achieve varying flavor profiles. Dark chocolate creates intensity, while milk chocolate offers mellowness. White chocolate provides a completely different experience altogether.
Heavy whipping cream remains essential for achieving the mousse’s signature texture. We never substitute this ingredient as it provides the necessary fat content and whipping properties that create the light, airy consistency we desire.
Ganache Modifications
Pure chocolate proves crucial for ganache quality and flavor development. We avoid chocolate chips or compound chocolate for the ganache as these contain stabilizers that affect the smooth, glossy finish. Quality chocolate melts evenly and creates the professional appearance that elevates the entire dessert.
Assembly and Presentation Enhancements
Chilling the mousse before assembly ensures it holds its shape and provides optimal texture. We always work with cold mousse as it makes handling easier and ensures cake stability throughout the assembly process.
Fresh fruits like raspberries add visual appeal and flavor contrast when used as garnishes. Chocolate covered espresso beans provide textural interest while reinforcing the coffee notes in certain variations. These garnishes should be added just before serving to maintain their appearance and prevent moisture from affecting the cake’s surface.
Troubleshooting Common Issues

Even experienced bakers encounter challenges when creating chocolate mousse cake. We’ll address the most common problems and provide practical answers to ensure your dessert turns out perfectly every time.
Grainy or Lumpy Texture
The most frustrating issue occurs when our smooth mousse develops an unpleasant grainy texture. This problem typically stems from chocolate seizing when liquid is introduced improperly or from over-whipping the cream component.
We recommend using high-quality chocolate and avoiding the addition of small amounts of liquid directly to melted chocolate. When whipping cream for our mousse, stop as soon as it becomes billowy rather than continuing until stiff peaks form. Over-whipped cream creates a lumpy consistency that cannot be corrected once it occurs.
Dense or Stiff Mousse
Our chocolate mousse should flow smoothly into molds and maintain an airy texture throughout. Dense mousse results from cream that has been whipped too aggressively on high speed settings.
We achieve the perfect consistency by whipping cream on medium speed until it becomes light and airy without forming distinct peaks. The cream should still move freely when the bowl is tilted slightly. This technique ensures our mousse maintains its signature smooth flow during assembly.
Temperature-Related Problems
Temperature control plays a crucial role in mousse texture and assembly success. When our chocolate base becomes too warm or too cold, the cream incorporation process fails to achieve the desired consistency.
We monitor the chocolate mixture temperature carefully before folding in whipped cream. The base should feel slightly warm to the touch but not hot enough to melt the cream immediately. This temperature balance allows proper incorporation while maintaining the mousse’s airy structure.
Incorporation Difficulties
Poor folding technique often leads to streaky appearance or lumpy texture in our finished mousse. Aggressive mixing breaks down the delicate air bubbles we’ve worked to create in the whipped cream.
We fold ingredients using gentle motions with a rubber spatula, working only until no visible streaks remain. The key lies in minimal handling while ensuring complete combination of all components. This approach preserves the mousse’s light texture while achieving uniform color and consistency throughout.
| Common Issue | Primary Cause | Solution |
|---|---|---|
| Grainy Texture | Chocolate seizing or over-whipped cream | Use quality chocolate, whip cream to billowy stage only |
| Dense Mousse | Over-whipped cream | Whip on medium speed until light and airy |
| Temperature Problems | Incorrect chocolate base temperature | Monitor temperature before cream incorporation |
| Poor Incorporation | Aggressive folding technique | Use gentle folding motions with rubber spatula |
Conclusion
We’ve created more than just a dessert – we’ve crafted an experience that transforms any gathering into a memorable celebration. This chocolate mousse cake represents the perfect marriage of technique and indulgence where every layer contributes to something truly extraordinary.
The beauty of this recipe lies in its versatility and make-ahead potential. Whether you’re planning an intimate dinner or hosting a grand celebration this cake adapts to your needs while maintaining its elegant appeal. The combination of rich flavors and contrasting textures ensures that each bite delivers pure satisfaction.
Armed with our detailed guidance troubleshooting tips and storage recommendations you’re now equipped to create a dessert that rivals any professional bakery. We’re confident that this chocolate mousse cake will become your go-to recipe for impressing guests and treating yourself to something spectacular.
Frequently Asked Questions
What makes this chocolate mousse cake special?
This chocolate mousse cake combines a rich, dense chocolate cake base with light, airy chocolate mousse, creating a perfect textural contrast. The luxurious dessert features three components – cake, mousse, and ganache – that work together to deliver an elegant treat suitable for special occasions or personal indulgence.
Can I make this chocolate mousse cake ahead of time?
Yes! The cake layers can be baked up to 2 days in advance, and the chocolate mousse can be prepared up to 5 days ahead. The complete assembled cake can be made up to 2 days before serving and should be stored in the refrigerator to allow flavors to meld properly.
What equipment do I need to make this cake?
Essential tools include a 9-inch springform pan, multiple mixing bowls, an electric mixer or whisk, rubber spatula, heavy-bottomed saucepan, sharp knife, and optionally a clear acetate cake collar roll. These tools ensure professional results and streamline the baking process for restaurant-quality presentation at home.
How should I store the chocolate mousse cake?
Keep the assembled cake refrigerated due to perishable components. Individual cake layers can be wrapped and stored at room temperature for 2 days or frozen for up to 3 months. The mousse and ganache should be refrigerated and can be frozen separately for longer storage.
What are some variations I can try?
Popular variations include dark chocolate mousse cake for richer flavor, peanut butter chocolate mousse cake for a nutty twist, or seasonal options like strawberry and pistachio mousse cake. You can also substitute the cake base with chocolate genoise sponge for a lighter texture.
Why is my chocolate mousse grainy or dense?
Grainy texture typically results from overheating chocolate or poor-quality ingredients. Dense mousse occurs from over-whipping cream or improper folding techniques. Use high-quality chocolate, monitor temperatures carefully, and fold ingredients gently to maintain the mousse’s light, airy texture.
How do I get clean slices when serving?
Use a sharp knife warmed under hot water and wiped clean between cuts. This technique prevents the mousse from sticking to the blade and ensures neat, professional-looking slices. Remove the cake from the refrigerator just before serving for best results.