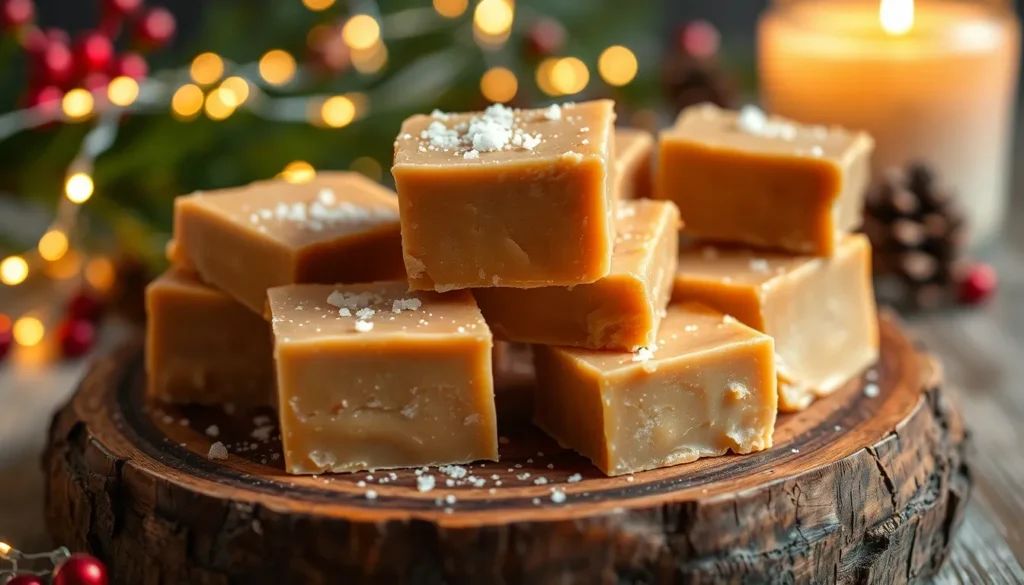
We’ve all fallen under the spell of that perfect sweet-and-salty combination that makes salted caramel irresistible. When you transform this beloved flavor into rich, creamy fudge, you create something truly magical that’ll have everyone asking for your secret recipe.
Our salted caramel fudge delivers the ultimate indulgence – silky smooth texture that melts on your tongue while balancing buttery caramel sweetness with just the right hint of sea salt. This isn’t your average fudge recipe; it’s a sophisticated treat that looks as impressive as it tastes.
Whether you’re planning holiday gifts, bringing dessert to a potluck, or simply treating yourself to something special, this salted caramel fudge hits every mark. We’ll show you how to achieve that perfect consistency and flavor balance that makes this confection absolutely addictive. Get ready to become the hero of every gathering with squares of pure bliss.
Equipment Needed
Creating perfect salted caramel fudge requires exact tools that ensure smooth preparation and consistent results. We recommend gathering all equipment before starting to maintain proper timing throughout the cooking process.
Essential Cookware:
- Heavy-bottomed saucepan (2-3 quart capacity)
- Wooden spoon or heat-resistant silicone spatula
- Candy thermometer or instant-read thermometer
- 8×8 inch baking pan
- Medium mixing bowl
Preparation Tools:
- Measuring cups and spoons
- Kitchen scale (for precise measurements)
- Parchment paper
- Aluminum foil
- Sharp knife for cutting finished fudge
Optional but Helpful Items:
- Stand mixer with paddle attachment
- Rubber spatula for scraping bowls
- Fine-mesh strainer
- Pastry brush for cleaning pan sides
The heavy-bottomed saucepan prevents hot spots that can cause caramel to burn or seize. We find that using a candy thermometer eliminates guesswork when reaching the proper temperature for perfect fudge consistency. Parchment paper creates easy removal from the pan while preventing sticking.
Professional-grade equipment makes a noticeable difference in texture and appearance. But, basic kitchen tools work well for home cooks who follow proper techniques. Temperature control remains the most critical factor for achieving that signature creamy texture that makes salted caramel fudge irresistible.
Ingredients

Our salted caramel fudge recipe combines simple pantry staples to create an extraordinary treat. Each ingredient plays a crucial role in achieving that perfect balance of creamy texture and bold flavor.
For the Fudge Base
- 397g sweetened condensed milk (1 tin) – forms the creamy foundation
- 115g unsalted butter – adds richness and smooth texture
- Dark brown sugar (200g) – provides deep molasses notes for richer flavor
- Whole milk (60ml) – ensures proper moisture content
- Vanilla extract (1 teaspoon) – enhances overall flavor profile
For the Salted Caramel Layer
- Golden syrup (3 tablespoons) – delivers deeper caramel complexity
- Caramel bits (100g) – intensifies the caramel flavor throughout
- Sea salt (1/2 teaspoon) – balances sweetness with savory contrast
For Finishing
- White chocolate (50g, chopped) – optional topping for added sweetness
- Flaky sea salt (1/4 teaspoon) – final sprinkle for enhanced salted caramel effect
| Ingredient Category | Key Temperature Point | Purpose |
|---|---|---|
| Fudge Base | 116°C (softball stage) | Prevents overcooking and crumbly texture |
| Caramel Layer | Medium heat | Maintains smooth consistency |
| Finishing | Room temperature | Preserves texture contrast |
Prep Work

Proper preparation sets the foundation for perfect salted caramel fudge. We need to organize our workspace and prepare our pan before we begin cooking to ensure smooth execution.
Preparing Your Pan
We start by selecting the right pan size for our batch. For a standard recipe we grease an 8-inch square pan thoroughly with butter and line it with parchment paper leaving some overhang for easy removal. Larger batches require a 9×13-inch pan with the same parchment paper treatment.
The parchment paper serves as our safety net making it effortless to lift the finished fudge from the pan. We press the paper down firmly into all corners to eliminate air bubbles that could affect our fudge’s shape. This preparation step prevents sticking and ensures clean professional looking squares when we cut our finished product.
Setting Up Your Workspace
We arrange all ingredients within arm’s reach before heating anything. Our heavy bottomed saucepan takes center stage on the stovetop with our wooden spoon or heat resistant spatula positioned nearby for constant stirring. Temperature control remains critical so we keep our candy thermometer accessible and ready to use.
We clear counter space around our cooking area to avoid accidents when working with hot caramel. The prepared pan should sit on a cooling rack or heat resistant surface near our cooking station for quick transfer once the fudge reaches the proper consistency. Having everything organized eliminates the stress of searching for tools while managing time sensitive caramel temperatures.
Our workspace setup includes having pot holders ready and a clean damp cloth nearby for quick cleanup of any spills. We position our measuring cups and remaining ingredients in the order we’ll use them to maintain our cooking rhythm without interruption.
Instructions

We start by creating the rich caramel layer that gives this fudge its signature flavor. The key to perfect salted caramel fudge lies in carefully monitoring temperatures and timing each step precisely.
Making the Caramel Layer
We combine sweetened condensed milk, brown sugar, butter, and golden syrup in our heavy-bottomed saucepan. Place the mixture over low heat and stir continuously until the sugar completely dissolves. Once dissolved, we increase the heat to medium and maintain constant stirring as the mixture begins to simmer.
The caramel layer requires 5-6 minutes of continuous stirring to reach the proper consistency. We watch for the mixture to thicken noticeably and develop a deeper amber color. The caramel should coat the back of our spoon when ready, indicating it has reached the perfect concentration for our fudge base.
Preparing the Fudge Base
We have two proven methods for creating the fudge foundation. Our first option involves mixing sugar, butter, and evaporated milk in a large saucepan over medium heat. This method produces a lighter colored fudge with a smooth texture.
Our second approach combines brown sugar, sweetened condensed milk, regular milk, and butter in the saucepan over low heat initially. We then bring this mixture to a rolling boil while stirring constantly. Both methods work effectively, though we recommend using a candy thermometer to monitor the temperature.
The fudge base reaches optimal consistency at the softball stage, approximately 116°C (240°F). We test this by dropping a small amount into cold water; it should form a soft ball that holds its shape briefly before flattening. This temperature ensures our fudge sets properly without becoming too hard or remaining too soft.
Combining and Setting
We remove the caramel mixture from heat once it reaches the desired consistency. At this point, we can stir in white chocolate pieces if desired, allowing them to melt completely into the warm caramel. Some variations include adding caramel bits or marshmallow fluff for extra texture and sweetness.
We pour the combined fudge mixture into our prepared 8×8 inch pan immediately while still warm. The mixture should spread evenly across the pan without air bubbles. We sprinkle flaky sea salt generously over the surface, pressing gently to ensure it adheres to the fudge.
Refrigeration requires 3-4 hours minimum for the fudge to set completely, though overnight chilling produces the best results. We test doneness by gently pressing the center; it should feel firm and spring back slightly. Once set, we lift the fudge from the pan using the parchment paper overhang and cut into uniform squares with a sharp knife.
| Temperature Guide | Stage | Time |
|---|---|---|
| 116°C (240°F) | Softball Stage | Critical for proper setting |
| Medium Heat | Caramel Layer | 5-6 minutes stirring |
| Low to Medium | Fudge Base | Until boiling point |
| 3-4 hours | Refrigeration | Minimum setting time |
Directions for Perfect Results

Now that we have our ingredients measured and workspace prepared, achieving perfect salted caramel fudge depends on mastering temperature control and timing. These crucial elements ensure our fudge reaches the ideal creamy texture and rich flavor balance.
Temperature Tips
We maintain low to medium heat throughout the cooking process to prevent scorching and ensure even caramel development. Start by heating our mixture over low heat until the sugar completely dissolves, then gradually increase to medium heat while stirring continuously.
Our fudge reaches optimal consistency when we monitor exact temperature ranges during cooking. The mixture should simmer and thicken at medium heat for 5-6 minutes, allowing the caramel to develop its signature depth.
| Temperature Stage | Target Range | Purpose |
|---|---|---|
| Cooking Temperature | Low to medium heat | Prevents burning and ensures even heating |
| Setting Temperature | 40°F (4°C) | Proper refrigeration for firm texture |
| Cooling Point | 110°F (43-45°C) | Ideal temperature before beating for smooth finish |
For recipes requiring beating, we cool the mixture to 110°F (43-45°C) before beginning the beating process. This temperature allows us to achieve the perfect consistency without the mixture becoming too firm to work with effectively.
Timing Guidelines
We follow precise timing guidelines to ensure our salted caramel fudge sets properly and develops the right texture. Preparation takes approximately 10 minutes when all ingredients are measured and ready.
During the cooking phase, we simmer and stir our mixture for 5-6 minutes until it reaches the proper thickness. This timing allows the ingredients to meld together while preventing overcooking that could result in grainy texture.
| Time Stage | Duration | Key Action |
|---|---|---|
| Preparation Time | 10 minutes | Measure ingredients and prep pan |
| Cooking Time | 5-6 minutes | Simmer until thickened |
| Cooling Time | 2-4 hours or overnight | Refrigerate for proper setting |
| Beating Time | 10-15 minutes | Achieve smooth matte finish |
Setting requires patience as we refrigerate our fudge for 2-4 hours minimum, though overnight chilling produces the best results. This extended cooling period allows the fudge to firm completely and makes cutting clean squares much easier.
When using the beating method, we dedicate 10-15 minutes to this process after cooling. This beating time transforms our mixture into a smooth, matte finish that creates the perfect fudge texture we desire.
Cutting and Serving

After our salted caramel fudge has set properly, we need to cut it into perfect pieces for serving. We refrigerate the fudge for at least 3 to 4 hours or overnight to ensure it reaches the proper consistency for clean cuts.
Preparing the Fudge for Cutting
We remove the fudge from the refrigerator and carefully peel it off the parchment paper. Our fudge block should feel firm and hold its shape when lifted. We place the fudge on a clean cutting board and put on disposable gloves to prevent leaving fingerprints on the surface.
Creating Clean Cuts
We start by using a pastry cutter to score the fudge surface in evenly spaced lines. After scoring in one direction, we turn the fudge block 90 degrees and score perpendicular lines to create a grid pattern for uniform squares. This scoring technique ensures we achieve consistent portion sizes throughout the batch.
We use a large sharp knife to cut through the scored lines, wiping the blade with a wet kitchen towel after each cut. This prevents the caramel from sticking to the knife and ensures smooth, clean edges on every piece.
Final Cutting Steps
Once we complete the initial cuts, we turn the fudge block 90 degrees and gently push the pieces back together to realign them. We follow our scored guidelines to finish cutting the remaining sections into smaller uniform pieces. Each piece maintains its shape while separating cleanly from the block.
Storage and Serving Guidelines
We store our finished salted caramel fudge in the refrigerator to maintain its optimal texture and freshness. The cool temperature prevents the caramel from becoming too soft and helps preserve the perfect balance between creamy and firm consistency.
| Storage Method | Duration | Temperature |
|---|---|---|
| Refrigerated | Up to 2 weeks | 35-40°F |
| Room Temperature | 3-5 days | 68-72°F |
We cut the fudge into thick squares for the best serving presentation. Each piece should showcase the rich caramel layers and maintain its shape when placed on serving plates or in gift boxes.
Storage Instructions

After cutting our salted caramel fudge into perfect squares, proper storage becomes essential for maintaining its rich texture and flavor. We recommend storing your fudge in an airtight container to prevent moisture exposure and preserve its creamy consistency.
Room Temperature Storage
Our salted caramel fudge stays fresh at room temperature for 1 to 2 weeks when stored in an airtight container. We find this method works best in environments with low humidity, though the fudge may soften slightly depending on ambient conditions. Keep the container away from heat sources and direct sunlight to prevent melting or excessive softening.
Refrigerated Storage
For extended freshness, we store our fudge in the refrigerator where it maintains optimal texture for 2 to 4 weeks. Place the fudge in an airtight container before refrigerating to prevent it from absorbing other flavors. Allow refrigerated fudge to come to room temperature for 10 to 15 minutes before serving for the best eating experience.
Freezer Storage
We can freeze salted caramel fudge for up to 6 months, though this may affect the texture and consistency. Wrap individual pieces in parchment paper before placing them in an airtight container or freezer bag. When ready to enjoy, thaw the fudge gradually at room temperature to prevent condensation from forming on the surface.
Storage Best Practices
| Storage Method | Duration | Temperature | Container Type |
|---|---|---|---|
| Room Temperature | 1-2 weeks | 68-72°F | Airtight container |
| Refrigerated | 2-4 weeks | 35-40°F | Airtight container |
| Frozen | Up to 6 months | 0°F or below | Wrapped + airtight container |
High humidity poses the greatest threat to our fudge’s texture, causing it to become sticky or overly soft. We always ensure our storage containers seal completely to maintain the ideal moisture level. Temperature variations can also compromise the fudge’s structure, so we avoid storing it near appliances that generate heat or in areas with frequent temperature changes.
Make-Ahead Tips

We love how easy it is to prepare salted caramel fudge ahead of time for special occasions and busy schedules. Planning ahead ensures our fudge develops the perfect texture while eliminating last-minute stress.
Prepare Your Workspace in Advance
Line your baking tray or mini muffin tin with parchment paper or liners before mixing any ingredients. This simple step allows us to pour the fudge mixture quickly once it’s ready and prevents sticking during the setting process.
Make Homemade Caramel Components Early
Homemade salted caramel can be prepared up to one month in advance when stored covered tightly in the refrigerator. We recommend making larger batches of caramel sauce to have on hand for multiple fudge recipes or other desserts throughout the month.
Work Efficiently During Assembly
After heating and combining our ingredients, we must work quickly to pour the fudge mixture into the prepared tray before it begins to set. Having everything prepped and ready ensures smooth execution during this critical timing phase.
Optimize Setting and Storage Times
| Storage Method | Duration | Temperature | Purpose |
|---|---|---|---|
| Initial Setting | 2 hours minimum | Refrigerated | Basic firmness |
| Optimal Setting | 3-4 hours to overnight | Refrigerated | Perfect slicing texture |
| Long-term Storage | Up to 6 months | Frozen | Extended preservation |
Refrigerate the fudge for at least 2 hours, though we prefer 3 to 4 hours or overnight for the firmest, most sliceable texture. For extended storage, we place the fudge in freezer-friendly containers where it maintains quality for up to 6 months.
Flexible Ingredient Preparation
We can substitute traditional ingredients with nut butters, seed butters, coconut oil, and maple syrup for vegan or paleo-friendly versions when making the fudge ahead. These alternatives work equally well when prepared in advance and actually benefit from longer setting times.
Multiple Preparation Methods
Both microwave and stovetop methods work effectively for melting ingredients together. We choose the method that best fits our kitchen setup and timing needs, as both deliver consistent results when proper temperatures are maintained.
Conclusion
We’ve shown you everything you need to create this irresistible salted caramel fudge that’ll become your go-to treat for any occasion. With the right techniques and timing you can achieve that perfect balance of sweet and salty that makes this dessert so memorable.
The beauty of this recipe lies in its flexibility – whether you’re making it weeks ahead or whipping it up last minute you’ll get consistently delicious results. Don’t be afraid to experiment with different variations to make it your own.
Now it’s time to gather your ingredients and start creating this crowd-pleasing dessert. Your friends and family will thank you for introducing them to this rich creamy indulgence that’s sure to become a new favorite.
Frequently Asked Questions
What makes salted caramel fudge different from regular fudge?
Salted caramel fudge combines buttery caramel sweetness with a hint of sea salt, creating a sophisticated flavor balance. The addition of sea salt enhances the caramel notes while adding complexity, making it more indulgent than traditional fudge varieties.
What essential equipment do I need to make salted caramel fudge?
You’ll need a heavy-bottomed saucepan, candy thermometer, and an 8×8 inch baking pan. Having all tools ready beforehand ensures smooth preparation and consistent results, as timing is crucial when working with caramel and fudge mixtures.
Can I make salted caramel fudge ahead of time?
Yes, you can prepare components up to a month in advance. Line baking trays ahead of time and prepare homemade caramel components early. This allows for stress-free execution during special occasions and holiday preparations.
How long does salted caramel fudge need to set?
Refrigerate the fudge for at least 3 to 4 hours for optimal slicing texture. This setting time ensures the fudge reaches the perfect consistency for clean cuts and proper presentation.
What are the key ingredients for salted caramel fudge?
Essential ingredients include sweetened condensed milk, unsalted butter, dark brown sugar, and sea salt. Each ingredient plays a specific role in achieving the desired texture and flavor balance of the finished fudge.
Can I make substitutions for dietary restrictions?
Yes, flexible ingredient substitutions are possible for vegan or paleo-friendly versions. You can adapt the recipe by replacing dairy ingredients with plant-based alternatives while maintaining the core flavor profile.
What’s the best method for melting ingredients?
Both microwave and stovetop methods are effective for melting ingredients. Choose the method you’re most comfortable with, but ensure proper temperature control regardless of your chosen technique for consistent results.
How should I store homemade salted caramel fudge?
Store the fudge in an airtight container in the refrigerator for optimal freshness. Proper storage maintains texture and flavor, with long-term storage options available for extended keeping periods.