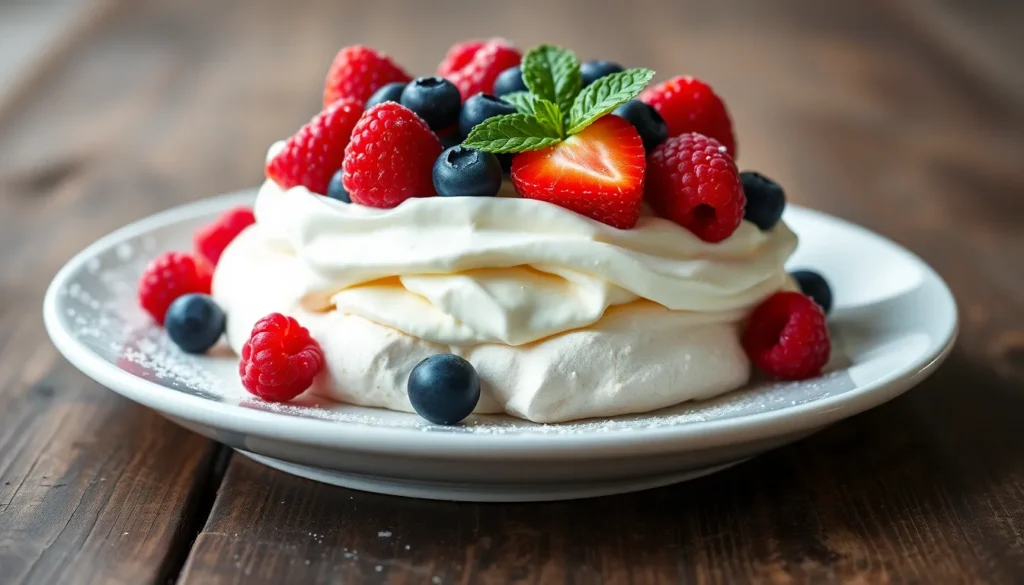
We’ve fallen head over heels for mini pavlovas – those cloud-like meringue desserts that make every gathering feel special. Named after the famous Russian ballerina Anna Pavlova, these individual treats capture all the elegance of their full-sized counterpart in perfectly portioned bites.
What makes mini pavlovas absolutely irresistible is their magical contrast of textures. Each delicate shell boasts a crispy exterior that gives way to a marshmallow-soft center, creating the perfect foundation for billowy whipped cream and fresh berries. They’re like edible works of art that taste even better than they look.
The best part? These stunning desserts are surprisingly simple to master. We’ll show you how to create bakery-worthy mini pavlovas in your own kitchen using just a handful of ingredients. Whether you’re hosting an elegant dinner party or craving something sweet and sophisticated, these individual masterpieces deliver restaurant-quality results every single time.
Ingredients
Creating these delightful mini pavlovas requires just a handful of simple ingredients that you likely already have in your kitchen. We’ve organized our ingredient list into two categories to make your preparation seamless and efficient.
For the Meringue
- 4 large egg whites, at room temperature
- 1 cup (200g) superfine sugar (caster sugar)
- 1 teaspoon vanilla extract
- 1 teaspoon white vinegar
- 1 tablespoon cornstarch
For the Toppings
- 1 cup heavy whipping cream
- 2 tablespoons powdered sugar
- 1 teaspoon vanilla extract
- 2 cups mixed fresh berries (strawberries, blueberries, raspberries, blackberries)
- Fresh mint leaves for garnish (optional)
- Passion fruit pulp for drizzling (optional)
Equipment Needed

Creating perfect mini pavlovas requires exact kitchen tools that ensure success with this delicate meringue dessert. We recommend gathering these essential pieces of equipment before starting your baking process.
Electric Mixer stands as the most crucial tool for this recipe. A handheld or stand mixer becomes essential for whipping the meringue mixture until it achieves the stiff and glossy texture that creates those signature crispy shells with soft centers. Manual whisking simply cannot achieve the volume and stability needed for proper pavlova meringue.
Metal or Glass Bowl provides the ideal surface for whipping egg whites into perfect peaks. We prefer these materials over plastic bowls because they create better conditions for achieving maximum volume and stability in your meringue mixture. Clean bowls free from any grease residue ensure optimal results.
Baking Sheet lined with parchment paper creates the foundation for baking your meringue shells. The parchment paper prevents sticking and allows for easy removal of the delicate pavlovas once they finish baking at the low temperature of 275°F.
Spatula helps you handle the fragile meringue shells without breaking their delicate structure. This tool becomes particularly useful when transferring the baked pavlovas from the baking sheet to your serving plates.
Rubber Spatula proves invaluable during the mixing process for scraping down the sides of the bowl while whipping. This ensures all ingredients incorporate evenly and helps achieve the glossy consistency that signals properly whipped meringue.
Having these tools ready before you begin creates a smooth baking experience and helps guarantee the beautiful texture contrast that makes mini pavlovas such an impressive dessert choice.
Instructions

With our ingredients measured and equipment ready, we can begin crafting these elegant meringue shells that will soon hold our luscious toppings.
Prep the Oven and Baking Sheets
We start by preheating our oven to 200°F (90°C) for the gentlest baking environment. Line a large baking sheet with parchment paper to prevent our delicate meringues from sticking. Position the oven rack in the center to ensure even heat distribution throughout the baking process.
Make the Meringue
Begin by ensuring our egg whites are at room temperature for optimal stability and volume. Place the 4 egg whites in our clean metal or glass bowl and beat with an electric mixer until foamy peaks begin to form. Add the white vinegar and continue beating while gradually incorporating the superfine sugar one tablespoon at a time. Beat the mixture until stiff glossy peaks form and the meringue holds its shape when the beaters are lifted. Gently fold in the vanilla extract and cornstarch using a rubber spatula to stabilize our meringue base.
Shape the Mini Pavlovas
Using a large spoon or piping bag, create 8 individual meringue rounds approximately 3 to 4 inches wide on our prepared baking sheet. Space each pavlova about 2 inches apart to allow for proper air circulation. Create a shallow well in the center of each meringue using the back of a spoon, forming borders that will cradle our whipped cream and berries.
Bake the Meringue Bases
Place the baking sheet in our preheated oven and bake for 60 minutes without opening the door. After the baking time is complete, turn off the oven and allow the pavlovas to cool completely inside for at least 2 hours or overnight. This gradual cooling process prevents cracking and ensures our meringue shells develop the perfect crispy exterior while maintaining their soft marshmallow-like centers.
Preparing the Toppings

The toppings transform our crispy pavlova shells into an elegant dessert masterpiece. We’ll create the perfect balance of creamy texture and fresh fruit flavors to complement our delicate meringue base.
Whip the Cream
We start by chilling our heavy whipping cream in the refrigerator until cold. Place the cream in a clean metal or glass bowl and beat with an electric mixer on medium speed until it begins to thicken. Gradually increase the speed to medium-high and add the powdered sugar and vanilla extract.
Continue beating until soft to firm peaks form, being careful not to overwhip. The cream should hold its shape when the beaters are lifted but still maintain a smooth, silky texture. For extra stability, we can fold in a tablespoon of mascarpone cheese to help maintain the structure if we’re assembling the pavlovas slightly ahead of serving time.
| Whipped Cream Storage | Time Limit |
|---|---|
| Room temperature | 2 hours maximum |
| Refrigerated (before assembly) | Up to 4 hours |
| Assembled pavlovas | 30 minutes maximum |
Prepare the Fruit
Fresh berries provide the perfect color contrast and bright flavor for our mini pavlovas. We thoroughly wash and gently dry our mixed berries, removing any stems or damaged pieces. Larger strawberries should be sliced into bite-sized pieces, while raspberries and blueberries can remain whole.
Pat the fruit completely dry with paper towels to prevent excess moisture from softening our crispy pavlova shells. We prepare the fruit just before serving to maintain optimal freshness and prevent the berries from releasing too much juice. If using passion fruit pulp as a garnish, we scoop it fresh from the fruit and set it aside in a small bowl for drizzling over the assembled desserts.
Assembly

We’ll transform our perfectly baked pavlova shells into stunning desserts by layering them with cream and fresh fruit. The key to success lies in assembling these delicate treats just before serving to maintain their signature crispy texture.
Add the Cream
We begin by ensuring our pavlova shells have cooled completely before adding any toppings. Using a piping bag or large spoon, we carefully fill the center well of each shell with our prepared whipped cream. The cream should sit nestled in the shallow depression we created during baking, providing a beautiful contrast between the crisp meringue and silky topping. We avoid overfilling the shells to prevent the cream from spilling over the edges and maintain an elegant presentation.
Top with Fruit
Fresh berries become the star of our mini pavlovas as we arrange them artfully over the whipped cream base. We scatter strawberries, raspberries, and blueberries in a natural pattern, allowing their vibrant colors to create visual appeal. The fruit’s natural acidity perfectly balances the sweetness of the meringue and cream below. For added variety, we can include sliced kiwi or other seasonal fruits, ensuring each piece is dry to prevent moisture from softening our crispy shells.
Final Garnish
We complete our mini pavlovas with finishing touches that elevate both appearance and flavor. A light dusting of powdered sugar adds an elegant snowy effect across the colorful berries. Fresh mint sprigs provide a pop of green color and aromatic freshness when tucked between the fruit. For those seeking extra indulgence, we can drizzle passion fruit pulp or berry coulis around the base of each pavlova, creating restaurant quality presentation that transforms these simple ingredients into sophisticated desserts.
Serving Suggestions

Timing plays a crucial role when serving mini pavlovas to maintain their signature crispy texture. We recommend decorating these delicate meringue shells just before presenting them to guests since whipped cream and fruit juices can soften the crisp exterior if left too long.
Optimal Serving Timeline
| Preparation Step | Timing |
|---|---|
| Bake meringue shells | Night before serving |
| Whip cream and wash fruit | Shortly before guests arrive |
| Assemble pavlovas | Just before serving |
| Storage of shells | Cool dry place or airtight container |
Customizable Toppings by Season
Seasonal ingredients allow us to create versatile presentations throughout the year. Summer calls for vibrant berries, tropical mango, and tangy passionfruit that complement the sweet meringue base. Winter presentations shine with poached pears, rich chocolate shavings, or warm spiced fruits that provide comforting flavors.
Beyond traditional fruits, we can enhance our mini pavlovas with indulgent additions like Nutella for chocolate lovers, bright lemon curd for citrus enthusiasts, or textural elements such as shaved dark chocolate, toasted coconut flakes, sliced almonds, and crushed pistachios.
Presentation Options
Individual plating creates an elegant fine dining experience where each guest receives their own perfectly portioned dessert. Alternatively, arranging multiple mini pavlovas on a large platter or grazing board encourages sharing and creates a stunning centerpiece for gatherings.
Piping the whipped cream using a pastry bag adds professional flair to our presentation. Artistic fruit arrangements and thoughtful garnish placement elevate the visual appeal significantly.
Storage Considerations
Humidity poses the greatest threat to pavlova shells, making them sticky and compromising their delicate texture. During hot or humid weather, we store our baked meringues in airtight containers at room temperature or keep them in the oven to prevent moisture absorption.
These versatile desserts suit various occasions from casual backyard gatherings to formal dinner parties, making them an invaluable addition to our dessert repertoire.
Storage Tips

Proper storage techniques ensure our mini pavlovas maintain their signature crispy texture and delicate structure. We recommend storing these delicate meringue treats in an airtight container placed in a cool, dry location away from direct sunlight and heat sources.
Room Temperature Storage
Our mini pavlovas perform best when stored at room temperature in optimal conditions. We place them carefully in airtight containers to prevent moisture absorption, which can quickly compromise their crispy exterior.
| Storage Method | Duration | Environment |
|---|---|---|
| Room temperature (dry climate) | 1-3 days | Cool, dry place |
| Room temperature (humid climate) | 1 day | Airtight container essential |
We handle these fragile desserts with extra care during storage, as their delicate structure can crack or crumble easily. The shelf life varies significantly based on humidity levels in our kitchen environment.
Freezing Method
Long term storage becomes possible through proper freezing techniques. We layer our mini pavlovas between sheets of parchment paper inside airtight containers before placing them in the freezer.
Our frozen mini pavlovas maintain their quality for up to one month when stored correctly. We remove them from containers and place them on wire racks for thawing, using them immediately after they reach room temperature to prevent softening.
Critical Storage Guidelines
We never store our completed mini pavlovas in the refrigerator, as this introduces unwanted moisture that softens the meringue shell. Decorating should always wait until just before serving, since cream and fruit juices can penetrate the crispy exterior and create soggy spots.
Our storage containers must seal tightly to create a barrier against humidity. We check the seals regularly and replace containers if they show signs of wear or damage that could allow moisture to enter.
Make-Ahead Instructions

We love how mini pavlovas offer exceptional flexibility for advance preparation, making them perfect for entertaining and special occasions. The meringue shells can be prepared well ahead of your serving time, allowing us to break down the work into manageable stages.
Preparing Meringue Shells in Advance
Our meringue shells store beautifully when made ahead of time. We can prepare them up to 2 to 3 days before serving and store them in an airtight container at room temperature. The key to maintaining their crispy texture lies in keeping moisture away from the delicate shells.
For optimal results, we recommend timing your meringue preparation strategically:
| Timing Option | Storage Method | Quality Result |
|---|---|---|
| Same day serving | Room temperature in airtight container | Excellent crispness |
| 1 day ahead | Room temperature in airtight container | Excellent crispness |
| 2-3 days ahead | Room temperature in airtight container | Good crispness |
Storage Conditions for Best Results
We emphasize the importance of dry storage conditions to preserve the meringue shells’ signature texture. Place the cooled pavlova shells in a completely airtight container immediately after they reach room temperature. Moisture is the enemy of crispy meringue, so we always ensure our storage containers have tight-fitting lids.
Never store the meringue shells in the refrigerator, as the humid environment will cause them to become soft and lose their delightful crunch. Room temperature storage in a dry location works best for maintaining the perfect texture contrast between the crispy exterior and soft interior.
Assembly Timeline
We strongly recommend assembling the pavlovas just before serving to preserve their textural integrity. The whipped cream and fresh berries should be added no more than 30 minutes before presentation. This timing prevents the cream from making the shells soggy while ensuring the berries remain fresh and vibrant.
For entertaining purposes, we suggest preparing all components separately in advance. Keep the meringue shells stored properly, have the whipped cream ready in the refrigerator, and prepare the fresh berries just before assembly. This approach allows us to create stunning desserts with minimal last-minute effort while maintaining the quality that makes mini pavlovas so special.
Troubleshooting Tips

Even experienced bakers encounter challenges when making mini pavlovas. We’ve compiled answers to the most common issues to help you achieve perfect results every time.
Preventing Cracks
Temperature control remains the most critical factor in preventing cracks during baking. We recommend baking at the low temperature of 90°C (195°F) to prevent rapid expansion that causes the meringue surface to split. Your oven’s accuracy matters significantly since temperature variations can lead to cracking even at seemingly correct settings.
Adding stabilizers to your meringue mixture provides an extra layer of protection against cracks. We incorporate a small amount of white vinegar and cornflour into our recipe to enhance the meringue’s stability throughout the baking process. These ingredients help the structure hold together as moisture evaporates slowly.
Gradual cooling prevents thermal shock that often causes surface cracks. We leave our pavlovas in the oven with the door slightly open after baking to allow them to cool slowly rather than exposing them to sudden temperature changes.
Achieving the Perfect Texture
Creating thick and glossy meringue forms the foundation of successful mini pavlovas. We ensure our meringue reaches the proper consistency by performing the “upside-down test” where the bowl can be inverted without the mixture falling out. This indicates the meringue has achieved sufficient stiffness for baking.
Proper baking conditions deliver the signature contrast between crispy exterior and marshmallow-like interior. We bake our pavlovas for exactly 1 hour at 90°C (195°F) to achieve this perfect textural balance. Extended low-temperature baking allows moisture to evaporate gradually while maintaining the soft center.
Fat contamination in egg whites prevents proper stiffening and creates texture problems. We meticulously clean all equipment with vinegar before use and ensure no egg yolk fragments contaminate the whites. Sugar ratios also affect stiffness so we maintain precise measurements for consistent results.
Underbaking creates soft and sticky pavlovas that lack the desired crispy shell. We verify doneness by gently tapping the surface which should sound hollow and feel firm to the touch before removing from the oven.
Conclusion
Mini pavlovas truly represent the perfect balance of elegance and simplicity in dessert making. We’ve shown you that creating these stunning treats doesn’t require professional pastry skills – just attention to detail and the right techniques.
The beauty of mini pavlovas lies in their versatility and make-ahead convenience. You can prepare the meringue shells days in advance and assemble them when guests arrive for maximum impact.
Whether you’re hosting a dinner party or treating yourself to something special these delicate desserts never fail to impress. Their crispy shells and cloud-like centers topped with fresh cream and berries create a memorable experience that’ll have everyone asking for the recipe.
Frequently Asked Questions
What are mini pavlovas?
Mini pavlovas are elegant meringue desserts named after Russian ballerina Anna Pavlova. They feature a crispy meringue shell with a soft, marshmallow-like center, topped with whipped cream and fresh berries. These individual-sized treats are perfect for dinner parties and special occasions, offering a sophisticated dessert that’s surprisingly easy to make at home.
What ingredients do I need to make mini pavlovas?
For the meringue, you’ll need 4 large egg whites, 1 cup superfine sugar, 1 teaspoon vanilla extract, 1 teaspoon white vinegar, and 1 tablespoon cornstarch. For toppings, gather 1 cup heavy whipping cream, 2 tablespoons powdered sugar, 1 teaspoon vanilla extract, 2 cups mixed fresh berries, and optional garnishes like mint leaves and passion fruit pulp.
What equipment is essential for making mini pavlovas?
You’ll need an electric mixer for whipping meringue to stiff peaks, a metal or glass bowl for optimal volume, a baking sheet lined with parchment paper for easy removal, and both regular and rubber spatulas for handling the delicate meringue. Having all equipment ready before starting ensures the best results for achieving perfect texture contrast.
How do I bake mini pavlovas properly?
Preheat your oven to 200°F (90°C). Beat egg whites until foamy, gradually add sugar until stiff glossy peaks form, then fold in vanilla, vinegar, and cornstarch. Shape meringue into rounds with shallow wells on parchment-lined baking sheets. Bake for 60 minutes, then cool in the oven to prevent cracking and achieve the signature crispy-soft texture.
How should I store mini pavlovas?
Store unfilled pavlova shells in an airtight container in a cool, dry place at room temperature – never refrigerate as moisture will make them soggy. Shells can be made 2-3 days ahead. Only assemble with cream and berries just before serving, no more than 30 minutes prior, to maintain their crispy texture and prevent softening.
What are common mistakes when making mini pavlovas?
Common issues include cracking from high temperatures or rapid cooling, weeping from overbeaten meringue or fat contamination, and soggy shells from humid conditions or premature assembly. Use low baking temperature, ensure clean bowls and beaters, add stabilizers like vinegar and cornstarch, and avoid assembling too early to prevent these problems.
Can I make mini pavlovas ahead of time?
Yes, you can make the meringue shells 2-3 days in advance and store them in an airtight container. However, only add whipped cream and fresh berries just before serving to maintain the crispy texture. The contrast between the crunchy shell and soft toppings is what makes pavlovas special, so timing the assembly is crucial.
How do I prevent my pavlovas from cracking?
Use a low baking temperature of 200°F (90°C) and allow gradual cooling by leaving them in the turned-off oven. Add stabilizers like white vinegar and cornstarch to the meringue. Avoid opening the oven door during baking, and ensure your bowl and beaters are completely clean and free from any fat or grease residue.