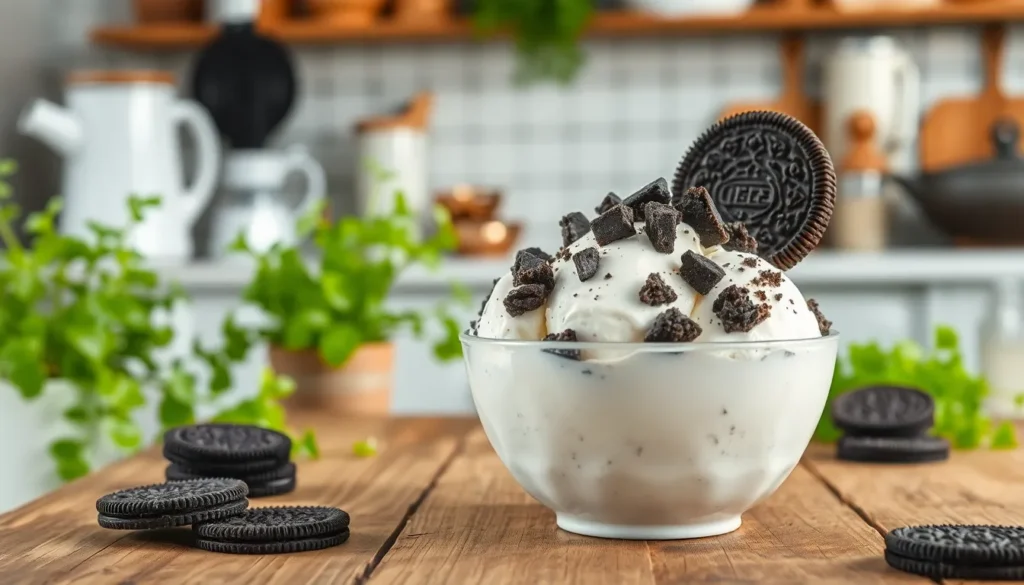
We’ve all been there – standing in the frozen dessert aisle debating between cookies and ice cream. But what if we told you there’s a way to have both in one incredible treat? Oreo ice cream combines the beloved chocolate sandwich cookie with creamy vanilla ice cream for a dessert that’s pure magic.
This homemade version beats store-bought every time. We’re talking about chunks of real Oreo cookies swirled into rich, velvety ice cream that you can customize to your heart’s content. Whether you’re craving extra cookie pieces or prefer a smoother texture, you’re in complete control.
Ingredients
Creating our homemade Oreo ice cream requires just a handful of simple ingredients that combine to deliver maximum flavor. We’ve organized everything into two categories to make preparation straightforward and efficient.
For the Ice Cream Base
- 2 cups heavy cream
- 1 cup whole milk
- 3/4 cup granulated sugar
- 6 large egg yolks
- 1 teaspoon vanilla extract
- 1/4 teaspoon salt
For the Oreo Mix-ins
- 20-24 Oreo cookies (about 1 sleeve)
- 2 tablespoons heavy cream (for crushing consistency)
Equipment Needed

Making homemade Oreo ice cream requires exact equipment to achieve that perfect creamy texture with evenly distributed cookie pieces. We recommend gathering these essential tools before starting your ice cream making adventure.
Ice cream makers form the foundation of our homemade ice cream process. The Cuisinart ICE-100 stands out as an excellent choice for consistent results. Alternatively, the Bosch Mixer with an ice cream attachment offers versatility for those who already own this kitchen staple. These machines ensure proper churning and aeration for smooth, professional quality ice cream.
Freezer bowls play a crucial role in the churning process. Most home ice cream makers require a pre-frozen bowl that must chill in your freezer for at least 24 hours before use. We always keep our ice cream bowl in the freezer so it’s ready whenever the craving strikes.
Cookie crushing tools help achieve the perfect Oreo texture. A food processor breaks down cookies into uniform pieces quickly and efficiently. Rolling pins work equally well for those who prefer a hands-on approach or want more control over chunk size. We find that crushing cookies between two sheets of parchment paper prevents mess while using a rolling pin.
A heavy-bottomed sauce pot becomes essential for heating the custard base. This equipment ensures even heat distribution and prevents the delicate egg yolk mixture from curdling. Stainless steel or enameled cast iron pots work best for this step.
Additional helpful tools include measuring cups, a whisk for combining ingredients, and airtight containers for storing your finished ice cream. Having everything prepared and within reach makes the ice cream making process smooth and enjoyable.
Instructions

Now that we have our ingredients and equipment ready, let’s walk through the step-by-step process to create this creamy, cookie-packed treat. Follow these detailed instructions for perfect homemade Oreo ice cream every time.
Prep the Oreo Cookies
Start by crushing the Oreo cookies into small, bite-sized chunks using your preferred method. We recommend using a food processor for consistent results, pulsing the cookies until they reach your desired size. Alternatively, place the cookies in a sturdy plastic bag and crush them with a rolling pin for a more rustic texture.
Reserve a portion of the crushed cookies for later topping if you want extra Oreo goodness on your finished ice cream. The remaining crushed cookies will be folded directly into the ice cream base during the final mixing stage.
Make the Ice Cream Base
Choose between two proven methods for creating your ice cream base. For the whipped cream method, use a hand mixer to whip cold heavy cream until stiff peaks form, ensuring the cream maintains its volume and texture. Gently fold in the sweetened condensed milk to preserve the airy, creamy consistency.
For the traditional custard method, combine sugar, eggs, and half-and-half in your heavy-bottomed saucepan. Heat the mixture gently over medium-low heat, stirring constantly until the sugar completely dissolves and the mixture thickens enough to coat the back of a spoon. Remove from heat and let cool completely before proceeding.
Churn the Ice Cream
Pour your prepared ice cream base into your pre-frozen ice cream maker bowl. Follow the manufacturer’s exact instructions for churning time, which typically ranges from 20 to 25 minutes. The mixture should reach a soft-serve consistency when properly churned.
If you’re using the no-churn whipped cream method, skip the churning process entirely and proceed directly to adding the Oreo pieces. This method relies on the whipped cream’s incorporated air to create the final texture.
Add the Oreo Pieces
Incorporate the crushed Oreos during the final few minutes of churning if using an ice cream maker. This timing prevents the cookies from becoming too pulverized while ensuring even distribution throughout the ice cream.
For the no-churn method, carefully fold the crushed Oreos into your prepared base using a spatula or large spoon. Mix gently to maintain the cream’s texture while achieving uniform cookie distribution.
Freeze and Set
Transfer the finished ice cream mixture into an airtight container, smoothing the surface with a spatula. Cover tightly and freeze for a minimum of 4 to 6 hours to allow the ice cream to reach the proper scooping consistency.
For best results, place a piece of plastic wrap directly on the ice cream surface before sealing the container to prevent ice crystals from forming. The ice cream will keep in the freezer for up to one month when properly stored.
Directions for Serving

We recommend scooping the ice cream at the optimal temperature for the best texture and flavor experience. Remove the container from the freezer 5-10 minutes before serving to allow slight softening.
Scooping Technique
Use a warmed ice cream scoop by running it under warm water between each scoop. This creates clean, round portions that hold their shape beautifully in bowls or cones.
Presentation Enhancement
Top each serving with additional crushed Oreos for visual appeal and extra crunch. We suggest crushing fresh cookies just before serving to maintain their texture and prevent them from becoming soggy.
Portion Guidelines
| Serving Size | Recommended Amount | Typical Use |
|---|---|---|
| Small scoop | 1/2 cup | Light dessert |
| Regular scoop | 3/4 cup | Standard serving |
| Large scoop | 1 cup | Generous portion |
Creative Serving Options
Serve in chilled bowls to maintain the ice cream’s consistency longer. Consider pairing with warm brownies or cookies for a temperature contrast that enhances the overall dessert experience.
Flavor Experimentation
We encourage experimenting with different types of Oreo cookies to create unique taste experiences. Golden Oreos, mint-flavored varieties, or seasonal cookie flavors can transform the traditional recipe into something extraordinary.
Storage After Serving
Return any unused ice cream to the freezer immediately after serving. Press plastic wrap directly onto the surface before sealing the container to prevent ice crystal formation and maintain optimal texture for future servings.
Storage Tips

Proper storage ensures our homemade Oreo ice cream maintains its creamy texture and rich flavor for weeks to come. We recommend storing the ice cream in the main compartment of our freezer rather than in the door or on the top shelf to maintain consistent cold temperatures. Our freezer should be set between -5°F and 0°F for optimal storage conditions.
Container Selection and Preparation
Airtight containers are essential for preventing freezer burn and maintaining freshness. We always cover the surface of our ice cream with plastic wrap before sealing the container to prevent ice crystals from forming. This extra layer of protection creates a barrier between the ice cream and any air that might enter the container.
Storage Duration
Our Oreo ice cream can be stored for up to 1 month in a tightly sealed container. While some recipes suggest it can last up to 2 months if stored properly, we achieve optimal freshness within 1 to 2 weeks of preparation.
| Storage Duration | Quality Level |
|---|---|
| 1-2 weeks | Optimal freshness |
| Up to 1 month | Good quality |
| Up to 2 months | Acceptable if properly stored |
Handling Best Practices
We avoid repeatedly softening and refreezing our ice cream as this degrades both texture and flavor. When the ice cream becomes too hard, we let it sit at room temperature for a few minutes before serving rather than using heat or microwaving.
Quality Check Guidelines
Always check our ice cream for any signs of spoilage before consuming it, even when it falls within the recommended storage period. Fresh appearance, proper texture, and absence of ice crystals indicate our storage methods are working effectively.
Make-Ahead Instructions

Planning ahead transforms our Oreo ice cream preparation into a stress-free experience. We can prepare several components in advance to streamline the process and ensure perfectly chilled results.
Freezer Bowl Preparation
Our ice cream maker’s freezer bowl requires at least 24 hours of freezing time before we begin churning. We recommend placing the bowl in the freezer immediately after cleaning to ensure it’s ready when we want to make ice cream. The bowl should feel completely solid and frozen throughout before use.
Custard Base Storage
When using the traditional custard method, we can prepare our ice cream base up to three days in advance. After heating the mixture to 155°F and allowing it to cool completely, we store the custard in an airtight container in the refrigerator. This advance preparation actually improves the flavor as the ingredients meld together during the chilling period.
Cookie Preparation Timeline
We can crush our Oreo cookies several days before making ice cream. Store the crushed cookies in an airtight container at room temperature to maintain their texture. This prevents them from becoming soggy and ensures they distribute evenly throughout our ice cream during churning.
No-Churn Method Timing
For our no-churn version, we can prepare the entire mixture and freeze it on the same day. The heavy cream and condensed milk base requires 6 to 8 hours of freezing time to reach the proper consistency. We can prepare this mixture in the morning and have perfectly set ice cream ready by evening.
Storage Planning
Our finished Oreo ice cream maintains optimal quality for about one week when stored properly in the freezer. We can make larger batches knowing the ice cream will stay fresh in an airtight container throughout the week. Planning our serving schedule around this timeframe ensures we enjoy the ice cream at its peak flavor and texture.
Variations and Customizations

Once you master the basic Oreo ice cream recipe we’ve shared, the possibilities for customization become endless. We can easily transform our base recipe by experimenting with different Oreo varieties, ice cream bases, and creative mix-in techniques.
Double Stuff Oreo Version
Double Stuff Oreos elevate our homemade ice cream with extra cream filling that creates a richer and creamier texture. We simply substitute regular Oreos with Double Stuff cookies using the same crushing technique we outlined earlier. The additional cream filling provides a bolder flavor profile and softer bite that melts beautifully into the ice cream base.
When we crush Double Stuff Oreos, the extra filling creates more creamy swirls throughout our ice cream. We can mix these crushed cookies into vanilla or chocolate ice cream bases for an indulgent twist. For layered desserts, we alternate crushed Double Stuff Oreos with our ice cream mixture before the final freezing step.
Cookies and Cream Swirl
Creating a cookies and cream swirl adds visual appeal and varied texture to our Oreo ice cream. We achieve this marbled effect by gently swirling crushed Oreo cookies through softened ice cream rather than mixing them completely. This technique works particularly well when making ice cream cakes or special occasion desserts.
To create the perfect swirl, we fold crushed cookies into our softened ice cream base using a knife or spoon in a figure-eight motion. We avoid overmixing to maintain distinct cookie ribbons throughout the frozen dessert. The swirling method distributes cookie pieces unevenly, creating delightful surprises in every bite.
Vegan Oreo Ice Cream Option
Plant-based ice cream lovers can enjoy our Oreo creation using dairy-free alternatives without sacrificing flavor or texture. We substitute traditional ice cream with versions made from almond, coconut, or oat milk bases. Many commercial dairy-free ice creams now provide excellent results for this variation.
The preparation process remains nearly identical to our original recipe. We soften the vegan ice cream, mix in crushed vegan-friendly Oreo-style cookies, and freeze using the same timeline. Coconut whipped topping serves as an excellent dairy-free alternative to heavy cream when we need additional richness. This version makes our beloved Oreo ice cream accessible to those following plant-based diets.
Troubleshooting Tips

Even experienced ice cream makers encounter challenges when creating the perfect batch of Oreo ice cream. We’ve compiled answers to the most common problems that can affect your homemade treat’s texture and quality.
Icy Texture Problems
Large ice crystals forming in your Oreo ice cream typically result from excessive water content or prolonged freezing times. We recommend reducing any added water in your recipe and ensuring proper ingredient balance to prevent this issue. Monitor your freezing time carefully to avoid over-freezing, which creates those unwanted icy chunks that interfere with the creamy texture we’re aiming for.
Coarse Texture Issues
When your ice cream feels grainy or coarse, insufficient solids or stabilizers are usually the culprit. We suggest increasing the solid content in your base recipe or incorporating appropriate stabilizers to achieve smoother results. Excessive freezing time can also contribute to this problem, so keep track of your churning and freezing periods.
Greasy or Clumpy Consistency
Too much butterfat or over-churning creates an unpleasantly greasy or clumpy texture in your finished ice cream. We recommend reducing the cream content and using more milk to balance the fat ratios properly. Limit your churning time to prevent the mixture from becoming overworked, which breaks down the smooth consistency we want.
Freezer Burn Prevention
Exposure to air while storing causes freezer burn, which affects both flavor and texture. We always store our Oreo ice cream in covered, freezer-safe containers to create an airtight seal. Press plastic wrap directly onto the ice cream surface before securing the container lid for maximum protection.
Essential Success Tips
Quality ingredients make a important difference in your final product. We use high-fat milks and creams as they’re crucial for achieving that smooth, rich texture. Start with chilled ingredients whenever possible, as this helps maintain consistency throughout the process.
Pre-freeze your ice cream maker bowl for at least 24 hours to ensure it reaches the proper temperature for effective churning. We’ve found this step essential for achieving professional results at home.
Moderation matters when adding chopped Oreos to your ice cream base. We use these add-ins sparingly to maintain the proper texture balance while still delivering that signature cookies and cream flavor we love.
Conclusion
We’ve equipped you with everything needed to master homemade Oreo ice cream from start to finish. With the right techniques and equipment you’ll create a dessert that rivals any store-bought version while offering complete control over texture and flavor intensity.
The beauty of this recipe lies in its flexibility – whether you prefer chunky cookie pieces or smooth swirls you can customize it to match your preferences perfectly. The make-ahead options and storage tips we’ve shared ensure you’ll always have this crowd-pleasing treat ready for any occasion.
Don’t let minor setbacks discourage you if your first batch isn’t perfect. Our troubleshooting guide addresses common issues so you can quickly identify and fix any problems. With practice you’ll develop the confidence to experiment with different Oreo varieties and create your own signature versions of this beloved frozen dessert.
Frequently Asked Questions
How long does homemade Oreo ice cream last in the freezer?
Homemade Oreo ice cream can be stored in the freezer for up to one month when kept in an airtight container. However, for optimal freshness and texture, it’s best consumed within 1 to 2 weeks. Store it in the main compartment of your freezer at temperatures between -5°F and 0°F to prevent freezer burn and maintain creamy consistency.
What equipment do I need to make Oreo ice cream at home?
You’ll need an ice cream maker (like Cuisinart ICE-100 or Bosch Mixer with ice cream attachment), a pre-frozen freezer bowl, and tools for crushing cookies such as a food processor or rolling pin. Additionally, you’ll need a heavy-bottomed sauce pot for the custard base, measuring cups, a whisk, and airtight containers for storage.
Can I make Oreo ice cream without an ice cream maker?
Yes, you can use the no-churn method as an alternative. This involves whipping heavy cream and combining it with sweetened condensed milk, vanilla extract, and crushed Oreos. The mixture is then frozen for 6 to 8 hours until set. While the texture may differ slightly from churned ice cream, it’s still delicious and creamy.
How do I prevent my homemade ice cream from becoming icy?
To prevent icy texture, ensure your ice cream maker bowl is properly frozen for at least 24 hours before use. Don’t over-churn the ice cream, and avoid repeatedly softening and refreezing. Store the ice cream with plastic wrap pressed directly onto the surface before sealing the container to prevent ice crystals from forming.
What’s the best way to crush Oreos for ice cream?
A food processor is the most effective tool for crushing Oreos, providing consistent chunk sizes. Alternatively, you can place cookies in a sealed plastic bag and crush them with a rolling pin. Aim for small to medium chunks that will distribute evenly throughout the ice cream without being too large or too fine.
Can I make vegan Oreo ice cream?
Yes, you can create a vegan version by substituting dairy ingredients with plant-based alternatives. Use coconut cream or cashew cream instead of heavy cream, plant-based milk instead of whole milk, and ensure you’re using vegan-friendly Oreo cookies or similar sandwich cookies that don’t contain dairy products.
How long should I churn the ice cream?
Typically, churn the ice cream base for 15-20 minutes or until it reaches a soft-serve consistency. Add the crushed Oreos during the last 2-3 minutes of churning to ensure even distribution without over-mixing. The exact time may vary depending on your ice cream maker model and the temperature of your ingredients.
Why is my ice cream grainy or coarse?
Grainy texture usually results from improper custard preparation or temperature issues. Ensure you temper the egg yolks properly when making custard base and strain the mixture to remove any lumps. Also, make sure your ice cream maker bowl is adequately frozen and that you’re not over-churning the mixture.