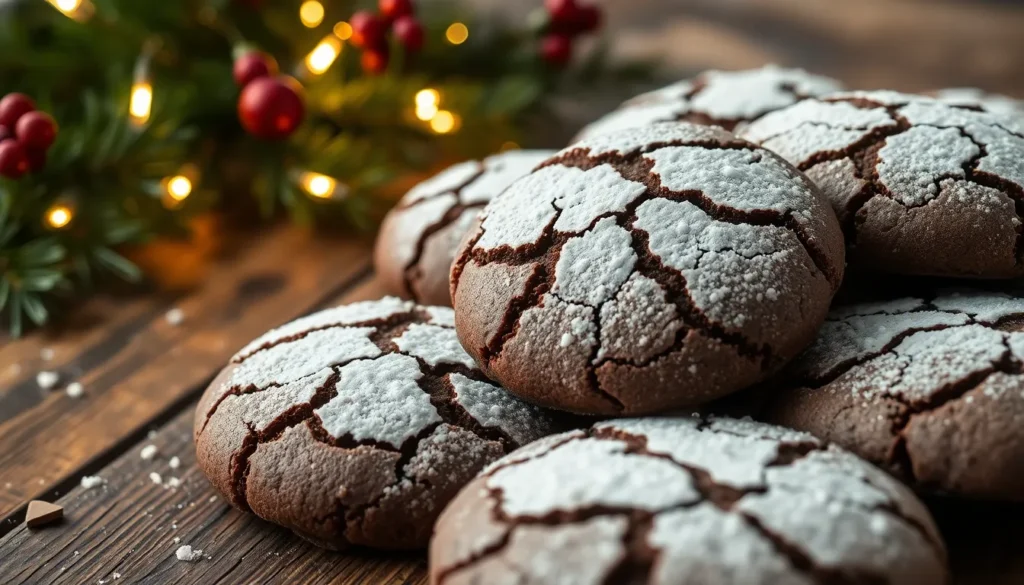
Nothing beats the irresistible charm of chocolate crinkle cookies during the holiday season. These fudgy, brownie-like treats captivate with their distinctive cracked appearance and powdered sugar coating that creates a beautiful contrast against their rich chocolate surface.
We’ve perfected this classic recipe that delivers the ultimate texture combination – crispy edges with incredibly soft, chewy centers. The secret lies in the perfect balance of cocoa powder and melted chocolate, creating an intensely chocolatey flavor that’ll have everyone reaching for seconds.
What makes these cookies truly special is their stunning visual appeal. As they bake, the dough expands and creates those signature “crinkles” that give these beloved treats their name. The powdered sugar coating transforms into beautiful white cracks, making each cookie look like a work of art that’s almost too pretty to eat.
Ingredients
We carefully selected each ingredient to achieve the perfect balance of rich chocolate flavor and that signature crinkled texture. These simple pantry staples work together to create cookies with crispy edges and fudgy centers.
Dry Ingredients
- 1 cup all-purpose flour
- ¾ cup unsweetened cocoa powder
- 1 teaspoon baking powder
- ¼ teaspoon salt
- 1 cup granulated sugar
- ½ cup packed light brown sugar
Wet Ingredients
- ¼ cup vegetable oil
- 4 ounces dark chocolate, melted and cooled slightly
- 2 large eggs, room temperature
- 1 teaspoon vanilla extract
For Rolling
- ½ cup powdered sugar
- Additional powdered sugar for extra coating if needed
Equipment Needed

Creating these delectable chocolate crinkle cookies requires the right tools to achieve that perfect cracked appearance and fudgy texture. We’ve compiled a comprehensive list of essential equipment that will make your baking process smooth and successful.
Large mixing bowls serve as our foundation for combining ingredients properly. We recommend having at least two bowls on hand to separate wet and dry ingredients before mixing them together.
Electric hand mixer or stand mixer becomes crucial for achieving the proper texture when beating together sugar, oil, eggs, and vanilla extract. This equipment ensures our wet ingredients reach the ideal consistency for incorporating with dry components.
Rubber spatula helps us scrape down bowl sides and fold ingredients together without overmixing. We use this tool to achieve uniform distribution throughout our cookie dough.
Fine mesh sifter prevents lumps in our cocoa powder and ensures smooth integration with flour and other dry ingredients. This step creates the silky texture that makes our cookies irresistible.
Large baking sheets provide ample space for our cookies to spread and develop those signature crinkles. We recommend using heavy duty pans that distribute heat evenly.
Parchment paper or silicone baking mats create a non-stick surface that prevents our powdered sugar coated cookies from sticking to the pan. These liners also make cleanup effortless.
Round cookie scoop or large spoon ensures consistent cookie sizes and professional appearance. We prefer using a 1.5 tablespoon scoop for uniform results every time.
Having these tools ready before we start mixing saves time and creates a more organized baking experience that leads to bakery quality chocolate crinkle cookies.
Instructions

We’ll walk through each step to create perfectly crinkled chocolate cookies that showcase those signature white cracks. These detailed instructions ensure bakery-quality results every time.
Prep the Dough
We start by combining the unsweetened cocoa powder, granulated sugar, and vegetable oil in a large mixing bowl. Mix these ingredients until the mixture becomes shiny and well combined. Add the eggs one at a time, beating well after each addition. Stir in the vanilla extract until fully incorporated.
In our separate bowl, we whisk together the all-purpose flour, baking powder, and salt. Add these dry ingredients to our wet mixture and mix just until incorporated. Avoid overmixing the dough as this can lead to tough cookies.
Chill the Dough
Our dough will be quite sticky at this point, which is exactly what we want. Cover the bowl tightly with plastic wrap and refrigerate for at least 3 to 4 hours. For best results, we recommend chilling the dough overnight.
This crucial chilling step makes the dough easier to handle and helps create thicker, more textured cookies. The cold dough also holds its shape better during baking, contributing to that perfect crinkled appearance.
Shape and Roll the Cookies
Once our dough is properly chilled, we roll it into 1-inch balls using our hands or a tablespoon-sized scoop. Place the powdered sugar in a shallow bowl. Roll each dough ball thoroughly in the powdered sugar, ensuring a thick, white coating covers the entire surface.
For extra texture and to help the powdered sugar layer remain distinct during baking, we can first roll the balls in granulated sugar before the powdered sugar coating. Space the coated dough balls about 2 inches apart on our prepared baking sheets.
Bake the Cookies
We preheat our oven to 350°F (175°C) and line our baking sheets with parchment paper. Bake the cookies for 9 to 12 minutes, watching carefully for set edges and slightly puffed centers.
The cookies are done when the edges appear firm but the centers still look slightly soft and underbaked. Allow the cookies to cool on the baking sheet for a few minutes before transferring them to a wire rack. This cooling process helps the cookies firm up to the perfect chewy texture while maintaining those beautiful white cracks.
Tips for Perfect Chocolate Crinkle Cookies

Creating chocolate crinkle cookies with that signature cracked appearance and perfect texture requires attention to several key details. We’ve discovered that following these essential tips will transform your cookies from good to bakery-quality.
Never Skip the Chilling Process
The dough must be chilled for several hours or overnight to achieve optimal results. This crucial step improves the dough’s consistency for rolling while preventing excessive spreading during baking. Chilled dough produces thicker and fudgier cookies with the characteristic crinkled texture we all love.
Resist Adding Extra Flour
Your initial dough will appear sticky and resemble batter more than traditional cookie dough. This consistency is completely normal and will firm up during the chilling process. Adding extra flour creates cakey cookies rather than the desired fudgy texture.
Master the Double Sugar Coating Technique
Roll chilled dough balls in granulated sugar before coating them thoroughly in powdered sugar. This double coating technique produces the most pronounced crinkled effect and creates those stunning white cracks that make these cookies so visually appealing.
Perfect Your Baking Timing
| Temperature | Baking Time | Results |
|---|---|---|
| 350°F (175°C) | 10-12 minutes | Edges set, centers soft |
| Under 10 minutes | Cookies spread too much | |
| Over 12 minutes | Centers become too firm |
Watch for edges that appear set while centers remain slightly soft and puffy. The cookies should be cracked all over with dry edges but moist centers for that perfect chewy texture.
Proper Spacing and Cooling
Space your cookies about 2 inches apart on baking sheets to allow for proper spreading. After baking, let cookies cool on the baking sheet for several minutes before transferring to a wire rack. This cooling period helps achieve the ideal texture balance between crispy edges and soft centers.
Use Quality Ingredients
Unsweetened cocoa powder provides the intense chocolate flavor that makes these cookies exceptional. Fresh baking powder ensures proper rising and contributes to the signature cracked appearance that develops during baking.
Storage Instructions

We recommend storing your freshly baked chocolate crinkle cookies in an airtight container at room temperature for up to one week. This storage method maintains their signature soft centers and crispy edges while preserving that beautiful crinkled appearance we worked so hard to achieve.
Room Temperature Storage Guidelines
| Storage Method | Duration | Container Type | Notes |
|---|---|---|---|
| Room Temperature | Up to 1 week | Airtight container | Cookies may become dry after 7 days |
After the first week your cookies may start to lose their tender texture and become dry or crumbly. We suggest enjoying them within this timeframe for the best eating experience.
Freezing Cookie Dough
Planning ahead becomes effortless when we freeze the cookie dough balls before baking. We can store these dough portions in airtight containers or freezer bags for up to 2 to 3 months without compromising quality.
When we’re ready to bake frozen dough we have two thawing options. The overnight method involves transferring the dough balls to the refrigerator and letting them thaw completely. For quicker results we can let the dough sit on the counter for 30 minutes to one hour until workable.
Once thawed we roll the dough balls in powdered sugar just as we would with fresh dough and bake according to our original recipe instructions.
Freezing Baked Cookies
Baked chocolate crinkle cookies freeze beautifully for up to 3 months when stored properly. We place parchment paper between cookie layers to prevent them from sticking together and use airtight freezer bags or containers to maintain freshness.
| Freezing Method | Duration | Preparation | Serving Instructions |
|---|---|---|---|
| Frozen Dough Balls | 2-3 months | Airtight containers/bags | Thaw overnight or 30-60 minutes |
| Baked Cookies | 3 months | Layer with parchment paper | Thaw at room temperature for few hours |
To serve frozen cookies we simply remove them from the freezer and let them thaw at room temperature for a few hours. This gentle thawing process helps restore their original texture while maintaining those distinctive white cracks that make these cookies so visually appealing.
Variations and Substitutions

We love experimenting with different flavor combinations and techniques to create unique versions of these beloved holiday cookies. The beauty of chocolate crinkle cookies lies in their versatility and ability to adapt to various tastes and dietary preferences.
Chocolate Variations
Double Chocolate Crinkle Cookies take the chocolate experience to the next level by incorporating both cocoa powder and chocolate chips into the dough. We recommend using mini chocolate chips for more uniform distribution throughout each cookie. This variation creates an intensely rich chocolate flavor that chocolate lovers absolutely adore.
Chocolate Chip Substitutions offer another delicious twist on the classic recipe. We suggest replacing regular chocolate chips with peanut butter chips for a unique flavor combination that balances the rich chocolate base with creamy peanut butter notes.
Flavor Alternatives
Lemon Crinkle Cookies provide a refreshing departure from chocolate while maintaining the signature crinkled appearance. We substitute the cocoa powder with lemon zest and add fresh lemon juice to create bright citrusy cookies that are perfect for spring celebrations.
Cake Mix Crinkle Cookies simplify the baking process significantly. We use chocolate cake mix as the base since it already contains many necessary ingredients like flour, sugar, and leavening agents. This variation reduces prep time while still delivering delicious results.
Ingredient Substitutions
Oil vs Butter creates different texture profiles in the finished cookies. We find that vegetable oil produces slightly more tender cookies with a different mouthfeel compared to butter-based versions. The oil also helps create that signature fudgy interior texture we love.
Sugar Coating Techniques can be enhanced with a double coating method. We roll the dough balls in granulated sugar first, then coat them thoroughly in confectioners’ sugar. This technique improves the adhesion of the powdered sugar and creates more dramatic white cracks during baking.
Timing and Texture Adjustments
Chilling Time Variations allow for different textures and handling preferences. We recommend chilling the dough for at least 3 hours for easier handling, though overnight chilling produces the thickest cookies with the most pronounced crinkled appearance.
| Variation | Key Ingredient | Texture Result |
|---|---|---|
| Double Chocolate | Mini chocolate chips | Intensely rich and fudgy |
| Peanut Butter | Peanut butter chips | Sweet and nutty |
| Lemon | Lemon zest and juice | Light and citrusy |
| Cake Mix | Chocolate cake mix | Simplified preparation |
These variations and substitutions allow us to customize the classic chocolate crinkle cookie recipe to suit different occasions, dietary needs, and flavor preferences while maintaining the essential crinkled appearance that makes these cookies so visually appealing.
Troubleshooting Common Issues

Even experienced bakers encounter challenges when making chocolate crinkle cookies. We have compiled answers to the most common problems that occur during the baking process.
Cookies Spread Too Much or Turn Out Flat
Several factors contribute to excessive spreading during baking. Butter temperature plays a crucial role in cookie structure. We recommend ensuring your butter is not too soft or melted before mixing, as this causes cookies to spread uncontrollably across the baking sheet.
Oven temperature accuracy directly affects cookie behavior. When ovens run too hot or too cold, cookies may spread before they have time to set properly. We suggest using an oven thermometer to verify your oven’s actual temperature matches the setting.
Baking sheet temperature significantly impacts cookie spreading. Placing dough on warm or hot baking sheets accelerates the spreading process before cookies can maintain their shape. Always use cool baking sheets between batches.
Measurement accuracy ensures proper cookie structure. Too much butter or sugar leads to excessive spreading. We recommend measuring ingredients by weight when possible for the most consistent results.
Cookies Fail to Develop Cracks
The signature crinkle effect requires exact conditions to develop properly. Oven temperature consistency creates the cracking pattern when the outside surface sets before the interior finishes baking. We find that maintaining the correct temperature throughout the baking process is essential for achieving those beautiful cracks.
Over-baking prevention preserves the crinkle effect. Cookies baked too long lose their ability to crack as the entire structure becomes too firm. We recommend removing cookies when edges are set but centers remain slightly soft.
Powdered Sugar Coating Disappears
Environmental factors affect the powdered sugar coating’s appearance. Humidity levels cause powdered sugar to dissolve or disappear completely. We suggest adding a layer of granulated sugar before the powdered sugar coating to help preserve the crinkle effect in humid conditions.
Cornstarch addition prevents sugar from melting into the dough. We recommend mixing a small amount of cornstarch with powdered sugar to maintain the white coating throughout the baking process.
Cookies Turn Out Too Dry
Texture problems often stem from baking technique and ingredient ratios. Over-baking creates dry, crumbly cookies that lack the desired chewy texture. We monitor baking time closely and remove cookies as soon as edges appear firm.
Ingredient balance affects final texture significantly. Insufficient fat content relative to other ingredients leads to dryness. We ensure proper ratios by following the recipe measurements precisely and avoiding the temptation to reduce oil or add extra flour.
Conclusion
These chocolate crinkle cookies truly embody the perfect holiday treat with their stunning appearance and irresistible fudgy texture. We’ve covered everything from selecting quality ingredients to mastering the essential chilling technique that creates those signature white cracks.
With our comprehensive guide you’re now equipped to create bakery-quality cookies that’ll impress family and friends. The versatility of this recipe means you can customize flavors while maintaining that beloved crinkled look.
Remember that patience during the chilling process and attention to baking time are your keys to success. Whether you’re making them for holiday gatherings or simply satisfying a chocolate craving these cookies deliver both visual appeal and incredible taste every single time.
Frequently Asked Questions
What makes chocolate crinkle cookies unique?
Chocolate crinkle cookies are known for their distinctive cracked appearance and contrasting textures. They feature fudgy, brownie-like centers with crispy edges, all coated in powdered sugar that creates striking white cracks against the dark chocolate surface during baking.
How long should I chill the cookie dough?
Chill the dough for at least 3 to 4 hours, or overnight for best results. This crucial step helps create thicker cookies with the perfect crinkled appearance and prevents excessive spreading during baking.
What temperature should I bake chocolate crinkle cookies?
Bake the cookies at 350°F (175°C) for 9 to 12 minutes. The edges should be firm while the centers remain slightly soft. This temperature and timing ensure the proper texture and signature crinkle effect.
How do I achieve the signature white cracks?
Roll chilled dough balls in powdered sugar before baking. As the cookies bake and expand, the powdered sugar coating cracks, creating beautiful white fissures against the dark chocolate surface. Avoid overbaking to maintain this effect.
How long do chocolate crinkle cookies stay fresh?
Store freshly baked cookies in an airtight container at room temperature for up to one week. For longer storage, freeze baked cookies for up to 3 months or freeze cookie dough balls for 2 to 3 months.
Can I make variations of chocolate crinkle cookies?
Yes! Popular variations include Double Chocolate Crinkle Cookies with mini chocolate chips, Lemon Crinkle Cookies using lemon zest instead of cocoa, or using chocolate cake mix for simplified preparation while maintaining the signature crinkled appearance.
Why are my cookies spreading too much?
Excessive spreading usually occurs when the dough isn’t chilled long enough, the oven temperature is too low, or butter is too warm. Ensure proper chilling time and accurate oven temperature to prevent flat, overly spread cookies.
What equipment do I need to make these cookies?
Essential equipment includes large mixing bowls, an electric mixer, rubber spatula, fine mesh sifter, large baking sheets, parchment paper, and a round cookie scoop for consistent sizing and professional-looking results.