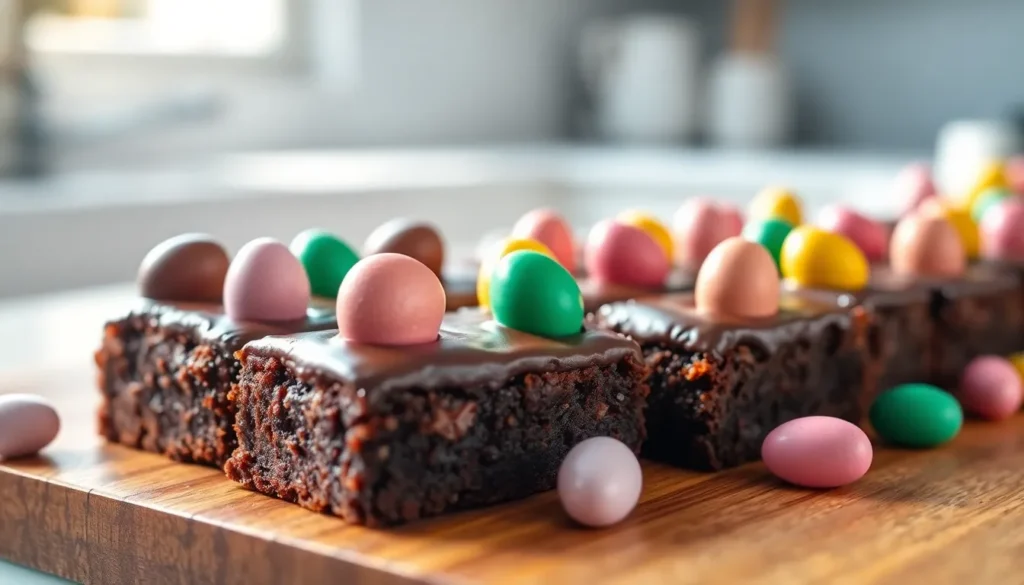
These decadent mini egg brownies combine the best of both worlds – rich, fudgy chocolate brownies topped with colorful mini chocolate eggs that’ll make your taste buds dance with joy. We’ve perfected this recipe to deliver that perfect balance of gooey center and slightly crisp top that brownie lovers crave.
What makes these brownies truly special isn’t just their irresistible chocolate flavor – it’s the delightful crunch and extra sweetness from those beloved mini eggs nestled right into the batter. They’re perfect for Easter celebrations, spring gatherings, or whenever you’re craving something indulgent that looks as amazing as it tastes.
We’ll show you exactly how to create these show-stopping treats that disappear faster than you can say “seconds please.” With simple ingredients you probably already have in your pantry and our foolproof technique, you’ll be pulling perfectly baked mini egg brownies from your oven in no time.
Ingredients
We’ve carefully selected each ingredient to create the perfect balance of rich chocolate flavor and delightful mini egg crunch. Our recipe uses common pantry staples that work together to produce brownies with an irresistibly fudgy texture.
For the Brownies
- 1/2 cup unsalted butter
- 4 oz dark chocolate, chopped (70% cocoa)
- 3/4 cup granulated sugar
- 2 large eggs, room temperature
- 1 teaspoon vanilla extract
- 1/2 cup all-purpose flour
- 1/4 cup unsweetened cocoa powder
- 1/2 teaspoon salt
- 1/4 teaspoon baking powder
For the Mini Egg Topping
- 1 cup mini chocolate eggs, assorted colors
- 2 tablespoons mini chocolate eggs, chopped (for mixing into batter)
- 1 tablespoon powdered sugar (optional, for dusting)
Equipment Needed

Creating perfect mini egg brownies requires minimal specialized tools since most items are likely already in your kitchen. We recommend gathering all equipment before starting to ensure a smooth baking process.
Essential mixing equipment forms the foundation of our brownie preparation. We need two mixing bowls for separating wet and dry ingredients during the preparation process. A whisk or electric mixer helps us achieve the proper texture when beating eggs with sugar and incorporating other ingredients smoothly. Our trusty spatula becomes indispensable for folding in ingredients and spreading batter evenly in the pan.
Measuring tools ensure accuracy in our recipe execution. We rely on standard measuring cups and spoons for both dry and wet ingredients to maintain proper ratios. A kitchen scale offers optional precision when measuring flour if you prefer weight-based measurements over volume measurements.
Baking essentials complete our equipment lineup for successful brownies. Our baking pan should measure either 9×9 inches for thicker brownies or 13×9 inches for a larger batch with slightly thinner results. We line our pan with parchment paper or apply non-stick spray to prevent sticking and ensure easy removal. A small bowl serves as an optional tool for pre-mixing dry ingredients before incorporating them into our wet mixture.
| Equipment | Primary Purpose | Optional/Essential |
|---|---|---|
| Mixing bowls (2) | Separate wet/dry ingredients | Essential |
| Whisk or electric mixer | Beat eggs and blend ingredients | Essential |
| Spatula | Mix and spread batter | Essential |
| Measuring cups/spoons | Accurate ingredient portions | Essential |
| 9×9 or 13×9 baking pan | Bake brownies | Essential |
| Parchment paper | Prevent sticking | Essential |
| Kitchen scale | Precise flour measurement | Optional |
| Small bowl | Pre-mix dry ingredients | Optional |
Our equipment selection prioritizes simplicity while ensuring professional results. These standard kitchen tools allow us to create bakery-quality mini egg brownies without investing in specialized equipment.
Instructions

We’ll walk you through the simple steps to create these irresistible mini egg brownies that perfectly balance rich chocolate with colorful Easter treats. Our method ensures a fudgy interior with just the right amount of crunch from the mini eggs.
Prep the Pan and Oven
Start by preheating your oven to 350°F (175°C) to ensure even baking throughout. Line your 9×9 inch baking pan with parchment paper or lightly grease it with butter to prevent the brownies from sticking. We recommend extending the parchment paper over the edges for easy removal later.
Make the Brownie Batter
Melt the dark chocolate and butter together in a microwave-safe bowl in 30-second intervals or use a double boiler method for more control. Allow this mixture to cool slightly while you prepare the other ingredients. Beat the eggs in a large mixing bowl until they become pale and thick in texture. Add the granulated sugar and continue beating until the mixture is well combined and the sugar begins to dissolve. Stir in the melted chocolate mixture and vanilla extract until smooth. Combine the flour, cocoa powder, salt, and baking powder in a separate bowl. Fold the dry ingredients into the wet mixture using a spatula until just combined, being careful not to overmix.
Add the Mini Eggs
Reserve about 1/4 cup of mini eggs for topping and roughly chop the remaining eggs into smaller pieces. Gently fold the chopped mini eggs into the brownie batter by hand to distribute them evenly throughout. This technique ensures the eggs maintain their shape and provide delightful bursts of color and crunch in every bite.
Bake the Brownies
Pour the batter into your prepared pan and use a spatula to spread it evenly into all corners. Scatter the reserved whole mini eggs across the top of the batter for an attractive presentation. Bake for 25 to 30 minutes until the brownies are set and only slightly jiggly in the center when gently shaken. The top should appear matte rather than shiny when properly baked. Cool the brownies completely in the pan on a wire rack before cutting to ensure clean slices and the perfect fudgy texture we’re aiming for.
Cooling and Cutting

Proper cooling transforms our mini egg brownies from a warm batter into the perfect fudgy texture we desire. We begin by allowing the brownies to cool in the baking tin for about 5 minutes after removing them from the oven. This initial cooling period helps them set slightly and makes handling much easier.
After this brief rest we transfer the brownies using the parchment paper to a cooling rack for complete cooling. The parchment paper acts as our lifting tool making the transfer seamless while preventing any breakage. Complete cooling ensures cleaner slicing and prevents our brownies from falling apart when we cut them.
For those seeking the neatest presentation we recommend placing the brownies in the refrigerator for a couple of hours before cutting. This chilling step yields sharper slices with crisp edges that showcase the mini eggs beautifully.
| Cooling Stage | Time Required | Purpose |
|---|---|---|
| Initial cooling in pan | 5 minutes | Sets structure for easier handling |
| Complete cooling on rack | 30-45 minutes | Prevents crumbling during cutting |
| Optional refrigeration | 2 hours | Creates cleanest slice edges |
Cutting requires the right technique to maintain our brownies’ integrity. We use a sharp knife and run it under hot water before each cut drying it thoroughly between slices. This method helps achieve clean cuts without dragging the fudgy interior.
Swift downward motions work best when cutting followed by slowly pulling the knife out to avoid crumbling the edges. We always wait until the brownies have cooled completely before slicing since cutting while warm results in messy uneven pieces that lose their appealing appearance.
The parchment paper lining we used earlier now simplifies both removal and cutting. Once cut we store our mini egg brownies in an airtight container at room temperature for up to 5 days or freeze them for longer storage. For brownies topped with crushed mini eggs we work quickly to apply toppings before any frosting sets if we’ve chosen to add that finishing touch.
Storage Tips

We understand that you want to keep your mini egg brownies fresh and delicious for as long as possible. Proper storage techniques ensure that your brownies maintain their signature fudgy texture and rich chocolate flavor.
Room Temperature Storage
An airtight container at room temperature keeps your mini egg brownies fresh for 3 to 4 days. We recommend using a container with a tight-fitting lid to prevent air exposure. This storage method works perfectly when you plan to enjoy the brownies within a few days of baking.
Refrigerator Storage
Refrigeration extends the freshness of your mini egg brownies for up to 7 days. We find that storing them in the fridge actually enhances the fudgy texture that makes these brownies so irresistible. Place the brownies in an airtight container before refrigerating to maintain moisture and prevent them from absorbing other flavors.
Freezer Storage
Your mini egg brownies freeze beautifully for longer storage needs. We can safely freeze them for up to 3 months when they have whole mini eggs on top. The quality of the mini eggs may degrade slightly over time, but the brownies themselves maintain their delicious taste and texture.
| Storage Method | Duration | Container Required |
|---|---|---|
| Room Temperature | 3-4 days | Airtight container |
| Refrigerator | Up to 7 days | Airtight container |
| Freezer | Up to 3 months | Airtight container |
Essential Storage Guidelines
Always use an airtight container regardless of your chosen storage method. This prevents moisture loss and keeps your brownies from becoming stale. We also suggest cutting the brownies before storing them to make serving easier later.
For the best texture experience, we recommend letting refrigerated brownies come to room temperature for about 15 minutes before serving. Frozen brownies should thaw completely at room temperature for the optimal fudgy consistency.
Variations and Substitutions

We love how versatile mini egg brownies can be with simple ingredient swaps and creative additions. These modifications allow you to customize the recipe to match your taste preferences or dietary needs.
Different Mini Egg Flavors
Traditional Cadbury Mini Eggs bring that classic milk chocolate sweetness we all know and love. But, experimenting with different flavors opens up exciting new taste possibilities. White chocolate Mini Eggs create a sweeter, creamier contrast against the rich brownie base. Dark chocolate Mini Eggs intensify the overall chocolate experience for those who prefer deeper cocoa notes.
We recommend trying layered brownies where you spread half the batter in the pan, add a layer of Mini Eggs, then top with the remaining batter. This technique creates beautiful visual appeal when you cut into the brownies and ensures every bite contains that satisfying crunch.
Make It Gluten-Free
Converting these brownies to gluten-free is surprisingly straightforward. Replace the all-purpose flour with your favorite gluten-free flour blend using a 1:1 ratio. We suggest checking that your cocoa powder is certified gluten-free, as some brands may contain trace amounts of gluten from processing facilities.
Almond flour works particularly well as a substitute, adding subtle nutty undertones that complement the chocolate beautifully. Rice flour blends provide a texture closest to traditional brownies, while oat flour creates a slightly denser, more rustic result.
Add Extra Chocolate
For chocolate lovers who believe more is always better, we have several delicious enhancement options. Adding white chocolate toppings creates stunning visual contrast and enhances the overall chocolate experience. Drizzle melted white chocolate over cooled brownies or fold white chocolate chips directly into the batter.
Using different percentages of dark chocolate significantly impacts flavor intensity. We find that 70% dark chocolate provides rich, sophisticated taste without overwhelming sweetness. Alternatively, mixing in nuts like chopped walnuts or pecans adds textural variety, while Biscoff spread swirled through the batter creates indulgent cookie-flavored pockets throughout your brownies.
Serving Suggestions

These decadent mini egg brownies shine in various presentation styles that showcase their festive charm and rich chocolate flavor. We recommend serving them as elegant squares cut into neat portions for Easter brunch or dinner gatherings. The colorful mini eggs create an instant spring atmosphere that guests will appreciate.
For special occasions, we love creating individual brownie nests that transform each serving into a delightful personal treat. Simply top each brownie square with a dollop of chocolate frosting and arrange three to four mini eggs on top to resemble bird nests. This presentation works wonderfully for Easter parties and children’s celebrations.
Our parfait version elevates these brownies into an impressive dessert that looks restaurant-quality. Layer cubed brownies with chocolate cream or vanilla pudding in tall glasses, then finish with whole mini eggs and a sprinkle of crushed cookies for added texture. The layered effect creates visual appeal while maintaining the beloved brownie flavor.
We suggest serving these brownies at room temperature for optimal texture, though some prefer them slightly chilled for extra fudginess. A light dusting of powdered sugar adds an elegant touch that complements the pastel mini eggs beautifully.
For larger gatherings, arrange the brownies on a tiered serving stand alongside fresh berries and whipped cream. This creates an impressive dessert buffet centerpiece that allows guests to customize their portions. The make-ahead nature of these brownies makes them perfect for stress-free entertaining.
Consider pairing these treats with vanilla ice cream or fresh strawberries to balance the rich chocolate intensity. Hot coffee or cold milk provides the perfect beverage complement that enhances the overall dessert experience.
Troubleshooting Tips

Even experienced bakers encounter challenges when making mini egg brownies. We’ve compiled the most common issues and their answers to help you achieve perfect results every time.
Dense or Crumbly Texture Issues
Our brownies can turn out dense or crumbly when we use too much flour or insufficient sugar. Overbaking also creates this undesirable texture. We recommend measuring flour accurately using the spoon-and-level method rather than scooping directly from the bag. When mixing wet and dry ingredients, we ensure the sugar dissolves completely by whisking it thoroughly with the eggs. Checking our oven temperature with a thermometer prevents overbaking that leads to dry brownies.
Overly Bitter Brownies
Insufficient sugar or poor quality cocoa powder causes bitter mini egg brownies. We adjust the sugar content by adding an extra tablespoon if needed. Using high-quality cocoa powder makes a important difference in flavor balance. Dutch-processed cocoa powder provides a smoother, less acidic taste than natural cocoa powder.
Sunken Centers
Over-whisking ingredients or using too many leavening agents causes brownies to sink in the center. We whisk eggs only to the “ribbon stage” where they become thick and pale. Mixing other ingredients requires gentle folding by hand rather than vigorous beating. When leavening agents appear excessive, we reduce baking powder by half to prevent rising and subsequent sinking.
Missing Crackly Tops
The signature crackly top forms when we properly dissolve sugar and whisk eggs adequately. We beat eggs and sugar until the mixture thickens and lightens in color. Using melted butter helps dissolve sugar more effectively than cold butter. This technique creates the glossy, cracked surface that makes brownies visually appealing.
Uneven Baking Problems
Incorrect oven temperature or overmixing prevents proper baking. We preheat our oven for at least 15 minutes before baking and verify the temperature with an oven thermometer. Mixing ingredients just until combined prevents tough brownies. Spreading batter evenly in the pan ensures uniform cooking throughout.
Professional Enhancement Tips
Combining melted chocolate with cocoa powder delivers superior flavor and texture compared to using cocoa powder alone. We achieve consistent results by bringing eggs to room temperature before mixing. Gentle folding technique preserves the delicate structure needed for fudgy brownies rather than cake-like texture.
Make-Ahead Instructions

Planning ahead transforms your baking experience and these mini egg brownies accommodate busy schedules beautifully. We’ve tested multiple make ahead methods to ensure your brownies maintain their perfect fudgy texture and festive appearance.
Freezing for Long Term Storage
The freezer becomes your best friend when preparing these brownies up to one month in advance. We recommend cutting the cooled brownies into squares and wrapping each piece individually in plastic wrap before placing them in a freezer safe container. This method prevents freezer burn while maintaining the brownies’ moisture and preventing the mini eggs from losing their vibrant colors.
Allow frozen brownies to thaw at room temperature for 2 to 3 hours before serving. The texture returns to its original fudgy consistency without any compromise in taste or appearance.
Overnight Refrigeration Method
Storing your finished brownies in the refrigerator overnight offers another convenient option. Place the cut brownies in an airtight container and refrigerate them for optimal freshness. This method works particularly well when you want to serve chilled brownies or need them ready for morning events.
The cool temperature actually enhances the fudgy texture while keeping the mini eggs crisp and colorful.
Advance Batter Preparation
Busy schedules sometimes require splitting the preparation process across multiple days. We’ve found that preparing the brownie batter ahead of time and baking just before serving produces excellent results. Mix all ingredients according to the recipe instructions and store the unbaked batter in the refrigerator for up to 24 hours.
Pour the chilled batter into your prepared pan and add 5 to 10 minutes to the original baking time to account for the cooler starting temperature. This technique ensures you serve warm brownies with that irresistible fresh from the oven aroma.
| Make-Ahead Method | Storage Duration | Best For |
|---|---|---|
| Freezing (individual pieces) | Up to 1 month | Long term planning |
| Refrigeration (cut brownies) | Overnight | Next day serving |
| Batter preparation | Up to 24 hours | Fresh baked presentation |
Conclusion
These mini egg brownies bring together everything we love about rich chocolate desserts with the playful charm of colorful mini eggs. They’re versatile enough to shine at Easter celebrations yet delicious enough to enjoy year-round.
We’ve shared everything you need to create these bakery-quality treats at home – from essential ingredients and equipment to professional tips that guarantee success. The make-ahead options and storage methods ensure you’re always prepared for unexpected guests or spontaneous celebrations.
With their fudgy texture and delightful crunch these brownies consistently deliver impressive results. Whether you’re serving them at elegant gatherings or enjoying them as an everyday treat they’re sure to become a beloved addition to your baking repertoire.
Frequently Asked Questions
What ingredients do I need to make mini egg brownies?
You’ll need unsalted butter, dark chocolate, granulated sugar, eggs, vanilla extract, all-purpose flour, cocoa powder, salt, and baking powder for the brownie base. For decoration, use assorted mini chocolate eggs (some chopped for mixing, others whole for topping) and optional powdered sugar for dusting.
What equipment is required to make these brownies?
Most items are likely already in your kitchen: mixing bowls, whisk or electric mixer, spatula, measuring cups and spoons, and a baking pan. Line your pan with parchment paper or use non-stick spray. These simple tools will help you achieve bakery-quality results without any specialized equipment.
How do I store mini egg brownies to keep them fresh?
Store brownies in an airtight container at room temperature for up to 5 days, or refrigerate for up to a week. For longer storage, freeze cut brownies for up to 3 months. Proper storage maintains their fudgy texture and prevents the mini eggs from losing their crunch and color.
Can I make these brownies ahead of time?
Yes! You can freeze baked brownies for up to 3 months, refrigerate cut brownies overnight, or prepare the batter in advance and refrigerate before baking. Each method maintains the brownies’ fudgy texture and vibrant appearance, making them perfect for busy schedules and party planning.
What are some serving suggestions for mini egg brownies?
Serve as elegant squares for gatherings, create brownie nests with chocolate frosting and mini eggs, or layer in parfaits for restaurant-quality dessert. Serve at room temperature or slightly chilled, paired with vanilla ice cream, fresh strawberries, hot coffee, or cold milk for enhanced flavor combinations.
How can I customize or vary this recipe?
Try different mini egg flavors, make it gluten-free by substituting flour, or experiment with various chocolate types. You can also adjust sweetness levels, add nuts for extra crunch, or incorporate different seasonal candies. These variations allow you to personalize the brownies for different occasions and dietary preferences.
What should I do if my brownies turn out too dry or bitter?
Ensure accurate measurements and don’t overbake – brownies should be set but still slightly soft in center. Use quality dark chocolate and balance it with enough sugar. Check your oven temperature with a thermometer, bring eggs to room temperature before mixing, and combine melted chocolate with cocoa powder for enhanced flavor.