We’re absolutely obsessed with this orange pound cake that brings together the rich buttery texture of classic pound cake with bright citrusy sunshine in every bite. There’s something magical about how fresh orange zest transforms an ordinary dessert into something extraordinary – and this recipe delivers that perfect balance we’ve been perfecting for years.
This isn’t your grandmother’s heavy pound cake that sits like a brick in your stomach. Our version stays incredibly moist and tender while packing serious orange flavor that’ll have your taste buds dancing. The secret lies in using both fresh orange juice and zest plus a special technique that ensures every slice bursts with citrusy goodness.
Whether you’re hosting a brunch planning a special dessert or simply craving something that tastes like pure comfort we guarantee this orange pound cake will become your new go-to recipe. It’s easier than you think and the results are nothing short of spectacular.
Ingredients
We’ve carefully selected each ingredient to create the perfect balance of citrus brightness and rich pound cake texture. Our ingredient list is divided into two parts to ensure you have everything needed for both the cake and its glossy orange glaze.
For the Cake
- 3 cups all-purpose flour
- 1 teaspoon baking powder
- 1/2 teaspoon salt
- 1 cup unsalted butter, softened to room temperature
- 1 3/4 cups granulated sugar
- 4 large eggs, room temperature
- 1 teaspoon vanilla extract
- 1/2 cup fresh orange juice
- 1/4 cup whole milk
- 2 tablespoons fresh orange zest
- 1 tablespoon orange liqueur (optional)
For the Orange Glaze
- 1 1/2 cups powdered sugar
- 3 to 4 tablespoons fresh orange juice
- 1 tablespoon fresh orange zest
- 1 tablespoon unsalted butter, melted
- Pinch of salt
Equipment Needed
 2")
Creating our perfect orange pound cake requires exact tools that ensure optimal mixing and baking results. We recommend gathering these essential items before starting your baking process.
Essential Mixing Tools
A stand mixer or hand mixer serves as the foundation for achieving our desired cake texture. We rely on this equipment to properly cream butter and sugar together, creating the light and fluffy base that makes pound cake exceptional. The mixing power ensures ingredients blend thoroughly without overworking the batter.
Baking Pans and Preparation
Our recipe works beautifully in a standard 9×5-inch loaf pan, though an 8×4-inch loaf pan also produces excellent results. We suggest using metal pans for even heat distribution and consistent browning. Some bakers prefer a 10-inch bundt pan for an elegant presentation, while mini loaf pans create perfect individual servings.
Citrus Preparation Tools
A Microplane zester or citrus zester becomes crucial for extracting fresh orange zest without bitter pith. We emphasize the importance of this tool since fresh zest provides the vibrant citrus flavor that distinguishes our orange pound cake from ordinary versions.
Measuring and Mixing Equipment
Accurate measurements determine baking success, so we recommend using either a kitchen scale or reliable measuring cups and spoons. A whisk helps combine dry ingredients evenly, preventing flour pockets in the finished cake. An offset spatula smooths batter perfectly in the pan, ensuring even baking throughout.
| Equipment Type | Exact Tool | Purpose |
|---|---|---|
| Mixing | Stand mixer or hand mixer | Creaming butter and sugar |
| Baking | 9×5-inch or 8×4-inch loaf pan | Primary baking vessel |
| Citrus prep | Microplane zester | Fresh orange zest extraction |
| Measuring | Kitchen scale or measuring cups | Accurate ingredient portions |
| Mixing | Whisk | Dry ingredient combination |
| Finishing | Offset spatula | Batter smoothing |
These tools work together to create the perfect environment for our orange pound cake’s success, ensuring every step proceeds smoothly from preparation through final presentation.
Instructions
 4")
Follow our step-by-step process to create this perfect orange pound cake with its signature moist texture and bright citrus flavor. Each stage builds upon the previous one to ensure optimal results.
Prep the Pan and Oven
We start by preheating our oven to 350°F (180°C) for consistent baking temperature throughout. Generously grease our 9×5-inch loaf pan with butter, ensuring every corner and surface is coated. Dust the greased pan lightly with flour, tapping out any excess to prevent sticking. This preparation creates the foundation for easy cake removal and professional presentation.
Mix the Dry Ingredients
In a medium mixing bowl, we whisk together 2 cups all-purpose flour, 1 teaspoon baking powder, and 1/2 teaspoon salt until evenly distributed. Thorough whisking eliminates any lumps and ensures our leavening agents are properly incorporated. Set this mixture aside as we prepare our wet ingredients. Proper mixing at this stage prevents dense spots in our finished cake.
Cream Butter and Sugar
We combine 1 cup softened unsalted butter with 1 1/2 cups granulated sugar in our stand mixer bowl. For maximum orange flavor, we rub 2 tablespoons fresh orange zest directly into the sugar before adding butter. Beat the mixture on medium speed for 4-5 minutes until it becomes pale, light, and noticeably fluffy. Scrape down the bowl sides periodically to ensure even mixing. This creaming process incorporates air for our cake’s tender crumb structure.
Add Eggs and Orange Zest
We add our 4 large eggs one at a time, mixing well after each addition before incorporating the next. Complete integration of each egg prevents curdling and maintains our smooth batter consistency. If we haven’t already mixed orange zest with sugar, we stir in 2 tablespoons fresh orange zest now. Beat in 2 teaspoons vanilla extract until fully combined throughout the mixture.
Combine Wet and Dry Ingredients
With our mixer on low speed, we alternate adding our flour mixture and liquid ingredients, beginning and ending with the dry ingredients. We combine 1/2 cup fresh orange juice with 1/2 cup whole milk for our liquid component. Add approximately one-third of the flour mixture, then half the liquid, another third of flour, remaining liquid, and finally the last of our flour mixture. Mix only until ingredients are just combined to avoid developing tough gluten strands.
Bake the Cake
We pour our smooth batter into the prepared loaf pan, using an offset spatula to level the surface. Bake for 50-60 minutes, checking for doneness with a toothpick inserted into the center. The cake is ready when the toothpick comes out clean or with just a few moist crumbs attached. Baking time may vary slightly depending on our exact oven and pan size. Allow the cake to cool in the pan for 35-40 minutes before turning out onto a wire rack for complete cooling.
Making the Orange Glaze
 6")
The final touch that transforms our orange pound cake from delicious to extraordinary is the glossy orange glaze. We create this sweet finishing element by combining sifted powdered sugar with fresh orange juice in a mixing bowl.
Start with the foundation by sifting 1½ cups of powdered sugar into a medium bowl to eliminate any lumps. This step ensures our glaze achieves a perfectly smooth consistency without any unwanted texture.
Add 3 tablespoons of fresh orange juice gradually while whisking continuously. We recommend starting with 2 tablespoons and adding the third tablespoon slowly to reach the ideal consistency. The glaze should flow smoothly off a spoon but still maintain enough thickness to coat the cake beautifully.
Incorporate ½ teaspoon of fresh orange zest for an extra burst of citrus flavor that complements the cake’s bright orange notes. The zest adds visual appeal with tiny flecks of orange throughout the glaze.
Whisk in 1 tablespoon of melted butter to create a lustrous finish that enhances both appearance and taste. The butter adds richness while helping the glaze adhere better to the cake surface.
Test the consistency by lifting the whisk and observing how the glaze falls back into the bowl. Perfect glaze should ribbon smoothly without being too thick or too thin. If the mixture appears too thick, add orange juice one teaspoon at a time. Should it become too thin, gradually incorporate more sifted powdered sugar.
Apply the glaze while the cake is still slightly warm for optimal absorption and coverage. Pour the glaze slowly over the top of the cake, allowing it to naturally drip down the sides for an elegant presentation.
Assembly and Finishing
 8")
We reach the most rewarding part of our orange pound cake journey where patience and technique come together to create the perfect finish. The final steps transform our beautifully baked cake into a stunning dessert that looks as amazing as it tastes.
Cool the Cake
We need to exercise patience during this crucial cooling phase to ensure our glaze application succeeds. Our orange pound cake should rest in the pan for about 35-40 minutes after baking. The cake needs to be warm but cool enough that we can comfortably handle the pan with our bare hands.
During this cooling period we avoid the temptation to rush the process. Proper cooling prevents the glaze from melting off the cake surface and ensures even distribution. The cake’s internal temperature should drop sufficiently while maintaining enough warmth to help the glaze adhere properly.
Apply the Glaze
We begin our glaze preparation by zesting one quarter of a fresh orange directly into our bowl of powdered sugar. The fresh orange quarter then gets squeezed to release its juice into the same bowl. We whisk the mixture until it reaches a completely smooth consistency without any lumps.
Our glaze consistency requires careful attention to achieve the perfect texture. We add more orange juice gradually if we want a thinner glaze that will soak into the cake more readily. More powdered sugar gets incorporated if we prefer a thicker glaze that will create a more pronounced coating.
We pour the finished glaze over our cooled cake and use a spatula to spread it evenly across the surface. Parchment paper placed beneath the cake catches any drips and keeps our workspace clean. The glaze flows naturally over the edges creating an elegant cascading effect that enhances the cake’s visual appeal.
Alternative glaze variations include combining powdered sugar with orange extract vanilla extract and milk for different flavor profiles. We adjust the milk quantity to reach our desired consistency whether we want a thin drizzle or a thick coating.
Storage Instructions
 10")
Our freshly baked orange pound cake requires proper storage to maintain its moist texture and vibrant citrus flavor. We recommend storing the cake at room temperature for optimal taste and texture preservation.
Room Temperature Storage
Wrapping the cake in plastic wrap or storing it in an airtight container prevents moisture loss and keeps the cake fresh. At room temperature, our orange pound cake maintains peak quality for 2 to 3 days when properly sealed. We suggest slicing the cake just before serving to retain maximum moisture and prevent the cut surfaces from drying out.
| Storage Method | Duration | Temperature | Container Type |
|---|---|---|---|
| Room Temperature | 2-3 days | 68-72°F | Airtight container or plastic wrap |
| Refrigeration | 5-7 days | 35-40°F | Sealed container or cake box |
| Freezing | 1-3 months | 0°F | Double-wrapped or airtight container |
Refrigerated Storage
For longer storage periods, we place the cake in the refrigerator where it stays fresh for up to 5 days in a sealed container. Some recipes allow refrigerated storage for up to one week when the cake is tightly wrapped. Before serving refrigerated cake, we let it sit at room temperature for 30 minutes to enhance the flavor and soften the texture.
Freezer Storage
Our orange pound cake freezes exceptionally well for extended storage. We wrap the cake tightly in plastic wrap followed by aluminum foil or place it in an airtight freezer container. Properly frozen orange pound cake maintains its quality for up to one month, though premium recipes suggest freezing capabilities of up to three months.
When ready to serve frozen cake, we thaw it overnight in the refrigerator or at room temperature for several hours. The cake can be frozen either whole or pre-sliced for convenient individual servings.
Glazed Cake Considerations
If our orange pound cake features the glossy orange glaze, we allow the glaze to set completely before wrapping to prevent sticking to the storage container. The glazed surface adds an extra layer of moisture protection during storage while maintaining the cake’s elegant appearance.
Serving Suggestions
 12")
We believe orange pound cake shines brightest when paired thoughtfully with complementary flavors and textures. Our glazed creation offers endless possibilities for elegant presentation and delicious combinations.
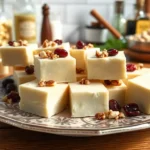
Plain slices showcase the cake’s natural citrus brightness beautifully. We recommend cutting generous portions to highlight the moist crumb and glossy glaze that cascades down each slice.
Fresh whipped cream and seasonal fruit create an irresistible contrast to our rich pound cake. Dollop softly whipped cream alongside fresh berries or orange segments for a restaurant-quality dessert presentation.
Premium ice cream pairings elevate the entire experience to new heights. We particularly love serving warm cake slices with orange cardamom chocolate chip ice cream, where the spices complement our citrus notes perfectly.
Additional orange glaze or syrup intensifies the citrus experience for those who crave bold flavors. Drizzle extra glaze over individual slices or brush simple orange syrup onto the cake before serving.
Mini loaf presentations work wonderfully for special occasions and gatherings. We slice our pound cake into elegant portions and arrange them on dessert plates with fresh mint sprigs for visual appeal.
Afternoon tea service transforms our orange pound cake into a sophisticated treat. Serve thin slices alongside other petit fours and delicate pastries for an impressive spread.
Breakfast or brunch offerings make this cake incredibly versatile throughout the day. We often serve it with coffee or tea as a delightful morning indulgence that guests always remember.
Tips for Perfect Orange Pound Cake
 14")
Creating the ultimate orange pound cake requires attention to key techniques that elevate this classic dessert from good to extraordinary. We’ve discovered that following these essential tips ensures consistent results every time you bake.
Bring Ingredients to Room Temperature
Temperature control plays a crucial role in achieving the perfect texture. We recommend removing butter, eggs, and milk from the refrigerator 1-2 hours before baking. Room temperature ingredients blend more easily and create a smoother batter that results in a more tender crumb.
Master the Creaming Method
The foundation of exceptional pound cake lies in proper creaming technique. We combine softened butter with granulated sugar and fresh orange zest, beating the mixture for 3-4 minutes until it becomes light and fluffy. This process incorporates air into the batter and creates the signature pound cake texture.
| Mixing Stage | Duration | Visual Cue |
|---|---|---|
| Initial creaming | 2-3 minutes | Pale yellow color |
| Full incorporation | 3-4 minutes | Light and fluffy texture |
| Egg addition | 30 seconds per egg | Smooth consistency |
Avoid Overmixing the Batter
Gentle handling preserves the cake’s tender structure. We mix dry and wet ingredients just until combined, using low speed on our mixer. Overmixing develops the gluten in flour and creates a dense, tough cake rather than the light texture we desire.
Control Your Baking Environment
Oven temperature accuracy determines baking success. We bake our orange pound cake at 350°F (180°C) for bundt pans, requiring 40-45 minutes of baking time. Tube pans require a lower temperature of 325°F and 60-70 minutes to ensure even cooking throughout the thicker batter.
Perfect the Cooling Process
Patience during cooling prevents structural collapse and ensures clean removal from the pan. We allow our cake to cool in the pan for 10-15 minutes before transferring it to a wire rack. This resting period lets the cake set properly while still being warm enough to release easily from the pan.
Test for Doneness Accurately
Proper testing prevents underbaked centers or overbaked edges. We insert a toothpick into the thickest part of the cake, looking for just a few moist crumbs rather than wet batter. The cake should also spring back lightly when touched and begin pulling away from the pan sides.
Conclusion
We’ve crafted the perfect orange pound cake recipe that’ll become your go-to dessert for any occasion. The combination of fresh orange zest bright citrus juice and that classic buttery pound cake texture creates something truly special.
With our detailed guide proper equipment recommendations and expert tips you’re equipped to create bakery-quality results in your own kitchen. The glossy orange glaze adds that professional finishing touch that’ll impress every guest.
This versatile cake works beautifully for breakfast with coffee afternoon tea with friends or as an elegant dessert. Store it properly and you’ll have delicious slices ready whenever that citrus craving hits.
Now it’s time to gather your ingredients preheat that oven and experience the joy of homemade orange pound cake. Your kitchen will smell amazing and your taste buds will thank you.
Frequently Asked Questions
What makes this orange pound cake different from traditional pound cake?
This orange pound cake combines the classic buttery texture of traditional pound cake with vibrant fresh citrus flavors. Unlike heavy traditional versions, this recipe creates a moist and tender cake using fresh orange juice and zest, resulting in a brighter, more flavorful dessert that’s perfect for various occasions.
What ingredients do I need for the orange pound cake and glaze?
For the cake: all-purpose flour, baking powder, salt, unsalted butter, granulated sugar, eggs, vanilla extract, fresh orange juice, whole milk, orange zest, and optional orange liqueur. For the glaze: powdered sugar, fresh orange juice, orange zest, melted butter, and a pinch of salt.
What equipment is essential for making this orange pound cake?
You’ll need a stand mixer or hand mixer, a 9×5-inch or 8×4-inch loaf pan, and a Microplane zester for fresh orange zest. Also required are accurate measuring tools (kitchen scale or measuring cups), a whisk for dry ingredients, and an offset spatula for smoothing batter.
How long should I bake the orange pound cake?
Bake the orange pound cake at 350°F (180°C) for 50-60 minutes. Test for doneness by inserting a toothpick into the center – it should come out clean or with just a few moist crumbs. Proper baking time ensures the cake’s signature moist texture.
How do I make the perfect orange glaze?
Sift powdered sugar and gradually add fresh orange juice while whisking until smooth. Add fresh orange zest for enhanced flavor and visual appeal, then incorporate melted butter for richness. Test consistency and apply to warm cake for optimal absorption and elegant presentation.
When should I apply the glaze to the cake?
Apply the glaze when the cake has cooled for 35-40 minutes after baking. The cake should be warm but cool enough to handle. This timing ensures proper glaze adhesion and creates an elegant cascading effect while preventing the glaze from melting completely.
How should I store the orange pound cake?
Store at room temperature in an airtight container for 2-3 days, refrigerate for 5-7 days, or freeze for 1-3 months. If glazed, allow the glaze to set completely before wrapping to prevent sticking. Proper storage maintains the cake’s moist texture and vibrant flavor.
What are some serving suggestions for orange pound cake?
Serve plain slices with fresh whipped cream and seasonal fruit, or warm slices with premium ice cream like orange cardamom chocolate chip. Drizzle with additional orange glaze for bold flavor, present as mini loaves for special occasions, or enjoy with coffee during afternoon tea.
What tips ensure the perfect orange pound cake?
Bring ingredients to room temperature for better blending, master the creaming method to incorporate air, and avoid overmixing to maintain tenderness. Control the baking environment, test accurately for doneness, and perfect the cooling process to prevent structural collapse for consistent results.