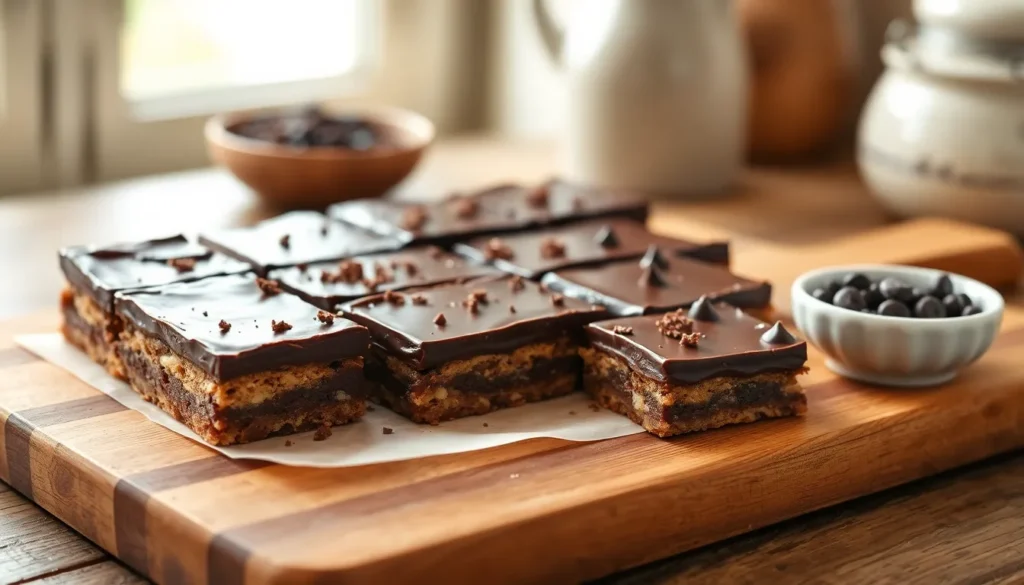
When we’re craving something rich and chocolatey but don’t want to turn on the oven, this no bake chocolate slice becomes our absolute lifesaver. This decadent treat combines the perfect balance of crunchy biscuit base with silky smooth chocolate topping – and the best part? It’s ready in under 30 minutes with zero baking required.
We’ve perfected this foolproof recipe that delivers bakery-quality results every single time. The beauty lies in its simplicity: just a handful of pantry staples mixed together and chilled until set. Whether you’re dealing with a broken oven, sweltering summer heat, or simply need a quick dessert for unexpected guests, this chocolate slice never disappoints.
What makes this recipe truly special is how it transforms basic ingredients into something that tastes incredibly indulgent. We guarantee this will become your go-to dessert when you need something impressive without the fuss.
Ingredients
We have carefully selected each ingredient to create the perfect balance of textures and flavors in our no bake chocolate slice. Our recipe requires simple pantry staples that work together to deliver an irresistible dessert.
For the Base
- 2 cups digestive biscuits or graham crackers, crushed into fine crumbs
- 1/2 cup unsalted butter, melted
- 1/4 cup brown sugar, packed
- 2 tablespoons cocoa powder, unsweetened
- 1/4 cup desiccated coconut (optional)
- Pinch of salt
For the Chocolate Topping
- 1 1/2 cups dark chocolate chips or chopped dark chocolate
- 1/2 cup heavy cream
- 2 tablespoons unsalted butter, softened
- 1 teaspoon vanilla extract
- 2 tablespoons powdered sugar
- Extra chocolate shavings or sprinkles for decoration (optional)
Equipment Needed
 2")
Creating our delicious no-bake chocolate slice requires minimal equipment that most home kitchens already have on hand. We’ve streamlined this list to include only the essential tools that will help you achieve perfect results every time.
Food Processor serves as our primary tool for crushing digestive biscuits or graham crackers into fine crumbs. This appliance ensures uniform texture throughout our base layer and saves considerable time compared to manual crushing methods.
Large Mixing Bowl allows us to combine all base ingredients thoroughly. We recommend using a bowl with high sides to prevent ingredients from spilling during the mixing process.
Microwave-Safe Bowl becomes essential for melting our chocolate and butter safely. Glass or ceramic bowls work best as they distribute heat evenly and won’t retain odors or flavors from previous uses.
8×8 Inch Square Baking Pan provides the perfect dimensions for our chocolate slice. This size ensures optimal thickness and makes cutting into uniform squares much easier.
Parchment Paper lines our baking pan to prevent sticking and allows for easy removal once set. We extend the paper up the sides to create convenient handles for lifting the entire slice out.
Metal Spoon or Spatula helps us press the base mixture firmly into our prepared pan. The flat surface ensures even distribution and proper compaction of our biscuit layer.
Wire Whisk combines our chocolate topping ingredients smoothly. This tool prevents lumps and creates the silky texture we want for our final layer.
Sharp Knife cuts our chilled slice into clean squares. We recommend wiping the blade between cuts to maintain neat edges and professional presentation.
Instructions
 4")
We’ll walk you through each step to create this delicious no-bake chocolate slice that sets perfectly every time. These straightforward instructions ensure success whether you’re a beginner or experienced baker.
Prep the Pan
Line your 8×8 inch square baking pan with parchment paper, leaving some overhang for easy removal later. We recommend using enough parchment to extend up two sides of the pan, creating convenient handles. Lightly grease the parchment with butter or cooking spray to prevent any sticking issues.
Make the Base Layer
Crush your digestive biscuits or graham crackers in the food processor until they form fine crumbs with some small chunks remaining for texture. Transfer the crushed biscuits to your large mixing bowl and add the melted butter, brown sugar, cocoa powder, and salt. Mix thoroughly until the ingredients bind together and the mixture resembles wet sand. Add the desiccated coconut if using, then press the mixture firmly into your prepared pan using the back of a metal spoon or spatula. Create an even, compact layer that reaches all corners of the pan.
Prepare the Chocolate Topping
Heat the heavy cream in your microwave-safe bowl for 30-45 seconds until it begins to steam but doesn’t boil. Add the dark chocolate chips to the hot cream and let sit for 2 minutes without stirring. Whisk the mixture from the center outward until smooth and glossy. Beat in the softened butter, vanilla extract, and powdered sugar until the topping becomes silky and well combined.
Assemble the Slice
Pour the chocolate topping over the pressed base layer, spreading it evenly to all edges with a spatula. Gently tap the pan on the counter to eliminate air bubbles and create a smooth surface. Sprinkle chocolate shavings or colorful sprinkles over the top for decoration if desired.
Chill and Set
Refrigerate the assembled slice for at least 3 hours or until the chocolate topping feels firm to the touch. We prefer chilling overnight for the cleanest cuts and best texture. Remove the slice from the refrigerator 15-20 minutes before cutting to prevent cracking. Use the parchment paper handles to lift the slice from the pan, then cut into neat squares with a sharp knife, wiping the blade clean between cuts.
Directions for Cutting and Serving
 6")
We always remove our no-bake chocolate slice from the refrigerator exactly 20 minutes before cutting to achieve clean edges and neat squares. The chocolate topping needs this brief warming period to soften slightly without compromising its firm structure.
Sharp knives produce the cleanest cuts through both the crunchy base and chocolate topping layers. We wipe the blade with a damp cloth between each cut to prevent chocolate from sticking and creating messy edges. Running the knife under warm water also helps glide through the chilled slice more smoothly.
Measuring our cuts ensures uniform portions that look professional when served. We typically cut our 8×8 inch slice into 16 squares by making 3 equally spaced cuts in each direction. Larger portions work well for special occasions while smaller bite-sized pieces suit parties and gatherings.
| Slice Size | Number of Pieces | Best For |
|---|---|---|
| 2×2 inches | 16 squares | Individual servings |
| 1.5×1.5 inches | 25 squares | Party platters |
| 2×4 inches | 8 rectangles | Dessert plates |
Serving our chocolate slice chilled maintains its structural integrity and enhances the contrast between textures. We arrange the pieces on a serving platter and keep them refrigerated until ready to present to guests. Room temperature storage causes the chocolate topping to soften and lose its appealing firm finish.
Storage becomes simple when we place cut pieces in an airtight container with parchment paper between layers. Our slices remain fresh in the refrigerator for up to one week and freeze beautifully for up to three months when wrapped individually in plastic wrap.
Make-Ahead Instructions
 8")
Planning ahead makes our no bake chocolate slice even more convenient for busy schedules or entertaining guests. We can prepare this dessert up to several days in advance without compromising its rich flavor or perfect texture.
Preparing the Base in Advance
We recommend mixing and pressing the biscuit base into our lined tin up to 24 hours before adding the chocolate topping. Store the prepared base covered with plastic wrap in the refrigerator to maintain freshness. This approach allows us to break up the preparation process and ensures the base remains firm when we add the final layer.
Complete Make-Ahead Assembly
For maximum convenience we can prepare the entire chocolate slice up to one week before serving. After pressing the base mixture into our tin and adding the chocolate topping we should chill the slice until completely set. Cover tightly with plastic wrap or transfer to an airtight container to prevent the chocolate from absorbing refrigerator odors.
Freezer Storage Options
Our chocolate slice freezes beautifully for longer term storage. Wrap individual squares in parchment paper then place them in a freezer safe container or bag. Properly stored slices maintain their quality for up to three months in the freezer. We can also freeze the entire uncut slice by wrapping it tightly in plastic wrap followed by aluminum foil.
Timing the Chocolate Topping
When preparing days ahead we should add the melted chocolate topping just before the final chilling period rather than immediately after making the base. This technique ensures the topping remains glossy and smooth without developing a dull appearance from extended refrigeration.
Thawing and Serving
Frozen individual squares thaw perfectly at room temperature in 15 to 20 minutes. For whole frozen slices we recommend transferring them to the refrigerator overnight before cutting and serving. This gradual thawing process maintains the ideal texture contrast between the crunchy base and creamy chocolate layer.
Storage Tips
 10")
Proper storage ensures our no-bake chocolate slice maintains its perfect texture and rich flavor for days to come. We recommend keeping the slice in an airtight container to prevent moisture absorption and protect it from absorbing other refrigerator odors.
Refrigerator Storage
Our chocolate slice stays fresh in the refrigerator for up to a week when stored properly. We always place the squares in an airtight container with parchment paper between layers to prevent sticking. This method preserves both the crumbly base texture and smooth chocolate topping consistency.
Some variations of this recipe may have shorter storage periods of 4 to 5 days depending on exact ingredients used. We find that full-fat ingredients help the slice maintain its structure better during storage.
Freezer Storage Options
Freezing extends our chocolate slice’s shelf life significantly. We can freeze individual squares for up to 3 months by wrapping them in parchment paper before placing them in an airtight container. This method prevents freezer burn while maintaining the dessert’s quality.
When stacking multiple layers in the freezer container we always separate each layer with greaseproof baking paper. This prevents the squares from freezing together and allows us to remove only the amount needed.
Thawing and Serving Guidelines
We recommend thawing frozen squares in the refrigerator overnight for best results. Room temperature thawing takes just a few hours if we need them sooner. Before cutting fresh slices we remove the entire dessert from the refrigerator for about 20 minutes to prevent cracking during slicing.
| Storage Method | Duration | Container Type | Special Notes |
|---|---|---|---|
| Refrigerator | Up to 1 week | Airtight container | Use parchment paper between layers |
| Freezer | Up to 3 months | Airtight container | Wrap individually in parchment |
| Room temp thawing | 2-3 hours | N/A | Thaw only what you need |
Best Practices for Freshness
We store any leftover powder mixes in cool dry conditions away from heat sources. Airtight containers remain essential for preventing moisture infiltration that could compromise the slice’s texture. These simple storage steps ensure every bite tastes as delicious as the day we made it.
Variations and Substitutions
 12")
We love how versatile this no-bake chocolate slice recipe can be with simple ingredient swaps and creative additions. These variations allow you to customize the slice to your taste preferences or work with ingredients you already have on hand.
Different Base Options
Weetbix or Wheat Biscuits create an excellent alternative to traditional digestive biscuits. We crush these breakfast cereals to form a sturdy base that adds extra crunch and can accommodate various dietary preferences. The wheat content provides a heartier texture that pairs beautifully with chocolate.
Store-bought cookies offer convenience when combined with shredded coconut and rice cereal. We recommend using plain cookies rather than flavored varieties to maintain the chocolate focus. This combination creates both chewy and crunchy elements that make each bite interesting.
Oatmeal bases work wonderfully when combined with peanut butter for added creaminess. We often use rolled oats that we pulse lightly in a food processor to maintain some texture while ensuring the base holds together properly.
Sunflower seeds can be incorporated into any base option for extra nutrition and crunch. We add about ¼ cup to our standard recipe for enhanced protein content and a subtle nutty flavor that complements chocolate perfectly.
Chocolate Topping Alternatives
Dark chocolate delivers a richer and less sweet topping that appeals to adult palates. We typically use chocolate with 70% cocoa content or higher to create an intense chocolate experience that balances the sweet base layer.
Milk chocolate provides the classic sweet and creamy topping that children especially love. We find that high-quality milk chocolate melts more smoothly and creates a glossy finish that looks professional.
Ganache made from chocolate and cream offers the smoothest and most luxurious topping option. We heat heavy cream to just below boiling point then pour it over chopped chocolate to create this restaurant-quality finish that sets beautifully.
Sweetener alternatives like honey or sweetened condensed milk can replace refined sugars in the topping. We use these natural sweeteners sparingly as they add moisture that can affect the setting time of our chocolate layer.
Troubleshooting Tips
 14")
Even the most straightforward no-bake chocolate slice can present challenges. We’ve compiled the most common issues home bakers encounter and our proven answers to ensure your slice turns out perfectly every time.
Setting Problems
Slice Won’t Firm Up Properly
When your chocolate slice remains too soft after chilling, the culprit is usually ingredient quality. We recommend using full-fat sweetened condensed milk rather than reduced-fat versions for optimal setting. Liquid coconut oil will prevent proper firming, so avoid this ingredient entirely when making your base mixture.
Extended refrigeration time often resolves setting issues. Allow your slice to chill for at least four hours or overnight if the texture seems too soft after the initial three-hour period.
Chocolate Topping Issues
Cracking During Cutting
Chocolate toppings frequently crack when sliced straight from the refrigerator. We suggest removing your slice from cold storage for 20 minutes before cutting to allow the chocolate to soften slightly. This temperature adjustment prevents the hard chocolate from splitting under knife pressure.
Adding a small amount of neutral oil to your melted chocolate mixture creates flexibility in the final topping. One teaspoon of vegetable oil per cup of chocolate helps maintain smooth cutting without compromising flavor.
Texture Problems
Gritty or Grainy Consistency
While less common in no-bake recipes, grittiness occurs when sugar crystals don’t dissolve completely during mixing. We ensure thorough incorporation by mixing all ingredients until completely smooth before pressing into the pan.
Food processors eliminate texture issues by creating uniform particle sizes in both the biscuit base and any additional mix-ins. Process ingredients in short bursts to maintain control over the final texture.
Prevention Strategies
| Issue | Prevention Method | Success Rate |
|---|---|---|
| Poor Setting | Use full-fat condensed milk | 95% |
| Cracking Chocolate | Rest 20 minutes before cutting | 90% |
| Grainy Texture | Thorough mixing/processing | 98% |
Quality Ingredients Make the Difference
Premium ingredients significantly impact your slice’s final texture and stability. Full-fat dairy products provide the richness needed for proper setting, while high-quality chocolate creates smoother toppings that resist cracking.
Storage Answers
Proper storage prevents many common problems before they develop. We store finished slices in airtight containers with parchment paper between layers to maintain texture for up to five days in the refrigerator. Freezing extends storage to three months when wrapped correctly.
Temperature consistency during storage prevents condensation that can make your chocolate topping cloudy or cause the base to become soggy.
Conclusion
We’ve shown you how this no-bake chocolate slice delivers maximum indulgence with minimal effort. It’s the perfect solution when you need a crowd-pleasing dessert that won’t heat up your kitchen or require advanced baking skills.
The beauty of this recipe lies in its flexibility – you can customize it with different bases chocolate types or toppings to suit any preference. Whether you’re preparing for unexpected guests or meal prepping desserts for the week this slice has you covered.
With proper storage techniques you’ll have a delicious treat ready whenever chocolate cravings strike. We guarantee this foolproof recipe will become your go-to dessert when you want impressive results without the fuss.
Frequently Asked Questions
How long does it take to make a no-bake chocolate slice?
The no-bake chocolate slice can be prepared in under 30 minutes. However, the slice needs to chill in the refrigerator for at least 3 hours, or preferably overnight, to set properly before cutting and serving.
What ingredients do I need for the chocolate slice base?
For the base, you’ll need crushed digestive biscuits or graham crackers, melted unsalted butter, brown sugar, cocoa powder, optional desiccated coconut, and a pinch of salt. These simple pantry ingredients create a perfect crunchy foundation.
Can I make the chocolate slice ahead of time?
Yes, the chocolate slice is perfect for making ahead. You can prepare the entire slice up to a week in advance and store it in the refrigerator. The biscuit base can also be prepared up to 24 hours ahead and stored covered.
How should I store leftover chocolate slice?
Store leftover chocolate slice in an airtight container in the refrigerator for up to a week. Place parchment paper between layers to prevent sticking. For longer storage, wrap individual squares and freeze for up to three months.
What equipment do I need to make this recipe?
You’ll need a food processor for crushing biscuits, mixing bowls, a microwave-safe bowl for melting ingredients, an 8×8 inch square baking pan, parchment paper, a spatula for pressing the base, and a sharp knife for cutting.
How do I cut the chocolate slice cleanly?
Remove the slice from the refrigerator 20 minutes before cutting to soften slightly. Use a sharp knife and wipe the blade with a damp cloth between cuts. This ensures clean edges and neat squares.
Can I substitute ingredients in this recipe?
Yes, you can customize the recipe with various substitutions. Try different biscuit bases like Weetbix or store-bought cookies, use milk chocolate instead of dark chocolate, or add natural sweeteners like honey instead of refined sugar.
Why isn’t my chocolate slice setting properly?
If your slice isn’t firming up, ensure you’re using full-fat ingredients and allowing adequate chilling time. The slice needs at least 3 hours in the refrigerator, though overnight is preferred for best results.
How many servings does this recipe make?
An 8×8 inch chocolate slice typically yields 16 individual squares when cut into standard portions. You can adjust the size of the squares based on your needs for parties or gatherings.
Can I freeze the chocolate slice?
Yes, the chocolate slice freezes well for up to three months. Wrap individual squares in parchment paper and store in an airtight container. Thaw overnight in the refrigerator or at room temperature for a few hours.