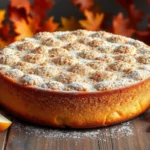
We’ve cracked the code for the perfect vegan vanilla cake that’ll make you forget it’s dairy-free and egg-free. This incredibly moist and fluffy cake proves that plant-based baking doesn’t mean sacrificing flavor or texture. With simple pantry staples and our foolproof technique you’ll create a show-stopping dessert that impresses vegans and non-vegans alike.
What makes this recipe special is how the vanilla flavor truly shines through without any artificial aftertaste. We use a combination of vanilla extract and a secret ingredient that amplifies the cake’s natural sweetness while keeping it perfectly tender. The result is a classic vanilla cake that’s light airy and absolutely delicious.
Whether you’re celebrating a birthday hosting a dinner party or simply craving homemade cake this vegan vanilla recipe delivers bakery-quality results every time. It’s also incredibly versatile – perfect on its own or as a base for your favorite frostings and decorations.
Ingredients
Our vegan vanilla cake requires simple pantry staples that work together to create an incredibly moist and fluffy texture. We’ve organized the ingredients by category to make preparation seamless and efficient.
Dry Ingredients
- 2 cups all-purpose flour
- 1½ cups granulated sugar
- 1 teaspoon baking soda
- 1 teaspoon baking powder
- ½ teaspoon salt
- 2 tablespoons cornstarch
Wet Ingredients
- 1¾ cups unsweetened plant milk (almond or oat work best)
- ⅓ cup neutral oil (vegetable or canola)
- 2 tablespoons apple cider vinegar
- 2 teaspoons pure vanilla extract
- 1 teaspoon vanilla bean paste (our secret ingredient)
- 1 cup warm water
Optional Add-ins
- 1 teaspoon almond extract (for enhanced flavor depth)
- 2 tablespoons vegan butter (melted for extra richness)
- 1 tablespoon lemon zest (for bright citrus notes)
- ½ cup mini vegan chocolate chips (for texture variation)
Equipment Needed

Creating our perfect vegan vanilla cake requires the right tools to achieve that bakery-quality texture and presentation. We’ll walk you through the essential equipment that ensures smooth preparation and professional results.
Mixing Equipment
- Large mixing bowl for combining dry ingredients
- Medium mixing bowl for wet ingredients
- Whisk for aerating flour and blending mixtures
- Hand mixer or stand mixer for achieving optimal batter consistency
Baking Essentials
- Two 8-inch round cake pans for even baking layers
- Measuring cups and spoons for accurate ingredient proportions
- Fine-mesh sieve for aerating flour before measuring
Finishing Tools
- Cake stand for elegant presentation
- Metal spatula for smooth frosting application and professional finishing
- Wire cooling racks for proper cake cooling
Preparation Accessories
- Rubber spatula for scraping bowls clean
- Small bowl for creating vegan buttermilk mixture
- Kitchen scale for precise measurements (optional but recommended)
Our equipment list focuses on tools that directly impact the cake’s final texture and appearance. The combination of proper mixing bowls and a reliable mixer ensures we achieve the light and fluffy consistency that makes this vegan cake indistinguishable from traditional versions. Quality cake pans distribute heat evenly while the metal spatula helps us create those smooth professional finishes that make our homemade cake look bakery-perfect.
Instructions

Creating our perfect vegan vanilla cake requires careful attention to each step to achieve that light and fluffy texture. Following these detailed instructions will ensure bakery-quality results every time.
Prep
We start by preheating our oven to 350°F (175°C) to ensure even baking temperature. Next, we grease our two 8-inch round cake pans thoroughly and line them with parchment paper for easy removal. This preparation step prevents sticking and guarantees clean cake layers.
We gather all our ingredients at room temperature for optimal mixing. Room temperature ingredients blend more easily and create a smoother batter texture. For enhanced flavor, we can prepare vegan buttermilk by combining our plant milk with apple cider vinegar and letting it sit for 5 minutes to curdle slightly.
Mix the Batter
We combine our dry ingredients in a large mixing bowl, whisking together the flour, sugar, baking soda, baking powder, salt, and cornstarch until evenly distributed. Proper mixing of dry ingredients ensures consistent leavening throughout our cake.
In a separate medium bowl, we whisk our wet ingredients together: plant milk, neutral oil, apple cider vinegar, vanilla extract, vanilla bean paste, and warm water. The warm water helps activate our leavening agents while the vinegar creates a tender crumb structure.
We create a well in our dry ingredients and pour the wet mixture into the center. Using gentle folding motions, we combine the ingredients until just incorporated, avoiding overmixing which can result in a dense cake. Our batter should appear smooth with only a few small lumps remaining.
Bake
We divide our batter evenly between our prepared pans, using a kitchen scale for precision if available. Even distribution ensures uniform baking and consistent layer heights.
Our cakes bake for 18 to 25 minutes, depending on our oven’s characteristics. We check for doneness by inserting a toothpick into the center of each cake. The toothpick should come out clean or with just a few moist crumbs attached.
We avoid opening the oven door during the first 15 minutes of baking to prevent temperature fluctuations that could cause our cakes to sink.
Cool
We remove our cakes from the oven and place them on wire cooling racks for 5 minutes while still in their pans. This brief cooling period allows the cake structure to set properly.
After 5 minutes, we carefully run a knife around the edges to loosen the cakes, then flip them onto the wire racks to cool completely. Complete cooling takes approximately 1 hour and prevents our frosting from melting when applied.
We ensure our cakes reach room temperature before frosting or decorating. Properly cooled cakes maintain their shape and provide the best foundation for our chosen toppings.
Vegan Vanilla Frosting

The perfect complement to our fluffy vegan vanilla cake deserves a frosting that’s equally impressive. This creamy vegan vanilla frosting delivers the classic taste and smooth texture you expect from traditional buttercream without any dairy products.
Frosting Ingredients
- 16 tablespoons vegan butter, room temperature
- 4 cups powdered sugar, sifted
- 2 teaspoons vanilla extract
- 2 tablespoons non-dairy milk
Frosting Instructions
- Cream the vegan butter in a large bowl using a hand mixer until light and fluffy, approximately 3-4 minutes.
- Gradually add the powdered sugar one cup at a time, beating continuously until the mixture becomes smooth and thick. This prevents lumps and ensures even distribution.
- Incorporate the vanilla extract and beat for another minute to distribute the flavor evenly throughout the frosting.
- Add non-dairy milk gradually one tablespoon at a time until you achieve the desired consistency. The frosting should be spreadable but hold its shape.
- Beat the mixture for an additional 2-3 minutes until the frosting becomes pale and fluffy with a smooth, pipeable texture.
- Use immediately to frost your cooled cake layers, or store covered at room temperature for up to 2 hours before use.
We recommend ensuring your vegan butter reaches room temperature before beginning this process for the smoothest results. Adjust the non-dairy milk quantity based on your preferred frosting thickness and spreading consistency.
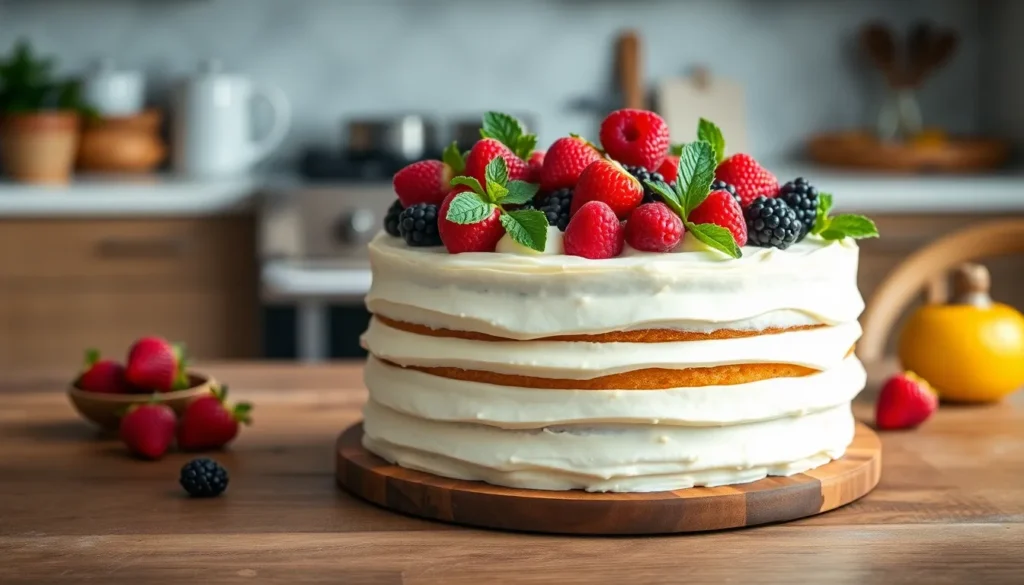
Assembly and Decorating

After our vegan vanilla cake layers have cooled completely on wire racks, we can begin the exciting process of bringing our masterpiece together. The assembly requires patience and attention to detail to achieve that professional bakery finish we’re aiming for.
Preparing for Assembly
We start by ensuring our cake layers are completely cool to the touch before handling them. Room temperature cakes prevent frosting from melting and sliding off during assembly. While our cakes finish cooling, we prepare our vegan vanilla frosting according to our recipe instructions.
Our frosting consistency plays a crucial role in successful assembly. We adjust the thickness by adding more powdered sugar for a firmer consistency or incorporating additional plant-based milk for easier spreading. The ideal frosting should spread smoothly while maintaining enough structure to hold decorative elements.
Layer Assembly Process
We position our first cake layer on a serving plate or cake stand with the flat bottom facing down. This creates a stable foundation for our assembled cake. Next, we spread an even layer of frosting across the top surface using a metal spatula, working from the center outward to the edges.
The second cake layer goes on top with the flat bottom facing up to create a level surface. We gently press down to secure the layers together without squeezing out the frosting between them. Starting from the top, we apply frosting to cover the entire cake, working systematically from top to sides for professional results.
Decorating Techniques
Fresh decorations require strategic timing to maintain their appearance and texture. We add fresh strawberries, berries, or herbs just before serving to prevent moisture from making our cake soggy. Sprinkles and other dry decorations can be applied immediately after frosting while the surface remains slightly tacky.
Piped frosting decorations offer another elegant finishing option. We use any remaining frosting to create borders, rosettes, or writing using a piping bag and appropriate tips. These decorative elements should be added after the base frosting layer has set for several minutes.
Storage Considerations
Our assembled vegan vanilla cake maintains optimal freshness when stored properly. We keep frosted cakes in an airtight container at room temperature, where they stay moist for up to five days according to storage guidelines. Unfrosted cake layers can be wrapped individually and stored separately from frosting components until assembly time.
Fresh fruit garnishes should remain separate until serving time to preserve both cake texture and fruit quality. We recommend adding these final touches no more than 30 minutes before presenting our finished vegan vanilla cake to guests.
Make-Ahead Instructions

Planning ahead transforms vegan vanilla cake baking from a last-minute rush into a stress-free experience. We can prepare various components of this cake days or even weeks in advance while maintaining the same delicious results.
Preparing Cake Layers in Advance
Baking the cake layers ahead of time saves considerable effort on serving day. After baking our layers according to the recipe instructions we need to cool them completely at room temperature. This cooling process typically takes 1 to 2 hours and prevents condensation from forming during storage.
Once cooled we wrap each layer tightly in plastic wrap to lock in moisture. The plastic should touch the surface of the cake without any air pockets. These wrapped layers stay fresh in the refrigerator for up to 4 days.
Freezing for Extended Storage
Freezing extends our make-ahead timeline significantly. We double-wrap the cooled cake layers first in plastic wrap then in aluminum foil for maximum protection against freezer burn. This method preserves the cake’s texture and flavor for up to 3 months.
When ready to use frozen layers we transfer them to the refrigerator to thaw overnight. The gradual thawing process maintains the cake’s moisture and prevents texture changes.
Make-Ahead Frosting Strategy
Our vegan vanilla frosting also benefits from advance preparation. We can make the frosting up to 3 days before needed and store it in an airtight container in the refrigerator. Before use we bring the frosting to room temperature and re-whip it with our mixer to restore its light and fluffy texture.
Assembly Timeline
| Component | Storage Method | Duration | Notes |
|---|---|---|---|
| Cake Layers | Wrapped in refrigerator | Up to 4 days | Cool completely before wrapping |
| Cake Layers | Double-wrapped in freezer | Up to 3 months | Thaw in refrigerator overnight |
| Frosting | Airtight container in fridge | Up to 3 days | Re-whip before using |
| Assembled Cake | Room temperature | Same day | Frost after components reach room temperature |
Final Assembly Day
On serving day we remove our prepared components from storage and allow them to reach room temperature. Cold cake layers and frosting don’t combine well so patience during this step ensures smooth assembly. We then follow our standard frosting and decorating techniques for a professional finish that tastes as fresh as if baked the same day.
Storage Tips

Our vegan vanilla cake stays fresh and delicious when stored properly using these proven methods. We recommend following exact storage guidelines to maintain the cake’s moist texture and rich vanilla flavor.
Room Temperature Storage
We can store our vegan vanilla cake at room temperature for 2 to 5 days depending on your kitchen’s humidity and temperature conditions. Wrap the cake tightly in cling film to preserve its freshness and prevent it from drying out. This method works best in moderate climates where temperatures remain stable.
| Storage Method | Duration | Best Conditions |
|---|---|---|
| Room Temperature | 2-5 days | Moderate humidity, stable temperature |
| Refrigeration | Up to 1 week | Consistent cool temperature |
| Freezing | Up to 3 months | Airtight wrapping required |
Refrigeration Method
For extended freshness we store our cake in the refrigerator where it lasts up to one week. Wrap leftover slices tightly in plastic wrap or place the entire cake in an airtight container before refrigerating. This method maintains the cake’s moisture while preventing it from absorbing other flavors from your refrigerator.
Freezing for Long-Term Storage
Our vegan vanilla cake freezes beautifully for up to three months making it perfect for advance preparation. Wrap the unfrosted cake layers tightly in plastic wrap followed by aluminum foil to prevent air exposure and freezer burn. We find that freezing individual slices allows for convenient single servings when needed.
Essential Storage Guidelines
Always ensure our cake cools completely before storing to prevent condensation and soggy texture. Use airtight containers or sealed food-safe bags to protect the cake from moisture and air exposure. Avoid storing the cake in areas with extreme temperature fluctuations or high humidity levels as these conditions can affect the cake’s quality and shelf life.
Serving Suggestions

Our vegan vanilla cake serves as the perfect canvas for countless delicious presentations that will impress guests and satisfy any sweet tooth. The cake’s versatile flavor profile pairs beautifully with both simple and elaborate toppings.
Classic Frosting Options
Vegan buttercream frosting remains the most popular choice for our vanilla cake. We recommend spreading a generous layer between cake layers and smoothing it over the entire surface for that bakery-quality finish. Vegan cream cheese frosting adds a tangy contrast that balances the cake’s sweetness perfectly. Rich chocolate frosting creates an indulgent combination that appeals to chocolate lovers. Swiss meringue buttercream offers an elegant option for special occasions.
Fresh Fruit Accompaniments
Seasonal berries transform our cake into a vibrant centerpiece. Fresh strawberries, blueberries, and raspberries add natural sweetness while providing beautiful color contrast. We suggest arranging mixed berries on top of the frosted cake or serving them alongside individual slices. Sliced peaches or mangoes create a tropical twist that works especially well during summer months.
Creative Toppings and Decorations
Colorful sprinkles bring joy to birthday celebrations and make the cake more festive. Toasted coconut flakes add texture and subtle flavor that complements the vanilla base. Chopped nuts like pecans or almonds provide a satisfying crunch. Edible flowers create an elegant presentation for garden parties or brunch gatherings.
Whipped Cream Variations
Vegan whipped cream serves as a lighter alternative to traditional frosting. We can pipe it in decorative rosettes or simply dollop it on individual servings. Flavored whipped creams infused with vanilla bean paste or citrus zest add extra dimension to each bite.
Presentation Styles
| Serving Style | Best For | Preparation Time |
|---|---|---|
| Layer cake | Celebrations | 40-60 minutes |
| Single layer | Everyday treats | 20-30 minutes |
| Cupcake format | Parties | 15-25 minutes |
| Sheet cake | Large groups | 30-45 minutes |
Our cake works beautifully for birthdays, anniversaries, and holiday gatherings. The neutral vanilla flavor makes it suitable for any age group and dietary preference. We find that serving the cake at room temperature brings out the best texture and flavor profile.
Recipe Variations

Our vegan vanilla cake serves as the perfect foundation for countless creative adaptations that suit different dietary needs and flavor preferences. Transform this basic recipe into exciting new versions that will keep your dessert repertoire fresh and interesting.
Gluten-Free Option
We can easily create a gluten-free version of our vegan vanilla cake by substituting oat flour for traditional all-purpose flour. This substitution maintains the cake’s essential moisture while creating a tender crumb that rivals wheat-based versions. The oat flour adaptation extends the cake’s freshness significantly, keeping it moist and delicious for up to five days when stored properly.
When using oat flour, we recommend measuring it the same way as regular flour and ensuring it’s finely ground for the smoothest texture. Store-bought oat flour works perfectly, or you can make your own by processing rolled oats in a food processor until they reach a fine powder consistency.
Different Flavor Combinations
Almond Vanilla Cake transforms our base recipe into a sophisticated dessert by reducing vanilla extract to 1 to 1.5 teaspoons and adding an equal amount of almond extract. Top the finished cake with toasted sliced almonds for extra nuttiness and visual appeal.
Coconut Vanilla Cake brings tropical flavors to our recipe by replacing regular plant milk with coconut milk and folding coconut flakes into the batter. This variation pairs beautifully with coconut buttercream frosting for a fully tropical experience.
Our frosting variations open up endless possibilities for customization. Choose from vegan buttercream, rich chocolate ganache, Swiss meringue buttercream, Italian meringue buttercream, or light whipped cream depending on your preference and occasion.
Fruit-filled variations add bright flavors through strategic layering. We love adding lemon curd between cake layers for a tangy surprise that cuts through the sweetness. Raspberry or strawberry curd creates fruity versions that work especially well for spring and summer celebrations.
Chocolate and coffee combinations satisfy deeper flavor cravings. Pair our vanilla cake with chocolate frosting or ganache for classic contrast, or try coffee buttercream for a sophisticated mocha twist that appeals to adult palates.
These variations use the same reliable base technique while allowing you to customize flavors for any occasion or dietary preference.
Troubleshooting Tips

Even experienced bakers encounter challenges when making vegan vanilla cake. We’ve compiled answers to the most common problems you might face during your baking journey.
Dense Cake Texture
Dense cakes typically result from overmixing the batter or using excessive flour measurements. When we combine hot melted vegan butter directly with flour, the proteins can overdevelop and create a heavy texture. Using a food scale ensures precise measurements and prevents flour overload. We recommend mixing vegan butter substitutes at room temperature or only slightly warm to maintain the cake’s light structure.
Over Browning and Tunneling Issues
Incorrect oven temperatures cause over browning while uneven baking creates tunneling or unwanted holes throughout the cake. We suggest verifying your oven temperature with an oven thermometer since many ovens run hot or cold. Always use a cake tester or toothpick inserted into the center to check for doneness rather than relying solely on visual cues.
Sinking Center Problems
Cakes that sink in the middle usually lack sufficient leavening power or contain expired raising agents. Fresh baking powder and baking soda are essential for proper lift and structure. When converting recipes to gluten-free versions, we increase leavening agents by approximately 25% to compensate for the different flour properties.
| Issue | Cause | Solution |
|---|---|---|
| Dense texture | Overmixing or excess flour | Use food scale, room temperature ingredients |
| Over browning | Incorrect oven temperature | Verify temperature, use cake tester |
| Sinking center | Insufficient/expired leavening | Fresh baking powder, increase by 25% for gluten-free |
| Moisture problems | Incorrect liquid ratios | Adjust liquid content carefully |
Moisture and Texture Corrections
Incorrect liquid levels significantly impact the final cake texture. We carefully adjust liquid content to achieve the proper batter consistency before baking. The batter should flow smoothly from the spoon without being too thick or watery.
Essential Prevention Tips
Weighing ingredients with a kitchen scale eliminates guesswork and prevents flour measurement errors. We always preheat the oven and prepare our pans before mixing to capitalize on the immediate leavening reaction when wet and dry ingredients combine.
Testing your leavening agents ensures they’re still active. We check baking powder by mixing a teaspoon with hot water and baking soda by combining it with vinegar. Both should bubble vigorously if they’re fresh and effective.
Conclusion
This vegan vanilla cake proves that plant-based baking doesn’t require complicated techniques or hard-to-find ingredients. We’ve shown you how everyday pantry staples can create a dessert that rivals any traditional cake.
Whether you’re serving guests at a special celebration or simply treating your family to something sweet this recipe delivers consistent results every time. The troubleshooting tips we’ve shared will help you avoid common pitfalls and achieve bakery-quality results at home.
We’re confident this will become your go-to vegan cake recipe. The versatility allows endless customization while the reliable technique ensures success with each batch. Your friends and family won’t believe this delicious cake is completely dairy-free and egg-free.
Frequently Asked Questions
What makes this vegan vanilla cake moist without eggs and dairy?
The combination of unsweetened plant milk, neutral oil, and apple cider vinegar creates a chemical reaction that mimics traditional egg and dairy functions. The vinegar activates the baking soda, creating lift and tenderness, while the oil provides moisture and the plant milk adds structure for a perfectly fluffy texture.
Can I make this vegan vanilla cake ahead of time?
Yes! You can bake the cake layers up to 2 days in advance and store them wrapped at room temperature. The frosting can be made 3-4 days ahead and refrigerated. Simply bring the frosting to room temperature and re-whip before using for best results.
How should I store leftover vegan vanilla cake?
Store the cake covered at room temperature for 2-5 days or in the refrigerator for up to one week. If frosted, keep it in an airtight container to prevent the frosting from drying out. Let refrigerated cake come to room temperature before serving for optimal flavor and texture.
What plant milk works best for this vegan cake recipe?
Any unsweetened plant milk works well, including almond, soy, oat, or cashew milk. Avoid sweetened varieties as they can affect the cake’s sweetness balance. Soy milk tends to create the most tender crumb due to its protein content, but all options produce excellent results.
Can I make this cake gluten-free?
Yes! Replace the all-purpose flour with a 1:1 gluten-free flour blend that contains xanthan gum. The cornstarch in the original recipe already helps create a tender texture. Ensure all other ingredients are certified gluten-free, and expect a slightly denser but still delicious cake.
Why is my vegan cake dense or heavy?
Dense texture usually results from overmixing the batter or incorrect measurements. Mix wet and dry ingredients just until combined, and use a kitchen scale for precise measurements. Also, ensure your baking soda and powder are fresh, as expired leavening agents won’t provide proper lift.
What’s the secret ingredient that enhances the cake’s sweetness?
The article mentions vanilla bean paste as a key ingredient that enhances natural sweetness and provides authentic vanilla flavor with visible specks. Combined with pure vanilla extract, it creates a more complex, bakery-quality taste without relying solely on added sugar for sweetness.