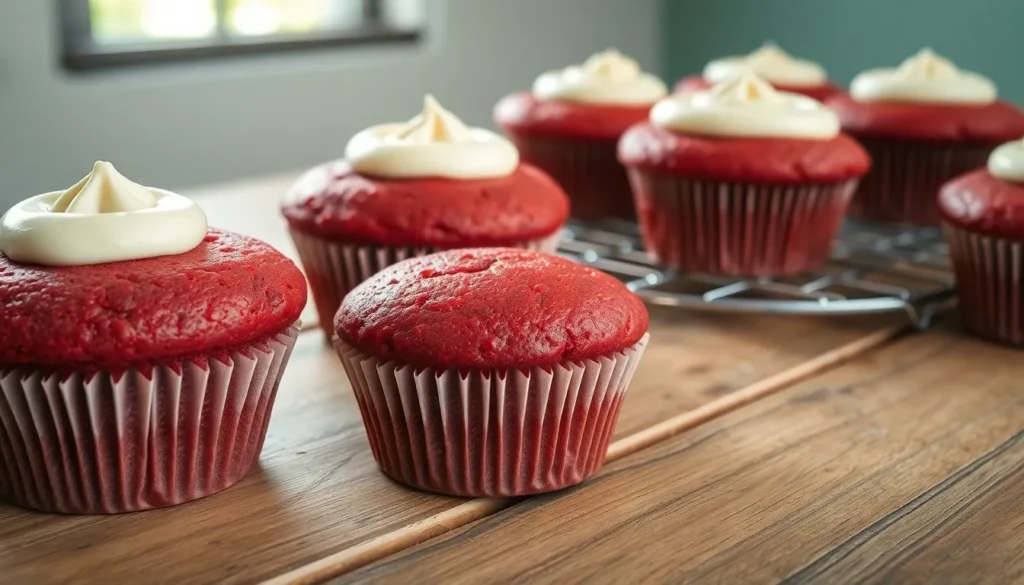
Red velvet muffins transform the beloved classic cake into perfectly portioned treats that’ll make your morning routine extraordinary. We’ve taken everything you love about traditional red velvet – that distinctive cocoa flavor, stunning crimson color, and irresistibly tender crumb – and packed it into convenient handheld muffins.
These aren’t your ordinary breakfast pastries. Our red velvet muffins deliver the same luxurious taste that’s made red velvet a Southern favorite for generations, but with added convenience for busy mornings or afternoon snacks. The subtle chocolate notes paired with tangy buttermilk create a flavor profile that’s both sophisticated and comforting.
Whether you’re hosting brunch, packing school lunches, or simply treating yourself to something special, these vibrant muffins deliver bakery-quality results right from your kitchen. We’ll show you exactly how to achieve that perfect red hue and moist texture that makes red velvet so irresistible.
Ingredients
Creating these bakery-style red velvet muffins requires carefully measured ingredients that work together to achieve the signature flavor and stunning color. We’ve organized our ingredient list into three categories to help you gather everything efficiently before you start baking.
Dry Ingredients
- 2 cups all-purpose flour
- 1 cup granulated sugar
- 2 tablespoons unsweetened cocoa powder
- 1 teaspoon baking soda
- 1 teaspoon salt
- 1/2 teaspoon baking powder
Wet Ingredients
- 1 cup buttermilk at room temperature
- 1/2 cup vegetable oil
- 2 large eggs at room temperature
- 1 teaspoon vanilla extract
- 1 teaspoon white vinegar
Red Velvet Components
- 2 tablespoons red food coloring (liquid gel works best)
- 4 ounces cream cheese softened for optional frosting
- 2 tablespoons unsalted butter softened for optional frosting
- 1 cup powdered sugar for optional frosting
Equipment Needed

Before we jump into creating our red velvet muffins, let’s gather the essential tools that will ensure perfect results every time. Having the right equipment makes the difference between bakery-quality muffins and disappointing dense treats.
Measuring spoons and measuring cups form the foundation of accurate baking. We need these for precisely measuring our cocoa powder, flour, and liquid ingredients to achieve the perfect texture and flavor balance.
A large bowl serves as our mixing station for combining all dry ingredients. This spacious vessel allows us to whisk together the cocoa powder, flour, brown sugar, baking powder, baking soda, and salt without creating flour clouds in our kitchen.
Our medium bowl handles the wet ingredient preparation perfectly. We’ll use this to whisk together the buttermilk, eggs, vanilla extract, and red food coloring into a smooth mixture.
The 12-cup muffin tin creates our signature muffin shape. Line each cup with muffin liners to prevent sticking and ensure easy removal of our finished treats.
A sturdy whisk becomes our primary mixing tool for combining ingredients smoothly. This tool helps us create the perfect batter consistency without overworking the mixture.
Finally, we need a spoon or spatula for the gentle folding technique required when incorporating white chocolate chips. This tool ensures we maintain the muffins’ tender texture while evenly distributing those delicious chocolate morsels throughout the batter.
Instructions

Now that we’ve gathered all our ingredients and equipment, we’re ready to create these stunning red velvet muffins. Follow these detailed steps to achieve perfectly moist muffins with that signature vibrant color and tender crumb.
Prep the Muffin Tin and Oven
We start by preparing our workspace for optimal baking results. Line a 12-cup muffin tin with paper liners or generously grease each cavity with baking spray to prevent sticking. Preheat the oven to 425°F (215°C) if you’re following the high initial temperature method for bakery-style domed tops. Alternatively, set your oven to 350°F (175°C) for the standard baking approach.
Mix the Dry Ingredients
We create our flour mixture by whisking together all-purpose flour, cocoa powder, baking powder, cornstarch, and a pinch of salt in a medium mixing bowl. This whisking step ensures even distribution of our leavening agents throughout the flour. Setting this mixture aside prevents lumps from forming in our final batter and guarantees consistent rise in every muffin.
Combine Wet Ingredients
In a large bowl, we whisk together room-temperature butter, neutral oil like vegetable or canola oil, and granulated sugar until the mixture becomes well combined and smooth. We add eggs one at a time, followed by the red food coloring and vanilla extract. Whisking thoroughly at this stage ensures our color distributes uniformly throughout the batter. Finally, we stir in the buttermilk, which provides the moisture and subtle tang that defines authentic red velvet flavor.
Create the Red Velvet Batter
We gently fold our prepared dry ingredients into the wet mixture using a spatula or large spoon. The key here is mixing only until just combined, leaving some streaks of flour visible in the batter. Overmixing develops the gluten too much and results in dense, tough muffins rather than our desired tender texture. At this point, we can fold in chocolate chips if desired for extra flavor and delightful texture contrast.
Fill and Bake the Muffins
We divide our batter evenly among the prepared muffin cups, filling each cavity to the top for those coveted large, domed muffin tops. For the high-temperature method, we bake at 425°F (215°C) for exactly 5 minutes, then reduce the temperature to 350°F (175°C) and continue baking for 10-12 minutes. Using the standard method, we bake at 350°F (175°C) for 18-20 minutes total. Our muffins are done when a toothpick inserted in the center comes out clean or with just a few moist crumbs. We allow the muffins to cool in the pan for several minutes before transferring them to a wire rack for complete cooling.
Cream Cheese Frosting

No red velvet muffin is complete without the perfect cream cheese frosting crowning each tender bite. This tangy and rich topping creates the ultimate balance to complement the subtle cocoa sweetness of our muffins.
Frosting Ingredients
- 8 oz cream cheese – Full-fat block-style cream cheese at room temperature
- 4 tablespoons butter – Softened unsalted or salted butter
- 2 cups confectioners’ sugar – Powdered sugar for sweetness and smooth texture
- 1 teaspoon vanilla extract – Pure vanilla extract adds depth of flavor
- Pinch of salt – Optional for enhanced flavor balance
Frosting Instructions
Beat the cream cheese and butter using an electric mixer on medium speed until the mixture becomes completely smooth and fluffy. This process typically takes 2-3 minutes of consistent beating.
Gradually add the confectioners’ sugar one cup at a time while continuing to beat the mixture. Pour in the vanilla extract during this step to ensure even distribution throughout the frosting.
Continue beating until light and creamy for an additional 3-4 minutes. The frosting should hold its shape when the beaters are lifted but remain spreadable and smooth.
Add the optional pinch of salt to taste if desired. This small addition helps balance the sweetness and enhances the overall flavor profile.
Store the finished frosting in an airtight container in the refrigerator for up to three days. Allow refrigerated frosting to come to room temperature before using and give it a quick stir to restore its creamy consistency.
Pro tip: Ensure all ingredients reach room temperature before mixing to achieve the smoothest possible frosting texture. Overmixing can cause the frosting to become too stiff so stop beating once you achieve the desired consistency.
Storage and Make-Ahead Tips

Our red velvet muffins deserve proper storage to maintain their signature texture and vibrant flavor. Different storage methods work best depending on whether we’ve added cream cheese frosting or kept the muffins plain.
Room Temperature Storage
Plain red velvet muffins store beautifully at room temperature for 3 to 5 days when kept in an airtight container. We recommend placing a paper towel inside the container to absorb excess moisture and prevent sogginess. This simple trick keeps our muffins fresh and maintains their tender crumb.
Refrigeration Guidelines
Muffins topped with cream cheese frosting require refrigeration to keep the frosting fresh and safe. We can store frosted muffins in the refrigerator for 3 to 5 days in a covered container.
| Storage Method | Duration | Best For |
|---|---|---|
| Room Temperature | 3-5 days | Plain muffins |
| Refrigeration | 3-5 days | Cream cheese frosted muffins |
| Freezing | 2-3 months | Both types |
Refrigeration tends to dry out plain muffins, so we suggest reheating them briefly before serving to restore their soft texture.
Freezing for Long-Term Storage
We can freeze our red velvet muffins for up to 2 to 3 months with proper preparation. Allow muffins to cool completely before wrapping each one individually in plastic wrap. Place wrapped muffins in a freezer-safe container or ziplock bag to prevent freezer burn.
When we’re ready to enjoy frozen muffins, we thaw them at room temperature for 30 minutes to 2 hours. For a fresh-baked texture, we warm them in the microwave for 10 to 30 seconds.
Make-Ahead Strategies
Planning ahead makes entertaining effortless with our red velvet muffins. We can bake muffins several days in advance and store them using the appropriate method based on our frosting choice.
For cream cheese frosted muffins, refrigeration becomes essential immediately after decorating. We achieve the best texture upon reheating by warming muffins in the microwave or placing them in a 300°F oven for 5 to 10 minutes to revive their softness.
Plain muffins maintain their quality best when stored at room temperature, while cream cheese filled or frosted varieties need the cool environment of our refrigerator to stay fresh and safe.
Serving Suggestions

These vibrant red velvet muffins shine brightest when paired with complementary accompaniments that enhance their rich cocoa flavor and tender crumb. We recommend serving them alongside fresh fruit to balance their sweetness and create visual appeal on your breakfast table or dessert spread.
Perfect Beverage Pairings
Coffee makes an ideal companion to red velvet muffins as the bitter notes complement the sweet chocolate undertones beautifully. Cold milk provides another classic pairing that enhances the muffins’ moistness and creates a comforting combination. Hot chocolate or tea also work wonderfully for afternoon snack time.
Cream Cheese Enhancements
Adding a cream cheese filling or swirl transforms these muffins into an extra special treat that mirrors the traditional red velvet cake experience. We suggest dolloping cream cheese frosting on top of cooled muffins for an elegant presentation. Alternatively, you can create a cream cheese center by placing a small spoonful of cream cheese mixture in the middle of each muffin cup before baking.
Special Presentation Ideas
Sprinkling sanding sugar over the tops before baking creates a beautiful sparkle that catches the light. Drizzling a simple glaze made from powdered sugar and milk adds sweetness without overwhelming the muffins’ delicate flavor. For holiday celebrations, consider dusting the tops with powdered sugar for a snow-like effect.
Occasion-Exact Serving
These versatile muffins work perfectly for breakfast alongside scrambled eggs and bacon. They make excellent afternoon snacks when served with fresh berries and whipped cream. For dessert service, pair them with vanilla ice cream and a drizzle of chocolate sauce to create an indulgent treat that guests will remember.
Recipe Variations

Red velvet muffins offer endless possibilities for customization and adaptation. We can transform the basic recipe to suit different dietary needs and preferences while preserving that signature cocoa flavor and vibrant color.
Mini Red Velvet Muffins
Mini red velvet muffins deliver all the indulgent flavor of our full-sized version in perfectly portioned bites. These bite-sized treats work wonderfully for parties, brunch buffets, or when we want to sample multiple flavors without overindulging.
We bake mini muffins using the same recipe with a few key adjustments. The batter gets divided between 24 mini muffin cups instead of 12 standard ones. Baking time reduces to 12-15 minutes at 350°F, and we check for doneness with a toothpick inserted in the center.
The cream cheese frosting scales down beautifully for mini muffins. We can pipe small dollops on top or create elegant swirls using a piping bag fitted with a star tip. These miniature treats disappear quickly at gatherings and make excellent gifts when packaged in decorative boxes.
Vegan Red Velvet Muffins
Vegan red velvet muffins maintain the same rich flavor and tender texture as traditional versions while accommodating plant-based diets. We substitute dairy and egg ingredients with carefully chosen alternatives that preserve the muffins’ signature characteristics.
For the wet ingredients, we replace buttermilk with unsweetened almond milk mixed with 1 tablespoon of white vinegar. This combination creates the same tangy flavor profile essential to authentic red velvet. Vegetable oil already makes our recipe naturally vegan, so no substitution is needed there.
We swap the two eggs for flax eggs made by combining 2 tablespoons of ground flaxseed with 6 tablespoons of water. This mixture sits for 5 minutes until it becomes gel-like, providing the binding properties eggs normally offer.
The vegan cream cheese frosting uses plant-based cream cheese and vegan butter at room temperature. We beat these ingredients until smooth, then gradually add confectioners’ sugar and vanilla extract just as we would for traditional frosting. The result tastes remarkably similar to the dairy version while accommodating vegan dietary requirements.
Troubleshooting Tips

Even experienced bakers encounter challenges when making red velvet muffins. We’ve identified the most common issues and their answers to help you achieve perfect results every time.
Muffins Falling or Not Rising
Temperature control plays a crucial role in achieving proper rise. We recommend verifying your oven temperature with an oven thermometer since incorrect heat can prevent muffins from rising properly.
Expired leavening agents often cause flat muffins. Check the expiration dates on your baking powder and baking soda before starting. Fresh leavening agents ensure optimal lift and texture.
Mixing technique affects gluten development significantly. We suggest combining ingredients until just incorporated to develop sufficient gluten structure without overworking the batter.
Muffins Not Cooked Properly
Testing for doneness requires the toothpick method. Insert a clean toothpick into the center of one muffin. The toothpick should emerge clean or with just a few moist crumbs attached.
Extended baking time may be necessary depending on your oven. Monitor the muffins closely and add 2-3 minute increments until properly baked through.
Muffins Sticking to Liners
Parchment liners provide superior release compared to standard paper liners. We recommend investing in quality parchment liners to prevent sticking and ensure easy removal.
Proper cooling time allows steam to escape before removing muffins from the tin. Let muffins cool for 5 minutes in the pan before transferring to a wire rack.
Color or Flavor Issues
Food coloring quality directly impacts the final appearance. Use gel or liquid food coloring from reputable brands to achieve the signature vibrant red hue.
Cocoa powder selection influences both flavor and color development. We suggest using high-quality unsweetened cocoa powder for the best chocolate undertones and proper color interaction with the food coloring.
| Common Issue | Primary Cause | Solution |
|---|---|---|
| Flat muffins | Expired leavening agents | Replace baking powder/soda |
| Undercooked centers | Incorrect oven temperature | Use oven thermometer |
| Sticking to liners | Poor liner quality | Switch to parchment liners |
| Weak red color | Low-quality food coloring | Use gel or premium liquid coloring |
Conclusion
These red velvet muffins bring bakery-quality results straight to your kitchen with minimal effort. We’ve equipped you with everything needed to create these stunning treats – from the perfect ingredient ratios to troubleshooting tips that guarantee success.
Whether you’re preparing them for a special brunch or packing them for on-the-go snacking these muffins deliver that signature red velvet experience in convenient individual portions. The versatility we’ve explored means there’s a version for every dietary preference and occasion.
With proper storage techniques and our make-ahead strategies you’ll always have these delightful muffins ready when cravings strike. Start baking today and discover why red velvet muffins have become a beloved favorite in kitchens everywhere.
Frequently Asked Questions
What makes red velvet muffins different from regular chocolate muffins?
Red velvet muffins have a distinctive subtle cocoa flavor combined with tangy buttermilk, creating a unique taste profile. They feature the signature vibrant red color from food coloring and have a tender, moist texture that’s different from traditional chocolate muffins. The addition of white vinegar also contributes to their characteristic flavor and texture.
How do I achieve the perfect red color in my muffins?
Use high-quality red food coloring for the best vibrant color. Gel food coloring typically works better than liquid versions as it provides more intense color without thinning the batter. Add the coloring gradually until you achieve your desired shade, and avoid overmixing to prevent the color from becoming muddy.
Can I make red velvet muffins without buttermilk?
Yes, you can substitute buttermilk by adding 1 tablespoon of white vinegar or lemon juice to 1 cup of regular milk and letting it sit for 5 minutes. This creates a similar tangy flavor that’s essential to red velvet’s distinctive taste. The acidity also helps activate the baking soda for proper rising.
How should I store red velvet muffins?
Store unfrosted muffins in an airtight container at room temperature for up to 3 days or refrigerate for up to a week. Frosted muffins should be refrigerated and consumed within 3-4 days. For longer storage, freeze unfrosted muffins for up to 3 months in freezer-safe containers.
Why did my red velvet muffins not rise properly?
Poor rising is usually caused by expired baking soda or baking powder, overmixing the batter, or incorrect oven temperature. Check that your leavening agents are fresh, mix ingredients just until combined, and ensure your oven is properly preheated to the correct temperature before baking.
Can I make vegan red velvet muffins?
Yes, substitute eggs with flax eggs or applesauce, use plant-based milk with vinegar instead of buttermilk, replace butter with vegan alternatives, and use dairy-free cream cheese for frosting. These substitutions maintain the signature red velvet flavor and texture while accommodating plant-based diets.
How do I prevent muffins from sticking to the liners?
Use high-quality parchment paper liners instead of regular paper ones. Alternatively, lightly grease the muffin tin or spray liners with cooking spray. Allow muffins to cool completely before removing from the tin, as warm muffins are more likely to stick to liners.
What’s the best way to make cream cheese frosting for red velvet muffins?
Use room temperature cream cheese and butter for smooth mixing. Beat cream cheese first, then gradually add powdered sugar and vanilla extract. The frosting should be thick enough to hold its shape but spreadable. Chill the frosting if it becomes too soft during preparation.