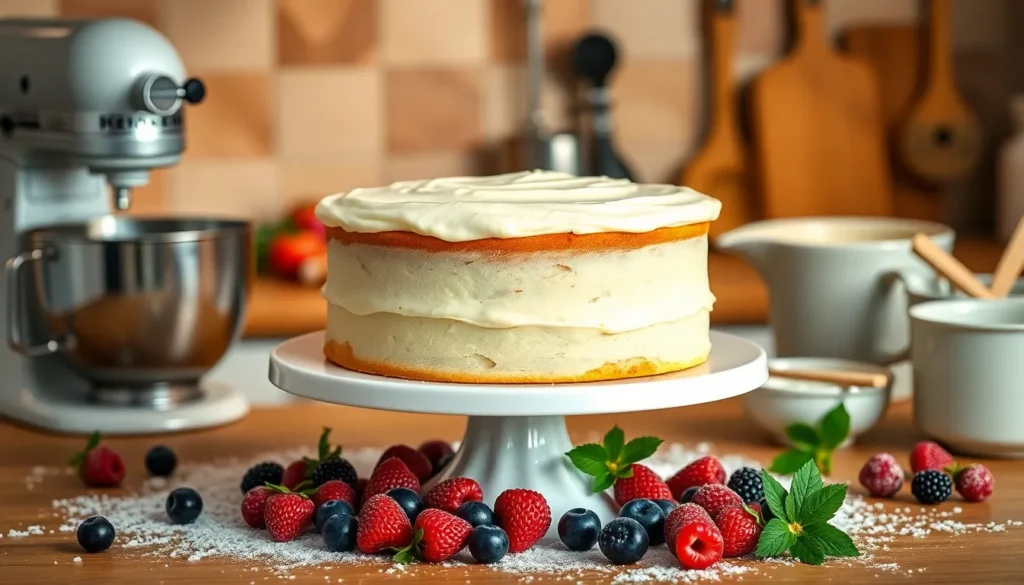
Nothing beats the rich decadent taste of a classic butter cake that melts in your mouth with every bite. This timeless dessert has graced dinner tables for generations and there’s a reason it’s remained a beloved favorite. We’re talking about that perfect golden crumb that’s tender yet sturdy enough to hold layers of frosting or stand beautifully on its own.
What makes butter cake so irresistible is its simplicity and versatility. Unlike more complex desserts this cake relies on basic pantry staples to create something truly extraordinary. The secret lies in the creaming method where we beat butter and sugar until light and fluffy creating those coveted air pockets that give the cake its signature texture.
Today we’re sharing our foolproof butter cake recipe that delivers consistent results every single time. Whether you’re planning a birthday celebration or simply craving something sweet this cake will become your go-to dessert that never disappoints.
Ingredients
Our butter cake recipe uses simple pantry staples that work together to create an incredibly moist and flavorful dessert. We’ve organized the ingredients by their role in this classic recipe.
For the Cake
- 1 cup (226g) unsalted butter, softened to room temperature
- 1¾ cups (350g) granulated sugar
- 4 large eggs, room temperature
- 2½ cups (315g) all-purpose flour
- 2½ teaspoons baking powder
- ½ teaspoon salt
- 1 cup (240ml) whole milk, room temperature
- 2 teaspoons vanilla extract
- ½ teaspoon almond extract (optional)
For the Frosting (Optional)
- ½ cup (113g) unsalted butter, softened
- 4 cups (480g) powdered sugar, sifted
- ¼ cup (60ml) heavy cream or whole milk
- 1 teaspoon vanilla extract
- Pinch of salt


Equipment Needed

Creating the perfect butter cake requires exact tools that ensure our batter develops properly and bakes evenly. We recommend gathering all equipment before starting to streamline the baking process.
Essential Mixing Equipment
Stand Mixer or Hand Mixer serves as our most crucial tool for creaming butter and sugar together. This equipment creates the light and airy texture that defines quality butter cake by incorporating air into our mixture.
Electric Whisk provides an alternative option for smaller batches when a stand mixer isn’t available. We find this particularly useful for single layer cakes or when making our optional frosting.
Baking and Measuring Tools
8-inch Square Baking Pan or round cake pans accommodate our butter cake recipe perfectly. The pan size directly affects baking time and final texture.
Digital Scale ensures accurate ingredient measurements that guarantee consistent results every time we bake. Precision in measuring affects our cake’s structure and taste significantly.
Measuring Spoons handle smaller quantities like vanilla extract and baking powder with the accuracy these potent ingredients require.
Supporting Kitchen Tools
Rubber or Silicone Spatula scrapes mixing bowl sides thoroughly and folds ingredients without deflating our carefully created batter.
Cake Tester or Toothpick determines doneness by checking the center of our cake for any wet batter.
Wire Cooling Racks allow proper air circulation around our finished cake for even cooling and prevent soggy bottoms.
Large Mixing Bowl provides adequate space for combining ingredients without spillage during the mixing process.
Jug measures liquid ingredients like milk accurately while allowing easy pouring into our batter.
Small Dish for Eggs keeps eggs ready for addition and prevents shell pieces from contaminating our mixture.
Bake Easy Spray or Grease prevents our butter cake from sticking to the pan and ensures clean release after baking.


Instructions

Follow these detailed steps to create the perfect butter cake with a tender crumb and rich flavor. Each step builds upon the previous one to ensure consistent results.
Prep the Pan and Oven
Start by preheating your oven to 350°F (175°C) for optimal baking temperature. Grease your 8-inch square or 7-inch round baking pan thoroughly with butter or Bake Easy spray. Line the bottom with parchment paper to guarantee easy removal after baking. This preparation step prevents sticking and ensures your cake comes out cleanly every time.
Cream Butter and Sugar
Place 250 grams (1 cup plus 2 tablespoons) of softened unsalted butter in your mixing bowl. The butter should yield slightly to pressure but not be melted. Add 200 grams (1 cup) of granulated sugar to the butter. Beat the mixture using your stand mixer or hand mixer on medium speed for 3-4 minutes until it becomes pale yellow and light and fluffy. This creaming process incorporates air into the batter and creates the tender texture we want in our final cake.
Add Eggs and Vanilla
Crack your eggs into a separate bowl first to check for any shell pieces. Add the eggs one at a time to your creamed butter mixture, beating well after each addition until fully incorporated. This gradual addition prevents the mixture from curdling. Pour in 1 to 1¼ tablespoons of pure vanilla extract and mix until evenly distributed throughout the batter.
Alternate Dry and Wet Ingredients
Sift together 200 grams (1½ cups) all-purpose flour, 2 teaspoons baking powder, and a pinch of salt in a separate bowl. Divide this dry mixture into three equal portions. Begin by adding one-third of the dry ingredients to your butter mixture, mixing on low speed until just combined. Pour in half of your 60-80 ml (¼-⅓ cup) milk and mix gently. Add the second portion of dry ingredients, then the remaining milk, and finally the last portion of flour mixture. Mix each addition only until the ingredients are just combined and the batter appears smooth.
Bake the Cake
Pour the batter into your prepared pan and use a rubber spatula to smooth the top evenly. Tap the pan gently on the counter 2-3 times to release any air bubbles trapped in the batter. Place the pan in your preheated oven and bake for 45-60 minutes, depending on your pan size. After 25-30 minutes of baking, cover the top loosely with aluminum foil to prevent over-browning while the center continues to cook. Test for doneness by inserting a cake tester or skewer into the center – it should come out clean when the cake is fully baked.


Directions for Frosting

The perfect finishing touch for our butter cake comes from a rich and creamy buttercream frosting that complements the cake’s tender crumb. We’ll guide you through creating a smooth buttercream and applying it for professional-looking results.
Make Simple Buttercream
Beat ½ cup unsalted butter at room temperature in a large mixing bowl using our stand mixer or hand mixer until the butter becomes pale and creamy. This process takes about 5 minutes and creates the foundation for smooth frosting texture.
Add 2 cups confectioners’ sugar gradually to the creamed butter while mixing on low speed to prevent sugar clouds. Increase mixer speed to medium and continue beating for 2 minutes until the mixture becomes light and fluffy.
Pour in 1½ teaspoons vanilla extract and 2 tablespoons milk to the butter mixture. Beat on high speed for another 2 to 3 minutes until the buttercream reaches a smooth and spreadable consistency. The frosting should hold its shape when lifted with a spoon but remain easy to spread across the cake surface.
Frost the Cooled Cake
Ensure our butter cake has cooled completely before applying frosting to prevent melting and sliding. Test the cake’s temperature by gently touching the surface with your palm – it should feel room temperature throughout.
Place the cooled cake on a serving plate or cake stand for easier frosting application. Start by spreading a thin layer of buttercream across the top surface using an offset spatula or butter knife to create a crumb coat that seals in any loose crumbs.
Apply the remaining buttercream generously to the top of the cake and work outward toward the edges with smooth, even strokes. Use the spatula to create decorative swirls or maintain a smooth finish based on your preferred presentation style.
Spread frosting down the sides of the cake if desired, using the spatula to create clean lines and even coverage. Allow the frosted cake to set for 15 minutes before slicing to ensure clean cuts and beautiful presentation.


Make-Ahead Instructions

Planning ahead transforms your butter cake baking experience into a stress-free try. We recommend several strategic approaches that maintain the cake’s signature texture and rich flavor while accommodating your schedule.
Cake Preparation Timeline
Our butter cake base can be prepared up to two days before serving. Wrap the completely cooled unfrosted cake tightly in plastic wrap and store at room temperature. This method preserves moisture while preventing the cake from drying out.
Freezing Options
Freezer storage extends your timeline significantly. We suggest wrapping individual cake layers in plastic wrap followed by aluminum foil for maximum protection. Frozen butter cake maintains quality for up to three months when properly stored.
Component Preparation
Buttercream frosting offers excellent make-ahead potential. Prepare the frosting up to one week in advance and refrigerate in an airtight container. Allow refrigerated frosting to return to room temperature and rewhip before applying to restore its smooth consistency.
Assembly Strategy
We recommend frosting your cake no more than 24 hours before serving for optimal appearance and texture. Store the frosted cake at room temperature under a cake dome or in an airtight container.
Storage Guidelines by Type
| Cake Type | Room Temperature | Refrigerated | Frozen |
|---|---|---|---|
| Unfrosted Butter Cake | 4 days | 7 days | 3 months |
| Frosted Butter Cake | 3 days | 5 days | 2 months |
| Individual Components | N/A | 7 days (frosting) | 3 months |
Serving Preparation
Remove frozen cake layers 2-3 hours before assembly to ensure complete thawing. Bring all refrigerated components to room temperature 30 minutes before final preparation for easier handling and better texture integration.


Storage Tips

Proper storage ensures our butter cake maintains its tender crumb and rich flavor for days after baking. We recommend following exact guidelines based on your frosting choice and intended serving timeline.
Room Temperature Storage
Our freshly baked butter cake stays perfectly moist at room temperature for up to 3 days when covered properly. We suggest using a cake dome or wrapping the cake tightly with plastic wrap to prevent the surface from drying out. This method works best for unfrosted cakes or those with stable buttercream frosting.
Refrigerator Storage
Refrigeration extends our butter cake’s life to about 1 week when wrapped with aluminum foil or plastic wrap. This storage method prevents moisture absorption and maintains the cake’s fresh texture. We place frosted cakes with buttercream or ganache in an airtight container and refrigerate for 30 minutes first to firm up the frosting before covering with plastic wrap.
| Storage Method | Duration | Best For |
|---|---|---|
| Room Temperature | Up to 3 days | Unfrosted cake, stable buttercream |
| Refrigeration | Up to 1 week | All frosting types |
| Freezing | 2-3 months | Long-term storage |
Freezer Storage
We can freeze our butter cake for 2 to 3 months when properly wrapped. First, we wrap the cake tightly with plastic wrap and then add a layer of aluminum foil for extra protection against freezer burn. Buttercream decorated cakes freeze well, but we thaw them slowly in the refrigerator to prevent the icing from cracking.
Special Frosting Considerations
Cakes topped with whipped cream or cream cheese frosting require immediate refrigeration since these frostings become unstable at room temperature. We always store these varieties in the refrigerator to maintain their texture and prevent spoilage.
Storage Best Practices
We cover all cakes thoroughly to prevent them from absorbing refrigerator odors that could affect the cake’s delicate butter flavor. When our cake or frosting contains perishable ingredients, refrigeration becomes essential for food safety. These simple storage steps help us enjoy our homemade butter cake at its peak quality for the longest possible time.
Serving Suggestions

We believe our perfectly baked butter cake deserves presentation options that highlight its rich flavor and tender crumb. The beauty of this classic dessert lies in its versatility and ability to shine whether served simply or dressed up for special occasions.
Simple Serving Options
Our butter cake stands beautifully on its own, making it an ideal choice for afternoon coffee or casual snacking. The rich buttery flavor requires no embellishment to satisfy your sweet tooth. We recommend serving generous slices at room temperature to fully appreciate the cake’s moist texture and deep vanilla notes.
For an elegant touch, we suggest dusting the cake with powdered sugar just before serving. This simple addition creates visual appeal while helping to conceal any minor imperfections on the surface.
Classic Pairings
Warm butter cake paired with vanilla ice cream creates a delightful temperature contrast that enhances both the cake’s tender crumb and the ice cream’s creamy texture. We recommend heating individual slices for 10 to 15 seconds in the microwave before adding the ice cream.
Fresh whipped cream and seasonal berries transform our butter cake into a restaurant quality dessert. Strawberries work particularly well as their natural acidity balances the cake’s richness. We suggest macerating the berries with a tablespoon of sugar for 15 minutes to release their natural juices.
Creative Serving Ideas
Raspberry sauce adds a sophisticated flavor profile to our butter cake. The tart sweetness of the berries creates an elegant contrast against the rich butter base. We recommend warming the sauce slightly before drizzling it over individual slices.
Leftover butter cake transforms beautifully into French toast for special breakfast occasions. We slice the cake into half inch thick pieces and prepare them using your favorite French toast batter. This creative repurposing extends the cake’s enjoyment beyond traditional dessert service.
Presentation Tips
For bundt style presentations, we allow the cake to cool completely in the pan before removing it. This cooling period helps any glazes or sauces penetrate the cake’s surface for enhanced flavor throughout each bite.
Wire cooling racks ensure even air circulation around the entire cake, preventing condensation that could make the bottom soggy. We transfer the cake to serving plates only after it reaches room temperature for optimal texture and easier slicing.


Troubleshooting Common Issues

Even experienced bakers encounter challenges when making butter cake. We’ll address the most common problems and provide practical answers to ensure your cake turns out perfectly every time.
Cake is Too Dense
Dense butter cake typically results from three main culprits that we can easily avoid. Too much flour in the batter creates a heavy texture that weighs down the cake’s structure. Over-mixing the batter develops excessive gluten which leads to a tough crumb instead of the tender texture we want.
Ingredients that aren’t at room temperature prevent proper incorporation and affect the cake’s ability to rise. We recommend measuring flour accurately by fluffing it first then spooning it into your measuring cup and leveling it off. Mix the batter just until ingredients are combined to avoid overworking the gluten. Ensure all ingredients reach room temperature before mixing for optimal results.
Cake is Too Dry
Dry butter cake disappointments stem from overbaking or insufficient moisture in the recipe. We prevent this by removing the cake from the oven when a toothpick inserted in the center comes out with moist crumbs attached. Completely clean toothpicks indicate overbaking which draws moisture from the cake.
Consider adding simple syrup to the cooled cake layers to enhance moisture retention. This technique works particularly well when you plan to store the cake for more than a day. Monitor your oven temperature closely since variations can cause faster baking than expected.
Cake Didn’t Rise Properly
Poor rising occurs when leavening agents fail to perform their crucial function. Expired baking powder loses its effectiveness over time while improperly activated ingredients won’t create the lift we need. Oven temperature issues also prevent proper rising by cooking the cake too quickly or too slowly.
Use fresh leavening agents and ensure they activate correctly by checking expiration dates regularly. Avoid over-mixing the batter after adding flour since this deflates air bubbles that contribute to rise. Check your oven temperature accuracy using an oven thermometer to ensure even heating throughout the baking process.
We also recommend avoiding excessive air incorporation during the creaming process as this can result in a deflated cake during baking. Verify your oven’s temperature calibration regularly since inaccurate readings significantly affect baking results.


Recipe Variations

Classic butter cake transforms beautifully into exciting flavor profiles that cater to different taste preferences. These variations maintain the same tender crumb and rich texture while adding distinctive flavors.
Lemon Butter Cake
We create this bright and citrusy variation by incorporating fresh lemon juice and zest into the classic butter cake recipe. Add 1/4 cup fresh lemon juice to the wet ingredients and fold in 2 tablespoons of lemon zest with the flour mixture for maximum flavor impact.
The lemon juice replaces an equal amount of milk in the original recipe to maintain proper moisture balance. Fresh lemon zest provides intense citrus oils that infuse throughout the cake during baking. This variation pairs exceptionally well with cream cheese frosting that has been enhanced with additional lemon juice and zest.
Chocolate Butter Cake
Rich chocolate flavor elevates the classic butter cake into an indulgent dessert perfect for chocolate lovers. Replace 1/4 cup of all-purpose flour with unsweetened cocoa powder to create the chocolate base. Sift the cocoa powder with the flour and other dry ingredients to prevent lumps from forming.
The cocoa powder intensifies the chocolate taste while maintaining the cake’s signature tender texture. We recommend using high-quality unsweetened cocoa powder for the deepest flavor. This variation works beautifully with both chocolate buttercream and vanilla frosting options.
Vanilla Bean Butter Cake
Vanilla bean paste or scraped vanilla bean seeds create an elegant upgrade to the standard vanilla extract version. Replace the vanilla extract with 1 tablespoon vanilla bean paste or the seeds from one vanilla bean pod. The tiny black specks throughout the cake indicate premium vanilla flavor.
Vanilla bean paste contains both vanilla extract and vanilla bean specks for convenience and consistent distribution. Fresh vanilla beans require scraping the seeds from the pod using a knife blade. This sophisticated variation showcases pure vanilla flavor and creates an impressive presentation with its distinctive appearance.


Conclusion
We’ve shared everything you need to master the art of butter cake baking. From our foolproof recipe to essential equipment and troubleshooting tips this comprehensive guide ensures you’ll create perfect results every time.
The beauty of butter cake lies in its simplicity and endless possibilities. Whether you stick with the classic version or explore our flavor variations you’ll have a dessert that’s guaranteed to impress family and friends.
With proper storage techniques and serving suggestions you can enjoy this timeless treat for days. We’re confident that our step-by-step approach will help you create memorable moments around this beloved classic dessert.
Frequently Asked Questions
What makes this butter cake recipe foolproof?
This recipe uses the traditional creaming method with clear step-by-step instructions and specific measurements. The technique of alternating dry and wet ingredients ensures consistent results, while room temperature ingredients guarantee proper mixing and a tender crumb every time.
Can I make this butter cake ahead of time?
Yes! You can prepare the unfrosted cake up to 2 days in advance and store it covered at room temperature. For longer storage, wrap individual layers tightly and freeze for up to 2-3 months. Thaw completely before frosting.
What equipment do I need to make butter cake?
Essential equipment includes a stand mixer or hand mixer, 8-inch cake pan, digital scale, measuring cups and spoons, rubber spatula, cake tester, wire cooling racks, and mixing bowls. These tools ensure proper mixing and consistent baking results.
How should I store my butter cake?
Store unfrosted cake or those with buttercream at room temperature for up to 3 days. Refrigerate cakes with cream cheese or whipped cream frosting for up to 1 week. For freezing, wrap tightly and store for 2-3 months.
Why did my butter cake turn out dense?
Dense cake usually results from too much flour, over-mixing the batter, or using cold ingredients. Ensure ingredients are at room temperature, measure flour accurately, and mix just until combined after adding flour to avoid developing too much gluten.
Can I make variations of this butter cake?
Absolutely! Popular variations include Lemon Butter Cake (add lemon juice and zest), Chocolate Butter Cake (replace some flour with cocoa powder), and Vanilla Bean Butter Cake (use vanilla bean paste). Each maintains the same tender texture.
How do I know when my butter cake is done baking?
The cake is done when a cake tester or toothpick inserted in the center comes out clean or with just a few moist crumbs. The cake should also spring back lightly when touched and pull slightly away from pan edges.
What’s the best way to serve butter cake?
Serve at room temperature for optimal flavor and texture. Dust with powdered sugar for elegance, pair with vanilla ice cream or fresh berries, or drizzle with fruit sauces. Creative options include using leftovers for French toast.