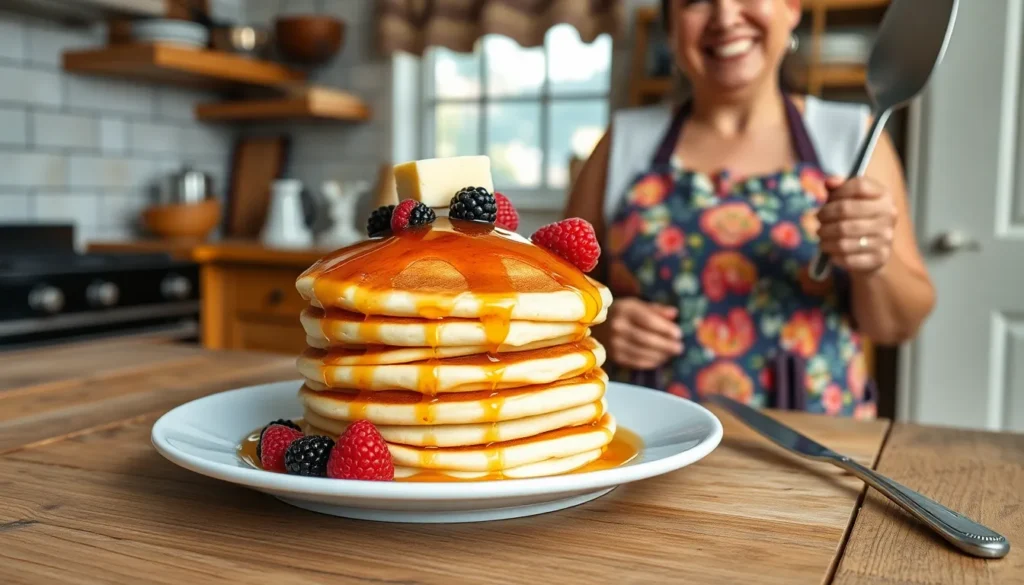
There’s nothing quite like the smell of buttermilk pancakes sizzling on a hot griddle on a lazy weekend morning. These fluffy, golden stacks have been America’s breakfast favorite for generations, and it’s easy to see why. The tangy buttermilk creates an incredibly tender crumb while adding that subtle depth of flavor that sets these pancakes apart from ordinary ones.
We’ve perfected this classic recipe to deliver consistently fluffy buttermilk pancakes that’ll have your family rushing to the breakfast table. The secret lies in not overmixing the batter and letting those lumps work their magic. Trust us – a few lumps are your best friend when it comes to achieving that perfect light and airy texture.
Whether you’re hosting a weekend brunch or treating your loved ones to a special breakfast, these homemade buttermilk pancakes deliver restaurant-quality results every single time. Get ready to create memories one delicious stack at a time.
Ingredients
We’ve carefully selected each ingredient to create the perfect balance of flavor and texture in our buttermilk pancakes. These simple pantry staples work together to deliver those signature fluffy results every time.
Dry Ingredients
- 2 cups all-purpose flour
- 2 tablespoons granulated sugar
- 2 teaspoons baking powder
- 1 teaspoon baking soda
- 1 teaspoon salt
Wet Ingredients
- 2 cups buttermilk (room temperature)
- 2 large eggs (room temperature)
- 4 tablespoons unsalted butter (melted and slightly cooled)
- 1 teaspoon vanilla extract
- Additional butter or oil for cooking
Equipment Needed
 1")
Making perfect buttermilk pancakes requires the right tools to ensure smooth preparation and consistent results. We recommend gathering these essential items before starting your cooking process.
Large mixing bowl serves as our primary workspace for combining all ingredients. The spacious design allows us to whisk dry ingredients thoroughly without creating flour clouds across our kitchen counter.
Whisk becomes our best friend for achieving the proper batter consistency. This tool helps us combine wet and dry ingredients just enough to create the perfect lumpy texture that produces fluffy pancakes.
Measuring cups and spoons ensure accuracy in our ingredient ratios. Precise measurements make the difference between mediocre and exceptional pancakes that turn out consistently delicious every time.
Griddle or large nonstick skillet provides the cooking surface for transforming our batter into golden brown pancakes. We prefer a griddle for cooking multiple pancakes simultaneously, though a large skillet works perfectly for smaller batches.
Spatula gives us the control needed for flipping pancakes at the perfect moment. A thin, flexible spatula slides easily under delicate pancakes without breaking them during the crucial flip.
Scoop offers optional convenience for portion control and uniform pancake sizes. This tool helps us create evenly sized pancakes that cook at the same rate, resulting in a more professional presentation.
Having these tools ready before we begin cooking streamlines our pancake making process and helps us achieve restaurant quality results in our own kitchen.
Instructions
 2")
We’ll walk through each step to create perfectly fluffy buttermilk pancakes with golden brown exteriors and tender interiors. Following these detailed instructions ensures consistent results every time.
Prep the Batter
Start by whisking together flour, sugar, baking powder, baking soda, and salt in a large bowl until evenly distributed. In a separate bowl, whisk buttermilk, eggs, and vanilla extract until smooth. Add the melted butter to the wet ingredients and mix until just combined.
Gently fold the wet ingredients into the dry ingredients using a spatula or spoon. Stop mixing as soon as the ingredients are almost combined – lumps are perfectly fine and actually desired. Overmixing develops gluten strands that create tough, dense pancakes instead of our desired light and airy texture.
Rest the Batter
The batter works best when used immediately after preparation rather than resting. Prepare the mixture just before cooking to ensure optimal rise and texture from the baking powder and baking soda reaction with the acidic buttermilk.
Heat the Pan
Preheat your non-stick pan, cast iron skillet, or griddle over medium heat until it reaches 325-350°F. Test the temperature by sprinkling a few drops of water on the surface – they should sizzle and evaporate quickly.
Grease the cooking surface with butter or non-stick cooking spray before adding the first batch of batter. Reapply grease between batches as needed to prevent sticking.
Cook the Pancakes
Use a ¼ cup measuring cup to scoop batter onto the heated pan, spacing pancakes about 2 inches apart. Watch for bubbles to form across the surface and begin popping after 2-3 minutes – this signals the bottom is golden brown and ready to flip.
Carefully flip each pancake using a wide spatula and cook for another 2-3 minutes until the second side develops a golden brown color. Avoid pressing down on the pancakes as this compresses their fluffy texture.
Keep Pancakes Warm
Place finished pancakes on a baking sheet in a preheated 200°F oven while cooking remaining batches. This method keeps them warm without overcooking or drying out the texture we’ve worked to achieve.
Serving Suggestions
 3")
Once you’ve mastered our fluffy buttermilk pancakes, the fun begins with choosing how to serve them. We love exploring both traditional and creative ways to elevate these golden breakfast treats.
Classic Toppings
Butter and maple syrup remain the quintessential pairing that never goes out of style. We recommend spreading a pat of butter while the pancakes are still warm to let it melt beautifully into every fluffy layer.
Fresh berries bring natural sweetness and vibrant color to your stack. Blueberries, strawberries, and raspberries offer delightful bursts of flavor that complement the tangy buttermilk base perfectly.
Sliced bananas create a timeless combination that adds creamy texture and mild sweetness. We often arrange them in overlapping circles for an attractive presentation that tastes as good as it looks.
Crispy bacon provides the perfect savory contrast to sweet pancakes. The salty crunch balances beautifully with the soft, fluffy texture of our buttermilk recipe.
Honey serves as an excellent alternative to maple syrup, offering floral notes that enhance the pancakes’ natural flavor profile.
Creative Variations
Stir-in additions transform ordinary pancakes into special treats. We love folding fresh blueberries or chocolate chips directly into the batter before cooking for bursts of flavor in every bite.
Seasonal fruit toppings keep your breakfast exciting year-round. Apple slices work wonderfully in fall, while fresh strawberries shine during summer months.
Nutty delights add satisfying crunch and rich flavor. Chopped pecans, walnuts, or almonds sprinkled on top create textural interest that elevates the entire dish.
Indulgent toppings turn breakfast into dessert. Whipped cream, hot fudge, or caramel sauce transform our buttermilk pancakes into decadent treats perfect for special occasions.
Complete breakfast accompaniments round out the meal beautifully. We suggest serving alongside scrambled eggs, oven-baked bacon, or a colorful summer fruit salad for a restaurant-quality breakfast experience at home.
Storage and Reheating
 4")
We understand that buttermilk pancakes often yield more than we can eat in one sitting. Proper storage techniques ensure we can enjoy these fluffy treats days or even months later without sacrificing their delicious taste and texture.
Storing Leftover Pancakes
Room temperature cooling marks the first crucial step in pancake preservation. We must allow our pancakes to cool completely before storing them to prevent moisture buildup that could make them soggy.
Refrigeration offers the most convenient short-term storage solution. We place cooled pancakes in an airtight container or wrap them carefully in foil before transferring to the fridge. Our pancakes stay fresh for approximately one week when stored this way.
Freezing extends storage time significantly for longer preservation. We wrap each pancake tightly in plastic wrap then place them in a freezer-safe bag for optimal protection. This method keeps our buttermilk pancakes fresh for up to three months.
Freezing Instructions
Complete cooling prevents ice crystal formation that could damage pancake texture. We start by allowing our pancakes to reach room temperature on a cooling rack.
Flash freezing creates individually frozen pancakes that won’t stick together. We arrange pancakes in a single layer on a baking sheet and freeze for about 30 minutes until firm.
Stacking with parchment paper separation prevents pancakes from freezing together. We place parchment paper between each pancake once they become firm from the initial freeze.
Freezer bag storage provides the final protection against freezer burn. We transfer our stacked pancakes to a ziplock bag or freezer-safe container while removing as much air as possible for maximum freshness.
Reheating Methods
| Method | Temperature/Setting | Time | Quantity |
|---|---|---|---|
| Microwave | Medium power | 20 seconds per pancake | 1-5 pancakes |
| Oven | 350°F | 10 minutes | Multiple pancakes |
| Toaster | Medium setting | 1-2 cycles | Single pancake |
Microwave reheating offers the quickest solution for individual servings. We place 1 to 5 frozen pancakes on a microwave-safe plate and heat for approximately 20 seconds per pancake. Power levels may require adjustment based on our exact microwave strength.
Oven warming works best for reheating multiple pancakes simultaneously. We preheat our oven to 350°F then place pancakes in a foil packet or on a sheet pan covered with foil. Ten minutes of baking restores warmth while maintaining moisture.
Toaster reheating suits single pancake portions but requires careful attention. We monitor closely to prevent over-crisping while ensuring thorough warming throughout.
Skillet and air fryer methods provide additional versatility for pancake reheating. These techniques help maintain optimal moisture levels while delivering evenly warmed pancakes that taste freshly made.
Tips for Perfect Buttermilk Pancakes
 5")
Making consistently perfect buttermilk pancakes requires attention to key techniques that separate good pancakes from extraordinary ones. We’ve mastered these essential tips through years of testing and refinement.
Temperature Control
Medium heat proves crucial for achieving evenly cooked pancakes. We maintain this temperature throughout the cooking process to prevent burning the outsides while keeping the insides raw. High heat creates uneven results with crispy exteriors and undercooked centers.
Mixing Technique
Gentle combining of ingredients makes all the difference in pancake texture. We whisk dry ingredients together in one bowl and wet ingredients in another before combining them with minimal stirring. Overmixing develops gluten strands that create tough and dense pancakes instead of light and fluffy ones.
Batter Consistency
The perfect batter maintains a thick but pourable consistency. We add buttermilk gradually if the mixture becomes too thick to pour smoothly. The batter should flow from a spoon but hold its shape when dropped onto the griddle.
Flipping Indicators
Bubbles appearing on the surface signal readiness for flipping. We wait for these bubbles to pop and the edges to set before turning the pancakes. This timing ensures both sides cook evenly without burning.
Portioning Control
Using a scoop creates uniform pancakes that cook at the same rate. We leave adequate space between each pancake on the griddle to allow for easy flipping and even heat distribution.
Keeping Pancakes Warm
A warm oven set to 200°F maintains perfect serving temperature for finished pancakes. We place completed pancakes on a baking sheet in the oven while cooking remaining batches to ensure every pancake stays warm and fresh.
Equipment Preparation
Proper griddle preparation prevents sticking and ensures even browning. We preheat the cooking surface thoroughly before adding any batter and maintain consistent heat throughout the cooking process.
Troubleshooting Common Issues
 6")
Even experienced home cooks encounter challenges when making buttermilk pancakes. We’ll address the most common problems and provide practical answers to ensure your pancakes turn out perfectly every time.
Flat Pancakes
Flat pancakes typically result from overmixing the batter, which develops gluten and creates a dense texture instead of the fluffy pancakes we desire. When we mix too vigorously, we’re essentially working against the tender crumb that makes buttermilk pancakes special. Another culprit is batter that’s too runny, causing pancakes to spread excessively on the griddle and lose their structure.
Our Solution: Mix your batter just until the ingredients combine, leaving small lumps throughout. These lumps will disappear during cooking and contribute to the pancakes’ light texture. If your batter appears too thin, gradually add flour until you achieve the proper consistency. We recommend using thick buttermilk or adjusting with additional flour when the mixture lacks body.
Dense, Heavy Texture
Dense pancakes often stem from expired or inactive leavening agents that fail to provide the necessary lift. Baking powder and baking soda lose potency over time, and using ineffective leavening results in pancakes that fall flat even though proper mixing technique.
Our Solution: Test your leavening agents before starting. Mix baking powder with hot water or combine baking soda with vinegar—both should produce vigorous fizzing if they’re active. Replace any leavening agents that don’t react properly, as fresh ingredients are essential for achieving the fluffy texture that defines great buttermilk pancakes.
Burnt or Unevenly Cooked Pancakes
High heat or uneven cooking temperatures create pancakes that burn on the outside while remaining raw inside. Overheated oil or butter can stain the pancake surface before you even pour the batter, creating an unappetizing appearance and bitter flavor.
Our Solution: Maintain medium heat throughout the cooking process and preheat your pan evenly before adding batter. Avoid overheating fats, and allow your pan to cool between batches if necessary. We find that consistent, moderate temperature produces evenly golden pancakes with properly cooked centers.
Lumpy Batter
Lumpy batter can result from improper flour storage or insufficient mixing technique. While some lumps are desirable in pancake batter, excessive clumping indicates ingredient issues that need addressing.
Our Solution: Break up flour lumps with a fork before combining wet and dry ingredients. Store flour in airtight containers to prevent moisture absorption and clumping. Mix minimally once you combine ingredients, as gentle incorporation prevents both overmixing and excessive lump formation.
Gummy or Rubber Pancakes
Gummy texture occurs when we overmix the batter or use too much liquid, creating a chewy consistency instead of the tender bite we expect from quality buttermilk pancakes.
Our Solution: Mix ingredients until just combined, stopping as soon as you no longer see dry flour. Adjust batter consistency by adding flour rather than liquid if modifications are needed. We emphasize gentle handling throughout the mixing process to maintain the delicate structure that produces tender pancakes.
| Issue | Primary Cause | Key Solution |
|---|---|---|
| Flat Pancakes | Overmixing or runny batter | Mix until just combined; adjust with flour |
| Dense Texture | Inactive leavening agents | Test and replace baking powder/soda |
| Burnt Exterior | High heat or overheated fats | Use medium heat; preheat evenly |
| Excessive Lumps | Improper flour storage | Break lumps with fork; store flour properly |
| Gummy Texture | Overmixing or too much liquid | Mix minimally; adjust with flour |
Make-Ahead Options
 7")
Busy mornings don’t have to mean skipping our favorite fluffy buttermilk pancakes. We can prepare these delicious breakfast treats ahead of time using several proven methods that maintain their exceptional texture and flavor.
Overnight Batter Preparation
We recommend mixing the complete batter the night before for the most convenient morning routine. Combine all dry ingredients in one bowl and whisk together the wet ingredients separately. Gently fold the wet ingredients into the dry mixture until just combined with lumps remaining. Cover the bowl tightly and refrigerate for at least 8 hours or up to 24 hours. Before cooking, give the batter a gentle stir to redistribute the ingredients without overmixing. This method produces exceptionally fluffy pancakes because the extended resting time allows the buttermilk to fully activate the leavening agents.
Make-Ahead Pancake Mix
Creating a dry mix saves important time during busy weeks. We combine 4 cups all-purpose flour, 4 tablespoons granulated sugar, 4 teaspoons baking powder, 2 teaspoons baking soda, 2 teaspoons salt, and 1/2 cup dry buttermilk powder in a large bowl. Whisk the ingredients thoroughly and store in an airtight container in the refrigerator for up to 3 months. When ready to cook, measure 1 cup of the mix and add 3/4 cup milk, 1 large egg, 2 tablespoons melted butter, and 2 tablespoons water. This approach provides consistent results while reducing morning prep time.
Cooked Pancake Storage
We can prepare full batches of pancakes and store them for future enjoyment. Cool the cooked pancakes completely on wire racks to prevent condensation. Layer the pancakes between sheets of parchment paper and place them in freezer-safe bags or containers. Properly stored pancakes maintain their quality for up to 3 months in the freezer. Remove excess air from bags to prevent freezer burn and maintain optimal texture.
| Storage Method | Duration | Container Type | Key Benefit |
|---|---|---|---|
| Overnight Batter | 8-24 hours | Covered bowl | Maximum fluffiness |
| Dry Mix | 3 months | Airtight container | Extended convenience |
| Cooked Pancakes | 3 months | Freezer-safe bags | Instant breakfast option |
Same-Day Advance Preparation
For morning efficiency without overnight planning, we can prepare the batter up to 1 hour before cooking. This shorter resting period still allows the buttermilk to begin working with the leavening agents while maintaining the batter’s optimal consistency. Keep the prepared batter covered at room temperature and stir gently before cooking. This method works particularly well when hosting brunches or feeding large groups.
Conclusion
We’ve covered everything you need to create exceptional buttermilk pancakes that’ll become your go-to breakfast recipe. From mastering the perfect batter consistency to troubleshooting common issues these techniques ensure success every single time.
The beauty of homemade buttermilk pancakes lies in their versatility and convenience. Whether you’re preparing batter the night before for busy mornings or whipping up a fresh batch for weekend brunch you now have all the tools for pancake perfection.
Your kitchen will soon be filled with the aroma of fluffy golden pancakes that rival any restaurant. With proper storage techniques and reheating methods you can enjoy these delicious pancakes whenever the craving strikes. Happy cooking!
Frequently Asked Questions
What makes buttermilk pancakes different from regular pancakes?
Buttermilk pancakes have a distinctive tangy flavor and incredibly fluffy texture thanks to the acidic buttermilk. The acid reacts with baking soda to create extra lift, resulting in lighter, more tender pancakes compared to regular milk-based versions. This unique combination delivers restaurant-quality results with superior taste and texture.
What ingredients do I need for buttermilk pancakes?
You’ll need dry ingredients: 2 cups all-purpose flour, 2 tablespoons sugar, 2 teaspoons baking powder, 1 teaspoon baking soda, and 1 teaspoon salt. For wet ingredients: 2 cups room temperature buttermilk, 2 large eggs, 4 tablespoons melted butter, and 1 teaspoon vanilla extract.
Why is it important not to overmix the batter?
Overmixing develops the gluten in flour, resulting in tough, dense pancakes instead of light and fluffy ones. Mix just until ingredients are combined – lumps are perfectly fine and will disappear during cooking. Stop mixing as soon as you don’t see dry flour for the best texture.
How do I know when to flip my pancakes?
Look for bubbles forming on the surface of the pancake and the edges appearing set. When bubbles pop and stay open, and the bottom is golden brown, it’s time to flip. This usually takes 2-3 minutes on medium heat for perfectly cooked pancakes.
Can I make buttermilk pancake batter ahead of time?
Yes! You can refrigerate the batter for up to 24 hours for maximum fluffiness, or use it within one hour for optimal results. For longer storage, create a dry pancake mix that keeps for up to three months – just add wet ingredients when ready to cook.
How should I store leftover pancakes?
Cool pancakes completely before storing to prevent sogginess. Refrigerate in an airtight container for up to one week, or freeze for up to three months. Layer pancakes with parchment paper when freezing to prevent sticking and maintain quality.
What’s the best way to reheat leftover pancakes?
Multiple methods work well: microwave for 30-60 seconds, toast in a toaster, warm in a 350°F oven for 5-10 minutes, heat in a skillet over medium heat, or use an air fryer at 350°F for 2-3 minutes. Each method helps restore the pancakes’ original texture.
Why are my pancakes turning out flat?
Flat pancakes usually result from expired leavening agents (baking powder or baking soda) or overmixing the batter. Test your leavening agents before use – baking powder should bubble in hot water, baking soda should fizz in vinegar. Replace if they don’t react properly.
What temperature should I cook pancakes at?
Cook pancakes over medium heat for even cooking and proper browning. Too high heat burns the outside while leaving the inside undercooked. Too low heat results in pale, tough pancakes. Medium heat ensures golden-brown exteriors with fully cooked, fluffy interiors.
How can I keep pancakes warm while cooking multiple batches?
Preheat your oven to 200°F and place finished pancakes on a baking sheet in a single layer. This keeps them warm without overcooking while you finish the remaining batches. Cover with foil if you notice them drying out during extended warming.


