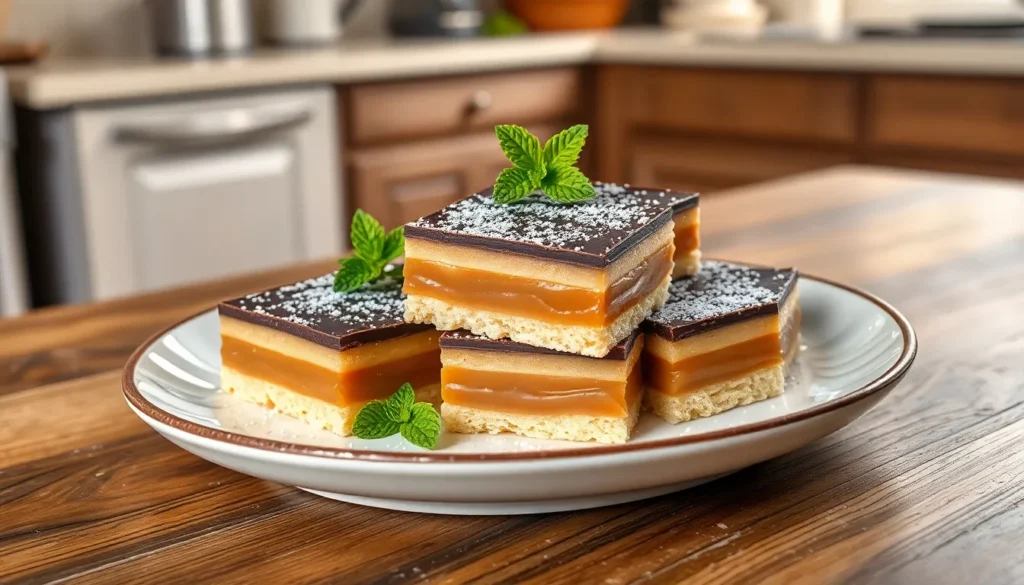
There’s something absolutely magical about a perfectly crafted caramel slice that makes it impossible to resist. This beloved Australian and New Zealand treat combines three heavenly layers – a buttery shortbread base, rich gooey caramel center, and smooth chocolate topping – creating the ultimate indulgent dessert that’ll have everyone begging for the recipe.
We’ve perfected this classic caramel slice recipe to deliver that ideal balance of textures and flavors you’re craving. The secret lies in getting each layer just right: a firm yet tender base that won’t crumble, silky caramel that’s sweet but not cloying, and a glossy chocolate finish that snaps beautifully when you bite into it.
Whether you’re planning a special occasion treat or simply want to satisfy your sweet tooth, this caramel slice delivers bakery-quality results every single time. Trust us – once you make this at home, you’ll never want to buy store-bought again.
Ingredients
We break down our caramel slice into three distinct components that work together to create the perfect dessert. Each layer requires exact ingredients to achieve the ideal texture and flavor profile.
For the Base
- 1 cup all-purpose flour
- 1/2 cup unsalted butter, softened
- 1/4 cup powdered sugar
- 1/4 teaspoon salt
For the Caramel Layer
- 1 can (14 oz) sweetened condensed milk
- 1/4 cup unsalted butter
- 2 tablespoons golden syrup or light corn syrup
- 1/4 teaspoon vanilla extract
- Pinch of sea salt
For the Chocolate Topping
- 7 oz dark chocolate, chopped
- 1/4 cup heavy cream
- 2 tablespoons unsalted butter
- 1 teaspoon vanilla extract


Equipment Needed

Creating perfect caramel slices requires the right tools to ensure each layer sets properly and achieves that signature bakery-quality finish. We’ve compiled the essential equipment list to help you succeed with this three-layer dessert.
Baking Equipment
- 8×8 inch baking pan for the perfect serving size portions
- Parchment paper to line the pan and ensure easy removal
- Electric mixer or whisk for combining base ingredients
- Large mixing bowls for preparing each layer separately
Stovetop Essentials
- Heavy-bottomed saucepan for caramel preparation to prevent burning
- Wooden spoon for stirring the caramel mixture consistently
- Candy thermometer to monitor caramel temperature accurately
Chocolate Layer Tools
- Microwave-safe bowl for melting chocolate smoothly
- Double boiler as an alternative melting method
- Offset spatula for spreading chocolate evenly across the caramel
Finishing Equipment
- Sharp knife for clean slicing through all layers
- Hot water bowl for cleaning the knife between cuts
- Cutting board with stable surface for precise portioning
| Equipment Category | Essential Items | Purpose |
|---|---|---|
| Baking | 8×8 inch pan, parchment paper | Base preparation and easy removal |
| Stovetop | Heavy saucepan, wooden spoon | Caramel cooking without burning |
| Chocolate Work | Microwave bowl, offset spatula | Smooth topping application |
| Finishing | Sharp knife, hot water | Clean professional slices |
Having these tools ready before starting ensures smooth preparation and professional results. The right equipment makes the difference between amateur and bakery-quality caramel slices that showcase each distinct layer beautifully.


Instructions

We’ll guide you through creating each layer of this irresistible caramel slice step by step. The key to success lies in allowing each layer to set properly before adding the next.
Preparing the Base
We start by combining 1½ cups plain flour, ½ cup brown sugar, and ½ cup desiccated coconut in a large mixing bowl. Melt ½ cup butter and pour it into the dry ingredients, mixing until the texture becomes crumbly throughout.
Press this mixture firmly and evenly into your lined 8×8 inch baking pan, ensuring the surface is smooth and compact. We bake the base at 350°F (180°C) for 12 to 15 minutes until it turns lightly golden around the edges.
Remove the pan from the oven and allow the base to cool completely before proceeding. This cooling step prevents the caramel from sinking into the base layer.
Making the Caramel Layer
We melt ½ cup butter in a heavy bottomed saucepan over low to medium heat. Add ¾ cup brown sugar and 1 teaspoon vanilla extract, stirring continuously until the sugar dissolves completely.
Pour in one 14 oz can of sweetened condensed milk and continue stirring constantly without stopping. The mixture will simmer and gradually thicken while darkening to a rich caramel color over approximately 10 minutes.
Once the caramel reaches the proper consistency, we pour it over the cooled base and spread it evenly using a spatula. Place the pan in the refrigerator for 1 hour to allow the caramel layer to set firmly.
Adding the Chocolate Topping
We melt 7 oz of chocolate using either a double boiler or microwave, stirring frequently to prevent burning. Add 1 tablespoon of mild flavored oil to the melted chocolate and stir thoroughly to ensure smooth cutting later.
Pour the chocolate mixture over the set caramel layer, spreading it into an even coating that covers the entire surface. We place the slice back in the refrigerator for at least 30 minutes until the chocolate sets completely.
For clean cuts, we dip a sharp knife in hot water before slicing the caramel slice into even pieces. Store the finished slices in an airtight container in a cool environment to maintain optimal freshness.


Directions for Assembly

With all three components prepared, we can now bring our caramel slice together in the proper sequence. The assembly process requires careful attention to timing and temperature to ensure each layer bonds perfectly with the next.
Layering the Caramel Slice
We begin by placing our cooled biscuit base as the foundation layer in our lined baking pan. The base should feel firm and slightly crisp to the touch before we proceed with the caramel application.
Next, we pour our warm caramel filling directly over the biscuit base, ensuring even coverage across the entire surface. We use a spatula to gently spread the caramel into corners and create a smooth, uniform layer. The caramel should be thick enough to coat the back of a spoon but still pourable.
After spreading the caramel, we return the pan to our preheated oven at 300°F (150°C) for exactly 10 minutes. This additional baking time allows the caramel to bubble gently and develop its signature texture while bonding with the base layer.
Once removed from the oven, we allow the caramel layer to cool at room temperature for approximately 30 minutes before adding our chocolate topping. We then pour the melted chocolate mixture over the caramel, using a palette knife to spread it evenly from edge to edge. The chocolate should create a smooth, glossy finish that completely covers the caramel beneath.
Setting and Chilling
We place our assembled caramel slice in the refrigerator immediately after adding the chocolate layer. The initial 10-minute chill allows the chocolate to set without becoming too firm, creating the perfect cutting consistency.
For complete setting, we recommend chilling the entire slice for at least 2 hours at standard refrigerator temperature. Room temperature setting takes considerably longer, requiring 4 to 6 hours for the same results.
We test for proper setting by gently pressing the chocolate surface with our fingertip. The chocolate should feel firm and leave no indentation when properly set. The caramel layer beneath should hold its shape without oozing when we make a small test cut in one corner.
Once fully chilled, we remove the slice from the refrigerator 5 minutes before cutting to prevent the chocolate from cracking. Using a sharp knife warmed under hot running water and dried between cuts ensures clean, professional-looking squares every time.


Make-Ahead Instructions

We love how flexible caramel slice becomes when we plan ahead. Our favorite approach involves preparing components separately to streamline the assembly process later.
Preparing Components in Advance
Shortbread Base: We recommend baking the shortbread base up to 2 days before assembly. Once cooled completely, we wrap it tightly in plastic wrap and store it at room temperature. The base maintains its texture perfectly and actually becomes easier to work with after resting.
Caramel Filling: Our caramel layer benefits from advance preparation since it needs time to reach the proper consistency. We cook the caramel mixture completely and store it in the refrigerator for up to 3 days or freeze it for up to 1 month. When ready to use, we gently reheat the caramel in a saucepan over low heat until it becomes spreadable again.
Assembly Timing and Storage
Once we assemble all three layers, the completed caramel slice stores beautifully in an airtight container for up to 5 days at room temperature. We find the flavors actually improve after the first day as each layer melds together.
For longer storage, we wrap individual portions in parchment paper and place them in freezer-safe containers. The slice remains fresh in the freezer for up to 3 months without losing its signature texture or flavor.
Thawing and Serving
When we need frozen portions, we transfer them to the refrigerator overnight for gradual thawing. Room temperature thawing takes about 2 hours for individual pieces. We never rush this process since proper thawing ensures the chocolate layer remains glossy and the caramel maintains its perfect consistency.
The make-ahead nature of caramel slice makes it our go-to dessert for entertaining since we can complete most of the work days before guests arrive.


Storage Tips

Proper storage ensures our caramel slices maintain their perfect texture and delicious flavor for days after preparation. We recommend using airtight containers to protect the layers from air exposure and prevent the chocolate from absorbing unwanted odors.
Room Temperature Storage
For short-term storage, we can keep caramel slices at room temperature in an airtight container for up to 4 to 5 days. The ambient temperature plays a crucial role in this storage method. Hot environments make room temperature storage unsuitable since the chocolate topping can melt and lose its firm texture.
Refrigerator Storage
Refrigeration extends the shelf life of our caramel slices significantly. We can store them in the fridge for up to 7 days while maintaining optimal quality. Before serving refrigerated slices, we should bring them to room temperature for the best texture and taste experience. This allows the caramel to soften slightly and the chocolate to lose its hard chill.
Freezing for Long-Term Storage
For extended storage, freezing offers an excellent solution. We wrap individual slices in food wrap and place them in an airtight bag or container. Frozen caramel slices maintain their quality for up to 3 months. Thawing should occur at room temperature or in the refrigerator to preserve the layers’ integrity.
| Storage Method | Duration | Temperature Requirements |
|---|---|---|
| Room Temperature | 4-5 days | Cool, dry environment |
| Refrigerator | 7 days | Standard fridge temperature |
| Freezer | 3 months | Standard freezer temperature |
Slicing for Best Results
We achieve the cleanest cuts by removing slices from the refrigerator a few minutes before slicing. Running a knife under warm water and wiping it dry helps create smooth cuts. Quick slicing prevents the chocolate from melting or smearing into the caramel layer, maintaining the distinct appearance of each component.
Serving Suggestions

We believe presentation transforms caramel slice from a simple dessert into an elegant treat worthy of any occasion. Whether we’re serving guests at a dinner party or enjoying a casual afternoon snack, these presentation techniques elevate our homemade caramel slice.
Elegant Plating for Special Occasions
For formal dining experiences, we recommend using abstract or long narrow plates to create visual impact. Arranging slices point-to-base along the plate edge delivers a stylish restaurant-quality presentation that impresses guests. This technique showcases each distinct layer while creating geometric visual interest.
We enhance the plate’s aesthetic appeal by lightly dusting the surrounding area with cocoa powder or powdered sugar using a fine sieve. White icing sugar works particularly well on darker plates, creating striking contrast that makes our caramel slice the focal point. For an artistic touch, we place a spoon and fork on the plate before dusting, which leaves a professional stencil effect once removed.
Garnish Ideas That Impress
Adding a rosette of freshly whipped cream alongside a small mint sprig provides both visual appeal and complementary flavors. The cream’s lightness balances the rich caramel while the mint adds a fresh aromatic note. Fruit curls from oranges or lemons create beautiful color contrast and introduce citrus brightness that cuts through the dessert’s sweetness.
Casual Serving Methods
For everyday enjoyment, we cut our caramel slice into neat bars or squares. Removing slices from the refrigerator 10-15 minutes before serving allows the chocolate layer to lose its chill, making each bite more enjoyable and easier to cut through cleanly.
Perfect Pairings
Our caramel slice pairs beautifully with hot beverages like coffee or tea, where the drinks’ slight bitterness complements the dessert’s sweetness. For a more indulgent experience, we serve individual slices with a scoop of vanilla ice cream, creating temperature and texture contrast that enhances each component.
| Serving Style | Best Occasions | Preparation Time |
|---|---|---|
| Elegant plating | Dinner parties, special events | 5-10 minutes |
| Casual squares | Afternoon tea, family gatherings | 2-3 minutes |
| With ice cream | Summer desserts, celebrations | 3-5 minutes |
These versatile serving suggestions ensure our caramel slice adapts perfectly to any setting while maintaining its delicious appeal.


Tips for Perfect Caramel Slice

Creating the ultimate caramel slice requires attention to detail across all three layers. We’ve compiled expert techniques that will elevate your homemade version to bakery-quality standards.
Base Layer Perfection
Browning butter transforms our shortbread base by adding a rich nutty flavor and aroma that sets professional caramel slices apart from basic versions. We can brown butter for both the base and caramel filling to create depth throughout the entire dessert.
Simple hand mixing prevents overworking the dough and maintains the tender crumbly texture we want in our base. Mix ingredients just until combined then press firmly into your prepared pan before baking until lightly toasted.
Caramel Layer Mastery
Sweetened condensed milk serves as our secret weapon for achieving that signature silky caramel texture while providing natural thickening properties. This ingredient eliminates the guesswork involved in traditional caramel making.
Low heat cooking prevents disaster and ensures smooth results every time. We cook our caramel mixture for approximately 30 minutes while stirring constantly to prevent burning and achieve the perfect consistency.
Monitor texture changes rather than color changes when determining doneness. Our caramel is ready when it coats the back of a spoon and holds its shape when drizzled.
Golden syrup acts as an invert sugar that enhances texture and helps our caramel layer set properly without becoming too firm or too soft.
Chocolate Topping Excellence
Adding a small amount of oil to melted chocolate prevents cracking when we cut our finished slices. Coconut oil works particularly well and won’t affect the chocolate’s flavor profile.
Scoring the chocolate layer while it sets ensures clean cuts without breaking or shattering the top layer. Use a sharp knife to lightly mark cutting lines before the chocolate fully hardens.
| Component | Key Success Factor | Timing |
|---|---|---|
| Base | Brown butter for flavor | Hand mix only |
| Caramel | Low heat cooking | 30 minutes constant stirring |
| Chocolate | Add oil for flexibility | Score while setting |
These professional techniques guarantee consistent results and help us avoid common pitfalls that can ruin an otherwise perfect caramel slice.
Conclusion
This comprehensive guide equips you with everything needed to create exceptional homemade caramel slices that rival professional bakeries. From mastering the buttery shortbread base to achieving that perfect glossy chocolate finish we’ve covered every essential technique and tip.
The beauty of this dessert lies in its make-ahead flexibility and impressive presentation. Whether you’re preparing for a special celebration or simply treating yourself these golden layers of indulgence never disappoint.
With proper storage techniques and our expert tips you’ll find these caramel slices become even more delicious over time. We’re confident that once you experience the satisfaction of creating this beloved treat from scratch you’ll never look back to store-bought versions again.
Frequently Asked Questions
What are the three main layers of a caramel slice?
A caramel slice consists of three distinct layers: a buttery shortbread base made with flour, butter, and powdered sugar; a rich caramel center using sweetened condensed milk, butter, and golden syrup; and a smooth chocolate topping made with dark chocolate, heavy cream, and butter. Each layer requires specific ingredients and techniques to achieve the perfect texture and flavor balance.
What essential equipment do I need to make caramel slices?
You’ll need an 8×8 inch baking pan, parchment paper, an electric mixer or whisk, and a heavy-bottomed saucepan for the caramel. A candy thermometer ensures accurate temperature monitoring, while a microwave-safe bowl or double boiler helps melt chocolate properly. Having a sharp knife ready is crucial for clean slicing of the finished dessert.
How long can I store caramel slices?
Caramel slices can be stored at room temperature in an airtight container for 4-5 days, or refrigerated for up to 7 days. For longer storage, individual slices can be frozen for up to 3 months. Always use airtight containers to protect the layers from air exposure and maintain optimal texture and flavor.
Can I make caramel slice components ahead of time?
Yes, you can prepare components separately for convenience. The shortbread base can be baked up to 2 days in advance and stored at room temperature. The caramel layer can be cooked and refrigerated for up to 3 days or frozen for a month. Once assembled, the complete slice improves in flavor over time.
How do I achieve clean cuts when slicing?
Use a warm, sharp knife to prevent smearing the layers. Dip the knife in hot water and wipe clean between cuts. Score the chocolate layer while it’s still setting for easier cutting later. Ensure the chocolate is completely firm before slicing, and consider warming the knife again if the chocolate begins to stick.
What are the best serving suggestions for caramel slices?
For formal occasions, serve on elegant plates with cocoa powder or powdered sugar garnish, plus whipped cream and mint. For casual settings, cut into neat squares and pair with hot beverages or ice cream. The versatile dessert adapts to any occasion while maintaining its delicious appeal and visual presentation.
What expert tips ensure perfect caramel slice results?
Brown the butter for the base to enhance flavor depth. Use low heat and constant stirring when making caramel to achieve silky texture. Add a small amount of oil to the chocolate topping to prevent cracking. Score the chocolate layer while setting and always let each layer cool properly before adding the next.


