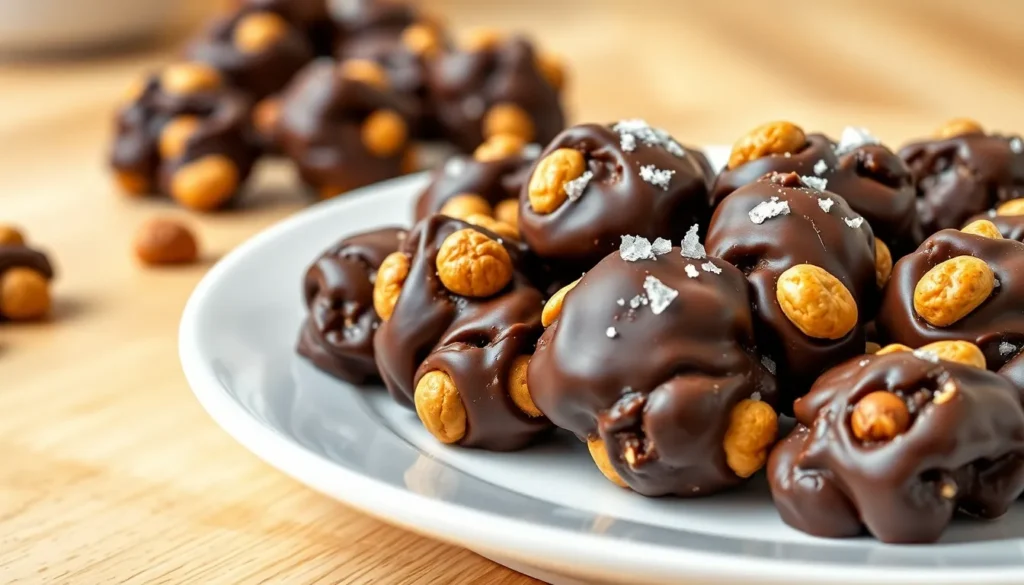
Nothing beats the irresistible combination of creamy chocolate and rich peanut butter wrapped around crunchy peanuts. These chocolate peanut butter peanut clusters deliver that perfect trifecta of flavors and textures that’ll have you reaching for just one more piece every single time.
We’ve perfected this simple yet satisfying treat that requires no baking and comes together in minutes. Whether you’re preparing for a holiday gathering or simply craving something sweet and salty, these clusters hit every mark. The beauty lies in their simplicity – melted chocolate meets smooth peanut butter while roasted peanuts add that essential crunch.
What makes these clusters truly special is how they satisfy multiple cravings at once. You’ll get your chocolate fix, that creamy peanut butter richness, and the satisfying crunch of real peanuts all in one perfect bite. They’re incredibly versatile too – perfect for gift-giving, potluck desserts, or keeping stashed in your freezer for those late-night sweet tooth emergencies.
Ingredients
We keep the ingredient list simple and focused on quality components that deliver maximum flavor impact. These carefully selected ingredients create the perfect balance of sweet chocolate and nutty crunch in every cluster.
For the Chocolate Coating
- 12 ounces semi-sweet chocolate chips
- 2 tablespoons coconut oil or shortening
- 1 teaspoon vanilla extract
For the Peanut Mixture
- 1 cup creamy peanut butter
- 2 cups salted roasted peanuts
- 1 cup mini marshmallows
- 1/2 cup powdered sugar
- 1/4 teaspoon salt (if using unsalted peanuts)


Equipment Needed
 1")
Creating perfect chocolate peanut butter peanut clusters requires just a few essential kitchen tools that most home cooks already have on hand. We recommend gathering these items before starting to ensure a smooth preparation process.
Microwave-safe bowl serves as our primary mixing vessel for melting chocolate and peanut butter together. Glass or ceramic bowls work best since they distribute heat evenly and prevent hot spots that could burn the chocolate. Choose a bowl large enough to accommodate all ingredients with room for stirring.
Baking sheet or tray provides the foundation for setting our clusters. We always line these with parchment paper or wax paper to prevent sticking and make removal effortless. Having two sheets ready allows us to work efficiently when portioning larger batches.
Spoon or cookie scoop helps us create uniform clusters with consistent sizing. A tablespoon or small ice cream scoop works perfectly for dropping the mixture onto our prepared sheets. Consistent sizing ensures even cooling and professional-looking results.
Rubber spatula becomes invaluable for scraping down bowl sides and folding ingredients together without damaging delicate components. The flexible head reaches into corners that spoons cannot access effectively.
Measuring cups and spoons guarantee accurate proportions for our chocolate to peanut butter ratio. Precision in measuring creates the perfect balance of flavors and textures that make these clusters irresistible.
Optional equipment includes a double boiler for those who prefer stovetop melting over microwave methods. Some bakers find this approach gives them more control over the melting process and reduces the risk of overheating.


Instructions
 2")
Creating these irresistible chocolate peanut butter peanut clusters requires careful attention to each step for perfect results. We’ll guide you through the straightforward process that transforms simple ingredients into a delectable treat.
Prep the Workspace
We begin by gathering our essential materials including parchment or waxed paper, rimmed baking sheets, a microwave-safe bowl, a spoon, and a teaspoon for measuring. Line the baking sheets with parchment or waxed paper to prevent sticking and ensure easy removal of our finished clusters. This preparation step creates an organized workspace that streamlines the entire process.
Prepare the Peanut Mixture
Set aside the roasted peanuts, whether salted or unsalted according to your preference. We recommend having optional sea salt ready for sprinkling on top if desired. Keep the peanuts within easy reach since we’ll incorporate them quickly once our chocolate mixture is ready.
Melt the Chocolate
Place the semi-sweet chocolate chips, milk chocolate chips, and peanut butter in our microwave-safe bowl. Microwave the mixture on high power using 30-second intervals, stirring thoroughly after each interval until the mixture becomes completely smooth. This gradual heating method prevents burning and ensures a silky texture that coats the peanuts perfectly.
Combine and Form Clusters
Stir the prepared peanuts into our melted chocolate mixture until every peanut is well coated. Drop the mixture by teaspoonfuls onto our prepared baking sheets, spacing them evenly to prevent clustering together. Sprinkle with sea salt immediately if desired, as this adds a gourmet touch that enhances the overall flavor profile.
Set and Cool
Transfer the baking sheets to the refrigerator for optimal setting conditions. Chill the clusters for 30 minutes or until they become completely firm to the touch. Store the finished clusters in an airtight container where they’ll maintain their quality for up to one week.


Directions for Storage
 3")
We need to store our chocolate peanut butter peanut clusters properly to maintain their delicious texture and flavor. The cooling process after preparation is crucial for proper storage success.
Refrigeration Storage
Our clusters store best in the refrigerator using an airtight container. This method keeps the chocolate solid and prevents unwanted melting. We can expect our clusters to maintain optimal quality for 1 to 2 weeks when refrigerated properly.
Freezer Storage
For extended storage periods we recommend freezing the clusters. Place them in an airtight container with parchment or wax paper between each layer to prevent sticking. Our frozen clusters maintain their quality for up to 3 months. We should allow them to thaw in the refrigerator before serving to preserve their texture.
Room Temperature Storage
In cooler environments we can store our clusters at room temperature for up to 1 week. But we recommend against this method since it may cause the chocolate to soften or melt.
| Storage Method | Duration | Temperature |
|---|---|---|
| Refrigerator | 1-2 weeks | 35-40°F |
| Freezer | 3 months | 0°F |
| Room Temperature | 1 week | Below 70°F |
Essential Storage Tips
We always use parchment or wax paper between layers to prevent our clusters from sticking together. Complete cooling before storage ensures proper setting and texture retention. Gentle handling during storage and retrieval prevents breaking our carefully crafted clusters.


Make-Ahead Tips
 4")
We love preparing these chocolate peanut butter peanut clusters ahead of time since they store beautifully and actually improve in flavor after sitting. Planning ahead makes entertaining stress-free while ensuring we always have a delicious treat ready to serve.
Timing and Preparation
Our clusters require minimal active preparation time of just 10 minutes plus 30 minutes for chilling. We recommend making them at least 2 hours before serving to allow the chocolate to fully set. For best results, prepare clusters the day before your event since the flavors meld together overnight.
Creating large batches works perfectly since the recipe scales up easily. We often double or triple the recipe when preparing for holiday gatherings or parties.
| Preparation Timeline | Task | Duration |
|---|---|---|
| Day Before | Make clusters and chill | 40 minutes total |
| 2 Hours Before | Minimum setting time | 2 hours |
| Same Day | Quick preparation option | 40 minutes |
Optimal Storage for Make-Ahead Success
We store our finished clusters in airtight containers with parchment paper between layers to prevent sticking. Room temperature storage works for up to one week in cooler environments, though we prefer refrigeration for longer lasting quality.
Refrigerated clusters maintain their perfect texture for 1 to 2 weeks when properly stored. We always ensure clusters cool completely before transferring them to storage containers to prevent condensation.
For extended storage, freezing preserves these treats for up to 3 months. We separate frozen clusters with wax paper and thaw them at room temperature for 15 minutes before serving.
Event Planning Advantages
These make-ahead treats shine at holiday gatherings and special occasions due to their convenience and crowd-pleasing appeal. We appreciate how they free up kitchen time on busy event days while providing a homemade touch that guests love.
Transporting becomes effortless since clusters hold their shape well and don’t require special temperature control for short periods. We pack them in sturdy containers with secure lids for potlucks and gift giving.
Serving Suggestions
 5")
Our chocolate peanut butter peanut clusters offer incredible versatility for various serving occasions. We recommend arranging these delightful treats on a festive platter as the centerpiece of your dessert table during holiday gatherings or family celebrations.
For special occasions, we love decorating the clusters with colorful sprinkles before the chocolate sets completely. This simple addition transforms our homemade treats into eye-catching desserts that guests will remember long after the event ends.
These clusters excel as convenient snacking options throughout the day. We often place them in small bowls around the house for unexpected guests or when we need a quick energy boost during busy afternoons.
Party hosting becomes effortless when we prepare these treats in advance. Our clusters maintain their perfect texture when displayed at room temperature for several hours, making them ideal for buffet-style gatherings where guests can help themselves.
Gift giving takes on new meaning with these homemade clusters. We package them in decorative tins or clear cellophane bags tied with ribbons for teachers, neighbors, or anyone who deserves a sweet surprise.
Movie nights become more enjoyable when we serve these clusters alongside popcorn and other favorite snacks. The combination of chocolate, peanut butter, and crunchy peanuts satisfies multiple cravings simultaneously.
For formal dessert presentations, we arrange individual clusters in mini paper cups or place them on small dessert plates alongside fresh berries or a drizzle of caramel sauce. This elegant approach elevates our simple treat into a sophisticated finale for dinner parties.
Office potlucks and bake sales benefit from our easily transportable clusters. We organize them in sturdy containers that prevent breakage while showcasing their appealing appearance to potential buyers or colleagues.


Troubleshooting Common Issues
 6")
Even the simplest recipes can present challenges, and our chocolate peanut butter peanut clusters are no exception. We’ve identified the most common problems you might encounter and provided practical answers to ensure perfect results every time.
Chocolate Won’t Set Properly
Improper melting technique ranks as the primary culprit when chocolate fails to set correctly. We must melt chocolate gently and evenly using low heat while stirring frequently to achieve smooth, properly tempered chocolate. Overheating causes chocolate to seize or become too thick, preventing proper setting entirely.
Moisture contamination presents another serious obstacle to proper chocolate setting. Even tiny amounts of water cause chocolate to seize, creating a grainy texture that refuses to harden. We recommend keeping all utensils completely dry and preventing steam or water from contacting the chocolate during the melting process.
Environmental conditions significantly impact chocolate’s ability to set properly. Chocolate requires a cool, dry environment to harden correctly. If our kitchen runs too warm or humid, clusters may remain soft even though adequate cooling time.
Clusters Fall Apart
Insufficient chocolate to peanut ratio creates the most frequent cause of crumbling clusters. We need adequate melted chocolate relative to peanuts and other mix-ins to provide proper cohesion. The mixture should appear well-coated and evenly combined before we scoop it onto baking sheets.
Premature handling destroys cluster integrity before they’ve had sufficient time to firm up. We must allow ample cooling time for clusters to set completely before attempting to remove them from the parchment paper. Patience during this stage prevents frustrating breakage.
Inadequate mixing results in loose, poorly bound clusters that lack structural integrity. We should stir thoroughly until all peanut pieces receive complete chocolate coating and the mixture achieves uniform consistency throughout.
Chocolate Becomes Grainy
Excessive heat exposure burns chocolate and creates an unpleasant grainy texture that ruins the smooth finish we desire. We must melt chocolate over low heat and avoid microwave scorching by heating in short 30-second bursts with stirring between each interval.
Water or moisture introduction immediately causes chocolate to seize and develop a gritty texture. We need to ensure all utensils remain completely dry and avoid any contact with water or steam during the melting process.
Temperature shock from overheating or rapid cooling causes sugar and fat crystals to form, resulting in an undesirable grainy mouthfeel. We should melt and cool chocolate gradually while maintaining consistent temperatures throughout the process to prevent recrystallization.


Variations and Customizations
 7")
We can easily transform our basic chocolate peanut butter clusters into exciting new flavors by exploring different ingredients and combinations. These simple modifications allow us to create unique treats that cater to various tastes and dietary preferences.
Different Nut Options
We recommend experimenting with almonds for a sophisticated crunch that pairs beautifully with chocolate and peanut butter. Walnuts add an earthy richness that complements the sweet elements while providing additional omega-3 benefits. Pecans bring a buttery Southern charm that creates an indulgent flavor profile perfect for special occasions.
We can also mix multiple nuts together for complex textures and flavors. Cashews offer a creamy smoothness that balances the cluster’s overall texture. Hazelnuts provide a European flair that works particularly well with milk chocolate variations.
White Chocolate Version
We create an elegant twist by replacing our semi-sweet or milk chocolate with white chocolate chips. This substitution produces clusters with a lighter appearance and sweeter taste profile that appeals to those who prefer milder chocolate flavors.
White chocolate melts differently than dark varieties so we adjust our technique by using slightly lower heat settings. We recommend using high-quality white chocolate chips or chopped white chocolate bars for the best melting consistency and flavor. The creamy sweetness of white chocolate enhances the peanut butter’s nuttiness while creating beautiful golden clusters.
Adding Extra Mix-Ins
We enhance our clusters with crushed cookies like Oreos or vanilla wafers for additional texture and flavor complexity. These additions create delightful surprises in each bite while maintaining the cluster’s structural integrity.
Dried cranberries introduce a fruity tartness that balances the rich chocolate and peanut butter combination. We add these sparingly to prevent overwhelming the base flavors. Toasted coconut flakes bring tropical notes that work surprisingly well with peanut butter.
| Mix-In Option | Recommended Amount | Flavor Profile |
|---|---|---|
| Crushed Cookies | 1/2 to 1 cup | Sweet and crunchy |
| Dried Cranberries | 1/4 to 1/2 cup | Tart and chewy |
| Toasted Coconut | 1/3 cup | Tropical and nutty |
| Mini Marshmallows | 1/2 cup | Sweet and soft |
| Pretzel Pieces | 1/2 cup | Salty and crunchy |
We can combine multiple mix-ins but recommend limiting ourselves to two or three additions to maintain balance. Pretzels add a salty element that enhances the sweet components while providing satisfying crunch.


Conclusion
These chocolate peanut butter peanut clusters have earned their place as our go-to treat for good reason. They’re incredibly simple to make yet deliver that perfect combination of flavors and textures that keeps everyone coming back for more.
What we love most is their versatility – whether you’re hosting a party or need a quick snack they’re always the right choice. The fact that they require no baking and can be prepared ahead of time makes them a lifesaver during busy periods.
We’re confident that once you try making these clusters you’ll find yourself reaching for this recipe again and again. They’ve become a staple in our kitchen and we know they’ll become one in yours too.
Frequently Asked Questions
What are chocolate peanut butter peanut clusters?
Chocolate peanut butter peanut clusters are a no-bake treat combining creamy chocolate, rich peanut butter, and crunchy roasted peanuts. These bite-sized clusters offer the perfect balance of sweet and nutty flavors, making them an ideal snack for satisfying multiple cravings at once.
How long do chocolate peanut butter peanut clusters take to make?
These clusters require only 10 minutes of active preparation time plus 30 minutes of chilling time. The simple no-bake recipe makes them perfect for quick treats when you need something delicious without spending hours in the kitchen.
What ingredients do I need for chocolate peanut butter peanut clusters?
You’ll need semi-sweet chocolate chips, coconut oil, vanilla extract, creamy peanut butter, salted roasted peanuts, mini marshmallows, powdered sugar, and salt. These quality ingredients work together to create the perfect balance of flavors and textures in every cluster.
How should I store chocolate peanut butter peanut clusters?
Store clusters in an airtight container in the refrigerator for 1-2 weeks for optimal quality. For longer storage, freeze them for up to 3 months with parchment paper between layers. They can also be kept at room temperature for up to 1 week in cooler environments.
Can I make chocolate peanut butter peanut clusters ahead of time?
Yes, these clusters are perfect for make-ahead preparation. They actually taste better after the flavors have time to meld together. Make them at least 2 hours before serving, or even the day before for optimal results and stress-free entertaining.
What equipment do I need to make these clusters?
Essential equipment includes a microwave-safe bowl for melting, a baking sheet lined with parchment paper, measuring cups and spoons, a rubber spatula for mixing, and a spoon or cookie scoop for portioning. A double boiler is optional for stovetop melting.
Why won’t my chocolate clusters set properly?
Clusters may not set due to improper melting technique, too much moisture, or incorrect chocolate-to-peanut ratios. Ensure you melt chocolate in 30-second intervals, work in a dry environment, and maintain proper ingredient proportions. Allow adequate chilling time in the refrigerator.
What variations can I make to the basic recipe?
Try different nuts like almonds, walnuts, or pecans instead of peanuts. Use white chocolate for a milder flavor, or add mix-ins like crushed cookies, dried cranberries, toasted coconut, or pretzel pieces to customize the clusters to your taste preferences.
How should I serve chocolate peanut butter peanut clusters?
These versatile treats work well on festive platters for parties, in mini paper cups for formal presentations, or as casual snacks. They’re perfect for holiday gatherings, office potlucks, gift-giving, or paired with popcorn for movie nights.
What’s the best way to prevent clusters from falling apart?
Ensure thorough mixing of all ingredients, maintain proper chocolate-to-peanut ratios, and allow complete cooling before handling. Work quickly when dropping clusters onto parchment paper, and handle gently once set to prevent breaking the delicate chocolate coating.


