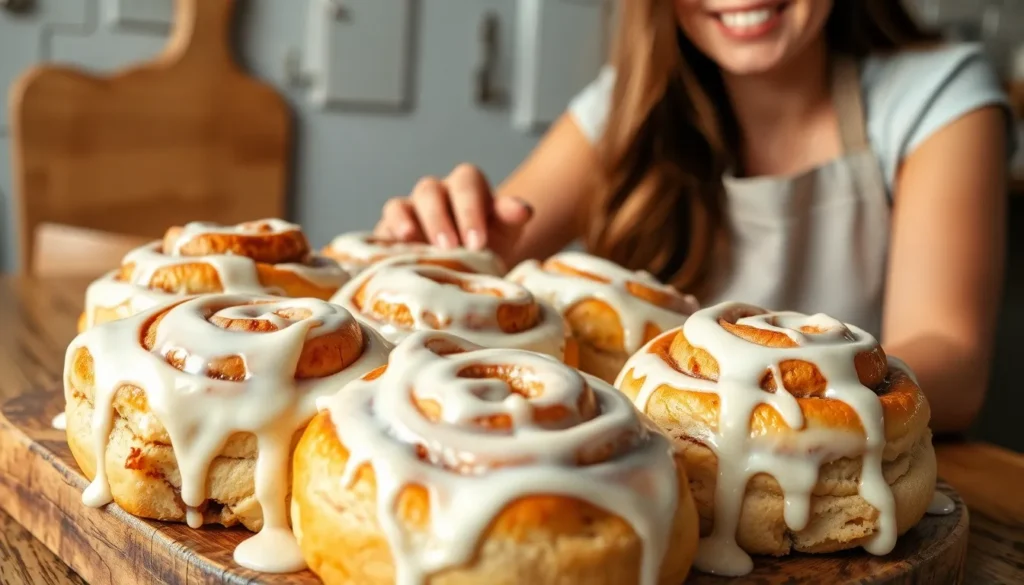
Nothing beats the irresistible aroma of freshly baked cinnamon rolls wafting through your kitchen. We’ve cracked the code to recreate those famous Cinnabon cinnamon rolls that make mall food courts so tempting. These aren’t just any ordinary cinnamon rolls – they’re the gooey, pillowy-soft masterpieces that’ll have your family begging for more.
Our homemade version delivers that signature Cinnabon experience with tender dough swirled with cinnamon-sugar perfection and topped with their iconic cream cheese frosting. We’ve perfected every detail from the soft, buttery texture to that perfect balance of sweetness and spice.
Ready to transform your kitchen into a bakery? This recipe captures all the magic of those legendary mall treats without leaving your house. Let’s jump into creating these heavenly cinnamon rolls that’ll become your new weekend tradition.
Ingredients
Creating these bakery-quality cinnamon rolls requires three distinct components that work together to deliver that signature Cinnabon experience. Each element plays a crucial role in achieving the perfect texture and flavor balance.
For the Dough
- 4 cups all-purpose flour
- 1 packet (2¼ teaspoons) active dry yeast
- 1 cup whole milk, warmed to 110°F
- ⅓ cup granulated sugar
- ⅓ cup unsalted butter, melted
- 1 large egg, room temperature
- 1 teaspoon salt
For the Cinnamon Filling
- ½ cup unsalted butter, softened to room temperature
- 1 cup packed light brown sugar
- 2½ tablespoons ground cinnamon
- ¼ teaspoon salt
For the Cream Cheese Frosting
- 8 ounces cream cheese, softened to room temperature
- ½ cup unsalted butter, softened to room temperature
- 3 cups powdered sugar, sifted
- 2 teaspoons vanilla extract
- ¼ teaspoon salt
- 2-3 tablespoons whole milk, as needed for consistency
Equipment Needed
 1")
Creating bakery perfect Cinnabon cinnamon rolls requires the right tools to achieve that signature soft texture and perfect shape. We recommend gathering these essential pieces of equipment before starting your baking adventure.
A stand mixer serves as our most valuable tool for creating the smooth, elastic dough that gives these rolls their pillowy texture. The dough hook attachment handles the heavy mixing work while developing the gluten structure needed for those tender layers. For bakers who prefer convenience, a bread machine offers an excellent alternative for preparing the dough with minimal hands-on effort.
Our large mixing bowl becomes essential for proofing the yeast and combining ingredients when not using a stand mixer. Choose a bowl with plenty of room for the dough to double in size during the rising process.
Rolling out the dough requires a sturdy rolling pin to create the large rectangle that forms the foundation of our cinnamon spiral. A traditional wooden rolling pin or silicone version both work effectively for achieving an even thickness across the entire surface.
The baking sheet you select impacts the final result significantly. We prefer using a rimmed baking sheet or large rectangular baking dish that accommodates all the rolls with slight spacing between each piece. This allows for even heat distribution and proper browning.
Finally, a cooling rack helps maintain the perfect texture by allowing air circulation around the freshly baked rolls. This prevents the bottoms from becoming soggy while we prepare the signature cream cheese icing that transforms these rolls into the ultimate Cinnabon experience.
Instructions
 2")
Now we’ll walk through each step to create these bakery-quality cinnamon rolls from scratch. Follow these detailed instructions to achieve that signature Cinnabon texture and flavor.
Make the Dough
We start by dissolving our active dry yeast in warm milk with a small amount of sugar and let the mixture sit until foamy for about 5 minutes. In our stand mixer bowl, we combine flour, sugar, salt, eggs, and softened butter. Pour in the yeast mixture and mix until the dough forms a cohesive ball. Place the dough in a greased bowl, cover with a damp towel, and let it rise in a warm place until doubled in size, which typically takes about 1 hour.
Prepare the Cinnamon Filling
While our dough rises, we soften the butter and stir in brown sugar and cinnamon until well combined. Alternatively, we can spread the softened butter directly over the rolled-out dough later, then sprinkle the brown sugar and cinnamon mixture on top. Add raisins or chopped nuts at this stage if desired for extra texture and flavor.
Roll and Shape the Cinnamon Rolls
We roll the risen dough on a lightly floured surface into a large rectangle measuring about 16×12 inches or up to 24×12 inches and ¼ inch thick. Spread our cinnamon filling evenly over the entire surface, leaving a small border around the edges. Starting from the long edge, we tightly roll the dough into a log shape. Using a sharp knife or unflavored dental floss, we cut the log into slices that are 1.5 to 2 inches thick.
First Rise
We place our cut cinnamon rolls in a greased baking pan with enough space between each roll for expansion. Cover the pan and let the rolls rise until nearly doubled in size, which takes about 30 to 60 minutes depending on room temperature.
Bake the Cinnamon Rolls
We preheat our oven to 350°F to 400°F while the rolls complete their second rise. Bake the cinnamon rolls for 18 to 20 minutes or until they turn golden brown on top. The internal temperature should reach about 190°F when fully cooked.
Make the Cream Cheese Frosting
While our rolls bake, we beat together cream cheese, butter, powdered sugar, vanilla extract, and a pinch of salt until the mixture becomes smooth and fluffy. The frosting should be spreadable but not too thin.
Assemble and Serve
We remove the baked cinnamon rolls from the oven and immediately spread our cream cheese frosting generously over the warm rolls. The heat from the rolls will slightly melt the frosting, creating that signature Cinnabon appearance. Serve while the rolls are still warm for the ultimate indulgent experience.
Make-Ahead Instructions
 3")
Planning ahead transforms your cinnamon roll experience from stressful morning baking to effortless indulgence. We’ve perfected three distinct approaches that guarantee fresh, bakery-quality rolls whenever you need them.
Overnight Refrigerator Method
After shaping our cinnamon rolls and placing them in the baking dish, we cover them tightly with plastic wrap and refrigerate overnight. This method allows the dough to develop deeper flavors while maintaining its structure. Remove the rolls from the refrigerator in the morning and let them rise at room temperature for 1 to 2 hours until nearly doubled in size. The cold temperature slows the yeast activity without stopping it completely, creating perfectly risen rolls ready for baking.
Freezer Storage Method
For longer storage, we can freeze shaped cinnamon rolls for up to 3 months. Place the cut rolls in your baking dish, wrap securely with plastic wrap, then cover with aluminum foil for extra protection against freezer burn. When ready to bake, thaw the rolls overnight in the refrigerator. Allow them to rise at room temperature for 1 to 2 hours before baking according to the original recipe instructions.
Post-Baking Storage
Already baked cinnamon rolls maintain their quality at room temperature for 1 to 2 days when stored in an airtight container. We recommend reheating individual rolls in the microwave for 15-30 seconds or warming them in a 300°F oven for 5-7 minutes. This gentle reheating restores their soft, pillowy texture without drying them out.
| Storage Method | Duration | Preparation Steps |
|---|---|---|
| Refrigerator | Overnight | Cover tightly, rise 1-2 hours before baking |
| Freezer | Up to 3 months | Wrap securely, thaw overnight, rise 1-2 hours |
| Room Temperature (baked) | 1-2 days | Store airtight, reheat gently |
Our make-ahead approach follows this essential sequence: prepare the dough and let it rise until doubled, roll out and spread with the cinnamon filling, cut into rolls and place in the baking dish, then cover tightly for refrigeration or freezing. The next day, we thaw frozen rolls if needed, allow them to rise at room temperature, bake according to instructions, and finish with our signature cream cheese frosting. This method ensures hot, fresh cinnamon rolls without the morning prep stress.
Storage Tips
 4")
We know that properly storing our homemade Cinnabon-style cinnamon rolls ensures they maintain their incredible flavor and texture for days to come. The storage method we choose depends on when we plan to enjoy these delightful treats.
Room Temperature Storage
For short-term storage, we can keep our cinnamon rolls at room temperature for up to 2 days. Place the rolls in an airtight container to maintain their freshness and prevent them from drying out. This method works best when we store the rolls unfrosted, as the cream cheese frosting requires refrigeration for food safety.
Refrigerator Storage
When we need longer storage, the refrigerator extends our cinnamon rolls’ life for up to a week. We recommend wrapping the rolls tightly in plastic wrap or aluminum foil before placing them in an airtight container. This double protection prevents the rolls from absorbing refrigerator odors and keeps them from drying out.
Freezer Storage
For maximum storage time, we can freeze our cinnamon rolls for up to 2 months. Wrap each roll tightly in plastic wrap or aluminum foil, then place them in a freezer-safe bag or container. Label the container with the date to track storage time and ensure optimal quality.
| Storage Method | Duration | Best Practices |
|---|---|---|
| Room Temperature | Up to 2 days | Airtight container, unfrosted rolls only |
| Refrigerator | Up to 1 week | Wrap tightly, use airtight container |
| Freezer | Up to 2 months | Double wrap, use freezer-safe containers |
Storing Unbaked Rolls
We can also store our shaped but unbaked cinnamon rolls for convenient future baking. Refrigerate unbaked rolls overnight for next-day baking, or freeze them for up to one month. This approach allows us to enjoy fresh-baked rolls with minimal morning preparation.
Reheating Guidelines
To restore our stored cinnamon rolls to their original glory, we wrap them in foil and warm them in a 350°F oven for a few minutes. This gentle reheating method revives their soft texture without overcooking.
Frosting Storage Strategy
We achieve the best results by storing our cinnamon rolls unfrosted and applying the cream cheese frosting just before serving. This approach maintains the frosting’s smooth consistency and prevents it from becoming too firm or separating during storage.
Pro Tips for Perfect Cinnabon Cinnamon Rolls
 5")
Mastering the art of authentic Cinnabon cinnamon rolls requires attention to exact techniques that separate good rolls from bakery-perfect ones. We’ve gathered these professional insights to help you achieve that signature taste and texture every time.
Temperature Control Makes All the Difference
Getting our yeast activation right sets the foundation for fluffy rolls. We warm our milk to precisely 100°F to 110°F before adding the yeast. This optimal temperature range ensures proper activation without killing the yeast. Room temperature ingredients blend more easily and create a smoother dough texture.
Preheating our oven to 400°F delivers the perfect golden brown exterior while maintaining a soft interior. Consistent temperature control throughout the process prevents dense or unevenly baked rolls.
Double Rising Creates Ultimate Fluffiness
Allowing our dough to rise twice transforms the texture dramatically. The first rise develops the yeast activity after mixing all ingredients. Our second rise occurs after shaping the rolls and proves crucial for achieving that pillowy softness Cinnabon is famous for.
| Rising Stage | Duration | Purpose |
|---|---|---|
| First Rise | 1-2 hours | Develops yeast activity |
| Second Rise | 30-45 minutes | Creates fluffy texture |
Heavy Cream Secret for Moisture
Pouring warm heavy cream over our shaped rolls before baking creates restaurant-quality moisture. This technique helps the rolls rise higher and prevents them from drying out during baking. We use about 2-3 tablespoons of cream for a standard batch.
Rolling and Slicing Technique
Rolling our dough tightly ensures even distribution of the cinnamon filling throughout each roll. We maintain consistent pressure while rolling to prevent air pockets. Using dental floss or a sharp knife creates clean cuts without crushing the delicate dough layers.
Overnight Preparation Strategy
Preparing our dough the night before and refrigerating it develops deeper flavors. This method allows the yeast to work slowly and creates more complex taste profiles. We simply shape the rolls and refrigerate them overnight before the final rise and baking in the morning.
Perfecting the Filling Distribution
Spreading our melted butter mixture evenly across the dough ensures every bite contains the perfect balance of cinnamon and sweetness. We leave a small margin at one end to prevent overflow when rolling. The filling should reach all edges except the sealing edge.
Cream Cheese Frosting Timing
Creating our icing while the rolls bake ensures it’s ready to spread on warm rolls. We combine softened butter with cream cheese, powdered sugar, vanilla, and salt for that signature tangy sweetness. Applying frosting to warm rolls allows it to melt slightly and penetrate the surface.
Troubleshooting Common Issues
 6")
Even with our detailed recipe and pro tips, we understand that baking these beloved cinnamon rolls can present some challenges. We’ve compiled the most common issues home bakers encounter and our proven answers to help you achieve bakery-quality results every time.
Filling Leakage and Caramelization
When cinnamon and sugar filling seeps out during baking, it creates a sticky mess at the bottom of our pan and can lead to burnt caramelized layers. We spread our filling evenly across the dough surface and avoid overfilling the pan to prevent this issue. Our solution focuses on using the correct pan size and ensuring we don’t overcrowd the rolls. This technique prevents the filling from spilling over and burning, maintaining the clean presentation we want.
Uneven or Wobbly Rolls
Rolls that come out lopsided or uneven typically result from loose rolling or inconsistent slicing. We roll our dough into a tight log and use either a sharp knife or unflavored dental floss to cut equal slices. Placing our slices closely together in the pan ensures uniform baking and helps maintain their shape throughout the process.
Dough That Is Tough or Dense
Over-kneading or insufficient rising time produces tough, chewy rolls instead of the soft texture we’re aiming for. We knead our dough gently and allow adequate rise time for it to double in size. Patience during the proofing stages proves crucial for achieving those soft, pillowy results that make Cinnabon rolls so irresistible.
Undercooked or Overcooked Rolls
Incorrect oven temperature and timing lead to either undercooked centers or overly hard crusts. We use an oven thermometer to verify our temperature accuracy since oven calibrations can vary significantly. Our recommended baking temperature of 330°F (165°C) for 20 to 25 minutes provides optimal results, though we adjust timing based on our exact oven’s performance.
| Baking Guidelines | Temperature | Time | Visual Cue |
|---|---|---|---|
| Standard Oven | 330°F (165°C) | 20-25 minutes | Golden brown tops |
| Convection Oven | 315°F (157°C) | 18-22 minutes | Even browning |
Layers Separating or Air Gaps
After baking, we sometimes notice air gaps or separated layers within our rolls. This issue stems from overproofing, underproofing, or insufficient fat in our filling mixture. We ensure proper proofing times and use enough butter or margarine in our filling to act as a binding agent between the dough layers. The fat content helps maintain structural integrity throughout the baking process.
Conclusion
We’ve covered everything you need to transform your kitchen into a Cinnabon paradise. From mastering the perfect dough consistency to achieving that signature cream cheese frosting we all crave these homemade cinnamon rolls will quickly become your go-to comfort food recipe.
The beauty of this recipe lies in its flexibility. Whether you’re planning ahead with our make-ahead methods or troubleshooting common baking challenges you’re now equipped with the knowledge to create bakery-quality results every single time.
There’s nothing quite like the satisfaction of pulling warm golden cinnamon rolls from your own oven. The aroma alone will have your family gathering in the kitchen before you’ve even applied that final layer of creamy frosting.
Frequently Asked Questions
What are the three essential components for making Cinnabon-style cinnamon rolls?
The three essential components are the enriched yeast dough (made with flour, yeast, milk, sugar, butter, egg, and salt), the cinnamon filling (softened butter, brown sugar, ground cinnamon, and salt), and the signature cream cheese frosting (cream cheese, butter, powdered sugar, vanilla, salt, and milk). Each component plays a crucial role in achieving that authentic Cinnabon taste and texture.
What kitchen equipment do I need to make perfect cinnamon rolls?
You’ll need a stand mixer or bread machine for the dough, a large mixing bowl for proofing, a sturdy rolling pin, a rimmed baking sheet or rectangular baking dish for even baking, and a cooling rack. Having the right tools ensures your rolls turn out with bakery-quality texture and appearance every time.
Can I make cinnamon rolls ahead of time?
Yes! You have three make-ahead options: the Overnight Refrigerator Method (refrigerate shaped rolls overnight), the Freezer Storage Method (freeze shaped rolls for up to 3 months), or Post-Baking Storage (store and reheat already baked rolls). These methods let you enjoy fresh cinnamon rolls without morning preparation stress.
How should I store leftover cinnamon rolls?
Store unfrosted rolls at room temperature for up to 2 days in an airtight container. For longer storage, refrigerate tightly wrapped rolls for up to a week or freeze double-wrapped rolls for up to 2 months. Always store cream cheese frosting separately and apply just before serving to maintain consistency.
Why are my cinnamon rolls tough or dense?
Tough or dense rolls usually result from over-mixing the dough, insufficient rise time, or using liquid that’s too hot for the yeast. Ensure your milk is warm (not hot), allow adequate rising time in both stages, and mix just until the dough comes together. Temperature control and patience are key to fluffy rolls.
What’s the secret to preventing filling from leaking out?
Use the correct pan size, roll the dough tightly but gently, and slice with a sharp knife or dental floss using a sawing motion. Ensure your filling isn’t too warm or liquid, and don’t overfill. A tight roll with even distribution prevents filling from oozing out during baking.
How do I know when my cinnamon rolls are perfectly baked?
Look for a golden-brown color on top and an internal temperature of 190°F. The rolls should spring back lightly when touched and pull away slightly from the pan edges. For convection ovens, reduce temperature by 25°F and check 5-10 minutes earlier than standard baking time.
Should I frost the rolls while they’re hot or after they cool?
Frost the rolls while they’re still warm for that signature melty appearance, but not piping hot or the frosting will completely melt off. Let them cool for about 10-15 minutes after baking, then apply the cream cheese frosting for the perfect consistency and presentation.


