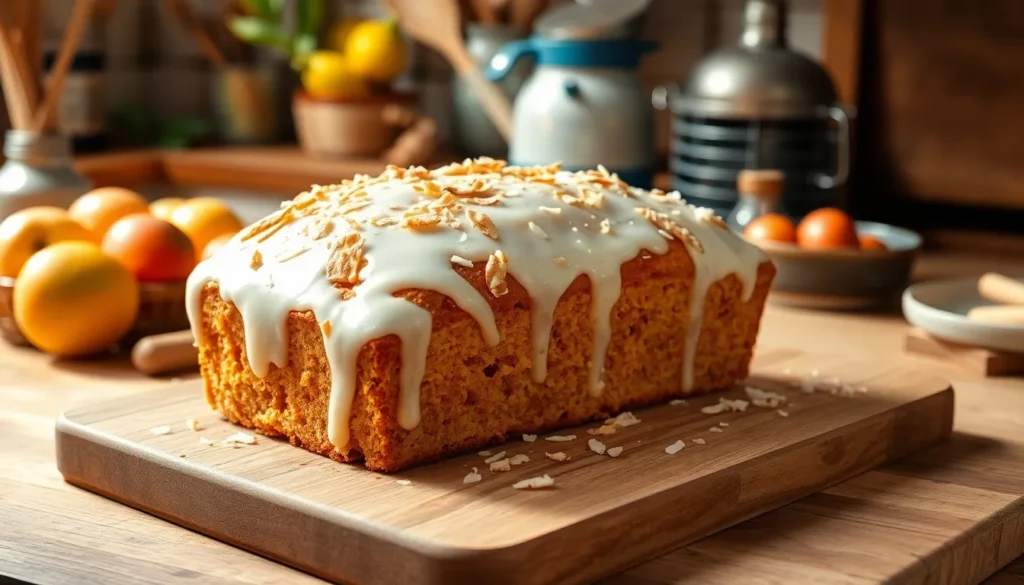
We’ve discovered the perfect treat that transforms your kitchen into a tropical paradise – our irresistible coconut loaf cake. This moist and tender cake captures the essence of coconut in every bite with its rich coconut flavor and delightfully dense crumb that melts in your mouth.
What makes this coconut loaf cake truly special is its incredible versatility. Whether you’re craving a quick breakfast slice with your morning coffee or an elegant dessert for weekend entertaining, this cake delivers every time. The combination of coconut milk, shredded coconut, and a hint of vanilla creates layers of flavor that’ll transport you straight to a sun-soaked beach.
We love how this recipe comes together with simple pantry ingredients yet produces bakery-quality results. The golden-brown exterior gives way to a beautifully moist interior that stays fresh for days, making it perfect for meal prep or gift-giving.
Ingredients
We’ve carefully selected each ingredient to create the perfect balance of coconut flavor and moist texture. These pantry-friendly components work together to deliver that bakery-quality taste we love.
For the Coconut Loaf Cake
- 2 cups all-purpose flour
- 1 cup granulated sugar
- 1/2 cup unsalted butter, softened
- 3/4 cup canned coconut milk
- 3 large eggs, room temperature
- 1 cup sweetened shredded coconut
- 2 teaspoons baking powder
- 1/2 teaspoon salt
- 1 teaspoon vanilla extract
- 1/2 teaspoon coconut extract
For the Coconut Glaze
- 1 1/2 cups powdered sugar
- 1/4 cup canned coconut milk
- 2 tablespoons unsalted butter, melted
- 1/2 teaspoon vanilla extract
- 1/4 cup toasted coconut flakes for garnish


Equipment Needed

Our coconut loaf cake requires exact equipment to achieve the perfect texture and professional presentation. We recommend gathering these essential tools before starting your baking process to ensure smooth preparation and optimal results.
9×5 Inch Loaf Pan serves as the foundation for our coconut cake’s signature shape. We always grease our pan thoroughly with butter or cooking spray and line it with parchment paper for effortless removal. The parchment paper creates easy lift handles that prevent our precious cake from sticking or breaking during removal.
Stand Mixer with Paddle Attachment transforms our butter and sugar into the light, fluffy base that creates our cake’s tender crumb. We use the paddle attachment specifically because it incorporates air without overworking the batter. Hand mixers work as an alternative, though we find stand mixers provide more consistent results for creaming butter to the perfect consistency.
Large Mixing Whisk helps us combine our dry ingredients evenly before adding them to the wet mixture. We whisk together flour, baking powder, and salt in a separate bowl to ensure even distribution throughout our batter. This step prevents pockets of leavening agents that could create uneven rising.
Rubber Spatula becomes indispensable for scraping down bowl sides and folding ingredients gently together. We use it to incorporate our shredded coconut without deflating the air we’ve worked to create in our creamed butter mixture. The flexible rubber head reaches every corner of our mixing bowl.
Wire Cooling Rack allows proper air circulation around our finished cake for even cooling. We transfer our loaf from the pan to the rack after it cools for 10 minutes in the pan. This prevents condensation from forming on the bottom, which could make our cake soggy.
Measuring Cups and Spoons ensure accuracy in our ingredient ratios, particularly important for achieving the right balance of coconut flavor and moisture. We use dry measuring cups for flour and sugar, liquid measuring cups for coconut milk, and measuring spoons for extracts and spices.


Instructions

Now that we have our ingredients and equipment ready, let’s walk through the step-by-step process to create this irresistible coconut loaf cake. The following method ensures a perfectly moist texture and rich coconut flavor in every slice.
Prep the Pan and Oven
We begin by preheating our oven to 325°F for a gentle bake that prevents over-browning while ensuring even cooking throughout. Lightly grease our 9×5 inch loaf pan with cooking spray to prevent sticking and guarantee easy removal later. This temperature setting allows the cake to develop its signature golden exterior while maintaining the tender crumb inside.
Mix the Dry Ingredients
We sift together 1½ cups of cake flour, 1½ teaspoons of baking powder, and ½ teaspoon of salt in a medium bowl. Sifting creates a lighter texture and removes any lumps that could affect the final product. The cake flour provides a more delicate crumb compared to all-purpose flour, while the baking powder ensures proper rise and fluffy texture.
Combine Wet Ingredients
Using our stand mixer with the paddle attachment, we cream ½ cup of softened butter with ⅔ cup of granulated sugar until the mixture becomes light and fluffy. This process typically takes 3-4 minutes and creates the foundation for our cake’s tender texture. We add 3 large eggs one at a time, beating well after each addition to ensure complete incorporation. Next, we mix in 1½ teaspoons of coconut extract for that authentic tropical flavor. Finally, we pour in ½ cup of full-fat coconut milk, which adds richness and moisture to our batter.
Combine Wet and Dry Mixtures
We reduce our mixer speed to low and gradually add the sifted dry ingredients to the wet mixture. Mixing continues just until the ingredients are combined and the batter becomes smooth. Overmixing at this stage can result in a tough, dense cake, so we stop as soon as no flour streaks remain visible.
Bake the Coconut Loaf Cake
We pour the prepared batter into our greased loaf pan, spreading it evenly with a rubber spatula. The cake bakes for 65 minutes, or until a toothpick inserted into the center comes out clean or with just a few moist crumbs. Once baking is complete, we allow the loaf to rest in the pan for 10 minutes before carefully transferring it to a wire cooling rack. This resting period prevents the cake from breaking apart during removal and ensures the structure sets properly.


Make the Coconut Glaze

While our coconut loaf cake cools to the perfect temperature, we create the silky glaze that transforms this treat into bakery-quality perfection. The timing matters here since we want to apply the glaze while the cake remains slightly warm for optimal absorption.
Start by sifting 1 cup of powdered sugar into a medium mixing bowl to eliminate any lumps. Add 3 tablespoons of coconut milk gradually, whisking continuously to prevent clumping. The mixture should reach a smooth, pourable consistency that coats the back of a spoon without being too thick or runny.
Incorporate 1 tablespoon of melted butter into the glaze, whisking vigorously to create a glossy finish. Add 1/2 teaspoon of vanilla extract to enhance the coconut flavor profile. Test the consistency by lifting your whisk; the glaze should fall in ribbons that dissolve back into the mixture within a few seconds.
| Glaze Component | Amount | Purpose |
|---|---|---|
| Powdered sugar | 1 cup | Creates sweet base and body |
| Coconut milk | 3 tablespoons | Provides coconut flavor and liquid |
| Melted butter | 1 tablespoon | Adds richness and shine |
| Vanilla extract | 1/2 teaspoon | Enhances overall flavor |
Adjust the glaze thickness by adding coconut milk one teaspoon at a time if too thick, or additional powdered sugar if too thin. We aim for a consistency that drizzles beautifully but doesn’t run off the cake completely.
Pour the glaze over the cake in a slow, steady stream, starting from one end and working across the surface. Allow the glaze to cascade down the sides naturally for an elegant finish. Sprinkle toasted coconut flakes immediately over the wet glaze so they adhere properly and create visual appeal.
The glazed cake requires 15 minutes to set before slicing, allowing the coconut glaze to firm up while maintaining its glossy appearance.


Assembly and Finishing

Now that our coconut loaf cake has baked to perfection, we need to focus on the final steps that will ensure optimal texture and presentation. Proper cooling and glazing techniques make the difference between a good cake and an exceptional one.
Cool the Cake
We must allow our coconut loaf cake to cool in the pan for 10 to 15 minutes before transferring it to a wire rack. This critical cooling period prevents the cake from breaking apart when we remove it from the pan. The cake’s structure needs time to set properly while it’s still supported by the pan walls.
After the initial cooling period, we carefully turn the cake out onto a wire rack to cool completely. Complete cooling is essential before we apply any glaze, as warm cake will cause the glaze to melt and absorb rather than create the desired coating.
Apply the Glaze
Once our cake reaches room temperature, we can choose from several glaze options to enhance both flavor and presentation. The most popular choice is a coconut glaze made by mixing canned coconut milk with powdered sugar, which intensifies the tropical coconut flavor profile.
For those who prefer citrus notes, we can create a lemon glaze by combining confectioners’ sugar, lemon juice, butter, and lemon extract. We adjust the consistency by adding more lemon juice for thinner coverage or more confectioners’ sugar for thicker application.
An espresso glaze offers a sophisticated contrast to the sweet coconut base. We whisk together softened butter, espresso or strong coffee, and vanilla extract to create this rich, coffee-flavored coating.
For an exotic twist, a hibiscus glaze combines hibiscus syrup with powdered sugar to deliver a tropical flavor with beautiful color.
| Glaze Type | Key Ingredients | Flavor Profile |
|---|---|---|
| Coconut | Coconut milk + powdered sugar | Enhanced coconut |
| Lemon | Lemon juice + confectioners’ sugar + butter | Citrus brightness |
| Espresso | Coffee + butter + vanilla | Rich coffee contrast |
| Hibiscus | Hibiscus syrup + powdered sugar | Tropical floral |
We ensure our 9 x 5-inch or 8 x 4-inch loaf pan is lined with parchment paper for easy removal throughout the process. The glaze should be applied evenly over the completely cooled cake to prevent melting and ensure proper adhesion to the surface.


Storage Instructions

Proper storage ensures our coconut loaf cake maintains its moist texture and rich flavor for several days. We recommend different storage methods depending on how long you plan to keep the cake and whether it includes frosting.
Room Temperature Storage
We can store our coconut loaf cake at room temperature for optimal freshness and convenience. Wrap the cake tightly in plastic wrap or aluminum foil to create an airtight seal that prevents moisture loss. This method keeps the cake fresh for up to 5 days when stored properly.
| Storage Method | Duration | Requirements |
|---|---|---|
| Room Temperature | 2-5 days | Airtight wrapping |
| Refrigeration | Up to 5 days | Airtight container |
| Freezing | 3-8 months | Double wrapping + freezer bag |
Some bakers prefer storing the cake for only 2 to 3 days at room temperature to maintain peak freshness. We find this approach works well when serving the cake for special occasions where presentation matters most.
Refrigeration Guidelines
Refrigeration becomes necessary when our coconut loaf cake includes cream cheese frosting or other perishable toppings. Store the frosted cake in an airtight container after a few hours at room temperature to prevent spoilage. The container prevents the cake from drying out while maintaining food safety standards.
Our unfrosted coconut loaf cake can be refrigerated for up to 5 days when wrapped properly. We recommend bringing refrigerated cake to room temperature before serving to restore its soft texture and enhance the coconut flavors.
Freezing for Long Term Storage
Freezing extends our coconut loaf cake’s shelf life significantly while preserving its quality. Wrap the completely cooled cake tightly in plastic wrap or aluminum foil first. Place the wrapped cake in a freezer safe bag or airtight container for double protection against freezer burn.
We can freeze the entire cake for up to 8 months using this method. Alternatively freeze individual slices for 3 months by placing parchment paper between each slice in a freezer safe bag. This approach allows us to thaw only the portions we need.
Thawing and Serving Tips
Thaw frozen coconut loaf cake by unwrapping it and letting it sit at room temperature for several hours. We never recommend thawing in the microwave as this can create uneven texture and compromise the cake’s moisture. Ensure the cake reaches room temperature completely before serving to experience the full coconut flavor profile.
Cut the cake into slices before freezing when you anticipate serving small portions regularly. This method eliminates the need to thaw the entire cake and reduces waste while maintaining convenience.


Make-Ahead Tips

Planning ahead makes serving our coconut loaf cake effortless for any occasion. We recommend preparing this cake up to several days in advance since its moist texture actually improves over time.
Storage Duration Guidelines
| Storage Method | Duration | Best For |
|---|---|---|
| Room Temperature | Up to 5 days | Unfrosted cake |
| Refrigerated | Up to 5 days | Frosted or glazed cake |
| Frozen | Up to 3 months | Long-term storage |
Unfrosted Cake Preparation
Baking our coconut loaf cake without glaze offers maximum flexibility for advance preparation. We wrap the completely cooled cake tightly in plastic wrap followed by aluminum foil to prevent moisture loss. Room temperature storage works perfectly for unfrosted cakes since coconut milk and butter create natural preservation.
Glazed Cake Storage
Our glazed coconut loaf cake requires refrigerated storage to maintain the glaze integrity. We place the glazed cake in an airtight container once the glaze sets completely. This prevents the glaze from becoming sticky while preserving the cake’s tropical flavor.
Freezing Techniques
Long-term storage becomes simple when we freeze our coconut loaf cake properly. We slice the cake before freezing for convenient individual servings. Each slice gets wrapped in plastic wrap then placed in freezer-safe bags with air removed. Whole cakes freeze equally well when double-wrapped and stored in freezer containers.
Thawing Process
Room temperature thawing preserves our cake’s signature moist texture best. We remove frozen cake from wrapping and place it on a wire rack for 2 to 3 hours. Refrigerated thawing works overnight for whole cakes. We avoid microwave thawing since it can create uneven texture and compromise the coconut flavor.
Glaze Application Timing
Adding glaze after thawing gives us the freshest presentation. We prepare fresh coconut glaze while the cake reaches room temperature. This approach ensures optimal glaze consistency and prevents separation that can occur during freezing and thawing cycles.
Serving Suggestions

We love to elevate our coconut loaf cake with various serving options that complement its tropical flavor profile and moist texture. The beauty of this cake lies in its versatility, allowing us to customize each serving to match different occasions and preferences.
Classic Glazed Presentation
Drizzling a glaze made from powdered sugar and coconut milk over the still-warm cake enhances both sweetness and moisture retention. This traditional approach creates an elegant finish while intensifying the coconut flavor throughout each slice.
Fresh and Creamy Accompaniments
We recommend pairing slices with whipped cream or coconut cream to add richness without overwhelming the cake’s delicate texture. Fresh fruit toppings such as sliced strawberries, raspberries, or blueberries provide a bright contrast that balances the cake’s richness while adding natural sweetness and visual appeal.
Flavor Enhancement Options
A drizzle of salted caramel or honey over individual servings creates a sweet and salty balance that adds an extra flavor dimension. These additions work particularly well when we want to transform the cake from a simple breakfast treat into an impressive dessert.
Aromatic Finishing Touches
Sprinkling grated lemon or lime zest over the cake or its toppings offers a bright, aromatic accent that enhances the tropical theme. We find this citrus addition particularly refreshing during warmer months or when serving the cake as an afternoon treat.
Luxurious Cream Options
A layer of mascarpone cheese or a dollop of fresh cream complements the coconut flavor beautifully while adding a creamy texture that melts perfectly with each bite. These dairy additions create a more indulgent experience suitable for special occasions.
Simple Elegant Serving
Serving the cake plain with a light dusting of powdered sugar remains a classic and simple option that lets the coconut flavor shine through. This minimalist approach works exceptionally well for breakfast or brunch settings.
Optional Texture Additions
We suggest sprinkling chopped nuts such as almonds or macadamias on top for added crunch and visual interest. For those seeking an even more tropical experience, incorporating crushed pineapple creates an alternative twist that enhances the cake’s island inspired character.


Conclusion
We’ve shared everything you need to create a bakery-quality coconut loaf cake that’ll transport your taste buds to the tropics. This recipe delivers consistent results every time and the versatility makes it perfect for any occasion.
The beauty of this coconut loaf cake lies in its simplicity and incredible flavor payoff. With basic pantry ingredients and our step-by-step guidance you’ll achieve that perfect moist texture and rich coconut taste that keeps everyone coming back for more.
Whether you’re meal prepping for the week ahead or surprising loved ones with a homemade treat this coconut loaf cake won’t disappoint. The make-ahead friendly nature and excellent storage properties make it a practical choice for busy bakers who don’t want to compromise on quality.
Frequently Asked Questions
What makes this coconut loaf cake so moist?
The combination of canned coconut milk, butter, and eggs creates the incredibly moist texture. The coconut milk adds richness and prevents the cake from drying out, while proper mixing techniques ensure the batter retains moisture throughout baking.
How long does the coconut loaf cake stay fresh?
When stored properly at room temperature, the unfrosted cake stays fresh for up to 5 days. Frosted or glazed cakes should be refrigerated and consumed within 3-4 days. For longer storage, the cake can be frozen for up to 8 months.
Can I make this coconut loaf cake ahead of time?
Yes, this cake is perfect for make-ahead preparation. The moist texture actually improves over time, making it ideal for meal prep. You can bake it several days in advance and store it wrapped tightly at room temperature or in the refrigerator.
What temperature should I bake the coconut loaf cake?
Bake the coconut loaf cake at 325°F for approximately 65 minutes. This lower temperature ensures even cooking and prevents the outside from browning too quickly while the inside remains undercooked. Test doneness with a toothpick inserted in the center.
Do I need special equipment to make this cake?
You’ll need basic baking equipment: a 9×5 inch loaf pan, stand mixer or hand mixer, mixing bowls, rubber spatula, wire cooling rack, and measuring cups. These common kitchen tools ensure proper mixing and presentation for bakery-quality results.
When should I apply the coconut glaze?
Apply the glaze while the cake is still slightly warm for optimal absorption. The cake should be completely cooled from the oven but not cold. This timing allows the glaze to soak in slightly while maintaining its glossy finish on top.
Can I freeze the coconut loaf cake?
Yes, the cake freezes excellently for up to 8 months. Wrap it tightly in plastic wrap and aluminum foil before freezing. For convenience, you can slice the cake before freezing and thaw individual portions as needed at room temperature.
What are some serving suggestions for coconut loaf cake?
Serve it plain with powdered sugar, topped with whipped cream or coconut cream, paired with fresh berries, or drizzled with honey or salted caramel. You can also add chopped nuts, crushed pineapple, or citrus zest for extra flavor and texture.


