Easter just got a whole lot sweeter with our decadent creme egg cheesecake that’ll make your taste buds do a happy dance! We’ve taken everyone’s favorite springtime candy and transformed it into the ultimate dessert that’s guaranteed to steal the show at any gathering.
This isn’t your ordinary cheesecake – we’re talking about a silky smooth masterpiece that captures all the creamy goodness of those beloved chocolate eggs in every single bite. The rich vanilla cheesecake base gets swirled with that signature golden “yolk” center that makes creme eggs so irresistible.
Whether you’re planning an Easter celebration or simply can’t resist the allure of this seasonal treat, our creme egg cheesecake delivers pure indulgence that’s surprisingly easy to make. We’ll show you exactly how to create this showstopper that combines the best of both worlds – classic cheesecake comfort with that nostalgic candy flavor we all crave.
Equipment Needed
Creating our stunning creme egg cheesecake requires the right tools to achieve that perfect silky texture and professional presentation. We recommend gathering all equipment before starting to ensure a smooth baking process.
Essential Baking Equipment:
- 9-inch springform pan for easy removal
- Electric stand mixer or hand mixer for smooth filling
- Large mixing bowls (at least 2)
- Rubber spatula for folding ingredients
- Measuring cups and spoons for accuracy
- Kitchen scale for precise measurements
Preparation Tools:
- Food processor for crushing graham crackers
- Medium saucepan for creating the golden yolk swirl
- Wire cooling rack for proper cooling
- Aluminum foil for water bath protection
- Large roasting pan for baking water bath
Finishing Equipment:
- Offset spatula for smooth top surface
- Sharp knife for clean slicing
- Warm water bowl for cleaning knife between cuts
- Serving plates for presentation
The springform pan proves crucial for this recipe since it allows us to remove the cheesecake without damaging its delicate structure. We strongly recommend using a kitchen scale alongside measuring cups to ensure consistent results every time.
Our electric mixer creates the smooth and creamy texture that makes this dessert irresistible. The water bath setup requires both aluminum foil and a roasting pan to prevent cracks and ensure even baking throughout the cheesecake.


Ingredients

We’ve carefully selected each ingredient to create the perfect balance of creamy cheesecake and beloved creme egg flavors. Our recipe uses premium ingredients that deliver exceptional taste and texture in every bite.
For the Crust
- 280-300 g (10 oz) digestive biscuits or Oreos, crushed
- 100-140 g (3.5-5 oz) unsalted butter, melted
For the Cheesecake Filling
- 550-750 g (19.4-26.4 oz) full-fat cream cheese, room temperature
- 100-200 g (3.5-7 oz) icing sugar
- 300-750 ml (10-25.4 oz) double or heavy cream
- 2 tsp vanilla extract (optional)
- 6-8 creme eggs, roughly chopped
For the Topping
- Whipped cream or Cool Whip for decoration
- 100 g milk chocolate, melted for drizzling
- 100 g white chocolate, melted for drizzling
- 2-3 creme eggs, sliced for decoration


Instructions

Follow these step-by-step instructions to create your perfect creme egg cheesecake. Each stage builds upon the previous one to ensure a smooth and successful baking experience.
Prep the Pan
Position your 9-inch springform pan on your work surface and lightly grease the bottom and sides with butter or cooking spray. Line the bottom with parchment paper for easy removal later. We recommend using a round loose-bottomed nonstick cake tin as specified in our research for the easiest release. Set the prepared pan aside while you work on the crust.
Make the Crust
Crush your digestive biscuits or graham crackers in a food processor until you achieve fine crumbs. Pour the melted unsalted butter over the crumbs and pulse until the mixture resembles wet sand and holds together when pressed. Transfer the mixture to your prepared pan and press firmly into the bottom using the back of a spoon or measuring cup. Create an even layer that extends slightly up the sides. Refrigerate the crust for at least 30 minutes to set while you prepare the filling.
Prepare the Filling
Beat the cream cheese in a large mixing bowl with an electric mixer until smooth and fluffy. Gradually add the icing sugar and continue beating until well combined. Pour in the double cream and vanilla extract if using. Mix on medium speed until the mixture thickens slightly. Gently fold in the chopped creme eggs using a spatula to distribute them evenly throughout the filling. Avoid overmixing to prevent the eggs from breaking down completely.
Bake the Cheesecake
Most creme egg cheesecakes follow a no-bake method as indicated in our research. Simply pour the prepared filling over the chilled crust and smooth the top with an offset spatula. Some recipes may require baking the crust briefly for enhanced texture but the filling itself remains unbaked. Tap the pan gently on the counter to release any air bubbles.
Cool and Chill
Cover the cheesecake with plastic wrap and refrigerate for at least 8 hours or overnight as recommended in our research data. This extended chilling time allows the filling to set properly and develop the perfect creamy texture. The cheesecake should feel firm to the touch when ready. Avoid disturbing it during this crucial setting period.
Add the Topping
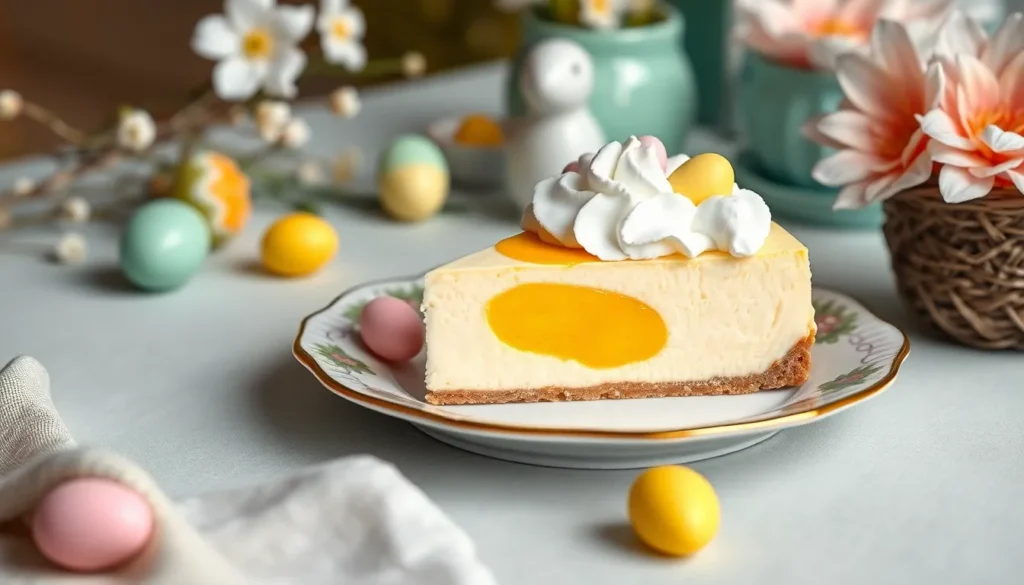
Remove the cheesecake from the refrigerator and carefully release it from the springform pan. Transfer to your serving plate using the parchment paper as a guide. Spread the whipped cream evenly over the surface using an offset spatula. Drizzle the melted milk and white chocolate in decorative patterns across the top. Arrange the sliced creme eggs around the edge and center for the final flourish that showcases the star ingredient.


Directions for Serving

We recommend removing our creme egg cheesecake from the refrigerator 15-20 minutes before serving to allow it to reach the ideal temperature. This brief resting period ensures the cheesecake maintains its creamy texture while becoming easier to slice cleanly.
Use a sharp knife dipped in warm water to cut through the dense cheesecake filling and crust. Wipe the blade clean between each slice to maintain neat presentation. The springform pan makes removal simple by releasing the sides and gently sliding the cheesecake onto your serving plate.
Each slice should showcase the beautiful layers of crushed biscuit crust topped with the rich cream cheese filling studded with colorful creme egg pieces. We suggest cutting the cheesecake into 8-10 generous portions to fully appreciate the indulgent dessert.
Garnish individual plates with additional whipped cream dollops and place a mini creme egg alongside each slice for an elegant finishing touch. The chocolate drizzle creates beautiful contrast against white serving plates and adds visual appeal to your presentation.
Store any remaining cheesecake covered in the refrigerator for up to 3-4 days. The flavors actually develop and intensify overnight, making leftovers equally delicious. We recommend bringing refrigerated slices to room temperature for 10 minutes before serving to restore the optimal creamy consistency.
For special occasions, dust the serving plates lightly with cocoa powder or arrange fresh berries around each slice to complement the rich creme egg flavors. The no-bake preparation makes this dessert perfect for entertaining since it can be prepared entirely in advance.


Make-Ahead Instructions

We recommend preparing this creme egg cheesecake in stages to ensure the best texture and flavor development. The beauty of this no-bake dessert lies in its make-ahead friendly nature, allowing you to spread the work across multiple days.
Base Preparation Timeline
We can prepare the base up to 2 days in advance. After mixing the crushed biscuits with melted butter and pressing into your springform pan, wrap the base tightly with plastic wrap. Store it in the refrigerator until you’re ready to add the filling.
Filling Component Preparation
The filling can be prepared up to 24 hours ahead of assembly. Beat the cream cheese and icing sugar until smooth, then fold in the whipped cream and chopped creme eggs. Transfer this mixture to an airtight container and refrigerate until needed.
Complete Assembly Schedule
| Timeline | Task | Storage Method |
|---|---|---|
| 2 days ahead | Prepare base | Wrap in plastic, refrigerate |
| 1 day ahead | Make filling | Airtight container, refrigerate |
| 8-24 hours ahead | Assemble cheesecake | Cover with plastic wrap |
| 2 hours before serving | Add decorations | Keep refrigerated |
Final Assembly and Chilling
Once assembled, we need to refrigerate the cheesecake for at least 8 hours or overnight to achieve the proper set. This extended chilling time allows the filling to firm up completely while the flavors meld together beautifully.
Decoration Strategy
We suggest adding the final decorative touches just before serving to maintain the best visual appeal. Prepare the melted chocolate drizzles and slice the creme eggs for garnish up to 2 hours in advance, but apply them to the cheesecake shortly before presentation. This timing prevents the chocolate from losing its glossy finish and keeps the creme egg decorations looking fresh and vibrant.


Storage Tips

Proper storage ensures our creme egg cheesecake maintains its creamy texture and delicious flavor for days after making it. We recommend keeping this dessert refrigerated at all times since the cream cheese and butter ingredients spoil quickly at room temperature.
Refrigeration Requirements
Our cheesecake needs to cool completely at room temperature before we place it in the refrigerator. This prevents rapid temperature changes that could affect the texture. Once cooled, we store the cheesecake in a large airtight container to maintain freshness and prevent it from absorbing other refrigerator odors.
| Storage Method | Duration | Best Quality |
|---|---|---|
| Refrigerated in airtight container | Up to 5 days | Within 3 days |
| Room temperature | Maximum 2 hours | Immediate consumption |
Container Options
We prefer using airtight containers for optimal storage, but food wrap or covering with a large bowl works as alternatives. The key is protecting our cheesecake from air exposure while maintaining proper refrigeration temperatures.
Freezing Method
Freezing offers another storage option that helps maintain freshness. We can freeze the entire cheesecake and slice it while frozen, which makes cutting through the creme egg pieces easier without damaging the candies or disrupting the smooth texture.
Safety Guidelines
We always use fresh dairy ingredients and maintain hygienic preparation conditions to prevent spoilage. Any cheesecake left above refrigerator temperature for more than two hours should be discarded for food safety reasons. Our storage timeline ensures we enjoy the cheesecake at peak quality while maintaining food safety standards.
Conclusion
We’ve created something truly special with this creme egg cheesecake recipe that captures all the magic of Easter in every bite. The combination of creamy texture and nostalgic candy flavors makes this dessert an instant crowd-pleaser that’ll have everyone asking for seconds.
With proper planning and our make-ahead tips you can effortlessly prepare this showstopper for any celebration. The no-bake approach means less stress in the kitchen while still delivering professional-looking results that taste incredible.
This cheesecake proves that sometimes the best desserts come from transforming our favorite childhood treats into grown-up indulgences. We’re confident this recipe will become your go-to Easter dessert for years to come.
Frequently Asked Questions
How long does it take to make a creme egg cheesecake?
The total time is approximately 8-10 hours, including preparation and chilling. Active preparation takes about 30 minutes to make the crust and filling, but the cheesecake requires at least 8 hours of chilling time in the refrigerator to set properly and achieve the ideal creamy texture.
Can I make this cheesecake ahead of time?
Yes, this cheesecake is perfect for making ahead. You can prepare the base up to 2 days in advance and the filling 24 hours ahead. The complete assembled cheesecake can be made 8-24 hours before serving, with final decorations added just 2 hours prior to presentation.
What equipment do I need to make this cheesecake?
Essential equipment includes a 9-inch springform pan, electric mixer, mixing bowls, measuring tools, and a kitchen scale for precise measurements. You’ll also need a food processor for crushing graham crackers and a medium saucepan for creating the golden yolk swirl if desired.
How should I store leftover creme egg cheesecake?
Store the cheesecake in the refrigerator in a large airtight container for up to 5 days for best quality. Let it cool completely at room temperature before storing. For longer preservation, it can be frozen, though refrigeration is recommended for optimal texture and flavor.
Do I need to bake this cheesecake?
No, this is a no-bake cheesecake recipe, making it perfect for entertaining and easier preparation. The cheesecake sets through chilling in the refrigerator rather than baking, which eliminates the risk of cracks and ensures a smooth, creamy texture throughout.
What’s the best way to slice the cheesecake cleanly?
Use a sharp knife dipped in warm water between each cut for clean slices. Remove the cheesecake from the refrigerator 15-20 minutes before serving to achieve the ideal temperature and creamy texture. The springform pan makes removal convenient and helps maintain the cheesecake’s shape.


