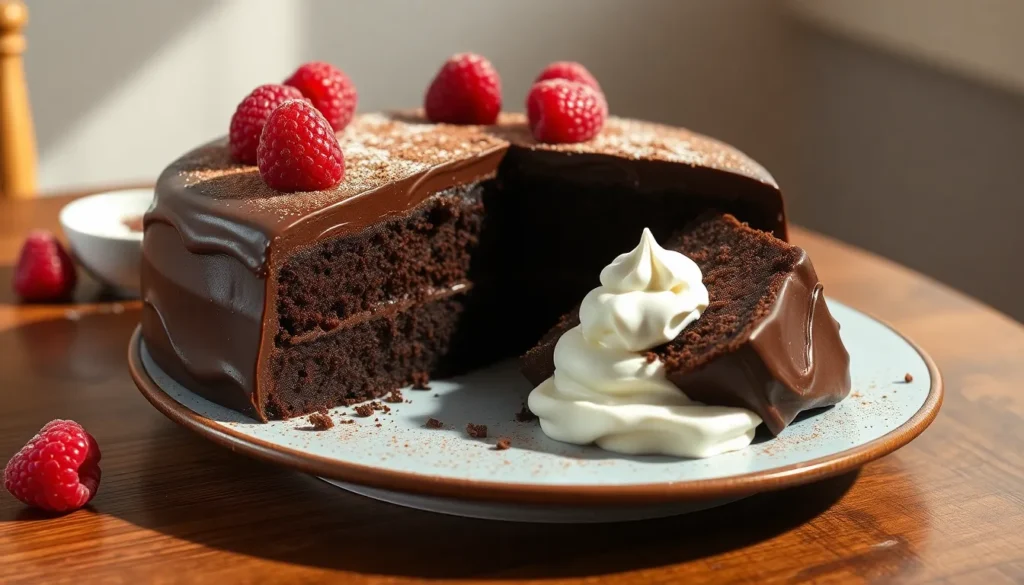
We’ve cracked the code for the ultimate dairy-free chocolate cake that’ll make you forget it’s missing any dairy at all. This rich and decadent dessert proves that plant-based baking doesn’t mean sacrificing flavor or texture – it’s actually become our go-to chocolate cake recipe even when dairy isn’t an issue.
What makes this cake special isn’t just what we’ve left out but what we’ve discovered along the way. Simple pantry staples like unsweetened applesauce and high-quality cocoa powder create an incredibly moist crumb that rivals any traditional chocolate cake. We’ve tested countless variations to perfect this recipe and the results speak for themselves.
Whether you’re accommodating dietary restrictions or simply curious about dairy-free baking this cake delivers on every level. It’s perfect for birthdays celebrations or those moments when you need serious chocolate comfort food without the dairy.
Ingredients
We’ve carefully selected each ingredient to create a moist and rich dairy-free chocolate cake that delivers exceptional flavor. Our recipe combines pantry staples with a few key substitutions to achieve the perfect texture and taste.
Dry Ingredients
- 1¾ cups all-purpose flour
- ¾ cup unsweetened cocoa powder
- 1¾ cups granulated sugar
- 2 teaspoons baking soda
- 1 teaspoon baking powder
- 1 teaspoon salt
- ½ teaspoon espresso powder (optional, enhances chocolate flavor)
Wet Ingredients
- 1 cup unsweetened applesauce
- 1 cup strong brewed coffee (cooled to room temperature)
- ½ cup neutral oil (vegetable or canola)
- 2 tablespoons apple cider vinegar
- 2 teaspoons vanilla extract
- 1 cup non-dairy milk (almond, oat, or soy)
For the Chocolate Frosting
- ½ cup vegan butter (softened)
- ⅓ cup unsweetened cocoa powder
- 3 cups powdered sugar
- ⅓ cup non-dairy milk
- 1 teaspoon vanilla extract
- Pinch of salt


Equipment Needed
 2")
Creating our dairy-free chocolate cake requires exact tools that ensure perfect results every time. We’ve identified the essential equipment based on our extensive testing to help you achieve the same professional quality we deliver in our kitchen.
Essential Baking Tools:
- Mixed bowls (at least 2 large mixing bowls)
- Measuring cups and spoons for accurate ingredient portions
- Cake pans (typically two 9-inch round pans for layer cake)
- Cooling rack for proper cake cooling
- Electric mixer (optional but recommended for smooth batter)
Additional Equipment:
- Rubber spatula for folding ingredients
- Wire whisk for combining wet ingredients
- Parchment paper for easy cake removal
- Toothpick or cake tester for doneness checking
Our testing shows that using two separate mixing bowls streamlines the process significantly. We combine dry ingredients in one bowl while whisking wet ingredients in another before bringing them together. The electric mixer proves particularly valuable when creating our chocolate frosting, though hand mixing works perfectly fine for the cake batter itself.
Quality cake pans make a substantial difference in baking results. We recommend using light-colored metal pans rather than dark ones, as they prevent over-browning and ensure even heat distribution. The cooling rack becomes crucial for achieving the proper texture, allowing air circulation that prevents soggy bottoms while our cakes cool completely before frosting application.


Instructions
 4")
We’ve carefully developed these step-by-step instructions to ensure your dairy-free chocolate cake turns out perfectly moist and decadent every time. Follow each stage precisely for the best results.
Prep the Cake Pans
Preheat your oven to 350°F (175°C). Generously grease two 9-inch round cake pans with cooking spray or oil. Dust each pan lightly with flour, tapping out any excess to prevent sticking. Line the bottom of each pan with parchment paper for extra insurance against sticking.
Mix the Dry Ingredients
Gather a large mixing bowl and combine all dry ingredients together. Add 1 3/4 cups all-purpose flour, 2 cups granulated sugar, and 3/4 cup Dutch-process cocoa powder to the bowl. Measure 1 1/2 teaspoons each of baking soda and baking powder, then add them to the mixture. Whisk in 1 1/2 teaspoons coarse salt until everything is evenly distributed. Set this bowl aside while you prepare the wet ingredients.
Combine the Wet Ingredients
Take a separate medium bowl and begin mixing your wet ingredients. Pour in 8 tablespoons of canola oil and 1 3/4 cups warm water. Crack 2 large eggs into the mixture, or substitute with flax eggs for a completely vegan option. Add 2 teaspoons vanilla extract and whisk everything together until smooth and well incorporated.
Create the Cake Batter
Pour the wet ingredient mixture into the bowl containing your dry ingredients. Use a whisk to combine them, starting slowly to prevent flour from flying everywhere. Continue whisking until the batter becomes completely smooth with no lumps remaining. The batter will be relatively thin, which is exactly what we want for a moist cake.
Bake the Cake
Divide the batter evenly between your two prepared cake pans. Place both pans on the center rack of your preheated oven. Bake for 25 to 30 minutes, checking for doneness by inserting a toothpick into the center of each cake. The toothpick should come out clean or with just a few moist crumbs attached. Allow the cakes to cool in their pans for 10 minutes before turning them out onto cooling racks.
Make the Dairy Free Chocolate Frosting
Start your frosting by gathering 1/2 cup dairy-free butter at room temperature. Beat the butter in a large bowl until light and fluffy using an electric mixer. Add 1/4 cup cocoa powder and 1 teaspoon vanilla extract, mixing until well combined. Gradually incorporate 3 cups powdered sugar, alternating with 2 tablespoons of water or dairy-free milk. Continue beating until the frosting reaches your desired spreading consistency.
Assemble and Frost the Cake
Wait for your cake layers to cool completely before assembling. Place the first layer on your serving plate and spread a generous amount of frosting evenly across the top. Position the second cake layer on top, pressing gently to secure it. Apply the remaining frosting to the top and sides of the cake, using an offset spatula for smooth, professional-looking results.


Storage Instructions
 6")
We’ve tested various storage methods to help you keep your dairy-free chocolate cake fresh and delicious for as long as possible. Proper storage techniques ensure your cake maintains its moist texture and rich chocolate flavor.
Room Temperature Storage
Your freshly baked dairy-free chocolate cake stays perfectly fresh at room temperature for 2 to 5 days when stored properly. We recommend covering the cake completely with plastic wrap or placing it in an airtight container to prevent the cake from drying out. This method works best when you plan to serve the cake within a few days of baking.
Refrigerated Storage
Refrigeration extends your cake’s freshness significantly. We store our dairy-free chocolate cake in the refrigerator for up to 5 to 7 days while maintaining optimal taste and texture. Always keep the cake covered to prevent it from absorbing refrigerator odors or losing moisture. This storage method works particularly well for frosted cakes or during warmer weather conditions.
Freezing for Long-Term Storage
Freezing offers the best solution for long-term storage of your dairy-free chocolate cake. We wrap individual slices in aluminum foil and place them in zip-top bags for convenient single servings. For whole cakes we freeze them on a parchment-lined tray until the frosting sets completely then wrap the entire cake in plastic wrap followed by aluminum foil. Your frozen cake maintains quality for up to 2 months.
Thawing Instructions
Thaw your frozen cake slices or whole cake at room temperature for the best texture. Alternatively we recommend thawing in the refrigerator if you prefer a slower process. Both methods restore the cake’s original moisture and flavor profile.
Unfrosted Cake Storage
Unfrosted cake layers require different storage considerations. We store these layers wrapped at room temperature for up to 2 days or refrigerated for up to 3 days. This flexibility allows you to bake the cake layers in advance and frost them when needed.
| Storage Method | Duration | Storage Requirements |
|---|---|---|
| Room Temperature | 2-5 days | Cover with plastic wrap or airtight container |
| Refrigeration | 5-7 days | Keep covered to prevent odor absorption |
| Freezing | Up to 2 months | Wrap slices individually or whole cake thoroughly |
| Unfrosted Layers | 2-3 days | Room temperature or refrigerated when wrapped |
Always store your cake in a clean dry environment away from strong odors that could affect the chocolate flavor. Check your exact recipe for any unique ingredient requirements that might influence storage recommendations.


Make-Ahead Tips
 8")
Planning ahead makes enjoying our dairy-free chocolate cake even more convenient. We can prepare this delicious dessert days or even weeks in advance with proper storage techniques.
Unfrosted Cake Storage
Our unfrosted cake layers stay fresh at room temperature for up to 3 days when wrapped tightly in plastic wrap. This approach works perfectly when we need to prepare components separately before final assembly.
For longer storage, we freeze the cooled cake layers for up to two months. We wrap each layer tightly in plastic wrap first, then add a layer of foil for extra protection against freezer burn.
Preparation Timeline
We always ensure our cake layers cool completely before wrapping and storing. This prevents condensation from forming inside the wrapping, which could make our cake soggy.
The frosting can be prepared separately and stored in the refrigerator for later use. We recommend preparing the frosting up to 3 days ahead, then bringing it to room temperature and re-whipping before use.
Storage Duration Guidelines
| Storage Method | Duration | Best For |
|---|---|---|
| Room Temperature (Unfrosted) | 2-3 days | Short-term planning |
| Freezer (Unfrosted layers) | Up to 2 months | Long-term preparation |
| Refrigerated frosting | Up to 3 days | Component preparation |
Texture Preservation Tips
We avoid overmixing our batter when preparing ahead, as this maintains the cake’s tender crumb structure during storage. Mixing wet and dry ingredients separately, then combining them just until blended, ensures optimal texture even after freezing and thawing.
Once we frost our cake, we consume it within a shorter timeframe due to moisture and texture changes that occur with the frosting’s dairy-free ingredients. This timing ensures we enjoy the cake at its absolute best quality.
Serving Suggestions
 10")
Our dairy-free chocolate cake becomes even more spectacular when paired with the right accompaniments. We recommend serving each slice with a dollop of dairy-free whipped cream or coconut yogurt to add a creamy contrast to the rich chocolate flavor.
Fresh fruits make excellent companions to this decadent dessert. Strawberries provide a bright tartness that cuts through the cake’s richness while raspberries offer a burst of color and subtle sweetness. We also love adding sliced bananas or a handful of blueberries for natural sweetness and visual appeal.
Beverage pairings elevate the entire dessert experience. A tall glass of your favorite non-dairy milk creates a classic combination that never disappoints. Coffee lovers will appreciate how a hot cup of coffee complements the chocolate notes beautifully. For special occasions we suggest pairing the cake with an Espresso Martini to create an elegant finish to any meal.
| Serving Option | Best Pairing | Occasion |
|---|---|---|
| Dairy-free whipped cream | Fresh berries | Everyday dessert |
| Coconut yogurt | Sliced bananas | Breakfast cake |
| Non-dairy milk | Warm coffee | Afternoon treat |
| Espresso Martini | Plain cake slice | Special celebrations |
Temperature variations can transform your serving experience. We enjoy serving the cake at room temperature for the fullest flavor development. Slightly chilled slices offer a firmer texture that some prefer during warmer months. Warming individual slices for 10-15 seconds in the microwave creates an indulgent treat that melts in your mouth.
The cake stands beautifully on its own without any additions. Its fudgy texture and intense chocolate flavor make it satisfying as a simple dessert. This versatility allows you to customize each serving based on your guests’ preferences or dietary needs.


Conclusion
We’ve shown you that creating an incredible dairy-free chocolate cake doesn’t require compromising on taste or texture. This recipe delivers all the rich chocolatey goodness you crave while meeting dietary needs and preferences.
The beauty of this cake lies in its versatility and reliability. Whether you’re planning ahead for a special celebration or satisfying a spontaneous chocolate craving our tested techniques ensure consistent results every time.
We’re confident this dairy-free chocolate cake will become your go-to dessert recipe. It’s proof that thoughtful ingredient choices and proper technique can create something truly special that everyone can enjoy regardless of their dietary restrictions.
Frequently Asked Questions
What makes this dairy-free chocolate cake so moist and flavorful?
The secret lies in using unsweetened applesauce as a moisture replacement for traditional dairy ingredients, combined with high-quality cocoa powder. The addition of brewed coffee enhances the chocolate flavor, while apple cider vinegar helps create a tender crumb structure. These carefully selected ingredients work together to produce a rich, moist cake that rivals traditional versions.
Can I make this cake ahead of time?
Yes! Unfrosted cake layers can be stored at room temperature for up to 3 days or frozen for up to 2 months when properly wrapped. The frosting can be made ahead and refrigerated for up to 3 days. Just ensure the cake layers are completely cooled before wrapping to prevent sogginess.
How should I store the finished cake?
Store the frosted cake covered at room temperature for 2-5 days, or refrigerate for 5-7 days for extended freshness. For long-term storage, wrap individual slices in aluminum foil and freeze in zip-top bags. Whole cakes can also be frozen after wrapping thoroughly.
What equipment do I need to make this cake?
Essential equipment includes two large mixing bowls, measuring cups and spoons, two 9-inch round cake pans (preferably light-colored metal), a cooling rack, and optionally an electric mixer. You’ll also want a rubber spatula, wire whisk, and parchment paper for best results.
What are the best serving suggestions for this cake?
Serve with dairy-free whipped cream or coconut yogurt, and fresh fruits like strawberries or raspberries for added flavor and visual appeal. Pair with non-dairy milk, coffee, or an Espresso Martini. The cake can be enjoyed at room temperature, slightly chilled, or warmed for different texture experiences.
Is the espresso powder necessary in the recipe?
The espresso powder is optional but highly recommended. It enhances the chocolate flavor without making the cake taste like coffee. If you don’t have espresso powder, you can substitute with instant coffee or simply omit it, though the chocolate flavor won’t be quite as intense.