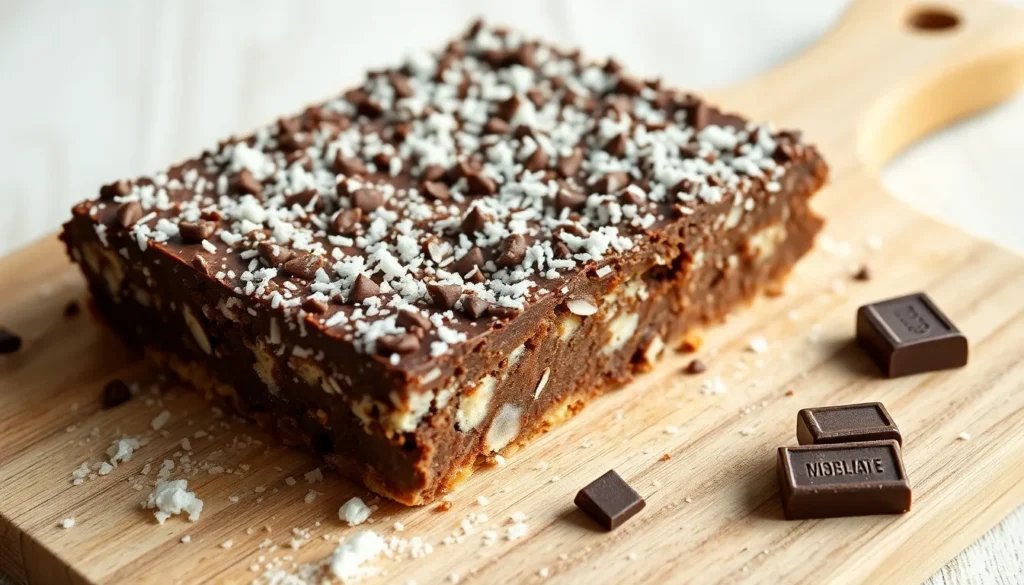
We’ve discovered the perfect no-bake treat that’ll transport you straight to an Australian kitchen – the beloved hedgehog slice. This iconic dessert earned its quirky name from the chocolate and coconut coating that resembles a hedgehog’s spiky exterior, making it as fun to look at as it is to devour.
What makes hedgehog slice absolutely irresistible is its incredible simplicity. We’re talking about a dessert that requires zero baking skills yet delivers maximum flavor impact. The combination of crushed biscuits, cocoa, coconut, and butter creates a rich, fudgy base that’s both nostalgic and indulgent.
Whether you’re planning a last-minute dessert for guests or craving something sweet without the oven hassle, this classic Australian slice delivers every time. We’ll show you how to create this crowd-pleasing treat that’s been winning hearts for generations – and trust us, once you try it, you’ll understand why it’s remained a household favorite across Australia and beyond.
What Is Hedgehog Slice
Hedgehog slice stands as one of Australia’s most beloved no-bake desserts, earning its whimsical name from the spiky coconut coating that mimics a hedgehog’s distinctive appearance. We recognize this treat as a cornerstone of Australian home baking, passed down through generations of families who appreciated its simplicity and rich flavor profile.
The dessert consists of a dense, fudgy base made from crushed biscuits bound together with cocoa, butter, and condensed milk. Desiccated coconut forms the signature exterior coating, creating those characteristic “spikes” that give the slice its charming hedgehog resemblance. Some variations include chopped nuts or dried fruit mixed into the base for added texture and flavor complexity.
We find hedgehog slice particularly appealing because it requires absolutely no baking skills or oven time. The preparation involves mixing ingredients, pressing the mixture into a lined tin, and allowing it to set in the refrigerator. This straightforward process makes it perfect for novice bakers, children learning to cook, or anyone seeking a quick dessert solution.
The texture delivers a satisfying contrast between the firm, chocolatey interior and the slightly chewy coconut exterior. Each bite provides rich cocoa flavors balanced by the subtle sweetness of coconut and the crunch of biscuit pieces. The density of the slice means small portions satisfy sweet cravings effectively.
Traditional hedgehog slice recipes vary slightly across different Australian regions and families, with some preferring Marie biscuits while others opt for plain sweet biscuits. The cocoa content can be adjusted to create lighter or more intensely chocolate flavored versions, allowing bakers to customize the treat to their preferences.


Ingredients

We’ve crafted this hedgehog slice recipe using traditional proportions that deliver the perfect balance of chocolate richness and textural contrast. Our ingredient list is divided into two essential components that work together to create this beloved Australian treat.
For the Base
- 500 grams plain sweet biscuits (Marie or digestive biscuits work perfectly)
- 250 grams unsalted butter
- 1 can (395 grams) sweetened condensed milk
- 3 tablespoons cocoa powder
- 1/2 cup (65 grams) chopped walnuts
- 1/2 cup (50 grams) desiccated coconut
- 1/2 cup sultanas (optional for extra sweetness)
For the Chocolate Topping
- 290 grams milk chocolate (chopped for easier melting)
- 2 teaspoons vegetable oil or coconut oil
- Additional desiccated coconut for sprinkling (optional)


Equipment Needed

Making our beloved hedgehog slice requires just a handful of basic kitchen tools that most home bakers already have on hand. We’ve designed this equipment list to help you prepare efficiently and achieve the perfect texture for your dessert.
Food processor or crushing method tops our essential equipment list for breaking down the biscuits into the ideal consistency. A food processor makes quick work of 500 grams of biscuits, creating uniform pieces that blend seamlessly into our chocolate base. Alternatively, we can place biscuits in a large sealed bag and use a rolling pin to crush them manually for those without a food processor.
Large pot or saucepan serves as our melting station for combining butter and chocolate into a smooth mixture. The pot should accommodate all our base ingredients comfortably while allowing easy stirring without spillage.
Slice tin or cake tin forms the foundation for shaping our hedgehog slice perfectly. We recommend using either an 18×28 cm rectangular tin or a 20 cm square tin, depending on your preferred thickness. Line the tin with parchment paper for easy removal after setting.
Mixing spoon or spatula becomes crucial for combining our crushed biscuits with the melted chocolate mixture. Choose a sturdy utensil that can handle the thick consistency without bending or breaking.
Refrigerator space completes our equipment requirements, as proper chilling transforms our mixture from a soft blend into firm, sliceable squares. Clear adequate shelf space to accommodate your tin for at least 2 hours of setting time.
| Equipment | Purpose | Alternative Option |
|---|---|---|
| Food processor | Crush 500g biscuits uniformly | Rolling pin with sealed bag |
| Large saucepan | Melt butter and chocolate | Double boiler method |
| Slice tin (18x28cm or 20cm square) | Shape and set the slice | Any similar sized baking dish |
| Mixing spoon/spatula | Combine ingredients | Large wooden spoon |
| Refrigerator | Set mixture for 2+ hours | Cool pantry (longer setting time) |


Instructions

Creating this beloved Australian treat requires careful preparation and patience. We’ll guide you through each step to achieve the perfect texture and rich chocolate flavor.
Prepare the Base
Crush the plain sweet biscuits in a food processor until you achieve a mixture of fine crumbs and slightly larger pieces for varied texture. Transfer the crushed biscuits to a large mixing bowl.
Melt the unsalted butter in a large saucepan over medium heat. Remove from heat and stir in the sweetened condensed milk until well combined. Add the cocoa powder and mix thoroughly to eliminate any lumps.
Pour the warm butter mixture over the crushed biscuits. Add the chopped walnuts and desiccated coconut to the bowl. Include sultanas if using for extra sweetness and texture.
Mix all ingredients thoroughly with a sturdy wooden spoon or spatula until every piece of biscuit is coated and the mixture holds together when pressed.
Make the Chocolate Topping
Combine the chopped milk chocolate and vegetable oil in a heatproof bowl. Melt the chocolate using a double boiler method or microwave in 30-second intervals.
Stir the mixture between each heating interval to prevent burning. Continue until the chocolate becomes smooth and glossy. The small amount of oil ensures easy spreading and a professional finish.
Set the melted chocolate aside to cool slightly while you prepare the base layer. This prevents the chocolate from sinking into the base mixture.
Assemble the Slice
Line your 20cm x 20cm slice tin with baking paper, leaving overhang for easy removal. Lightly butter the paper to prevent sticking.
Transfer the prepared base mixture into the lined tin. Press the mixture down firmly using the back of a spoon or your hands to create an even, compact layer.
Pour the melted chocolate over the pressed base. Use an offset spatula or the back of a spoon to spread the chocolate evenly across the entire surface.
Sprinkle additional desiccated coconut over the chocolate layer if desired for extra texture and authentic appearance.
Chill and Set
Place the assembled slice in the refrigerator immediately after assembly. Allow the dessert to set for a minimum of 2 hours or until completely firm.
Check that the chocolate topping has hardened and the base feels solid before cutting. Properly set hedgehog slice should hold its shape when lifted.
Remove from the tin using the baking paper overhang. Cut into squares or rectangles using a sharp knife for clean edges. Store covered in the refrigerator until ready to serve.


Directions for Cutting and Serving

Proper cutting technique ensures clean square pieces that showcase the hedgehog slice’s distinctive appearance. We recommend chilling the slice for at least 3 hours or overnight to achieve the ideal firmness for cutting. A sharp knife dipped in warm water and wiped clean between cuts produces the cleanest edges.
Remove the entire slice from the tin using the baking paper overhang as handles. Place it on a cutting board and use a ruler to mark even portions if desired. Cut the slice into squares or rectangular bars depending on your preference for serving size.
| Serving Option | Temperature | Texture Result |
|---|---|---|
| Room Temperature | 20-22°C (68-72°F) | Softer, fudgier consistency |
| Refrigerated | 4°C (39°F) | Firmer, cleaner cutting |
We suggest serving the hedgehog slice at room temperature for the best flavor experience. Allow refrigerated pieces to sit for 10-15 minutes before serving to soften slightly. The coconut coating and chocolate flavors develop more fully at room temperature.
Store cut pieces in an airtight container in the refrigerator for up to one week. Layer pieces between baking paper to prevent sticking. Individual wrapping in plastic wrap makes hedgehog slice perfect for lunchboxes or picnic treats.
The no bake nature of this dessert makes it ideal for advance preparation. Cut pieces maintain their shape and quality when stored properly. Bring refrigerated slices to room temperature 15 minutes before serving for optimal texture and taste.


Storage Tips

We understand that proper storage is crucial for maintaining the quality and texture of your hedgehog slice. Since this delicious treat contains dairy and perishable ingredients, we need to follow exact storage guidelines to ensure food safety and optimal taste.
Refrigerator Storage
We always recommend storing hedgehog slice in an airtight container in the refrigerator. The slice maintains its best quality when kept at consistent cold temperatures. Your hedgehog slice will stay fresh for 5 to 10 days when properly refrigerated, though some variations can last up to two weeks under optimal storage conditions.
| Storage Method | Duration | Container Type |
|---|---|---|
| Refrigerated | 5-10 days | Airtight container |
| Refrigerated (optimal conditions) | Up to 2 weeks | Airtight container |
| Frozen | Up to 3 months | Freezer-safe airtight container |
We suggest placing parchment paper between layers if you’re stacking multiple pieces. This prevents the slices from sticking together and makes serving individual portions much easier.
Freezing for Long-Term Storage
We recommend freezing hedgehog slice when you want to store it for extended periods. Before freezing, we cut the slice into individual portions for convenient serving later. Each piece goes into a freezer-friendly airtight container with parchment paper separating the layers.
Your frozen hedgehog slice maintains its quality for up to 3 months in the freezer. We label containers with the date to track storage time effectively.
Thawing and Serving
We allow frozen slices to thaw at room temperature for 20 to 30 minutes before serving. This timing gives the slice the perfect texture without becoming too soft. For those who prefer a firmer consistency, we serve the slice while it’s still slightly chilled.
Preventing Texture Issues
We keep hedgehog slice refrigerated to prevent it from becoming sticky, especially in warmer environments. Room temperature storage causes the slice to lose its firm texture and can compromise food safety. We never leave the slice out for extended periods, particularly during hot weather or in warm kitchens.
Variations and Tips

The beauty of hedgehog slice lies in its adaptability and forgiving nature. We can customize this classic dessert to suit different tastes and dietary preferences while maintaining its signature appearance and texture.
Flavor Variations
Our hedgehog slice transforms beautifully with different flavor additions that complement the chocolate base. We recommend incorporating chopped walnuts or hazelnuts for added richness and crunch. Dried fruit like sultanas or cranberries provides bursts of sweetness that balance the cocoa’s intensity.
Coffee lovers can enhance the chocolate flavor by adding a tablespoon of instant coffee dissolved in warm water to the mixture. Mint extract creates a refreshing twist when we add just half a teaspoon to the base ingredients. For those preferring different chocolate profiles, we can substitute the milk chocolate topping with dark chocolate for a more intense flavor or white chocolate for a sweeter finish.
Marshmallows work exceptionally well when chopped into small pieces and folded through the mixture. The Dutch variation known as Arretjescake demonstrates how mascot-based recipes can inspire unique presentations and flavor combinations.
Texture Tips
Achieving the perfect hedgehog slice texture depends on how we prepare and combine our ingredients. We control the final texture by adjusting how finely we crush the biscuits. Coarse crushing creates a chunky, crunchy texture that provides satisfying bites, while finer crumbs produce a smoother, more uniform result.
For an exceptionally fudgy texture, we increase the chocolate-to-biscuit ratio in our mixture. Rice puffs offer an interesting alternative to crushed biscuits, creating a lighter crunch that appeals to those preferring less density. We ensure thorough mixing of melted chocolate with crushed ingredients to achieve consistent distribution throughout the slice.
| Texture Feature | Method | Result |
|---|---|---|
| Chunky texture | Coarse biscuit crushing | Satisfying crunch with varied bite sizes |
| Smooth texture | Fine crumb consistency | Uniform, fudgy consistency |
| Light crunch | Rice puffs substitution | Airy texture with gentle crunch |
| Extra fudgy | Higher chocolate ratio | Rich, dense consistency |
Proper setting technique ensures clean cuts and stable structure. We line our tray with parchment paper for effortless removal and press the mixture firmly into corners. Refrigeration for at least 2 hours allows the chocolate to set completely before cutting. Using a hot, sharp knife dipped in warm water between cuts prevents cracking and creates professional-looking portions.
Make-Ahead Instructions

Planning ahead transforms our hedgehog slice into the perfect make-ahead dessert for entertaining or busy weekdays. We can prepare this delicious treat up to several days in advance while maintaining its rich texture and flavor.
Preparation Timeline
| Timeline | Action | Details |
|---|---|---|
| 15-20 minutes | Active preparation | Mix ingredients and assemble |
| 2-3 hours minimum | Initial chilling | Base setting time |
| 3-5 days ahead | Full preparation | Complete make-ahead window |
Day-of-Event Preparation
We recommend completing the entire hedgehog slice 24 hours before serving for optimal results. The extended chilling time allows flavors to meld beautifully while ensuring clean cuts when we slice the dessert. Our slice actually improves with time as the condensed milk penetrates the biscuit pieces more thoroughly.
Extended Make-Ahead Options
For events planned several days in advance we can prepare our hedgehog slice up to 5 days early. The key lies in proper wrapping once the chocolate topping has completely set. We wrap the entire tin tightly with plastic wrap then cover with aluminum foil to prevent any refrigerator odors from affecting the delicate chocolate flavor.
Pre-Slicing Strategy
When preparing for large gatherings we find pre-slicing saves valuable serving time. After the full chilling period we cut our hedgehog slice into individual portions using our warm knife technique. Each piece gets wrapped individually in plastic wrap or placed in separate compartments of an airtight container with parchment paper layers between pieces.
Temperature Management
Our make-ahead hedgehog slice benefits from a brief room temperature rest before serving. We remove individual portions from refrigeration 10-15 minutes early allowing the chocolate to soften slightly for the best eating experience. This timing ensures our guests enjoy the perfect texture contrast between the firm base and smooth chocolate topping.


Conclusion
We’ve shared everything you need to master this quintessential Australian treat that’s captured hearts for generations. The hedgehog slice stands as proof that the best desserts don’t always require complex techniques or expensive equipment.
What makes this dessert truly special is its forgiving nature and endless adaptability. Whether you’re a beginner baker or someone looking for a reliable crowd-pleaser we’re confident this recipe will deliver exceptional results every time.
The combination of rich chocolate flavors crunchy textures and that distinctive coconut coating creates a dessert experience that’s both nostalgic and satisfying. With proper storage techniques and our variation suggestions you’ll never run out of ways to enjoy this beloved slice.
We encourage you to make this recipe your own and discover why the hedgehog slice has remained a staple in Australian kitchens for so many years.
Frequently Asked Questions
What is a hedgehog slice?
A hedgehog slice is a beloved no-bake Australian dessert featuring a chocolate and coconut coating that resembles a hedgehog’s spiky appearance. It consists of a dense, fudgy base made from crushed biscuits, cocoa, butter, and condensed milk, covered with desiccated coconut. This traditional treat is cherished for its rich chocolate flavor and simple preparation method.
How long does it take to make hedgehog slice?
The preparation time for hedgehog slice is approximately 20-30 minutes for mixing and assembling. However, it requires at least 3 hours of chilling time in the refrigerator to set properly, though overnight chilling is recommended for best results. The total time from start to serving is about 4-24 hours, depending on your preferred setting time.
Can I make hedgehog slice without baking?
Yes, hedgehog slice is a completely no-bake dessert. It requires no oven or baking skills, making it perfect for beginners or when you need a quick dessert solution. The slice sets in the refrigerator through chilling rather than baking, which is what makes it so simple and accessible to prepare.
How long does hedgehog slice last?
When stored properly in an airtight container in the refrigerator, hedgehog slice stays fresh for 5-10 days, or up to two weeks under optimal conditions. For longer storage, it can be frozen for several months. Individual portions should be wrapped in baking paper or stored in freezer-safe containers to maintain quality.
What ingredients do I need for hedgehog slice?
The main ingredients include 500g plain sweet biscuits, 250g unsalted butter, one can of sweetened condensed milk, cocoa powder, chopped walnuts, and desiccated coconut. For the chocolate topping, you’ll need chopped milk chocolate and vegetable or coconut oil. Optional additions include sultanas for extra sweetness and texture.
Can I customize the hedgehog slice recipe?
Absolutely! The hedgehog slice is highly adaptable. You can add nuts, dried fruits, instant coffee, or mint extract for different flavors. Adjust the biscuit crushing method for varied textures, or modify the chocolate-to-biscuit ratio to suit your preferences. Different types of biscuits and cocoa content can also be used for personalization.
How do I cut hedgehog slice cleanly?
For clean cuts, ensure the slice is well-chilled for at least 3 hours or overnight. Use a sharp knife dipped in warm water, wiping it clean between cuts. This technique helps achieve neat edges and prevents the slice from crumbling. Line your tin with parchment paper for easy removal before cutting.
Should hedgehog slice be served cold or at room temperature?
Hedgehog slice is best served at room temperature for optimal flavor and texture. If stored in the refrigerator, let individual pieces sit for 10-15 minutes before serving to soften slightly. This allows the flavors to develop fully and provides the best eating experience while maintaining the slice’s structural integrity.


