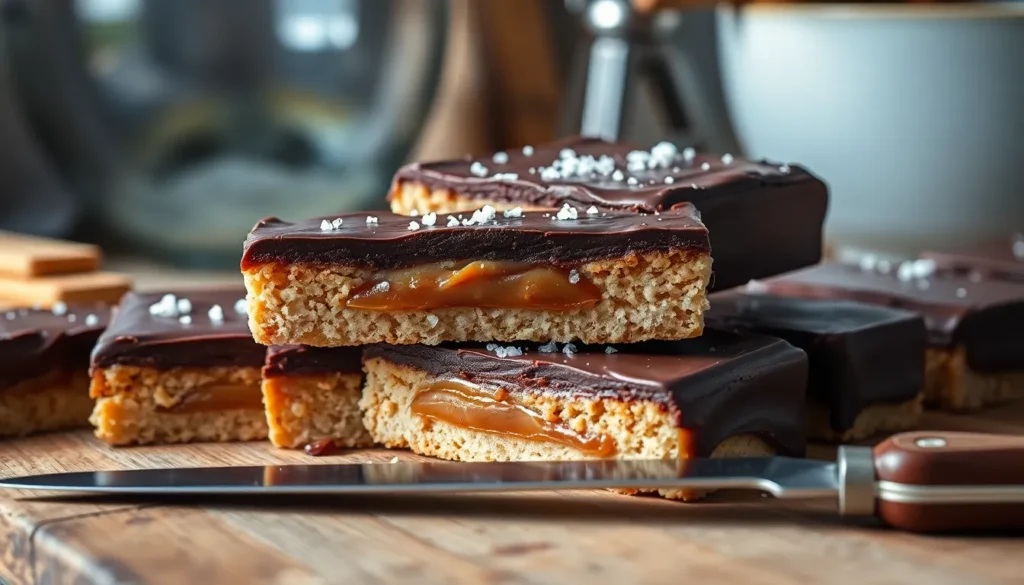
We’ve all experienced that moment of pure bliss when biting into a Twix bar – the perfect harmony of buttery shortbread, smooth caramel, and rich chocolate coating. But what if we told you that you could recreate this beloved candy bar magic right in your own kitchen?
Making homemade Twix bars isn’t just possible – it’s surprisingly simple and incredibly rewarding. Our foolproof recipe delivers all the nostalgic flavors you crave while giving you complete control over ingredients and quality. No artificial preservatives or mystery additives here, just pure deliciousness made from scratch.
The best part? These homemade versions taste even better than store-bought ones. We’re talking crispy shortbread that won’t crumble apart, silky caramel that’s perfectly chewy, and a chocolate coating that snaps satisfyingly with each bite. Once you make these irresistible treats, you’ll never look at store-bought candy bars the same way again.
Ingredients
Creating these decadent homemade Twix bars requires simple pantry staples organized into three distinct layers. We’ve broken down each component to help you gather everything needed for this irresistible treat.
For the Shortbread Base
- 1 cup all-purpose flour
- 1/2 cup unsalted butter, softened at room temperature
- 1/4 cup powdered sugar
- 1/4 teaspoon vanilla extract
- 1/4 teaspoon salt
For the Caramel Layer
- 1/2 cup granulated sugar
- 3 tablespoons unsalted butter
- 3 tablespoons heavy cream
- 1/4 teaspoon vanilla extract
- 1/8 teaspoon salt
For the Chocolate Coating
- 8 ounces semi-sweet chocolate chips or chopped chocolate
- 2 tablespoons coconut oil or vegetable shortening
- Pinch of sea salt for sprinkling (optional)
Equipment Needed

Creating these delicious homemade Twix bars requires some essential kitchen tools that will help us achieve professional results. We recommend gathering all equipment before starting to ensure a smooth baking process.
Baking Pan: An 8×8-inch or 9×9-inch baking pan serves as our foundation for pressing the shortbread base. The square shape provides even thickness throughout our bars and makes cutting easier.
Food Processor: While optional, a food processor streamlines mixing the shortbread ingredients by quickly combining flour, butter, and sugar into perfect crumbs. This tool saves time and ensures consistent texture.
Saucepan: A medium saucepan becomes crucial for heating our caramel layer. We need this for combining butter, brown sugar, corn syrup, and sweetened condensed milk at the proper temperature.
Rubber Spatula: This flexible tool helps us mix ingredients thoroughly and scrape every bit of caramel from the saucepan sides. Silicone spatulas work best since they handle heat without melting.
Microwave Safe Bowl: For melting our chocolate topping, a microwave safe bowl provides convenient temperature control. Glass or ceramic bowls work perfectly for this step.
Candy Thermometer: We highly recommend using a candy thermometer for precise caramel temperature control. This tool ensures our caramel reaches the perfect consistency without burning.
Having these tools ready makes our Twix bar creation process efficient and enjoyable. Each piece of equipment plays a exact role in achieving those signature layers we love.
Instructions

Creating our homemade Twix bars requires careful attention to each layer for that perfect combination of textures. Follow these step-by-step instructions to achieve professional-quality results.
Prep the Pan
Select an 8×8-inch or 9×9-inch square baking pan for optimal bar thickness. Line the pan completely with parchment paper, allowing extra paper to hang over the edges for easy removal. Alternatively, lightly grease the pan with nonstick cooking spray if parchment paper is unavailable.
Make the Shortbread Base
Combine 1¼ to 1½ cups all-purpose flour, ¼ cup granulated sugar, and ⅔ to ¾ cup softened butter in a mixing bowl. Cut the butter into the flour mixture using a pastry cutter or two forks until the mixture resembles coarse crumbs. Press this crumbly mixture firmly and evenly into our prepared pan, ensuring the surface is level.
Preheat the oven to 350°F and bake the shortbread base for 15 to 20 minutes. Watch for a lightly golden surface and test doneness with a toothpick, which should come out clean. Remove from the oven and allow the base to cool completely before adding the caramel layer.
Prepare the Caramel Layer
Melt ½ cup butter in a medium saucepan over medium heat, stirring constantly to prevent burning. Add ½ cup packed brown sugar, 2 tablespoons corn syrup, and ½ cup sweetened condensed milk to the melted butter. Bring the mixture to a rolling boil while stirring continuously, then cook for 4 minutes. Continue stirring for an additional 2 minutes until the caramel thickens significantly.
For a quicker alternative, microwave 11 ounces of caramel baking pieces with 2 tablespoons heavy cream in 30-second intervals until smooth. Pour the prepared caramel evenly over the cooled shortbread base and let it set until firm to the touch.
Assemble the Bars
Once the caramel layer feels firm, carefully remove the entire base from the pan using the parchment paper overhang. Place on a cutting board and slice into rectangular bars approximately 1 inch wide using a sharp knife. Clean the knife between cuts for neat edges. Some bakers prefer chilling the bars in the freezer for 15 minutes before slicing for cleaner cuts.
Add the Chocolate Coating
Melt 2 to 3 cups chocolate chips with 1 to 3 tablespoons neutral oil in a microwave-safe bowl, heating in 30-second intervals and stirring between each interval. Alternatively, use a double boiler method for more controlled melting. The mixture should be completely smooth and glossy.
Dip each bar into the melted chocolate using a fork or dipping tool, ensuring complete coverage on all sides. Allow excess chocolate to drip off before placing the coated bars on a parchment-lined baking sheet. Drizzle additional melted chocolate over the bars for extra decoration if desired.
Chill and Set
Refrigerate the chocolate-coated bars for 10 to 30 minutes until the chocolate coating becomes firm and no longer tacky to the touch. For faster setting, place the bars in the freezer for 10 minutes. Store finished bars in an airtight container at room temperature for up to one week or refrigerate for longer storage.
Directions for Cutting and Serving

Proper cutting technique makes all the difference when serving our homemade Twix bars. We recommend using a warm knife to slice through the layers cleanly without cracking the chocolate coating or pulling the caramel. Run your knife under hot water and dry it thoroughly before each cut to maintain the heat.
Start by removing the bars from the refrigerator and lifting them out of the pan using the parchment paper overhang. Place the entire block on a cutting board for easier handling. Score the surface lightly with your warm knife to mark your cutting lines before making the full cuts through all layers.
Make straight downward cuts rather than sawing motions to preserve the distinct layers we worked so hard to create. Clean the knife blade between cuts to prevent chocolate and caramel buildup that could make subsequent cuts messy. We find that cutting into 16 squares from a 9×9-inch pan creates the perfect bite-sized portions.
Temperature plays a crucial role in achieving clean cuts. Allow the bars to sit at room temperature for 2-3 minutes if they seem too firm from the refrigerator. But, avoid letting them sit too long as the caramel layer may become too soft and stick to the knife.
Serve the bars chilled for the best texture and flavor experience. The contrast between the crisp shortbread base and the firm caramel creates the authentic Twix sensation we’re aiming for. Store cut bars in an airtight container in the refrigerator with parchment paper between layers to prevent sticking.
For special occasions, we can drizzle additional melted chocolate over the cut bars or dust them lightly with sea salt for an elevated presentation. The bars maintain their quality for up to one week when properly stored in the refrigerator.
Make-Ahead Instructions

Planning ahead transforms your homemade Twix bar preparation into a stress-free experience. We recommend breaking down this recipe into manageable stages that work perfectly with busy schedules.
Shortbread Base Preparation
The shortbread layer offers excellent make-ahead potential since it stays fresh for extended periods. We can prepare and bake this foundation up to one day in advance without compromising texture or flavor. Store the cooled shortbread base tightly covered at room temperature until you’re ready to add the caramel layer.
Caramel Layer Timing
Fresh caramel delivers the best results for our homemade Twix bars. But, we can prepare this sticky layer up to one week ahead when stored properly in the refrigerator. Allow the caramel to come to room temperature before spreading it over the shortbread base for easier application and smoother results.
Full Assembly Strategy
Complete bar assembly works best just before serving to maintain optimal texture contrast between layers. When advance preparation becomes necessary, we can fully assemble the bars and store them in the refrigerator or freezer. Refrigerated bars maintain quality for up to one week, while frozen bars stay fresh for up to three months.
Temperature Management
Proper chilling ensures the chocolate layer hardens completely before serving or storage. We recommend allowing assembled bars to set in the refrigerator for at least 2 hours before cutting. Frozen bars require 30 minutes of thawing time at room temperature for easier cutting and optimal eating texture.
Storage Best Practices
| Storage Method | Duration | Temperature | Notes |
|---|---|---|---|
| Refrigerated | 1 week | 32-40°F | Cover tightly to prevent moisture |
| Frozen | 3 months | 0°F or below | Wrap individually for portion control |
| Room Temperature | 2 days | 68-72°F | Store in cool, dry location |
Layer separation between bars using parchment paper prevents sticking during storage and makes individual serving much simpler.
Storage Tips

We recommend storing your homemade Twix bars in an airtight container in the refrigerator for optimal freshness. The bars will maintain their perfect texture for up to 2 to 4 weeks when properly refrigerated. This storage method keeps the caramel layer soft and prevents the chocolate coating from losing its satisfying crunch.
Refrigeration Storage
Place the finished bars in a single layer within your airtight container to prevent them from sticking together. The refrigerated environment maintains the ideal consistency of each layer while preserving the bars’ structural integrity. We avoid stacking the bars directly on top of each other since the chocolate sides can adhere together.
Freezing Options
For longer storage periods, we freeze the assembled bars for up to 1 to 3 months. Arrange them in a single layer on a baking sheet before transferring to freezer-safe containers. This prevents the bars from freezing together and makes individual portions easy to remove.
Alternatively, we can assemble the shortbread and caramel layers without the chocolate coating and freeze them for extended storage. The chocolate can be applied after thawing for the freshest taste and appearance.
Proper Handling Techniques
We allow each layer to cool completely in the refrigerator before adding the next component. This cooling process ensures proper setting and prevents the layers from mixing together. The shortbread base should be firm and the caramel layer should be set before applying the chocolate coating.
Defrosting Guidelines
When ready to serve frozen bars, we transfer them to the refrigerator and allow them to defrost overnight. This gradual thawing process maintains the texture quality of all three layers. The bars are ready to cut and serve once they reach refrigerator temperature.
| Storage Method | Duration | Temperature | Container Type |
|---|---|---|---|
| Refrigeration | 2-4 weeks | 35-40°F | Airtight container |
| Freezing (with chocolate) | 1-3 months | 0°F | Freezer-safe container |
| Freezing (without chocolate) | 1-3 months | 0°F | Freezer-safe container |
Make Ahead Storage
We can prepare the shortbread and caramel portions in advance and store them in the freezer until ready to add the chocolate coating. This approach allows us to complete the bars when needed while maintaining the freshest chocolate layer possible. The assembled components thaw quickly and are ready for chocolate coating within hours.
Conclusion
We’ve shown you that creating your own Twix bars at home isn’t just possible—it’s incredibly rewarding. With the right ingredients equipment and techniques you’ll have perfectly layered treats that rival any store-bought version.
The beauty of homemade Twix bars lies in their versatility and freshness. You control every ingredient while enjoying the satisfaction of crafting something truly special from scratch.
Whether you’re making them for a special occasion or simply satisfying a craving these homemade bars deliver on taste texture and quality. Your kitchen will smell amazing and your taste buds will thank you for the upgrade from commercial candy bars.
Frequently Asked Questions
What ingredients do I need to make homemade Twix bars?
You’ll need three sets of ingredients for the layers: shortbread base (all-purpose flour, unsalted butter, powdered sugar, vanilla extract, salt), caramel layer (granulated sugar, unsalted butter, heavy cream, vanilla extract, salt), and chocolate coating (semi-sweet chocolate, coconut oil or vegetable shortening, optional sea salt).
What kitchen equipment is essential for making Twix bars?
The essential tools include an 8×8 or 9×9-inch baking pan, food processor for mixing, medium saucepan for caramel, rubber spatula, microwave-safe bowl for melting chocolate, and a candy thermometer for precise caramel temperature control. These tools ensure smooth preparation and proper layering.
How should I cut homemade Twix bars for serving?
Use a warm knife to achieve clean cuts without damaging the layers. Warm the knife blade under hot water, dry it, then cut through the chilled bars. This technique prevents cracking and maintains the distinct layers. Serve the bars chilled for best texture and flavor.
Can I make Twix bars ahead of time?
Yes! The shortbread base can be made a day ahead and stored at room temperature. Caramel can be prepared up to a week in advance. For best results, assemble the full bars just before serving, though completed bars can be stored in the refrigerator for up to a week.
How should I store homemade Twix bars?
Store in an airtight container in the refrigerator for 2-4 weeks. Avoid stacking bars to prevent sticking. For longer storage, freeze for 1-3 months. Use parchment paper between layers to prevent sticking. Always allow each layer to cool completely before adding the next layer.
Are homemade Twix bars better than store-bought?
Homemade Twix bars offer several advantages over store-bought versions. You can control all ingredients, avoid artificial additives, and customize flavors to your preference. Many find the homemade version tastes fresher with better texture, featuring crispier shortbread, chewier caramel, and richer chocolate coating.


