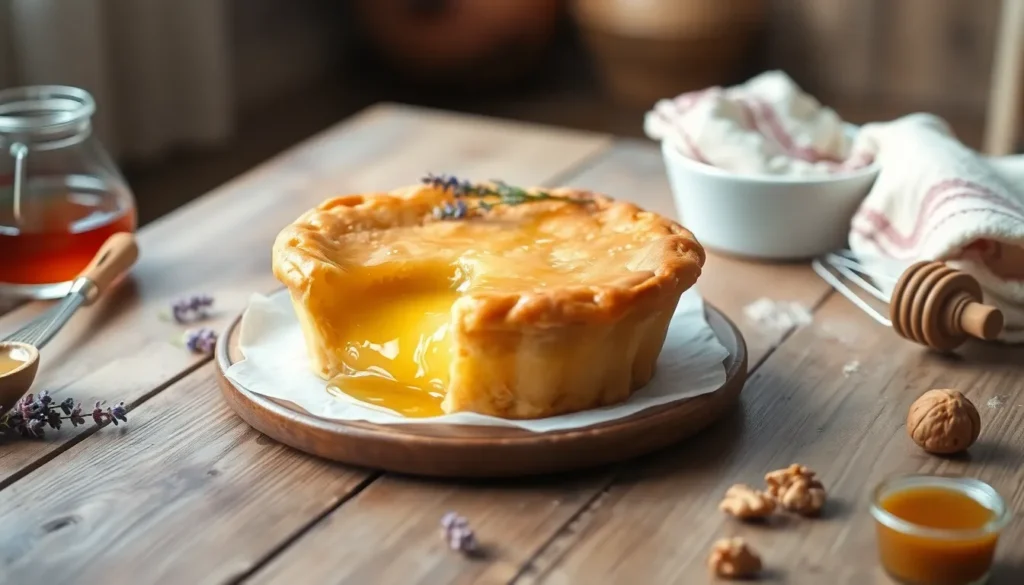
Honey pie brings together the perfect marriage of flaky pastry and golden sweetness that’ll transport you straight to dessert heaven. This timeless treat has graced American tables for generations, earning its place as a beloved comfort food that’s both rustic and refined.
We’ve perfected this recipe to capture that pure honey flavor while achieving the ideal custard-like texture that makes each bite absolutely irresistible. The beauty of honey pie lies in its simplicity – with just a handful of pantry staples, you’ll create a dessert that rivals any bakery masterpiece.
Whether you’re planning a special dinner party or craving something sweet on a Sunday afternoon, this honey pie delivers every single time. The rich amber filling paired with our buttery crust creates an unforgettable combination that’ll have everyone asking for seconds.
Ingredients
We keep our honey pie ingredients simple yet essential for creating that perfect balance of flaky crust and silky smooth filling. These pantry staples come together to form a dessert that showcases the natural sweetness of honey.
For the Pie Crust
- 1¼ cups all-purpose flour
- ½ teaspoon salt
- ⅓ cup cold unsalted butter, cubed
- 3 to 4 tablespoons ice water
For the Honey Filling
- ¾ cup honey (preferably wildflower or clover)
- 3 large eggs
- ½ cup unsalted butter, melted
- ¼ cup heavy cream
- 2 tablespoons cornmeal
- 1 teaspoon vanilla extract
- ¼ teaspoon salt
- 1 tablespoon apple cider vinegar


Equipment Needed

Creating the perfect honey pie requires exact tools that ensure smooth preparation and professional results. We’ve compiled a comprehensive list of essential equipment to help you achieve bakery-quality results in your own kitchen.
Essential Baking Tools:
- 9-inch (23-cm) Pie Pan – The foundation for your honey pie
- Mixing Bowls – Multiple sizes for separating ingredients and mixing
- Rolling Pin – For creating an evenly rolled pie crust
- Whisk – Essential for incorporating air into the custard filling
- Pastry Brush – Perfect for applying egg wash to achieve a golden crust
Measuring Equipment:
- Measuring Cups – For accurate dry ingredient portions
- Measuring Spoons – For precise amounts of vanilla extract and salt
- Glass Measuring Jug – Ideal for liquid ingredients like cream and honey
- Kitchen Scale (optional) – Provides the most accurate measurements for consistent results
Additional Preparation Tools:
- Rimmed Baking Sheet – Catches any overflow during baking and provides stability
Having these tools ready before you begin ensures a seamless baking process. The rimmed baking sheet serves as an excellent foundation for your pie pan, preventing spills and making it easier to transfer your honey pie in and out of the oven. Quality equipment makes a important difference in achieving the perfect balance between a flaky crust and silky smooth honey filling that defines exceptional honey pie.


Instructions

We’ll guide you through each step to create this delicious honey pie with perfect results. These detailed instructions ensure your pie turns out beautifully every time.
Prep the Pie Crust
Roll out your pie dough on a lightly floured surface to form a circle about 1/8 inch thick. Carefully transfer the dough to your 9-inch pie dish and gently press it into the bottom and sides. Trim any excess dough hanging over the edges and crimp the borders to create a decorative seal.
Prick the bottom of the crust all over with a fork to prevent puffing during blind baking. Line the crust with parchment paper and fill with pie weights or dried beans. Preheat your oven to 350°F and bake the weighted crust for 20 minutes.
Remove the weights and parchment paper from the crust. Continue baking for another 8 minutes until the bottom appears set and lightly golden. Set the partially baked crust aside to cool while you prepare the filling.
Make the Honey Filling
Combine heavy cream, honey, sugar, cornstarch, and melted butter in a medium saucepan. Whisk the ingredients together until smooth and well incorporated. Place the saucepan over medium heat and cook while stirring constantly.
Continue heating the mixture until it begins to thicken slightly and coats the back of a spoon. This process typically takes 5 to 7 minutes of gentle heating and stirring.
Remove the saucepan from heat and whisk in vanilla extract and a pinch of salt for enhanced flavor depth. Allow the filling to cool for about 5 minutes before assembling the pie.
Assemble the Pie
Pour the warm honey filling directly into your prepared pie crust. Use a spatula to spread the filling evenly and ensure it reaches all edges of the crust. Gently tap the pie dish on your counter to release any air bubbles that may have formed.
Bake the Honey Pie
Place the assembled pie on a rimmed baking sheet to catch any potential overflow. Bake at 350°F for approximately 45 minutes until the filling appears set around the edges but still has a slight jiggle in the center.
The pie is properly baked when the filling no longer appears liquid and has developed a golden color on top. Remove from the oven and allow the pie to cool completely on a wire rack before serving. This cooling period helps the filling achieve its perfect custard consistency.


Cooling and Serving

After removing our honey pie from the oven, we need to allow it to cool properly for the best results. Cooling the pie on a wire rack facilitates airflow around the entire pie and prevents the bottom crust from becoming soggy. Room temperature cooling takes 2 to 4 hours depending on our kitchen environment and the exact recipe we’ve used.
| Cooling & Storage Times | Duration |
|---|---|
| Room temperature cooling | 2-4 hours |
| Refrigerator chilling | 4+ hours |
| Refrigerator storage | Up to 2 days |
| Freezer storage | Up to 3 months |
We recommend letting our honey pie reach room temperature before deciding whether to serve it immediately or chill it further. For those who prefer a firmer texture, placing the cooled pie in the refrigerator for at least 4 hours creates a more set consistency that slices beautifully.
Serving our honey pie offers several delicious options. We can present it at room temperature to highlight the creamy texture of the honey filling. Alternatively, serving it slightly warm brings out the aromatic qualities of the honey and creates a comforting dessert experience. Adding a dollop of freshly whipped cream enhances each slice, and we can even flavor the cream with a touch of honey for extra sweetness.
When storing leftover pie, we should loosely cover it in the refrigerator for up to 2 days to prevent moisture accumulation while maintaining freshness. For longer storage, we can wrap our honey pie tightly in plastic wrap or seal it in an airtight bag before freezing for up to 3 months. Thawing frozen pie at room temperature ensures the best texture when we’re ready to enjoy it again.


Storage Instructions

Proper storage ensures our honey pie maintains its custard-like texture and rich flavor for days after baking. We must refrigerate the pie after it cools completely to room temperature to prevent spoilage and maintain food safety standards. The egg-based filling requires cold storage to prevent bacterial growth and preserve the pie’s silky consistency.
Refrigerator Storage
We recommend placing the cooled honey pie in a sealed container before refrigerating to prevent it from absorbing other flavors. Our honey pie stays fresh in the refrigerator for 4 to 5 days when stored properly. Place the container on a stable shelf where it won’t get jostled or damaged.
| Storage Method | Duration | Temperature |
|---|---|---|
| Refrigerated | 4-5 days | 35-40°F |
| Room Temperature | Up to 2 days | 68-72°F |
| Frozen | 2-3 months | 0°F or below |
Room Temperature Storage
We can keep honey pie at room temperature for up to 2 days if necessary. But, we strongly prefer refrigeration for longer storage periods due to the moisture content and dairy ingredients in the filling. Room temperature storage works best in cooler climates where temperatures remain below 70°F.
Freezing Instructions
We can freeze honey pie for extended storage up to 2 to 3 months. Wrap individual slices or the entire pie tightly in plastic wrap first. Then place the wrapped pie in an airtight container or freezer bag to prevent freezer burn and maintain quality.
Thawing and Serving
We thaw frozen honey pie in the refrigerator overnight or at room temperature for several hours. Before serving a refrigerated pie, we let it come to room temperature for 30 minutes for optimal texture. Alternatively, we can warm the pie gently in a 300°F oven for 15 to 20 minutes and let it cool briefly before slicing.
Storage Tips
We avoid adding whipped cream or other toppings until ready to serve to prevent sogginess. Store any leftover toppings separately in the refrigerator. Keep the pie covered at all times to maintain moisture and prevent the surface from drying out.


Recipe Variations

Now that we’ve mastered the classic honey pie technique let’s explore creative variations that elevate this beloved dessert. These adaptations maintain the essential custard base while introducing new flavors and presentation styles.
Honey Lavender Pie
This elegant variation transforms our traditional honey pie into a sophisticated floral dessert by incorporating culinary lavender. We steep 1 tablespoon of dried culinary lavender in the warmed heavy cream for 15 minutes before straining out the buds. The lavender infuses the custard with delicate floral notes that complement honey’s natural sweetness without overwhelming the palate. We follow the same preparation method as our classic recipe but add the lavender-infused cream to create a more refined flavor profile. The result delivers a restaurant-quality dessert that pairs beautifully with vanilla ice cream or plain whipped cream.
Honey Walnut Pie
Our honey walnut variation adds satisfying texture and nutty richness to the smooth custard base. We toast 1 cup of chopped walnuts in a dry skillet over medium heat for 3 to 4 minutes until fragrant and golden. These toasted nuts get folded into the prepared honey filling just before pouring into the pre-baked crust. The walnuts create delightful contrast against the silky custard while their earthy flavor enhances honey’s complexity. This variation appeals to those who enjoy pecan pie but prefer honey’s more nuanced sweetness over corn syrup’s intensity.
Mini Honey Pies
Individual mini honey pies offer perfect portion control and elegant presentation for dinner parties or special occasions. We divide our standard recipe filling among 12 mini pie tins or tartlet shells instead of using a single 9-inch pan. Each mini pie requires only 12 to 15 minutes of baking time due to the reduced size and faster heat penetration. These personal-sized desserts set more quickly and provide ideal serving portions without the need for slicing. Mini honey pies work exceptionally well for buffet-style entertaining where guests can easily grab individual servings.


Tips for Perfect Honey Pie

Creating the perfect honey pie requires attention to several key techniques that ensure our custard filling achieves the ideal texture while maintaining a crisp bottom crust. We have compiled essential tips that will elevate your honey pie from good to exceptional.
Crust Preparation
Blind baking forms the foundation of our perfect honey pie. We line the crust with parchment paper and fill it with pie weights before baking at 350°F for 20 minutes. After removing the weights we continue baking for another 8 minutes to achieve a golden and fully set bottom crust.
Crust protectors become essential during the baking process. We recommend using foil or specialized crust protectors around the edges to prevent over-browning while allowing the center to bake evenly. This technique ensures our crust maintains its beautiful appearance throughout the entire baking process.
Filling Preparation
High-quality honey makes all the difference in our final result. We select premium honey varieties such as orange blossom or sage to add unique flavor profiles that complement the custard base. Local honey sources often provide the most distinctive and flavorful options for our recipes.
Traditional dairy ingredients create the rich texture we desire. We use milk and heavy cream rather than non-dairy substitutes to maintain the custard’s proper consistency and mouthfeel. These ingredients work together to create the silky smooth filling that defines exceptional honey pie.
Tempering eggs prevents scrambling and ensures smooth custard formation. We gradually whisk small amounts of the warm cream mixture into our beaten eggs rather than adding them all at once. This technique creates a uniform texture without lumps or curdled pieces.
Assembly and Baking
Assembly timing affects our final texture significantly. We pour the prepared filling into our pre-baked crust and immediately place it in a 350°F oven for 12-15 minutes. The edges should appear set while the center remains slightly jiggly when properly baked.
Cooling requires patience but delivers superior results. We allow our pie to reach room temperature before refrigerating to ensure the custard sets completely. This two-stage cooling process prevents condensation from forming and maintains the ideal texture.
Serving Enhancement
Whipped cream and honey drizzle elevate our presentation. We serve each slice with a dollop of freshly whipped cream and an additional drizzle of honey to enhance the natural sweetness of our dessert.
Flaky sea salt provides unexpected flavor contrast. We sprinkle a small pinch over each serving to create a delightful salty-sweet combination that highlights the honey’s complexity and adds sophisticated depth to every bite.
Conclusion
We’ve shared everything you need to master this timeless American dessert that transforms simple pantry staples into something truly extraordinary. From selecting the perfect honey to achieving that signature custard-like texture honey pie’s charm lies in its beautiful simplicity.
Whether you stick with the classic recipe or explore our creative variations with lavender and walnuts you’ll discover why this dessert has captured hearts for generations. The combination of proper technique and quality ingredients ensures your honey pie will become a cherished addition to your baking repertoire.
Now it’s time to roll up your sleeves gather your ingredients and create your own golden masterpiece. Trust us – once you experience that first bite of flaky crust meeting silky honey custard you’ll understand why we can’t stop raving about this delightful dessert.
Frequently Asked Questions
What is honey pie and what makes it special?
Honey pie is a beloved American dessert featuring a flaky pastry crust filled with a sweet, custard-like honey filling. Its special quality comes from the perfect balance between the buttery, crisp crust and the silky smooth honey filling that showcases the natural sweetness of honey while maintaining a rustic yet refined character.
What ingredients do I need to make honey pie?
For the crust, you’ll need all-purpose flour, salt, cold unsalted butter, and ice water. The filling requires honey, eggs, melted butter, heavy cream, cornmeal, vanilla extract, salt, and apple cider vinegar. These simple pantry staples combine to create a rich, flavorful dessert.
What equipment is essential for making honey pie?
Key equipment includes a 9-inch pie pan, mixing bowls, rolling pin, whisk, pastry brush, measuring cups and spoons, and a glass measuring jug. A rimmed baking sheet is recommended to catch overflow during baking. Having the right tools ensures smooth preparation and professional results.
How long does honey pie need to cool before serving?
Honey pie should cool on a wire rack for 2 to 4 hours at room temperature before serving. This cooling time is crucial for achieving the proper custard texture and preventing a soggy bottom crust. The pie can be served at room temperature or slightly warm.
How should I store honey pie and how long does it last?
Store honey pie in the refrigerator for 4-5 days in a sealed container after it cools completely. It can stay at room temperature for up to 2 days in cooler climates. For longer storage, freeze for 2-3 months. Always keep toppings separate until serving to prevent sogginess.
What are some popular variations of honey pie?
Popular variations include Honey Lavender Pie with floral notes from culinary lavender, Honey Walnut Pie with toasted walnuts for added texture, and Mini Honey Pies for individual servings. These variations maintain the classic custard base while offering unique flavor profiles and presentation options.
What are the key tips for making perfect honey pie?
Essential tips include blind baking the crust for crispness, using high-quality honey, tempering eggs properly, and timing the assembly carefully. Use traditional dairy ingredients for richness, and enhance serving with whipped cream, honey drizzle, or flaky sea salt for elevated presentation and flavor.


