Nothing beats the perfect balance of tangy citrus and creamy indulgence that makes lemon cheesecake an absolute showstopper dessert. We’ve perfected this classic recipe that delivers bright lemon flavor in every single bite while maintaining that signature velvety smooth texture that makes cheesecake so irresistible.
This crowd-pleasing dessert combines fresh lemon juice and zest with rich cream cheese to create a dessert that’s both refreshing and decadent. Whether you’re hosting a dinner party or celebrating a special occasion this lemon cheesecake will have your guests asking for the recipe.
We’ll walk you through each step to ensure your cheesecake turns out flawlessly every time. From creating the perfect graham cracker crust to achieving that silky smooth filling this recipe delivers bakery-quality results right in your own kitchen.
Equipment Needed
Creating our perfect lemon cheesecake requires exact kitchen tools that ensure smooth preparation and flawless results. We recommend gathering all equipment before starting to streamline the baking process.
Essential Baking Equipment:
- 9-inch springform pan
- Electric mixer (stand mixer or hand mixer)
- Large mixing bowls (at least 2)
- Food processor or rolling pin for crust preparation
- Fine-mesh sieve or zester for lemon zest
- Citrus juicer or reamer for fresh lemon juice
- Rubber spatula for folding ingredients
- Measuring cups and spoons
- Kitchen scale (optional but recommended)
Preparation Tools:
- Aluminum foil for water bath wrapping
- Large roasting pan for water bath
- Parchment paper for easy removal
- Wire cooling rack
- Sharp knife for clean slicing
Our springform pan makes removing the finished cheesecake effortless without damaging the delicate sides. The electric mixer ensures our cream cheese reaches the perfect smooth consistency that prevents lumps in the final texture.
We strongly recommend using a food processor for crushing graham crackers as it creates uniform crumbs that form a sturdy crust base. The fine-mesh sieve extracts maximum zest from fresh lemons while avoiding bitter white pith.
Preparing a water bath requires wrapping the springform pan bottom in aluminum foil to prevent water seepage. This technique creates gentle steam that prevents cracks and ensures even baking throughout our cheesecake.
Ingredients

We’ve carefully selected each ingredient to create the perfect balance of tangy citrus and creamy richness. These quality components work together to deliver an exceptional lemon cheesecake that will impress every time.
For the Crust
- 1½ to 2 cups graham cracker crumbs (depending on desired crust thickness)
- ¼ to ½ cup melted butter
For the Lemon Cheesecake Filling
- 24 to 32 ounces (680 to 904g) full-fat brick cream cheese, softened
- ¾ to 1¼ cups (150 to 250g) granulated sugar
- 2 large eggs
- 1 to 2 tablespoons packed lemon zest
- 2 to 3 tablespoons freshly squeezed lemon juice
- 1 teaspoon vanilla extract
For the Lemon Topping (Optional)
- 1 cup granulated sugar
- ½ cup freshly squeezed lemon juice
- ¼ cup unsalted butter, softened
- 2 large egg yolks
- 1 teaspoon grated lemon zest
Instructions

Now we’ll walk through each step to create our perfect lemon cheesecake. Follow these detailed instructions for guaranteed delicious results every time.
Prep the Pan and Oven
Preheat our oven to 325°F (163°C) and adjust the rack to the lower middle position. Line the bottom of our 9-inch springform pan with parchment paper to prevent sticking. Wrap the outside of the pan completely in aluminum foil if we plan to use a water bath for baking.
Make the Graham Cracker Crust
Grind our graham crackers into fine crumbs using a food processor or blender until we achieve a consistent texture. Pour the crumbs into a mixing bowl and stir in the sugar until evenly distributed. Add our melted butter and mix thoroughly until the mixture resembles wet sand and holds together when pressed. Press this mixture firmly into the bottom and slightly up the sides of our prepared pan. Use the bottom of a measuring cup to smooth and compact the crust evenly. Pre-bake for 8 to 10 minutes then set aside to cool slightly while we prepare the filling.
Prepare the Lemon Cheesecake Filling
Beat our cream cheese and sugar together with an electric mixer until the mixture becomes smooth and creamy with no lumps remaining. Add the fresh lemon zest and lemon juice mixing until fully incorporated. Pour in the sour cream and vanilla extract blending until the mixture is uniform. Beat in our eggs one at a time ensuring each egg is just incorporated before adding the next to avoid overbeating the mixture.
Bake the Cheesecake
Pour our prepared filling over the pre-baked crust spreading it evenly to the edges. Place the foil wrapped pan into a larger roasting pan and carefully fill the roasting pan with warm water until it reaches halfway up the sides of our cheesecake pan. Bake for 40 to 75 minutes until the center is set but still has a slight jiggle when gently shaken.
| Temperature | Time Range | Visual Cue |
|---|---|---|
| 325°F (163°C) | 40-75 minutes | Center set with slight jiggle |
Cool and Chill
Turn off our oven and prop the door open slightly allowing the cheesecake to cool gradually for 30 minutes inside the oven. Remove the pan from the water bath and continue cooling at room temperature until completely cooled. Transfer our cheesecake to the refrigerator and chill for at least 4 to 6 hours though overnight chilling produces the best texture and flavor.
Add Lemon Topping
Remove our chilled cheesecake from the refrigerator and carefully release it from the springform pan. Top with lemon curd, freshly whipped cream, or additional lemon zest for enhanced presentation and flavor. Use a hot dry knife to slice clean portions wiping the blade between each cut for professional looking slices.
Storage Instructions

Proper storage ensures our lemon cheesecake maintains its creamy texture and vibrant citrus flavor for maximum enjoyment. We recommend following exact guidelines based on whether you made a baked or no-bake version.
Refrigeration Storage
Our baked lemon cheesecake stays fresh in the refrigerator for up to 2-3 days after we add the lemon curd topping. We always allow the cheesecake to chill overnight before serving to achieve the perfect consistency and flavor development.
No-bake versions offer more flexibility with refrigerator storage lasting up to 5 days when kept in an airtight container. We find this extended storage time particularly convenient for meal planning and entertaining.
Freezing Guidelines
| Cheesecake Type | Storage Duration | Special Instructions |
|---|---|---|
| Baked Lemon Cheesecake | 2-3 months | Freeze without lemon curd topping |
| No-Bake Lemon Cheesecake | Up to 3 months | Not recommended for setting |
We recommend freezing baked lemon cheesecake without the lemon curd topping to maintain optimal texture. Wrap the cheesecake tightly in plastic wrap followed by aluminum foil to prevent freezer burn and preserve flavor.
No-bake cheesecakes can be frozen for later enjoyment though we don’t recommend using the freezer for initial setting. We suggest wrapping the cheesecake without lemon curd before freezing to maintain the best quality.
Serving Preparation
Our cheesecake tastes best when we allow it to sit at room temperature for 30 minutes before serving. This brief warming period enhances both flavor and texture for optimal enjoyment.
We achieve clean slices by using a sharp knife heated under hot water and wiping it clean between each cut. This technique prevents crumbling and creates professional looking portions that showcase our beautiful lemon cheesecake.
Make-Ahead Tips

We love how lemon cheesecake becomes even more delicious when prepared in advance. Planning ahead allows the flavors to meld beautifully while creating a perfectly set texture that slices cleanly.
Timeline Planning
Preparing your lemon cheesecake ahead of time requires strategic timing. We recommend making the cheesecake at least 24 hours before serving to allow proper chilling and flavor development. The graham cracker crust can be prepared and baked up to 2 days in advance then stored covered at room temperature.
Filling Preparation Strategy
Creating the cream cheese filling works best when we prepare it the day before serving. Mix all filling ingredients until smooth then pour over the prepared crust immediately. This approach prevents the filling from sitting too long before baking which could affect texture.
Overnight Chilling Benefits
Our lemon cheesecake requires overnight refrigeration for optimal results. The extended chilling time allows the cream cheese mixture to firm up completely while the lemon flavors intensify throughout the dessert. We find that cheesecakes chilled for 12 to 24 hours develop superior texture and taste.
Storage Duration Guidelines
| Storage Method | Duration | Best Practices |
|---|---|---|
| Refrigerated | Up to 4 days | Cover tightly with plastic wrap |
| Frozen (without topping) | 2-3 months | Wrap in aluminum foil then freezer bags |
| Room temperature | Maximum 2 hours | Only for serving periods |
Topping Preparation Timing
We recommend preparing lemon curd or whipped cream toppings separately from the main cheesecake. Stabilized whipped cream can be made up to 2 days ahead and stored in the refrigerator. Lemon curd topping should be prepared the day of serving or stored separately for up to 3 days.
Assembly Strategy
Adding delicate toppings like fresh lemon zest or whipped cream works best just before serving. We prepare all components separately then assemble the final presentation when ready to serve. This method preserves the visual appeal and prevents soggy textures.
Freezing Guidelines
Freezing baked lemon cheesecake extends storage up to 3 months when properly wrapped. We wrap the cooled cheesecake tightly in plastic wrap then aluminum foil before freezing. Thaw frozen cheesecake in the refrigerator for 24 hours before serving for best results.
Serving Suggestions

We recommend chilling your lemon cheesecake thoroughly before serving to achieve the perfect texture and flavor. Allow the cheesecake to cool at room temperature first and then refrigerate for at least 4 to 5 hours. Overnight chilling delivers optimal results for both texture and taste.
When ready to serve we carefully remove the cheesecake from the springform pan by loosening it first and then removing the rim. You can serve the cake directly on the pan’s removable base or carefully transfer it to an elegant serving platter.
For clean professional slices we use a large sharp knife and run it under hot water between each cut. Wiping the blade clean after each slice ensures neat presentation. We slide a metal server under each slice to preserve the delicate crust structure.
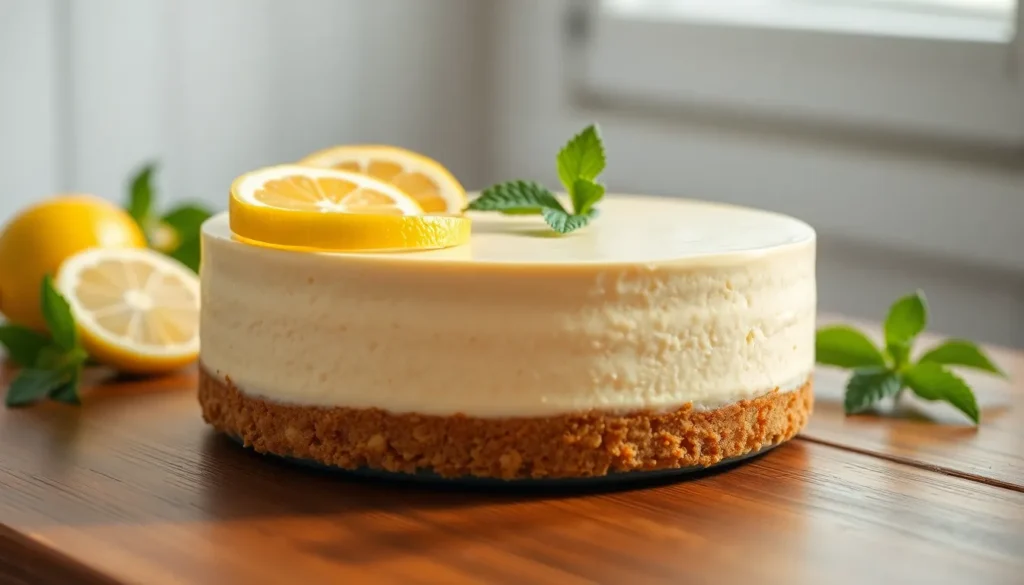
Garnishing options transform our lemon cheesecake into a stunning centerpiece. We often spread a layer of lemon curd evenly across the top for enhanced citrus flavor. Fresh berries like raspberries or blueberries provide beautiful color contrast and complementary tartness. Thin lemon slices and freshly grated lemon zest add visual appeal and aromatic intensity.
Whipped cream creates an elegant finishing touch when piped around the edges or dolloped alongside each slice. We sometimes dust the entire surface with powdered sugar for a classic bakery appearance. Fresh berry arrangements over whipped cream create restaurant quality presentation.
Raspberry sauce pairs exceptionally well with lemon cheesecake as it balances the tart and sweet flavor profiles perfectly. We drizzle it artfully around the plate or offer it as a side accompaniment.
Temperature matters significantly for optimal enjoyment. We let the cheesecake sit at room temperature for about 30 minutes before serving unless we’ve added perishable toppings like whipped cream. This brief warming enhances both flavor and texture.
Our finished lemon cheesecake stores beautifully in the refrigerator for up to 5 days when covered properly. We keep any version topped with lemon curd or whipped cream well covered to maintain freshness and prevent absorption of other flavors.
Conclusion
We’ve shared everything you need to create an exceptional lemon cheesecake that’ll impress your family and friends. From selecting the right equipment to mastering the perfect water bath technique this recipe delivers consistently delicious results.
The beauty of this dessert lies in its make-ahead convenience and impressive presentation. Whether you’re planning for a special occasion or simply craving something sweet you’ll find this lemon cheesecake becomes a go-to favorite in your recipe collection.
Remember that patience is key – allowing proper chilling time transforms your efforts into a restaurant-quality dessert. With our detailed guidance and helpful tips you’re well-equipped to create a lemon cheesecake that’s both visually stunning and absolutely delicious.
Frequently Asked Questions
What equipment do I need to make lemon cheesecake?
You’ll need a 9-inch springform pan, electric mixer, food processor for the crust, aluminum foil for the water bath, and a fine-mesh sieve for lemon zest. Having all equipment ready beforehand streamlines the baking process and helps prevent cracks in your cheesecake.
How long does lemon cheesecake need to chill before serving?
Lemon cheesecake should chill for at least 4-6 hours, but overnight chilling (24 hours) is recommended for best results. This allows the flavors to meld and the filling to firm up properly, resulting in better texture and enhanced citrus flavor.
Can I make lemon cheesecake ahead of time?
Yes, lemon cheesecake is perfect for making ahead. Prepare it at least 24 hours before serving for optimal flavor and texture. The graham cracker crust can be made up to 2 days in advance, while the filling should be prepared the day before serving.
How should I store leftover lemon cheesecake?
Store baked lemon cheesecake in the refrigerator for 2-3 days in an airtight container. For longer storage, wrap tightly and freeze for up to 2-3 months. No-bake versions last up to 5 days refrigerated or 3 months frozen (though freezing isn’t recommended for initial setting).
What temperature should I bake lemon cheesecake at?
Bake lemon cheesecake at 325°F (163°C) in a water bath for 40-75 minutes. The cheesecake is done when it’s set with just a slight jiggle in the center. After baking, cool gradually in the oven to prevent cracking.
What ingredients do I need for the lemon cheesecake filling?
You’ll need 24-32 ounces full-fat cream cheese, granulated sugar, eggs, fresh lemon zest, lemon juice, sour cream, and vanilla extract. For the crust, use 1½-2 cups graham cracker crumbs and ¼-½ cup melted butter. Fresh lemons provide the best flavor.
How do I prevent my lemon cheesecake from cracking?
Use a water bath (aluminum foil around the pan), bake at the correct temperature (325°F), avoid overmixing, and cool gradually. After baking, turn off the oven and let the cheesecake cool inside with the door slightly open before refrigerating.
What toppings pair well with lemon cheesecake?
Popular toppings include lemon curd, fresh berries (blueberries, raspberries), whipped cream, and additional lemon zest. Prepare toppings separately and add just before serving to maintain freshness and optimal presentation. Let the cheesecake sit at room temperature briefly before serving for best flavor.


