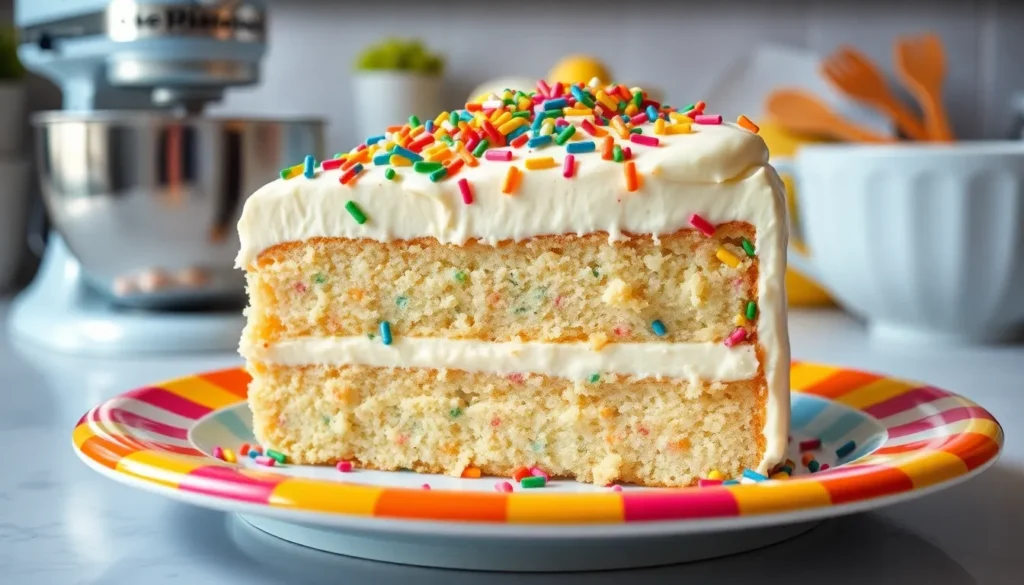
We’ve all dreamed of recreating Christina Tosi’s legendary Milk Bar Birthday Cake at home – and today we’re making that dream a reality. This isn’t your typical birthday cake. It’s a masterpiece of nostalgic flavors that transforms humble vanilla cake into something extraordinary with its signature rainbow crumb topping and tangy cream cheese frosting.
What makes this cake so special? It’s the genius combination of textures and that distinctive “birthday cake” flavor that tastes exactly like childhood memories. The secret lies in the rainbow sprinkles baked right into the cake layers and the addictive crumb topping that provides the perfect sweet crunch.
We’ll walk you through every step of creating this Instagram-famous dessert that’s taken the baking industry by storm. From mixing the perfect vanilla base to achieving that coveted crumb texture, you’ll master the techniques that make Milk Bar’s birthday cake so irresistibly delicious.
Equipment and Tools Needed
We need exact equipment to recreate the Milk Bar Birthday Cake’s signature textures and layers. Essential baking tools ensure our cake achieves the proper crumb structure and professional assembly that makes this dessert so distinctive.
Stand Mixer with Paddle Attachment
Our stand mixer creates the perfect cake crumb texture that defines this recipe. The paddle attachment incorporates ingredients without overworking the batter.
Digital Kitchen Scale
We rely on precise measurements for consistent results. A digital scale provides accuracy that cup measurements cannot match for this professional-level recipe.
Quarter Sheet Pans (2)
These rectangular pans create the characteristic thin layers. We need two pans to bake multiple components simultaneously and maintain proper cake proportions.
Parchment Paper
Lining our pans with parchment prevents sticking and ensures clean removal. This step protects our delicate cake layers during the baking process.
Large Mixing Bowls (3)
We use separate bowls for different components including cake batter, frosting, and crumb mixture. Multiple bowls streamline our workflow and prevent cross-contamination of flavors.
Fine-Mesh Sieve
Sifting dry ingredients creates the smooth texture essential for this cake. A fine-mesh sieve removes lumps and aerates flour for optimal results.
Rubber Spatulas (2)
We need flexible spatulas for folding ingredients and scraping bowls clean. Having two prevents flavor transfer between sweet and tangy components.
Offset Spatula
This tool spreads frosting evenly across cake layers. An offset spatula creates the smooth finish that makes our homemade version look professionally made.
6-Inch Cake Ring or Springform Pan
We assemble the final cake in this specialized pan. The ring creates clean edges and maintains the cake’s distinctive compact shape during chilling.
Plastic Wrap
Wrapping components during chilling prevents moisture loss and flavor absorption. We use plastic wrap to maintain freshness throughout the multi-day assembly process.
Ingredients

Creating this iconic birthday cake requires gathering ingredients for four distinct components that come together to form the complete dessert. We’ve organized everything by component to streamline your preparation process.
For the Birthday Cake
- 1½ cups all-purpose flour
- ¾ cup granulated sugar
- ¼ cup light brown sugar, packed
- 1½ teaspoons baking powder
- 1 teaspoon kosher salt
- ¼ cup rainbow sprinkles
- ½ cup unsalted butter, melted
- ¼ cup grapeseed oil
- 2 large eggs, room temperature
- ¾ cup buttermilk
- 1 tablespoon vanilla extract
For the Birthday Cake Crumbs
- ¼ cup cake flour
- 2 tablespoons granulated sugar
- 1 tablespoon light brown sugar, packed
- ¼ teaspoon baking powder
- ¼ teaspoon kosher salt
- 2 tablespoons rainbow sprinkles
- 2 tablespoons grapeseed oil
- ½ teaspoon vanilla extract
For the Birthday Frosting
- 8 tablespoons unsalted butter, room temperature
- 4 ounces cream cheese, room temperature
- 2 cups confectioners’ sugar, sifted
- 2 tablespoons light corn syrup
- 1 teaspoon vanilla extract
- ¼ teaspoon baking powder
- ¼ teaspoon kosher salt
For Assembly
- ¼ cup whole milk
- ½ teaspoon vanilla extract
- Acetate strips or parchment paper for lining
- 6-inch cake ring or springform pan
Instructions

Now we’ll walk through each component of the Milk Bar Birthday Cake process step by step. The key to success lies in following these detailed instructions precisely for each element.
Making the Birthday Cake
We begin by preheating our oven to 350°F and lining a quarter sheet pan with parchment paper. In our stand mixer bowl, we combine all dry ingredients: flour, both sugars, baking powder, salt, and rainbow sprinkles.
Using the paddle attachment, we cream together 230 grams of unsalted butter and 200 grams of sugar until light and fluffy. We add the vanilla extract along with the grapeseed oil, mixing until well incorporated.
Next, we alternate adding the buttermilk and eggs to our butter mixture, beating well after each addition. We gradually fold in our dry ingredient mixture until just combined, being careful not to overmix.
We spread the batter evenly across our prepared sheet pan and bake for 30 to 35 minutes. The cake doubles in size during baking but maintains its characteristically dense texture. We know it’s done when a toothpick inserted in the center comes out clean.
Preparing the Birthday Cake Crumbs
We preheat our oven to 300°F and line a sheet pan with parchment paper. In our stand mixer bowl, we combine all dry ingredients: cake flour, both sugars, baking powder, salt, and rainbow sprinkles.
Using the paddle attachment on low speed, we add the grapeseed oil and vanilla extract to our dry mixture. We continue mixing until small clusters begin to form throughout the mixture.
We spread this crumb mixture evenly across our prepared sheet pan and bake at 300°F for exactly 15 minutes. The crumbs should be lightly golden and fragrant when finished. We allow them to cool completely before using.
Making the Birthday Frosting
We start by bringing our butter and cream cheese to room temperature for optimal mixing. In our stand mixer bowl, we cream the butter and cream cheese together using the paddle attachment until the mixture becomes light and fluffy.
We add the confectioners’ sugar gradually, beating well to prevent lumps. Next, we incorporate the light corn syrup, vanilla extract, baking powder, and kosher salt.
We continue beating the mixture until it becomes perfectly smooth and creamy. The frosting should hold its shape when lifted with a spatula but remain easily spreadable.
Assembly Process
We begin assembly by using a 6-inch cake ring to cut two perfect circles from our cooled birthday cake. The remaining cake scraps form our bottom layer, which we place in the bottom of our cake ring.
We brush this bottom layer generously with a mixture of whole milk and vanilla extract to add moisture. Using an offset spatula, we spread a generous layer of birthday frosting over the soaked cake.
We sprinkle a handful of our prepared birthday cake crumbs evenly over the frosting layer. We place one of our cut cake circles on top and repeat the soaking, frosting, and crumb process.
For the final layer, we place our last cake circle on top and cover the entire surface with frosting and a final generous coating of crumbs. We wrap the assembled cake tightly in plastic wrap and freeze for at least 12 hours before serving to allow all flavors to meld together perfectly.
Directions for Perfect Results

Following our comprehensive component preparation, we’ll guide you through the critical techniques that separate a good Milk Bar birthday cake from an exceptional one. These professional methods ensure your homemade version matches the bakery’s signature texture and flavor profile.
Prep Work Tips
We recommend preparing your vanilla milk soak by whisking together the milk and vanilla extract until completely combined. This mixture penetrates each cake layer and creates the signature moist texture that makes this dessert so memorable.
Room temperature ingredients blend more effectively, so we suggest removing your butter and cream cheese from the refrigerator 2 hours before beginning. Cold ingredients can cause the frosting to separate and create an uneven texture throughout your cake.
Measure all dry ingredients using the spoon and level method for consistent results. We find that sifting the cake flour prevents lumps and creates a smoother crumb structure in your finished cake.
Baking Guidelines
Preheat your oven to 350°F and position the rack in the center for even heat distribution. We use 230 grams of unsalted butter with 200 grams of caster sugar and 2 teaspoons of vanilla extract for the optimal flavor balance.
Monitor your cake closely between the 30 to 35 minute mark, testing for doneness when the surface springs back lightly to touch. The cake should rise properly but maintain a slightly dense texture that’s characteristic of this recipe.
Cool your baked cake completely before cutting to prevent crumbling. We cut two precise layers using a 6-inch cake ring and reserve the scraps for forming the bottom layer of our assembled cake.
Frosting Techniques
Beat your butter and cream cheese on medium speed until the mixture becomes light and fluffy, approximately 3 to 4 minutes. This creaming process incorporates air and creates the smooth, pipeable consistency we need.
Add the confectioners’ sugar gradually while mixing on low speed to prevent a powdery mess. We incorporate the salt and baking powder along with the sugar for even distribution throughout the frosting.
Scrape down the bowl sides frequently during mixing to ensure all ingredients combine uniformly. The finished frosting should hold its shape when piped but spread easily when smoothed with an offset spatula.
Make-Ahead Instructions

Planning ahead transforms this elaborate dessert into a manageable project that actually improves with time. Each component can be prepared separately and stored, making the final assembly much smoother.
Preparing Components in Advance
Birthday Cake Crumbs offer the most flexibility for advance preparation. We can refrigerate these crunchy sprinkle-studded pieces for up to a month in an airtight container. For longer storage, the crumbs freeze beautifully for up to three months without losing their signature texture or flavor.
Cake Layers freeze exceptionally well and actually become easier to work with after freezing. Once completely cooled, we wrap the baked cake tightly in plastic wrap and freeze overnight or for up to three months. The frozen cake cuts more cleanly into precise layers without crumbling.
Frosting stays fresh in the refrigerator for up to one week when stored in an airtight container. Before using refrigerated frosting, we bring it to room temperature and give it a quick whip to restore its light, fluffy texture.
Assembly Timeline
The assembled cake requires freezing time to properly set, making advance preparation essential rather than optional. We complete the entire assembly process the day before serving, as the cake needs at least 12 hours in the freezer to achieve its signature firm texture.
After assembly, we wrap the cake ring tightly in plastic wrap and place it in the freezer. This extended freezing time allows all components to meld together while maintaining distinct textures that make each bite memorable.
Storage Guidelines
| Component | Refrigerator | Freezer |
|---|---|---|
| Birthday Cake Crumbs | Up to 1 month | Up to 3 months |
| Baked Cake Layers | Not recommended | Up to 3 months |
| Frosting | Up to 1 week | Not recommended |
| Assembled Cake | 2-3 days | Up to 1 month |
We remove the assembled cake from the freezer about two hours before serving to allow it to come to the perfect serving temperature. This gradual thawing ensures each component maintains its intended texture while making the cake easy to slice.
Storage and Serving

Refrigeration and Freezer Storage
Our Milk Bar birthday cake stores beautifully for future enjoyment. Refrigerate the assembled cake for up to five days when wrapped properly in plastic wrap. Freezer storage extends the lifespan dramatically—we can keep our creation frozen for up to two weeks while maintaining optimal flavor and texture.
| Storage Method | Duration | Notes |
|---|---|---|
| Refrigerator | 5 days | Wrap tightly in plastic |
| Freezer | 2 weeks | Maintains optimal quality |
Optimal Serving Conditions
Temperature plays a crucial role in serving our birthday cake masterpiece. Remove the cake from refrigeration two hours before serving to achieve the ideal consistency. Room temperature serving ensures the frosting becomes perfectly creamy while the cake layers reach their most tender state.
Planning and Delivery Considerations
Strategic planning elevates our cake experience significantly. We can schedule orders up to 30 days in advance for special occasions. Time-sensitive celebrations benefit from having cakes arrive at least three days before the event to ensure proper preparation and serving readiness.
| Planning Timeline | Recommended Action |
|---|---|
| Up to 30 days | Schedule orders in advance |
| 3 days before event | Recommended arrival time |
| 2 hours before serving | Remove from refrigeration |
Serving Capacity and Presentation
Our 10-inch birthday cake generously serves 20 to 30 people depending on portion preferences. The three-tier vanilla funfetti creation showcases layers of creamy frosting, crunchy crumbs, and vibrant rainbow sprinkles that create an impressive presentation. Each slice delivers the perfect balance of textures and nostalgic birthday cake flavors that make every celebration memorable.
Conclusion
Creating Milk Bar’s iconic birthday cake at home becomes entirely achievable with proper planning and technique. We’ve walked you through every essential step from mixing the perfect crumb texture to achieving that signature tangy frosting that makes this dessert so memorable.
The beauty of this recipe lies in its make-ahead flexibility. You can prepare each component separately and assemble when ready which makes it perfect for busy schedules or special celebrations that require advance planning.
Most importantly this isn’t just about recreating a trendy dessert – it’s about capturing those nostalgic birthday cake flavors we all remember from childhood. The combination of rainbow sprinkles vanilla cake and cream cheese frosting creates something truly special that’ll become your go-to celebration cake.
Frequently Asked Questions
What makes Milk Bar Birthday Cake different from regular birthday cake?
Milk Bar Birthday Cake features a unique combination of nostalgic vanilla flavors, signature rainbow crumb topping, and tangy cream cheese frosting. The rainbow sprinkles are incorporated throughout the cake, not just as decoration, creating that distinctive “birthday cake” flavor that reminds you of childhood celebrations.
What essential equipment do I need to make this cake?
You’ll need a stand mixer with paddle attachment, digital kitchen scale, quarter sheet pans, parchment paper, large mixing bowls, fine-mesh sieve, rubber spatulas, offset spatula, 6-inch cake ring or springform pan, and plastic wrap for assembly and storage.
Can I make the cake components ahead of time?
Yes! Birthday cake crumbs can be refrigerated for up to a month or frozen for three months. Cake layers can be frozen for easier handling, and frosting keeps in the refrigerator for a week. This makes the entire process much more manageable.
How long does the assembled cake need to freeze before serving?
The assembled cake must freeze for at least 12 hours to allow the flavors to meld and achieve the proper texture. This freezing time is crucial for the cake’s signature consistency and taste.
How should I store and serve the finished cake?
The assembled cake can be refrigerated for up to five days or frozen for two weeks. Remove from refrigeration two hours before serving to ensure creamy frosting and tender cake layers. The 10-inch cake serves 20-30 people.
What’s the purpose of the milk soak in this recipe?
The vanilla milk soak enhances moisture and helps bind the layers together. Each layer is soaked with this mixture during assembly, contributing to the cake’s distinctive texture and ensuring it stays moist throughout storage.


