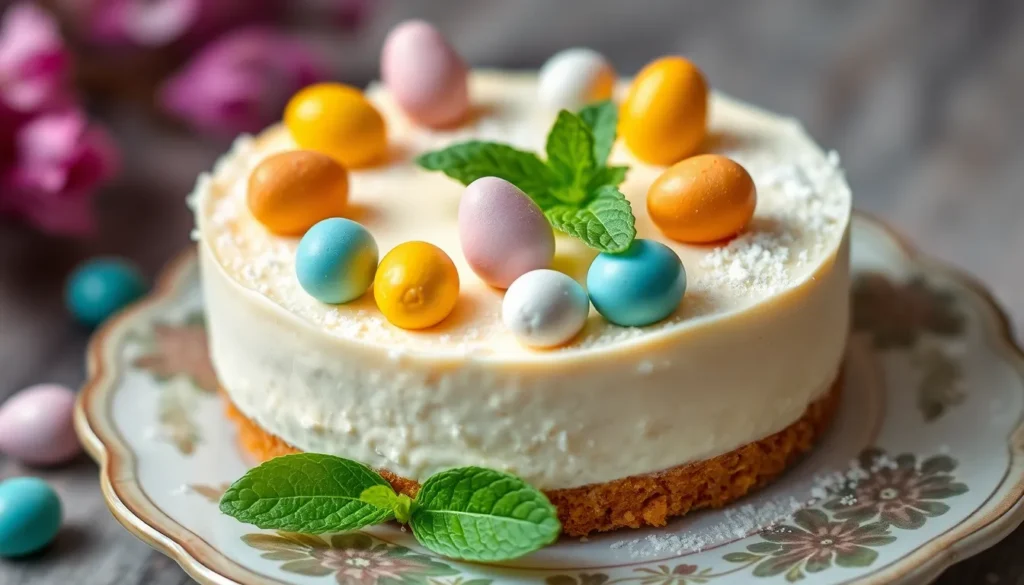
We’ve discovered the perfect way to celebrate spring with these irresistible mini egg cheesecakes that combine two beloved desserts into one showstopping treat. These individual-sized delights feature rich, creamy New York-style cheesecake topped with colorful mini chocolate eggs that make every bite a delightful surprise.
What makes these mini cheesecakes truly special is their versatility and convenience. We love how they’re perfectly portioned for parties, Easter gatherings, or when you’re craving something sweet but don’t want to commit to a full-sized dessert. The graham cracker crust provides the perfect buttery foundation while the silky cheesecake filling melts in your mouth.
Whether you’re an experienced baker or just starting your dessert journey, we’ll guide you through creating these Instagram-worthy treats that look as amazing as they taste. Get ready to impress your family and friends with a dessert that’s guaranteed to disappear from the plate in minutes.
Ingredients
We’ve organized the ingredients into three simple categories to make preparation effortless. Each component works together to create these delightful springtime treats.
For the Crust
- 1 cup graham cracker crumbs
- 3 tablespoons granulated sugar
- 4 tablespoons unsalted butter, melted
- Pinch of salt
For the Cheesecake Filling
- 16 ounces cream cheese, softened to room temperature
- 1/2 cup granulated sugar
- 2 large eggs, room temperature
- 1 teaspoon vanilla extract
- 1/4 cup sour cream
- 2 tablespoons all-purpose flour
For the Topping
- 1/2 cup mini chocolate eggs (assorted colors)
- 2 tablespoons powdered sugar for dusting (optional)
- Fresh mint leaves for garnish (optional)


Equipment Needed

We recommend gathering the proper tools before starting our mini egg cheesecake recipe to ensure smooth preparation and professional results. Our equipment list focuses on items that make the process easier and help achieve the perfect texture and presentation.
Springform pan serves as our most essential tool for these individual cheesecakes. We prefer using 4-inch mini springform pans or a standard muffin tin with paper liners for portion control and easy removal.
Food processor becomes invaluable for creating perfectly crushed graham crackers and achieving uniform crust texture. We find this method produces consistent results compared to manual crushing methods.
Electric whisk or stand mixer ensures our cream cheese filling reaches the ideal smooth and creamy consistency. We recommend using the paddle attachment on stand mixers to avoid overbeating the mixture.
Rolling pin or heavy pan provides the muscle needed for crushing mini chocolate eggs into appealing chunks. We suggest placing the eggs in a sealed plastic bag before crushing to prevent pieces from scattering.
Mixing bowls in various sizes help us organize ingredients and separate preparation steps. We typically need at least two medium bowls for efficient workflow.
Measuring cups and spoons guarantee accuracy in our ingredient ratios. We emphasize using dry measuring cups for solids and liquid measuring cups for wet ingredients to maintain recipe precision.
Rubber spatula allows us to fold ingredients gently and scrape bowls clean without deflating our mixture. We find silicone spatulas work best for their flexibility and heat resistance.
Wire cooling rack provides proper air circulation during the chilling process. We place our completed cheesecakes on racks before refrigerating to prevent condensation buildup on the bottom.


Instructions

We’ll guide you through each step to create these delightful mini egg cheesecakes with precision and ease. Our method ensures perfect results every time by breaking down the process into manageable stages.
Prep the Crust
Crush the graham crackers in a food processor until they form fine crumbs. Combine the crumbs with granulated sugar and salt in a mixing bowl. Pour the melted butter over the mixture and stir until the crumbs hold together when pressed. Press the crust mixture firmly into the bottom of each muffin cup or your springform pan using the back of a spoon. Chill the prepared crusts in the refrigerator for 30 minutes to solidify before adding the filling.
Make the Cheesecake Filling
Beat the softened cream cheese with an electric mixer until smooth and creamy with no lumps remaining. Gradually add the granulated sugar and continue beating until well combined. Add eggs one at a time, mixing well after each addition. Pour in the vanilla extract and sour cream, then beat until the mixture is completely smooth. Sprinkle the flour over the filling and mix gently until just incorporated. Fold in half of the crushed mini chocolate eggs, reserving the remainder for topping.
Assemble the Mini Cheesecakes
Spoon or pipe the cream cheese filling evenly over the chilled crusts, filling each muffin cup about three-quarters full. Gently tap the pan on the counter to release any air bubbles trapped in the filling. Smooth the tops with the back of a spoon for an even surface. Sprinkle the remaining crushed mini eggs over each cheesecake for added texture and visual appeal.
Bake
Preheat your oven to 325°F (163°C) before placing the assembled cheesecakes inside. Bake for 18-22 minutes for individual portions or 45-50 minutes for a full-size cheesecake until the centers are almost set but still slightly jiggly. Turn off the oven and crack the door open, allowing the cheesecakes to cool gradually for 1 hour to prevent cracking.
Cool and Chill
Remove the cheesecakes from the oven and let them cool completely at room temperature for 2 hours. Transfer the cooled cheesecakes to the refrigerator and chill for at least 4 hours or overnight until completely set. This chilling time is essential for achieving the perfect creamy texture and clean slicing.
Add Toppings
Remove the chilled cheesecakes from their pans carefully using a thin knife around the edges if needed. Place whole mini chocolate eggs on top of each cheesecake for decoration. Dust lightly with powdered sugar using a fine mesh sieve if desired. Garnish with fresh mint leaves just before serving to add a pop of color and freshness.


Make-Ahead Instructions

Planning ahead transforms these mini egg cheesecakes into stress-free desserts for any occasion. We can prepare these delightful treats up to 48 hours before serving while maintaining their perfect texture and flavor.
Advance Preparation Timeline
Our no-bake mini egg cheesecakes benefit from extended chilling time in the refrigerator. Storage covered for up to two days allows the flavors to meld beautifully while the texture becomes perfectly set.
| Timeline | Storage Method | Benefits |
|---|---|---|
| 3-4 hours | Refrigerate covered | Minimum setting time |
| Overnight | Refrigerate covered | Optimal texture development |
| 24-48 hours | Refrigerate covered | Maximum flavor integration |
Overnight Chilling Benefits
Chilling our cheesecakes overnight creates the ideal consistency we desire. The extended refrigeration period allows the cream cheese filling to firm completely while the digestive biscuit base maintains its perfect crumb structure.
Long-Term Storage Options
Freezing undecorated cheesecakes extends storage possibilities significantly. We recommend wrapping individual portions tightly and storing them in the springform tin for optimal protection. Defrosting requires transferring the frozen cheesecakes to the refrigerator several hours before serving.
Final Assembly Strategy
Decorating with whole Mini Eggs and garnishes works best just before serving. This approach prevents the chocolate decorations from affecting the cheesecake texture during extended storage periods. Fresh mint leaves and powdered sugar dusting should always be added at the last moment for maximum visual impact.


Storage Tips

Proper storage ensures our mini egg cheesecakes maintain their creamy texture and delicious flavor for days after baking. We recommend storing these delightful treats covered in the refrigerator where they will stay fresh for 3 to 5 days. Sealing them in an airtight container or covering with plastic wrap or foil prevents the cheesecakes from drying out and absorbing other refrigerator odors.
Refrigeration Guidelines
| Storage Method | Duration | Temperature |
|---|---|---|
| Refrigerator (covered) | 3-5 days | 35-40°F |
| Room temperature | Maximum 2 hours | 68-72°F |
| Freezer (wrapped) | 2-3 months | 0°F |
Never leave our mini egg cheesecakes at room temperature for more than 2 hours due to their high dairy content. The cream cheese filling requires consistent refrigeration to prevent spoilage and maintain food safety standards.
Long Term Freezing Options
For extended storage we can freeze individual mini egg cheesecakes for up to 2 to 3 months. Wrap each cheesecake tightly in plastic wrap first then cover with aluminum foil to prevent freezer burn. Thaw overnight in the refrigerator before serving to restore the optimal creamy texture.
Undecorated mini cheesecakes freeze particularly well and can be stored for up to one month. We recommend freezing them before adding any toppings then decorating after thawing for the best presentation.
Serving and Decorating Considerations
Cheesecake slices most cleanly when fully chilled. Run a sharp knife under hot water and wipe it dry before each cut for professional looking results. Repeat this process between slices to maintain clean edges.
Mini eggs used as decoration require special attention since their candy coating may start to bleed color after about a day in the refrigerator. We suggest adding these colorful toppings just before serving to preserve their vibrant appearance and prevent color transfer to the cheesecake surface.
Serving Suggestions

We recommend serving these mini egg cheesecakes chilled for the best texture and flavor experience. The cold temperature enhances the creamy consistency while allowing the mini chocolate eggs to maintain their satisfying crunch.
Temperature and Preparation
Always remove the cheesecakes from the refrigerator just before serving to ensure optimal texture. For clean slicing of larger versions, we suggest running your knife under hot water and wiping it dry between cuts. When using a springform pan, gently release the sides and transfer the cheesecake to an attractive cake plate before adding final garnishes.
Garnishing Options
Mini Egg Toppings: Create visual impact by arranging whole or halved mini eggs on top of each cheesecake. This approach provides extra crunch and reinforces the Easter theme while adding vibrant color contrast.
Chocolate Drizzles: Enhance sweetness and presentation by drizzling melted white or milk chocolate over the surface. The chocolate creates elegant patterns while complementing the existing flavors.
Fresh Fruit Pairings: Balance the rich cheesecake with fresh raspberries or strawberries. These tart fruits provide a refreshing contrast that cuts through the creamy texture.
Whipped Cream Additions: Top with extra whipped cream and delicate chocolate curls for a luxurious finish. This combination adds height to your presentation while increasing the indulgent factor.
Accompaniment Ideas
Vanilla ice cream serves as an excellent side pairing that complements the cheesecake’s creamy texture. The cool temperature and neutral flavor enhance rather than compete with the mini egg elements.
For special occasions, consider dusting the plates with powdered sugar before placing the cheesecakes. Fresh mint leaves provide a pop of color and subtle aromatic contrast that elevates the overall presentation.


Conclusion
These mini egg cheesecakes deliver the perfect balance of convenience and indulgence that we all crave during spring celebrations. With their individual portions and make-ahead friendly nature they’re destined to become your go-to dessert for Easter gatherings and beyond.
We’ve equipped you with everything needed to create these show-stopping treats from essential equipment to storage tips. The beauty lies in their versatility – whether you’re hosting a crowd or treating yourself to a sweet moment these mini cheesecakes adapt to any occasion.
Now it’s time to gather your ingredients and start creating these delightful springtime desserts. Your guests will be impressed and you’ll have discovered a new favorite that’s as enjoyable to make as it is to eat.
Frequently Asked Questions
What makes mini egg cheesecakes perfect for springtime?
Mini egg cheesecakes combine the rich flavors of New York-style cheesecake with colorful mini chocolate eggs, creating a delightful springtime treat. Their individual serving size makes them perfect for Easter gatherings and parties, while the vibrant mini eggs add a festive touch that captures the essence of spring celebrations.
What ingredients do I need for the crust?
The crust requires just four simple ingredients: graham cracker crumbs, granulated sugar, melted unsalted butter, and a pinch of salt. These ingredients create a classic, buttery foundation that perfectly complements the creamy cheesecake filling and provides the ideal texture contrast.
What equipment is essential for making mini egg cheesecakes?
Key equipment includes a springform pan or muffin tin for portion control, a food processor for uniform crust texture, and an electric whisk or stand mixer for smooth filling. Additional helpful tools include measuring cups, mixing bowls, a rubber spatula, rolling pin, and wire cooling rack for professional results.
How long can I store mini egg cheesecakes?
Mini egg cheesecakes can be refrigerated for 3-5 days when properly stored in airtight containers. For longer storage, freeze undecorated cheesecakes for 2-3 months. Never leave them at room temperature for more than 2 hours due to food safety concerns with dairy ingredients.
Can I make mini egg cheesecakes ahead of time?
Yes, these cheesecakes can be prepared up to 48 hours in advance while maintaining perfect texture and flavor. Overnight chilling provides optimal texture development. For best results, add mini egg decorations just before serving to preserve their vibrant appearance and prevent color bleeding.
What’s the best way to serve mini egg cheesecakes?
Serve chilled for optimal texture and flavor. Use a sharp knife for clean slicing and transfer to attractive plates. Garnish with fresh mini eggs, drizzled chocolate, fresh fruit, or whipped cream. Consider pairing with vanilla ice cream and dusting plates with powdered sugar for an elegant presentation.
At what temperature should I bake the cheesecakes?
Bake the mini egg cheesecakes at 325°F until they’re set but still slightly jiggly in the center. This moderate temperature ensures even cooking without cracking, resulting in perfectly creamy cheesecakes. Proper cooling and chilling after baking are essential for achieving the ideal texture.


