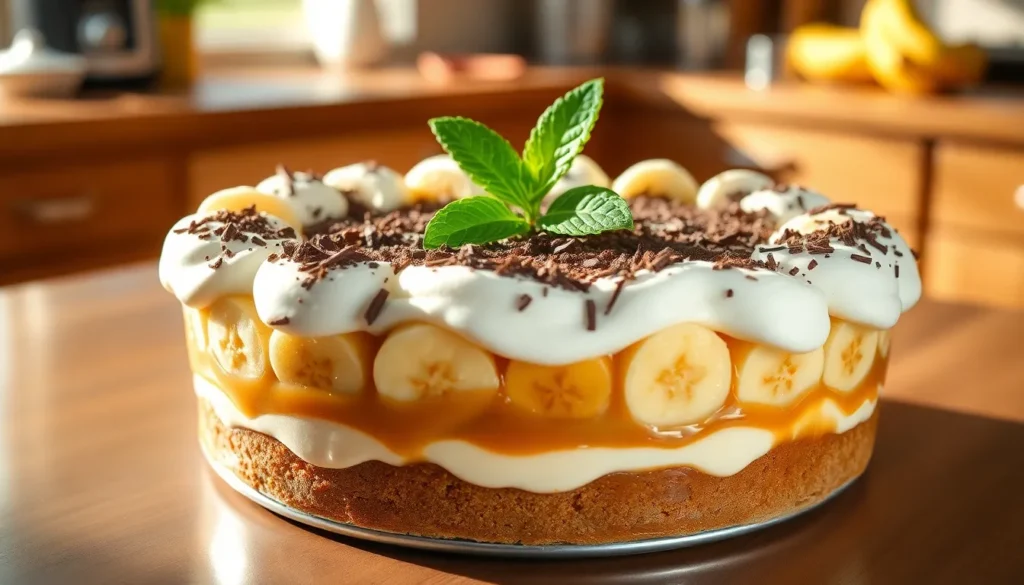
We’ve discovered the perfect dessert for when you’re craving something decadent but don’t want to turn on the oven. Our no-bake banoffee pie combines the irresistible flavors of creamy toffee, fresh bananas, and fluffy whipped cream in one show-stopping dessert that’ll have everyone asking for seconds.
This British-inspired treat originated in the 1970s and has been winning hearts ever since with its perfect balance of sweet and creamy textures. What makes our version even better? You can whip it up in just 30 minutes without any baking required – making it ideal for hot summer days or when you need an impressive dessert fast.
We’ll show you how to create that signature buttery biscuit base, make silky smooth toffee filling, and layer everything together for a dessert that looks like it came from a fancy bakery. Trust us, once you try this foolproof recipe, it’ll become your go-to crowd-pleaser.
Equipment Needed
Creating this stunning no bake banoffee pie requires minimal equipment that most home bakers already have in their kitchen. We recommend gathering all your tools before starting to ensure a smooth preparation process.
Essential Equipment:
- 9-inch springform pan or pie dish
- Food processor or mixing bowl with pastry cutter
- Heavy-bottomed saucepan for toffee making
- Electric hand mixer or stand mixer
- Large mixing bowl for whipped cream
- Rubber spatula for folding ingredients
- Sharp knife for slicing bananas
- Measuring cups and spoons
- Wire cooling rack
Optional but Helpful Tools:
- Offset spatula for smooth spreading
- Piping bag with star tip for decorative cream
- Fine-mesh sieve for dusting cocoa
- Kitchen scale for precise measurements
The springform pan makes removing your finished pie effortless while maintaining its perfect shape. We find that a food processor creates the finest biscuit crumbs for our base though a rolling pin and sealed bag work as alternatives. Your heavy-bottomed saucepan prevents the toffee from burning during the crucial caramelization process.
An electric mixer transforms cream into fluffy peaks in minutes rather than the arm workout of whisking by hand. We always keep our mixing bowls and beaters chilled in the refrigerator beforehand as cold equipment whips cream faster and creates better volume.


Ingredients
 2")
Our no-bake banoffee pie requires simple yet quality ingredients that create layers of incredible flavor and texture. We’ve organized everything by layer to help you gather ingredients efficiently and understand how each component contributes to this show-stopping dessert.
For the Biscuit Base
- 300 g (11 oz) crushed graham cracker or gingernut biscuits
- 100 g (3.5 oz) melted unsalted butter
For the Toffee Layer
- 397 g (14 oz) can of caramel or dulce de leche
For the Banana Layer
- 3-4 bananas, peeled and sliced
For the Whipped Cream Topping
- 300-450 ml (1.25-1.5 cups) heavy whipping cream
- 1/3-2 tbsp powdered sugar
- 2 tsp vanilla extract (optional)
- 100 g (3.5 oz) dark chocolate, for shavings


Instructions
 4")
Creating this stunning no-bake banoffee pie requires careful attention to each layer for optimal results. We’ll guide you through each step to ensure your dessert achieves the perfect balance of textures and flavors.
Prepare the Biscuit Base
Place the crushed biscuits in a large mixing bowl and gradually add the melted butter while stirring continuously. Mix until the crumb mixture resembles wet sand and holds together when pressed between your fingers. Line your 9-inch springform pan with baking paper for easy removal later. Press the biscuit mixture firmly into the bottom and up the sides of the prepared tin using the back of a spoon or measuring cup. We recommend applying steady pressure to create an even layer that won’t crumble when sliced. Refrigerate the base for 30 minutes to set completely before adding the next layer.
Make the Toffee Layer
Open your can of caramel or dulce de leche and transfer half to a heavy-bottomed saucepan if you prefer a thicker consistency. Boil the caramel for 5 minutes while stirring constantly to prevent burning and achieve a richer texture. Allow the caramel to cool slightly before proceeding to maintain the right spreading consistency. Pour the prepared caramel over the chilled biscuit base using a spatula to spread it evenly across the surface. Ensure the caramel reaches all edges for consistent flavor distribution throughout each slice.
Add the Banana Layer
Peel your bananas just before assembling to prevent browning and maintain fresh flavor. Slice the bananas into rounds approximately 1/4 inch thick for optimal layering. Arrange the banana slices in overlapping circles over the caramel layer starting from the outer edge and working inward. Press the banana slices gently into the caramel to secure them in place. We suggest using bananas that are ripe but still firm to prevent them from becoming mushy during assembly.
Create the Whipped Cream Topping
Chill your mixing bowl and beaters in the refrigerator for 15 minutes before whipping for better volume. Pour the heavy whipping cream into the chilled bowl and begin beating on medium speed until soft peaks form. Gradually increase to high speed and add the powdered sugar and vanilla extract if using. Continue whipping until stiff peaks form but be careful not to overbeat as this can result in a grainy texture. The cream should hold its shape when the beaters are lifted but remain smooth and spreadable.
Assemble the No Bake Banoffee Pie
Spoon the whipped cream over the banana layer and use an offset spatula to spread it evenly across the entire surface. Create decorative swirls or peaks in the cream for an attractive presentation. Grate the dark chocolate directly over the whipped cream using a fine grater or vegetable peeler to create delicate shavings. Distribute the chocolate evenly for both visual appeal and flavor balance. Refrigerate the completed pie for 30 to 60 minutes before serving to allow all layers to set properly. Remove the springform pan sides just before serving to showcase the beautiful layers.


Chilling and Setting
 6")
Now that we’ve assembled all our layers the critical chilling and setting phase begins. This step transforms our loose components into a perfectly sliced dessert that holds its shape beautifully.
Initial Crust Setting
We start by placing our assembled pie in the freezer for 30 minutes minimum. This initial freeze locks the crust into place and prevents it from crumbling when we slice. The butter in our biscuit base needs this time to solidify completely.
Full Refrigeration Process
After the initial freeze we transfer our banoffee pie to the refrigerator for proper setting. The chilling requirements vary based on our desired timeline:
| Chilling Time | Result |
|---|---|
| 1 hour minimum | Basic setting for immediate serving |
| 4 hours recommended | Complete layer integration and optimal texture |
| Overnight | Perfect consistency for special occasions |
Caramel Layer Development
During refrigeration our caramel layer undergoes important transformation. The dulce de leche thickens naturally as it cools creating that signature dense texture we expect from banoffee pie. This process typically requires several hours to reach its ideal consistency.
Optimal Serving Temperature
We serve our banoffee pie directly from the refrigerator while completely chilled. The cold temperature maintains the whipped cream’s stability and prevents the caramel from becoming too soft. Room temperature serving causes the layers to lose their definition quickly.
Storage Guidelines
Our assembled pie maintains peak quality for up to two days when stored covered in the refrigerator. Beyond this timeframe the bananas begin to soften excessively and the cream may separate. We always cover the surface with plastic wrap to prevent the cream from absorbing refrigerator odors.
The setting process cannot be rushed. Proper chilling ensures each forkful delivers the perfect balance of textures that makes banoffee pie such a beloved dessert.


Make-Ahead Instructions
 8")
Preparing our no-bake banoffee pie ahead of time makes entertaining effortless and allows the flavors to meld beautifully. We can tackle different components separately to streamline the process and ensure perfect results when serving time arrives.
Crust Preparation Timeline
Our biscuit base benefits from advance preparation and can be made up to 24 hours before assembly. We press the crushed biscuit and butter mixture firmly into our springform pan and cover tightly with plastic wrap. Refrigeration during this period helps the crust achieve the ideal firmness that supports our toppings without crumbling.
| Component | Advance Timeline | Storage Method |
|---|---|---|
| Biscuit Crust | Up to 24 hours | Covered in refrigerator |
| Homemade Caramel | Up to 3 days | Sealed container in fridge |
| Assembled Pie | Up to 2 days | Covered in refrigerator |
Caramel Layer Strategy
Store-bought dulce de leche can be used directly from the jar, but homemade caramel requires advance planning. We prepare our caramel up to three days ahead and store it in a sealed container in the refrigerator. Before spreading, we bring the caramel to room temperature for easier application and smoother consistency.
Assembly Timeline Recommendations
We assemble our banoffee pie no more than 4 hours before serving for optimal texture and appearance. Slicing bananas too far in advance leads to browning, while whipped cream loses its structure over extended periods. The ideal window allows our layers to set properly without compromising the fresh banana flavor.
Final Assembly Steps
Our whipped cream performs best when prepared fresh on serving day. We can whip the cream up to 2 hours before final assembly and store it covered in the refrigerator. Adding powdered sugar and vanilla extract helps stabilize the cream and maintain its peaks longer.
Storage Guidelines
Once fully assembled, our banoffee pie stays fresh in the refrigerator for up to 48 hours maximum. We cover the entire pie with plastic wrap or store it in an airtight container to prevent absorption of refrigerator odors. Beyond two days, banana texture deteriorates and cream separation becomes noticeable.


Serving Suggestions
 10")
We recommend serving our no bake banoffee pie in individual portions for the most elegant presentation. Creating single servings in glass jars or small ramekins provides better portion control and allows guests to enjoy their own personal dessert experience.
Temperature plays a crucial role in the perfect banoffee pie experience. We always serve our pie well chilled to maintain the structural integrity of each layer and preserve the optimal flavor balance. The cold temperature keeps the whipped cream stable and ensures the caramel layer maintains its ideal consistency.
Fresh garnishes elevate the visual appeal just before serving. We add chocolate shavings or grated dark chocolate directly onto each slice to create an attractive contrast against the pale cream. A light dusting of cocoa powder provides another elegant finishing touch that complements the toffee flavors.
| Garnish Option | Application Method | Visual Impact |
|---|---|---|
| Chocolate Shavings | Sprinkle over cream layer | High contrast texture |
| Cocoa Powder | Light dusting with sifter | Elegant finish |
| Fresh Banana Slices | Arrange on top | Color and freshness |
| Mint Leaves | Single leaf per serving | Fresh accent |
Color enhancement comes from strategically placed fresh banana slices arranged on top of each serving. We slice these bananas just before plating to prevent browning and maintain the bright appearance that makes the dessert so appealing.
Mint leaves provide a refreshing visual accent that complements the rich flavors. We place a single fresh mint sprig on each portion to add a pop of green color and a subtle aromatic element.
For special occasions we create a chocolate drizzle by melting dark chocolate and allowing it to cool slightly before drizzling over individual servings. This technique adds both visual drama and an extra layer of indulgent flavor.
Beverage pairings enhance the traditional British dessert experience. We serve banoffee pie alongside freshly brewed coffee or strong black tea to balance the sweetness and create an authentic afternoon tea atmosphere.
The timing of final assembly ensures optimal presentation quality. We recommend adding the whipped cream layer and banana garnishes no more than 30 minutes before serving to maintain peak freshness and prevent any deterioration in appearance.


Storage Tips
 12")
We understand that proper storage is crucial for maintaining the quality and appearance of our no-bake banoffee pie. The key to successful storage lies in understanding which components store well and which require fresh preparation.
Refrigerator Storage
Our banoffee pie can be stored in the refrigerator for a few days when kept in an airtight container. But, we must note that the appearance and texture of fresh bananas and whipped cream will degrade over time, becoming less appealing. The bananas may brown and soften while the whipped cream loses its structure and volume.
Freezer Storage Strategy
We recommend a strategic approach when freezing this dessert. The crust and caramel components can be frozen separately for up to 2-3 months without losing quality. These components maintain their texture and flavor exceptionally well in the freezer. The bananas and whipped cream should never be frozen as they do not preserve well and will compromise the final texture of our pie.
Pre-Assembly Storage
We achieve the best results by storing our pie before adding the bananas and whipped cream. This approach ensures optimal preservation of the crust and caramel layers while allowing us to complete the dessert with fresh components when ready to serve.
Freezing Process
We place the frozen components in an airtight bag or container to prevent moisture and other flavors from affecting our pie. When we’re ready to serve, we thaw the frozen parts completely and assemble the pie with fresh bananas and newly whipped cream for the best possible result.
Essential Storage Guidelines
We always use airtight containers to maintain freshness and prevent moisture from compromising our dessert. The preparation of bananas and whipped cream should occur just before serving to ensure optimal texture and appearance. This timing guarantees that every slice delivers the perfect balance of textures that makes banoffee pie so irresistible.


Conclusion
We’ve shared everything you need to create this show-stopping no-bake banoffee pie that’ll have your guests asking for the recipe. With its perfect balance of buttery crust creamy toffee fresh bananas and fluffy whipped cream this dessert delivers bakery-quality results without turning on your oven.
The beauty of this recipe lies in its simplicity and make-ahead flexibility. You can prepare components in advance and assemble when ready making it perfect for entertaining or satisfying those spontaneous dessert cravings.
Remember that proper chilling is your secret weapon for clean slices and the ideal texture contrast between layers. Serve it well-chilled with your favorite garnishes and watch as this British classic becomes your go-to impressive dessert that’s surprisingly easy to master.
Frequently Asked Questions
How long does it take to make a no-bake banoffee pie?
The entire no-bake banoffee pie can be assembled in just 30 minutes. However, proper chilling time is essential – allow at least 30 minutes for initial setting, followed by 1-4 hours of refrigeration for optimal texture. For best results, chill overnight before serving to achieve the perfect balance of textures.
What equipment do I need to make banoffee pie?
Essential equipment includes a 9-inch springform pan or pie dish, food processor or mixing bowl, heavy-bottomed saucepan, electric mixer, and sharp knife. Optional tools like an offset spatula and piping bag can enhance presentation. A springform pan is recommended for easy removal and maintaining the pie’s shape.
Can I make banoffee pie ahead of time?
Yes, components can be prepared in advance. The biscuit crust lasts 24 hours refrigerated, and homemade caramel keeps for 3 days. Assemble the complete pie no more than 4 hours before serving to maintain optimal texture. The fully assembled pie stores well for up to 48 hours covered in the refrigerator.
What ingredients do I need for banoffee pie?
You’ll need 300g crushed graham crackers or gingernut biscuits, 100g melted butter, 397g caramel or dulce de leche, 3-4 bananas, 300-450ml heavy cream, 1-2 tbsp powdered sugar, 2 tsp vanilla extract (optional), and 100g dark chocolate for shavings. Quality ingredients ensure the best flavor and texture.
How should I store leftover banoffee pie?
Store covered in the refrigerator for up to 2 days maximum. After this time, bananas soften and cream may separate, affecting quality. For longer storage, freeze the crust and caramel components separately for 2-3 months. Never freeze bananas or whipped cream, as they don’t thaw well.
Why is my banoffee pie not setting properly?
Insufficient chilling time is the most common cause. Ensure at least 30 minutes initial freezing, followed by 1-4 hours refrigeration. Use a springform pan for better structure, press the crust firmly, and whip cream to stiff peaks. Proper chilling allows the caramel to thicken and layers to stabilize.
Can I use store-bought caramel for banoffee pie?
Absolutely! Canned caramel or dulce de leche works perfectly and saves time. For richer texture, briefly boil the caramel before spreading over the biscuit base. Store-bought caramel provides consistent results and is ideal for quick preparation while maintaining authentic banoffee pie flavor.
How do I prevent bananas from browning in banoffee pie?
Slice bananas just before assembling the pie and arrange them immediately over the caramel layer. The caramel creates a protective barrier, and the whipped cream topping further shields the bananas. For best results, assemble the complete pie no more than 4 hours before serving.