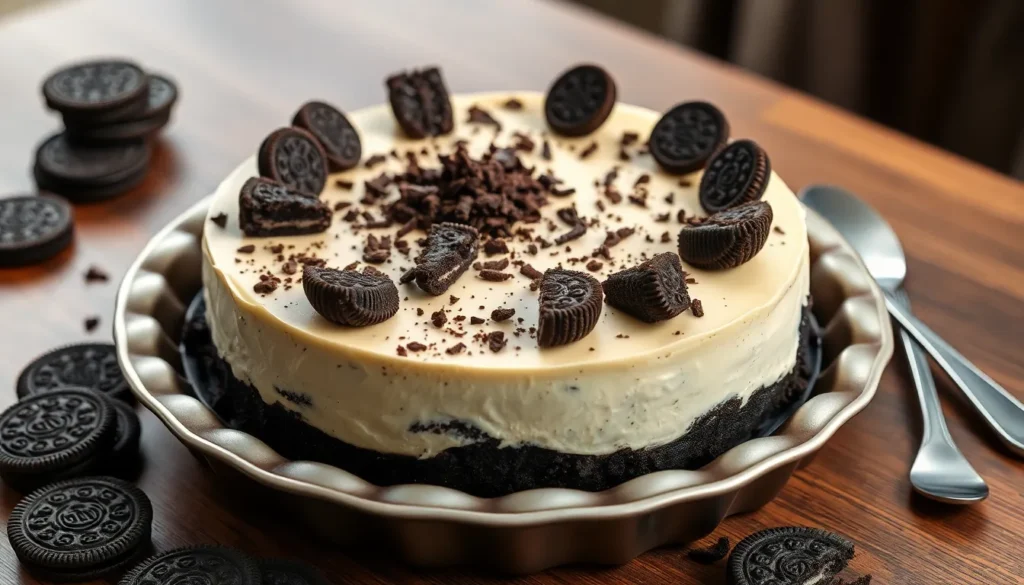
When we’re craving something decadently sweet but don’t want to turn on the oven, this no-bake Oreo cheesecake becomes our ultimate go-to dessert. We’ve perfected this crowd-pleasing recipe that combines the beloved chocolate sandwich cookie with rich, creamy cheesecake filling – and it requires absolutely no baking skills whatsoever.
What makes this dessert so irresistible is how the crushed Oreos create both the perfect crust and add delightful texture throughout the silky filling. We love how the cookies’ chocolate flavor intensifies the overall taste while their cream centers blend seamlessly with the cheesecake base.
The best part? We can whip this up in just 20 minutes of active prep time, then let the refrigerator do all the work. Whether we’re hosting a dinner party or need a last-minute dessert for the family, this no-bake Oreo cheesecake delivers bakery-quality results every single time.
Ingredients
We’ve organized our no bake Oreo cheesecake ingredients into three simple categories to make preparation effortless. Each component plays a crucial role in creating the perfect balance of textures and flavors.
For the Oreo Crust
- 36 Oreo cookies (about 1 package), finely crushed
- 6 tablespoons unsalted butter, melted
- 2 tablespoons granulated sugar
For the Cheesecake Filling
- 24 oz cream cheese, softened to room temperature
- 1 cup powdered sugar
- 1 teaspoon vanilla extract
- 2 cups heavy whipping cream, cold
- 20 Oreo cookies, roughly chopped
- 1/4 teaspoon salt
For the Topping
- 1 cup heavy whipping cream, cold
- 3 tablespoons powdered sugar
- 1/2 teaspoon vanilla extract
- 12 Oreo cookies, halved or quartered for decoration
- Chocolate shavings (optional)


Equipment Needed
 1")
Creating this delicious no-bake Oreo cheesecake requires a few essential kitchen tools that will help you achieve professional results every time. We recommend gathering all equipment before starting to ensure a smooth preparation process.
Food processor serves as the most important tool for crushing Oreos into fine crumbs for our crust. This appliance creates the perfect texture that binds properly with melted butter and forms a solid foundation for our cheesecake.
Mixing bowls in various sizes allow us to prepare different components separately before combining them. We suggest using at least two medium-sized bowls for optimal workflow organization.
Electric mixer or whisk becomes essential for whipping cream to stiff peaks and creating the light, airy texture that makes our cheesecake filling irresistible. A handheld electric mixer works perfectly for this recipe.
Spatula helps us fold ingredients together gently without deflating the whipped cream. This tool ensures we maintain the fluffy consistency that gives our cheesecake its signature texture.
Pie pan with removable bottom provides the ideal vessel for our cheesecake assembly and makes removal effortless after chilling. We prefer springform pans or tart pans with removable bottoms for best results.
Measuring cups and spoons guarantee accurate ingredient proportions that deliver consistent results every time we make this recipe. Precision in measurements creates the perfect balance of flavors and textures.
These tools work together to streamline our preparation process and ensure our no-bake Oreo cheesecake turns out perfectly every time.


Instructions
 2")
With our ingredients measured and equipment ready, we’ll transform these simple components into an impressive no-bake dessert. Follow these step-by-step instructions to create the perfect Oreo cheesecake.
Prepare the Oreo Crust
Place 36 whole Oreo cookies in your food processor and pulse until they become finely ground crumbs. Transfer the crushed cookies to a mixing bowl and combine with 6 tablespoons of melted butter and 2 tablespoons of granulated sugar. Mix thoroughly until the mixture holds together when pressed.
Line your 9-inch springform pan with parchment paper for easy removal. Press the Oreo mixture firmly into the bottom of the pan using the back of a spoon or measuring cup. Create an even layer that extends slightly up the sides. Refrigerate the crust while you prepare the filling.
Make the Cheesecake Filling
Beat the softened cream cheese in a large mixing bowl using an electric mixer until completely smooth and free of lumps. Add 1 cup of powdered sugar and 1 teaspoon of vanilla extract, continuing to beat until well incorporated. Scrape down the sides of the bowl as needed to ensure even mixing.
In a separate bowl, whip 2 cups of cold heavy whipping cream until stiff peaks form. Gently fold the whipped cream into the cream cheese mixture using a spatula, being careful not to deflate the cream. Add a pinch of salt and fold in 1 cup of roughly chopped Oreos for extra texture and flavor.
Assemble the Cheesecake
Remove the crust from the refrigerator and pour the cheesecake filling over the prepared base. Use an offset spatula or the back of a spoon to spread the filling evenly across the surface. Smooth the top and ensure the filling reaches all edges of the pan.
Cover the cheesecake with plastic wrap and refrigerate for at least 4 hours to allow it to set properly. For best results, we recommend chilling overnight to achieve the ideal firm texture.
Add the Final Touches
Once the cheesecake is completely set, prepare the topping by whipping 1 cup of cold heavy cream with 2 tablespoons of powdered sugar and 1/2 teaspoon of vanilla extract until soft peaks form. Pipe or dollop the whipped cream around the edges of the cheesecake using a piping bag or spoon.
Garnish with halved or quartered Oreos, pressing them gently into the whipped cream for a decorative finish. Add chocolate shavings if desired for an extra touch of elegance. Run a knife around the edges before releasing the springform pan for clean removal.


Chilling and Setting Time
 3")
After assembling our no-bake Oreo cheesecake, proper chilling becomes essential for achieving the perfect texture and stability. We need to allow adequate time for both the filling to firm up and the crust to set completely.
Minimum Chilling Requirements
The absolute minimum chilling time depends on the size and thickness of our cheesecake. For smaller or thinner versions, we can get away with just 2 hours of refrigeration. But, we recommend at least 4 hours as the bare minimum for larger or thicker cheesecakes to achieve a firmer set that holds together when sliced.
| Cheesecake Size | Minimum Time | Recommended Time |
|---|---|---|
| Small/Thin | 2 hours | 4 hours |
| Large/Thick | 4 hours | 6+ hours |
Optimal Setting Time
For the best results, we always recommend chilling our no-bake Oreo cheesecake for 6 hours or overnight. This extended chilling period ensures the filling becomes properly firm and the crust sets to the ideal consistency. The longer refrigeration time allows all flavors to meld together beautifully.
Proper Storage During Chilling
We must cover our cheesecake tightly with plastic wrap while it chills. This protective covering prevents the dessert from absorbing refrigerator odors and keeps the surface from drying out. The plastic wrap should touch the surface gently or create a complete seal around the pan.
Make-Ahead Convenience
Our no-bake Oreo cheesecake offers excellent make-ahead potential. We can prepare it up to 2 days in advance and store it safely in the refrigerator. This timing makes it perfect for entertaining since we can complete all the work ahead of time.
Temperature Sensitivity
Room temperature exposure can quickly compromise our cheesecake’s texture. If left out too long, the filling becomes soft and mousse-like while the crust may crumble more easily. We should keep the dessert refrigerated until just before serving to maintain its structural integrity.
Once our cheesecake has chilled properly, we can add the final garnishes of whipped topping and crushed Oreos right before presenting this impressive dessert to our guests.


Make-Ahead Instructions
 4")
Planning ahead becomes effortless with this no bake Oreo cheesecake since it’s designed for advance preparation. We can prepare this dessert up to 5 days before serving while maintaining its creamy texture and rich flavor throughout the storage period.
After assembling the cheesecake completely we need to cover it tightly with plastic wrap or aluminum foil before refrigerating. This protective covering prevents the dessert from absorbing refrigerator odors and keeps the surface from drying out during extended storage.
Our cheesecake requires proper chilling time to set correctly so we recommend preparing it at least one day before your event. The flavors meld beautifully overnight and the texture becomes perfectly firm for clean slicing.
For longer storage we can freeze individual slices in airtight containers for up to 6 months. Each slice should be wrapped individually in plastic wrap before placing in the freezer container to prevent freezer burn and maintain quality.
When ready to serve frozen slices we transfer them to the refrigerator and allow them to thaw overnight. This gradual thawing process preserves the creamy consistency without creating ice crystals or compromising the texture.
We always add fresh toppings like whipped cream and halved Oreos just before serving rather than storing the cheesecake with these garnishes. Pre applied toppings can become soggy or lose their appealing appearance during storage.
Storage becomes simple when we follow these timeline guidelines:
| Storage Method | Duration | Instructions |
|---|---|---|
| Refrigerated (whole cheesecake) | Up to 5 days | Cover tightly with plastic wrap |
| Frozen (individual slices) | Up to 6 months | Wrap individually in airtight containers |
| Thawing time | Overnight | Transfer from freezer to refrigerator |
Before serving we let the cheesecake sit at room temperature for about 15 minutes which makes slicing much easier and enhances the creamy mouthfeel that guests expect from this indulgent dessert.


Storage Tips
 5")
Refrigeration
Our no-bake Oreo cheesecake stays fresh in the refrigerator for up to 5 days when we store it properly. We recommend wrapping the entire pan tightly with plastic wrap or transferring individual slices to airtight containers to maintain optimal freshness. Planning ahead becomes effortless since we can prepare this dessert 2 to 3 days in advance before serving.
| Storage Method | Duration | Container Type |
|---|---|---|
| Whole cheesecake | Up to 5 days | Tightly wrapped pan |
| Individual slices | Up to 5 days | Airtight containers |
| Make-ahead preparation | 2-3 days | Refrigerated storage |
Freezing
Long-term storage becomes possible when we freeze our cheesecake for up to 1 to 3 months. We wrap the entire pan tightly with multiple layers of plastic wrap followed by aluminum foil to prevent freezer burn. Individual slices require a different approach where we first flash freeze them for 2 hours on a baking sheet before wrapping each piece separately.
Thawing frozen cheesecake requires patience as we transfer it from the freezer to the refrigerator several hours before serving. Room temperature thawing creates uneven texture and potential food safety concerns.
Handling Guidelines
Temperature control plays a crucial role in maintaining our cheesecake’s structure. We avoid leaving it at room temperature for extended periods since the filling becomes soft and the crust may start crumbling. Serving preparation works best when we add fresh toppings like whipped cream and additional Oreos just before presenting the dessert to our guests.
Proper storage containers protect against odor absorption while maintaining the cheesecake’s creamy consistency throughout the storage period.
Serving Suggestions
 6")
Our no-bake Oreo cheesecake shines brightest when we present it with thoughtful garnishes and accompaniments that enhance its rich flavors. We recommend topping each slice with a generous dollop of freshly whipped cream to add lightness and visual appeal. Crushed Oreos scattered over the whipped cream create delightful textural contrast while reinforcing the dessert’s signature flavor profile.
For an elegant presentation we suggest placing halved or quartered Oreo cookies around the edges of each slice. This creates a beautiful border that showcases the dessert’s main ingredient while adding visual interest. We find that drizzling melted chocolate over the top transforms our cheesecake into a restaurant-quality dessert that impresses guests.
Temperature plays a crucial role in our serving strategy. We always serve our cheesecake chilled directly from the refrigerator to maintain its perfect creamy consistency. The cold temperature allows the flavors to meld beautifully while preserving the dessert’s structural integrity.
Creative customization options abound with our versatile base recipe. We love adding chocolate shavings for sophisticated flair or incorporating colorful sprinkles for festive occasions. Fresh berries like strawberries or raspberries provide a bright acidic note that balances the rich sweetness of the Oreo cheesecake.
Individual portion control becomes effortless when we slice our cheesecake into neat wedges using a sharp knife warmed under hot water. Clean cuts between each slice ensure professional presentation while making serving seamless for dinner parties or family gatherings.
Pairing beverages thoughtfully elevates the entire dessert experience. We recommend serving alongside fresh coffee or cold milk to complement the cookie flavors. Hot chocolate or dessert wines also create memorable flavor combinations that enhance our cheesecake’s indulgent nature.


Recipe Variations
 7")
Our no-bake Oreo cheesecake provides the perfect foundation for creative customization. We can transform this classic dessert into exciting new flavors that cater to different taste preferences.
Chocolate Drizzle Version
We enhance the chocolate experience by adding cocoa powder directly to our cream cheese mixture for intensified chocolate flavor. This variation requires 2 tablespoons of unsweetened cocoa powder mixed with the softened cream cheese and powdered sugar. After our cheesecake sets completely we top it with rich chocolate ganache for an extra layer of chocolatey goodness.
To create the ganache we heat ½ cup of heavy cream until it just begins to simmer then pour it over 4 ounces of chopped dark chocolate. We let the mixture sit for 2 minutes before stirring until smooth and glossy. Once the ganache cools slightly we drizzle it over our chilled cheesecake using a spoon or squeeze bottle for elegant presentation.
Mini Individual Cheesecakes
We create perfect party portions by adapting our recipe for individual servings using smaller molds. Mini cheesecakes work beautifully for events and gatherings where guests prefer single serving desserts. The filling and preparation process remain identical to our full sized version with ingredient quantities adjusted proportionally.
For 12 mini cheesecakes we use standard muffin tins lined with paper liners or silicone molds. We divide our Oreo crust mixture evenly among the molds pressing about 2 tablespoons into each bottom. Our cream cheese filling gets distributed equally with approximately ¼ cup per mini cheesecake. These smaller versions require only 2 to 3 hours of chilling time due to their reduced thickness.
Peanut Butter Oreo Twist
We introduce rich peanut butter flavor by incorporating ½ cup of creamy peanut butter into our cream cheese mixture. This combination creates a delightful contrast that complements the Oreo cookies perfectly while adding a new dimension to our cheesecake. We beat the peanut butter with the softened cream cheese until completely smooth before adding our powdered sugar and vanilla extract.
The peanut butter variation pairs exceptionally well with additional garnishes like chopped peanuts or mini peanut butter cups. We can also substitute regular Oreos with peanut butter flavored Oreos for an even more intense peanut butter experience. This twist maintains the same creamy texture while delivering a completely different flavor profile that appeals to peanut butter enthusiasts.


Troubleshooting Tips
 8")
Even with careful preparation, we sometimes encounter issues that can affect our no bake Oreo cheesecake’s final texture and appearance. Understanding these common problems helps us achieve consistent results every time we make this delicious dessert.
Cheesecake Not Setting Properly
When our cheesecake remains too soft or runny after the recommended chilling time, several factors could be at play. Most recipes require at least 4 to 6 hours of refrigeration, though we recommend an overnight chill for optimal firmness and flavor development. Insufficient chilling time ranks as the primary culprit behind setting issues.
Under-whipped cream also contributes to setting problems. We need to beat our heavy cream until stiff peaks form to provide the proper structure for our cheesecake filling. Also, excess liquid in our mixture can prevent proper setting, so we should measure ingredients accurately and ensure our cream cheese reaches room temperature before mixing.
Achieving the Perfect Filling Texture
Our filling should appear thick and fluffy when properly prepared. Cold cream cheese creates lumps and prevents smooth blending, so we always bring it to room temperature before beginning. Beat the cream cheese with sugar and vanilla until the mixture becomes completely smooth and free of lumps.
Room temperature ingredients blend more easily and create a smoother consistency. We should remove our cream cheese from the refrigerator about 30 minutes before starting our recipe to ensure optimal texture.
Preventing Crust Problems
A crumbly or weak crust often results from insufficient butter or inadequate pressing. We need enough melted butter to properly bind our Oreo crumbs together. Press the mixture firmly into our pan bottom and up the sides to create a solid foundation for our cheesecake.
Using a measuring cup or flat-bottomed glass helps us achieve even compression across the entire crust surface. This technique ensures our crust holds together when we slice and serve our cheesecake.
Managing Whipped Cream Toppings
Runny or melting whipped cream toppings can detract from our presentation. We should stabilize our whipped cream and add it immediately before serving to maintain its structure. Keep our completed cheesecake chilled until the moment we’re ready to serve it.
Fresh decorative elements like halved Oreos and chocolate shavings should be added just before presentation to prevent them from becoming soggy or losing their visual appeal.
| Problem | Solution |
|---|---|
| Not setting | Chill longer (4–6 hours minimum, or overnight) |
| Filling too soft | Whip cream thoroughly, use room temp cream cheese |
| Lumpy filling | Beat cream cheese until smooth, then add other ingredients |
| Weak crust | Press crumbs firmly, use enough butter |
| Runny topping | Stabilize whipped cream, serve immediately after decorating |
Temperature control plays a crucial role in our cheesecake’s success. We should maintain consistent refrigeration throughout the chilling process and avoid frequent temperature changes that can affect the setting process. These troubleshooting strategies help us create a perfectly textured no bake Oreo cheesecake that impresses every time.
Conclusion
We’ve shown you everything you need to create this show-stopping no-bake Oreo cheesecake that’ll have your guests asking for the recipe. With our detailed guidance on ingredients equipment and troubleshooting you’re equipped to tackle any challenges that might arise.
This dessert proves that impressive results don’t always require turning on your oven. The combination of creamy filling crunchy Oreos and endless customization possibilities makes this recipe a true winner for any occasion.
Now it’s time to gather your ingredients and start creating this delicious treat. Your taste buds (and anyone lucky enough to share this with you) will thank you for choosing such a crowd-pleasing dessert that’s as easy as it is indulgent.
Frequently Asked Questions
How long does it take to make a no-bake Oreo cheesecake?
The active preparation time is only 20 minutes. However, the cheesecake requires at least 4 hours of chilling time to set properly, with 6 hours or overnight being optimal for the best texture and stability.
What equipment do I need to make this cheesecake?
Essential tools include a food processor for crushing Oreos, mixing bowls, an electric mixer or whisk, a spatula, a pie pan with removable bottom, and measuring cups and spoons. Having all equipment ready beforehand ensures smooth preparation.
How many Oreo cookies do I need for this recipe?
You’ll need 36 Oreo cookies total. These are divided between the crust (finely crushed) and the filling (roughly chopped), plus additional cookies for topping decoration.
Why isn’t my no-bake cheesecake setting properly?
Common causes include insufficient chilling time, warm ingredients, or incorrect proportions. Ensure your cream cheese is properly softened, whip cream to stiff peaks, and chill for at least 4-6 hours in a covered container.
How should I store the no-bake Oreo cheesecake?
Cover the cheesecake tightly with plastic wrap to prevent odor absorption and drying out. Store in the refrigerator for up to 5 days. The tight covering is crucial for maintaining freshness and preventing the cheesecake from absorbing other flavors.
Can I customize this Oreo cheesecake recipe?
Yes! The article suggests various recipe variations and creative garnishing options. You can experiment with different cookie types, add chocolate shavings, or pair with complementary beverages to enhance the rich flavors and elevate your dessert experience.


