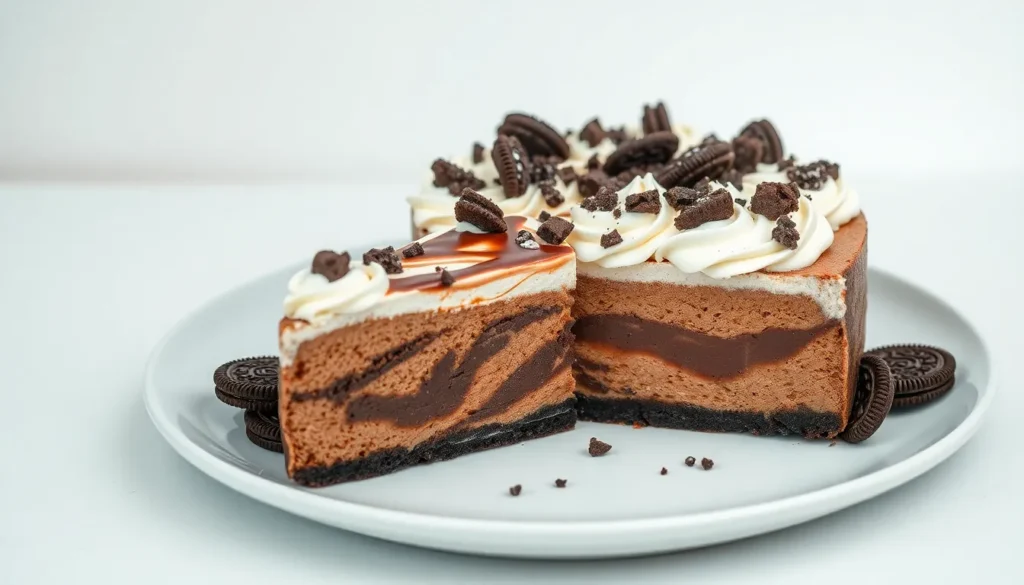
We’ve all been there – standing in front of the dessert aisle wondering how to combine our favorite treats into one show-stopping creation. That’s exactly how our Nutella Oreo Cheesecake was born. This decadent dessert brings together the rich hazelnut-chocolate bliss of Nutella with the beloved crunch of Oreo cookies in a velvety smooth cheesecake base.
What makes this recipe truly special is how effortlessly it transforms simple ingredients into bakery-quality elegance. The crushed Oreo crust provides the perfect foundation while swirls of melted Nutella create stunning marbled patterns throughout each creamy slice.
Whether you’re planning a birthday celebration or simply treating yourself to something extraordinary this no-bake wonder delivers maximum impact with minimal fuss. We guarantee this will become your go-to recipe when you want to impress guests or satisfy those intense chocolate cravings that only the perfect combination of flavors can cure.
Ingredients
We carefully select each ingredient to create the perfect balance of flavors and textures in our Nutella Oreo cheesecake. Our recipe requires ingredients for three distinct components that work together harmoniously.
For the Oreo Crust
- 24 Oreo cookies (cream filling included)
- 4 tablespoons unsalted butter, melted
- 1 tablespoon granulated sugar
- Pinch of salt
For the Nutella Cheesecake Filling
- 24 oz cream cheese, softened to room temperature
- 3/4 cup granulated sugar
- 1/2 cup Nutella, warmed slightly for easier mixing
- 3 large eggs, room temperature
- 1/2 cup sour cream
- 1 teaspoon vanilla extract
- 1/4 cup heavy cream
- 2 tablespoons all purpose flour
For the Toppings
- 1/4 cup Nutella, melted for drizzling
- 6 Oreo cookies, roughly chopped
- 1/2 cup heavy cream, whipped to soft peaks
- 2 tablespoons powdered sugar
- Whole hazelnuts for garnish (optional)
Equipment Needed
 1")
Creating our Nutella Oreo cheesecake requires exact tools that ensure smooth preparation and professional results. We recommend gathering all equipment before starting to streamline the baking process.
Electric Mixer serves as our most essential tool for achieving the perfect cheesecake texture. This appliance whips cream cheese to silky smoothness and creates fluffy whipped cream toppings without lumps or air pockets.
Springform Pan makes removing our finished cheesecake effortless and prevents cracking. The removable bottom and adjustable sides allow us to present our dessert beautifully without damaging the delicate texture.
Food Processor or Alternative Crushing Method transforms whole Oreos into fine crumbs for our crust. Those without a food processor can place cookies in a sealed ziplock bag and crush them with a rolling pin for equally effective results.
Rubber Spatula enables gentle folding techniques that preserve the airy texture of our cheesecake filling. This flexible tool reaches every corner of the mixing bowl and prevents overmixing that could deflate our carefully whipped ingredients.
Measuring Cups or Kitchen Scale ensures precise ingredient ratios that deliver consistent results every time. Accurate measurements prove crucial for achieving the perfect balance between Nutella richness and cream cheese tanginess.
| Equipment | Primary Function | Alternative Option |
|---|---|---|
| Electric Mixer | Whipping cream and mixing batter | Hand whisk (requires more effort) |
| Springform Pan | Easy cheesecake removal | Regular cake pan with parchment |
| Food Processor | Crushing Oreos | Ziplock bag and rolling pin |
| Rubber Spatula | Gentle ingredient folding | Large spoon |
| Measuring Tools | Precise measurements | Standard measuring cups |
Having these tools ready transforms our baking experience from challenging to enjoyable while guaranteeing bakery quality results in our home kitchen.
Instructions
 2")
Follow these straightforward steps to create our decadent Nutella Oreo cheesecake. We’ll guide you through each stage to ensure perfect results every time.
Prep the Oreo Crust
Place 24 Oreo cookies with their filling into a food processor and pulse until you achieve fine crumbs. Alternatively, seal the cookies in a Ziplock bag and crush them with a rolling pin for consistent texture. Mix the cookie crumbs with 4 tablespoons of melted butter and 2 tablespoons of granulated sugar in a medium bowl until evenly moistened.
Press this mixture firmly into the bottom and up the sides of a greased 9-inch springform pan using the back of a measuring cup. Ensure the crust is evenly distributed and tightly packed. Preheat your oven to 350°F (175°C) and bake the crust for 12-14 minutes until set. Remove from the oven and let it cool completely while preparing the filling.
Make the Nutella Cheesecake Filling
Beat 24 ounces of softened cream cheese in a large bowl using an electric mixer until smooth and completely lump-free. Add 1 cup of powdered sugar and 1 teaspoon of vanilla extract, mixing until well combined. Scrape down the sides of the bowl to ensure even mixing.
Warm ¾ cup of Nutella slightly in the microwave for 15-20 seconds to make it easier to incorporate. Add the warmed Nutella to the cream cheese mixture and beat until smooth. Add 3 large eggs one at a time, beating just until incorporated after each addition. Avoid overmixing to prevent cracks during baking.
Assemble the Cheesecake
Pour the Nutella cheesecake filling over the cooled Oreo crust, spreading it evenly with a rubber spatula. Tap the pan gently on the counter to release any air bubbles that may have formed. Smooth the top surface with the spatula for a professional appearance.
Reserve 2 tablespoons of the filling if you want to create decorative swirls on top. Drop small dollops of the reserved filling across the surface and use a knife to create elegant swirl patterns.
Bake the Cheesecake
Reduce the oven temperature to 300°F (150°C) for gentler baking. Wrap the bottom of your springform pan with aluminum foil to prevent water from seeping in. Place the pan in a larger roasting pan and add hot water halfway up the sides to create a water bath.
Bake for 55-65 minutes until the center is just set but still slightly jiggly when gently shaken. The edges should be firm and lightly golden. Turn off the oven and crack the door open, allowing the cheesecake to cool gradually for 1 hour.
Cool and Chill
Remove the cheesecake from the water bath and place it on a wire rack to cool to room temperature. This gradual cooling process prevents cracking and ensures the perfect texture. Once completely cool, cover with plastic wrap and refrigerate for at least 4 hours or overnight.
The chilling time allows the filling to firm up properly and makes slicing much easier. For best results, we recommend chilling overnight for the ideal consistency.
Add Final Toppings
Before serving, carefully remove the sides of the springform pan by running a knife around the edges first. Transfer the cheesecake to your serving plate using a large spatula or cake lifter.
Top with dollops of whipped cream around the perimeter and sprinkle with chopped Oreo cookies for extra crunch. Drizzle additional Nutella over the surface and add chocolate shavings for an elegant finishing touch. Slice with a sharp knife wiped clean between each cut for perfect presentation.
Make-Ahead Instructions
 3")
Planning ahead transforms this indulgent dessert into a stress-free entertaining option. We can prepare our Nutella Oreo cheesecake several days before serving, making it perfect for special occasions and busy schedules.
Baked Version Storage Timeline
Our baked Nutella Oreo cheesecake stores beautifully for extended periods. We recommend preparing the cheesecake up to 5 days in advance for optimal freshness and flavor development. Store the completed cheesecake in an airtight container in the refrigerator to maintain its creamy texture and prevent any unwanted flavors from affecting the taste.
| Storage Method | Timeline | Temperature |
|---|---|---|
| Baked Cheesecake | Up to 5 days | Refrigerated |
| No-Bake Version | 2-3 days | Refrigerated |
No-Bake Version Preparation
The no-bake variation offers excellent make-ahead convenience with a shorter storage window. We can prepare this version 2 to 3 days before serving while maintaining peak quality. Store the assembled cheesecake in the refrigerator throughout this period to ensure the layers remain firm and the flavors meld perfectly.
Optimal Serving Preparation
Both versions benefit from advance preparation as the flavors intensify during storage. Remove the cheesecake from the refrigerator 15 to 20 minutes before serving to achieve the ideal texture. This brief warming period allows the creamy filling to soften slightly while maintaining structural integrity.
Final Touches Before Serving
Reserve any final decorative elements like fresh whipped cream dollops or additional Nutella drizzle until just before serving. We can prepare these garnishes earlier in the day and apply them when ready to present our masterpiece to guests.
Storage Tips
 4")
Proper storage ensures our Nutella Oreo cheesecake maintains its rich flavor and creamy texture for days after preparation. We recommend following exact guidelines based on whether you’ve made a baked or no-bake version.
Refrigeration Storage
Baked cheesecake stays fresh when stored in an airtight container in the refrigerator for up to 7 days. We find that covering the cheesecake completely prevents it from absorbing odors from other foods in the fridge.
No-bake cheesecake maintains its best quality for 3-4 days when kept in an airtight container in the refrigerator. The shorter storage time reflects the different texture and ingredients used in no-bake versions.
| Cheesecake Type | Refrigerator Storage | Container Type |
|---|---|---|
| Baked | Up to 7 days | Airtight container |
| No-Bake | 3-4 days | Airtight container |
Freezing Options
Freezing extends the life of our cheesecake significantly when done properly. Baked cheesecake can be frozen whole for up to 3 months or in individual slices for up to 2 months.
We wrap the cooled cheesecake in plastic wrap followed by aluminum foil before freezing. This double wrapping prevents freezer burn and maintains the dessert’s quality.
No-bake cheesecake slices freeze well for 2-3 months when properly wrapped. We thaw frozen cheesecake overnight in the refrigerator before serving for the best texture.
| Storage Method | Baked Cheesecake | No-Bake Cheesecake |
|---|---|---|
| Whole frozen | 3 months | Not recommended |
| Slices frozen | 2 months | 2-3 months |
| Thawing time | Overnight in fridge | Overnight in fridge |
Serving Preparation
We wait to add final toppings such as Nutella drizzle or whipped cream until ready to serve. These decorative elements maintain their appearance and texture better when applied fresh rather than stored with the cheesecake.
Always keep the cheesecake covered during storage to preserve its moisture and prevent contamination from other refrigerator odors.
Serving Suggestions
 5")
We recommend serving our Nutella Oreo cheesecake chilled directly from the refrigerator for the best texture and flavor experience. The chilled temperature allows the Nutella filling to maintain its creamy consistency while providing a refreshing contrast to the rich chocolate flavors.
Elegant Presentation Options
For special occasions, we suggest garnishing each slice with a dollop of whipped cream and an additional drizzle of warmed Nutella. This luxurious presentation elevates the dessert’s visual appeal and adds an extra layer of indulgence that guests will appreciate.
Mini chocolate chips scattered around the plate create a delightful textural contrast and enhance the overall chocolate experience. We often add a few whole Oreo cookies as decorative elements, breaking them into artistic pieces that complement the dessert’s theme.
Individual Serving Variations
Creating parfait jars offers an impressive alternative presentation method that works beautifully for dinner parties or special events. We layer Oreo crumbs at the bottom, followed by the Nutella cheesecake mixture, and top with whipped cream and chopped chocolate for a visually stunning individual dessert.
These single serving presentations allow guests to enjoy their own portion while maintaining the elegant appearance throughout the meal. The clear jars showcase the beautiful layers and make portion control effortless.
Temperature and Timing Considerations
| Serving Method | Optimal Temperature | Best Timing |
|---|---|---|
| Baked Version | Chilled (35-40°F) | 15-20 minutes after removing from fridge |
| No-bake Version | Chilled (35-40°F) | Serve immediately when removed |
| Parfait Jars | Chilled (35-40°F) | 10-15 minutes for slight softening |
We find that allowing the cheesecake to sit at room temperature for 15 to 20 minutes before serving creates the perfect texture balance. This brief warming period makes slicing cleaner and allows the flavors to become more pronounced.
Complementary Accompaniments
Fresh berries provide a tart contrast that balances the rich Nutella and Oreo flavors beautifully. Strawberries and raspberries work particularly well, adding both color and a refreshing element to each bite.
A light dusting of cocoa powder around the plate adds professional finishing touches that restaurant quality presentations demand. We also recommend serving alongside a cup of strong coffee or espresso to complement the chocolate and hazelnut notes in the cheesecake.
Conclusion
We’ve shown you how to create a show-stopping Nutella Oreo cheesecake that’s guaranteed to become your go-to dessert for special occasions. This recipe combines the best of both worlds – the rich creaminess of cheesecake with the irresistible flavors of Nutella and Oreos.
The beauty of this dessert lies in its versatility and convenience. Whether you choose the baked or no-bake version you can prepare it days ahead and customize the presentation to match any celebration.
With proper storage techniques and our serving suggestions your homemade cheesecake will rival any bakery creation. The combination of make-ahead convenience and impressive results makes this recipe a true winner for both novice and experienced bakers.
We’re confident this Nutella Oreo cheesecake will become a treasured addition to your dessert repertoire delivering consistent wow-factor results every single time.
Frequently Asked Questions
How long can I store Nutella Oreo cheesecake in the refrigerator?
Baked Nutella Oreo cheesecake can be stored in an airtight container in the refrigerator for up to 7 days. No-bake versions should be consumed within 3 to 4 days for optimal freshness and texture. Always keep the cheesecake covered to maintain moisture and prevent absorption of other refrigerator odors.
Can I freeze Nutella Oreo cheesecake for later?
Yes, you can freeze Nutella Oreo cheesecake. Baked cheesecake can be frozen whole for up to 3 months or in individual slices for up to 2 months. No-bake cheesecake slices freeze well for 2 to 3 months. Wrap properly to prevent freezer burn and maintain quality.
What equipment do I need to make Nutella Oreo cheesecake?
Essential equipment includes an electric mixer for smooth texture, a springform pan for easy removal, a food processor for crushing Oreos, a rubber spatula for gentle folding, and precise measuring tools. These tools ensure professional bakery-quality results and streamline the preparation process.
How far in advance can I make this cheesecake?
Nutella Oreo cheesecake is perfect for make-ahead preparation. You can prepare it several days in advance, making it ideal for special occasions and busy schedules. However, save final decorative elements like whipped cream and Nutella drizzle until just before serving for the best presentation.
What’s the best way to serve Nutella Oreo cheesecake?
Serve the cheesecake chilled for optimal texture and flavor. Remove from refrigerator 15-20 minutes before serving. Garnish with whipped cream, warmed Nutella drizzle, mini chocolate chips, and whole Oreo cookies. Consider serving with coffee or espresso to complement the rich chocolate-hazelnut flavors.
Can I make individual servings instead of a whole cheesecake?
Absolutely! Parfait jars make visually stunning individual servings. Layer Oreo crumbs and cheesecake mixture in clear jars to showcase the beautiful layers. This presentation option is perfect for parties and allows for easy portion control while maintaining the dessert’s elegant appeal.


