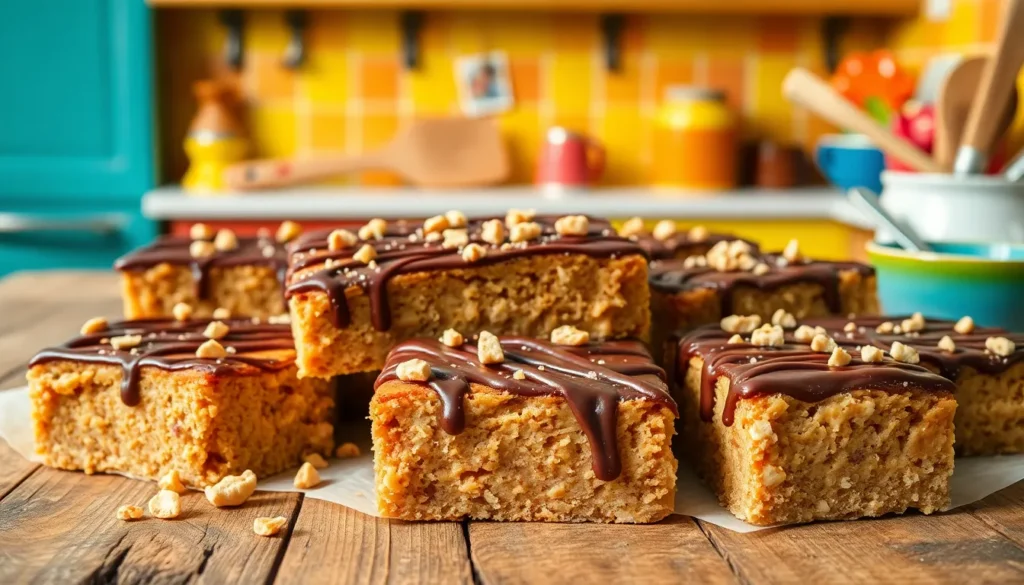
We’ve discovered the perfect solution for your peanut butter cravings – these irresistible peanut butter bars that deliver pure comfort in every bite. These treats combine the rich, nutty flavor of creamy peanut butter with a perfectly chewy texture that’ll have you reaching for seconds before you’ve finished your first piece.
What makes these bars truly special is their incredible versatility and foolproof preparation. Whether you’re planning a bake sale, need a quick dessert for unexpected guests, or simply want to satisfy your sweet tooth, these peanut butter bars deliver every single time. They’re also incredibly kid-friendly, making them the ideal treat for school lunches or after-school snacks.
The best part? You probably already have most of the ingredients sitting in your pantry right now. With just a few simple steps and minimal prep time, you’ll have a batch of golden, perfectly sweet bars that rival any bakery creation. Let’s jump into this foolproof recipe that’s about to become your new go-to dessert.
Ingredients
We’ve carefully selected ingredients that create the perfect balance of creamy peanut butter richness and decadent chocolate topping. These simple pantry staples combine to deliver bars with incredible depth of flavor.
For the Peanut Butter Base
- 1 cup creamy peanut butter
- 1/2 cup unsalted butter, melted
- 1 cup light brown sugar, packed
- 1 large egg
- 1 teaspoon vanilla extract
- 1 1/4 cups all-purpose flour
- 1/2 teaspoon salt
- 1/4 teaspoon baking powder
For the Chocolate Topping
- 1 cup semi-sweet chocolate chips
- 1/4 cup creamy peanut butter
- 2 tablespoons unsalted butter
- 1/4 cup chopped peanuts (optional)


Equipment Needed
 1")
Having the right tools makes creating these delectable peanut butter bars effortless and ensures professional results every time. We recommend gathering these essential items before starting your baking adventure.
Baking Pan serves as the foundation for your bars. An 8-inch or 9-inch square pan works perfectly for achieving the ideal thickness and texture. We prefer using a square pan because it creates uniform bars that cut cleanly and look professional.
Parchment Paper or Non-Stick Foil becomes your best friend for easy removal. Lining your baking pan prevents sticking and allows you to lift the entire batch out for effortless cutting. This step saves time during cleanup and ensures your bars maintain their perfect shape.
Microwave-Safe Bowls are essential for melting chocolate smoothly. We use these for creating the silky chocolate topping that makes these bars irresistible. Multiple bowls allow you to melt different components separately for better control over texture.
Offset Spatula transforms your chocolate layer from good to exceptional. This tool spreads the melted chocolate evenly across the peanut butter base, creating that professional bakery appearance. The angled blade reaches every corner without disturbing the base layer.
Food Processor offers an optional but valuable upgrade for mixing ingredients. While not strictly necessary, this tool creates a more uniform texture and saves considerable mixing time. Hand mixing works perfectly fine if you prefer the traditional approach.
Each piece of equipment contributes to the success of your peanut butter bars, ensuring consistent results that will impress family and friends alike.


Instructions
 2")
Let’s create these irresistible peanut butter bars by following our step-by-step process. We’ll guide you through each stage to ensure perfect results every time.
Prep the Pan
Line your 8-inch or 9-inch square baking pan with parchment paper, leaving some overhang for easy removal. Lightly grease the parchment paper with butter or cooking spray to prevent any sticking. This preparation step ensures we can lift our finished bars out cleanly for neat cutting.
Make the Peanut Butter Base
Preheat your oven to 350°F (175°C). Cream together the unsalted butter and light brown sugar in a large mixing bowl until light and fluffy, about 2-3 minutes with an electric mixer. Beat in the egg and vanilla extract until well combined. Add the creamy peanut butter and mix until smooth.
Combine the all-purpose flour, salt, and baking powder in a separate bowl. Gradually add the dry ingredients to the wet mixture, mixing until just combined. We want to avoid overmixing to maintain our bars’ tender texture.
Press Into Pan
Transfer the peanut butter mixture to your prepared pan. Press the mixture evenly into the bottom using clean hands or an offset spatula. Make sure the surface is level and reaches all corners for uniform thickness. Bake for 20-25 minutes until the edges are lightly golden and the center appears set.
Prepare the Chocolate Topping
While the base cools, combine the semi-sweet chocolate chips and unsalted butter in a microwave-safe bowl. Microwave in 30-second intervals, stirring between each interval, until smooth and completely melted. Stir in the creamy peanut butter until the mixture is glossy and well combined.
Add the Chocolate Layer
Pour the chocolate mixture over the cooled peanut butter base. Use an offset spatula to spread the topping evenly across the entire surface. Sprinkle chopped peanuts over the chocolate layer if desired for added crunch and visual appeal.
Chill and Set
Refrigerate the bars for at least 2 hours or until the chocolate topping is completely firm. Once set, use the parchment paper overhang to lift the bars from the pan. Cut into squares using a sharp knife, wiping the blade clean between cuts for the neatest presentation.


Directions for Cutting and Serving
 3")
Cutting Techniques
We recommend cutting peanut butter bars before the chocolate topping fully sets to achieve the cleanest results. Allow the bars to come to room temperature if they’ve been chilled completely, as this helps the chocolate soften slightly and prevents fracturing during cutting.
Sharp tools make all the difference when slicing through layers of chocolate and peanut butter. We use a heavy-bladed knife for the most precise cuts, wiping the blade clean between each slice to avoid smearing the chocolate and peanut butter layers together.
Warm knife technique works exceptionally well for stubborn chocolate toppings. Dip a sharp knife in hot water and wipe it dry before each cut to glide through the bars smoothly without dragging or cracking the surface.
Serving Recommendations
Room temperature serves as the ideal starting point for enjoying these bars. We let them sit for a few minutes before serving to prevent the chocolate from cracking when bitten, creating a more pleasant eating experience.
Chilled bars maintain the best consistency and hold their shape beautifully. Store them in the refrigerator if they’ll be sitting out for extended periods, as this preserves the perfect texture balance between the creamy base and firm chocolate topping.
Traditional square shapes work best for these peanut butter bars, and we typically cut them into portions based on desired serving sizes. Here’s our recommended cutting guide:
| Serving Size | Number of Squares | Approximate Size |
|---|---|---|
| Large portions | 12 squares | 2.5 x 2.5 inches |
| Medium portions | 16 squares | 2 x 2 inches |
| Small portions | 24 squares | 1.5 x 1.5 inches |
These cutting and serving methods ensure each bar maintains its structural integrity while delivering the perfect bite of creamy peanut butter and rich chocolate in every piece.


Storage Instructions
 4")
After you’ve enjoyed cutting these delicious peanut butter bars, proper storage becomes essential to maintain their fresh taste and perfect texture. We recommend several storage methods depending on how long you plan to keep them and your preferred serving temperature.
Room Temperature Storage
For short-term storage, we can keep our peanut butter bars at room temperature for up to one week. Place them in an airtight container to prevent moisture from affecting the chocolate topping and peanut butter base. This method works particularly well when you plan to serve the bars within a few days of making them.
Refrigerated Storage
Refrigeration offers our preferred storage method for maintaining optimal freshness and achieving a firmer texture. Store the bars in the refrigerator for 7 to 14 days in an airtight container. The cool temperature helps preserve the chocolate layer while keeping the peanut butter base from becoming too soft.
| Storage Method | Duration | Container Type | Best For |
|---|---|---|---|
| Room Temperature | Up to 7 days | Airtight container | Quick consumption |
| Refrigerated | 7-14 days | Airtight container | Firm texture preference |
| Frozen | Up to 3 months | Freezer-safe bags | Long-term storage |
Freezer Storage
We can extend the shelf life significantly by freezing our peanut butter bars for up to three months. First, chill the bars in the refrigerator before preparing them for the freezer. Wrap each bar individually in plastic wrap or place parchment paper between layers to prevent sticking. Transfer the wrapped bars to freezer-safe bags for optimal protection against freezer burn.
Thawing and Serving Tips
When we’re ready to enjoy frozen bars, thaw them overnight in the refrigerator for best results. This gradual thawing process maintains the texture integrity of both the peanut butter base and chocolate topping. Keep in mind that freezing may slightly affect the quality of the chocolate layer, though the bars will still taste delicious.
Always use airtight containers regardless of your chosen storage method to prevent other flavors from affecting our carefully crafted peanut butter bars. Proper storage ensures every bite delivers the same rich peanut butter flavor and satisfying texture we worked so hard to achieve.
Make-Ahead Tips
 5")
Preparing peanut butter bars ahead of time transforms them into the perfect solution for busy schedules and planned gatherings. We recommend making the entire batch up to a week before your event since these bars actually improve in flavor as they rest.
No-Bake Preparation Timeline
No-bake peanut butter bars require at least a few hours of chilling time to set properly, though overnight refrigeration delivers the best results. We can prepare these treats up to seven days in advance when stored in an airtight container in the refrigerator. The extended chilling time allows the flavors to meld beautifully while achieving the perfect firm texture.
Baked Version Advanced Prep
Cookie dough for baked peanut butter bars can be prepared a full day ahead and refrigerated until ready to bake. We wrap the prepared dough tightly in plastic wrap or store it in an airtight container to prevent drying out. This advance preparation saves valuable time on the day we plan to serve them.
Optimal Timing Strategy
| Preparation Method | Advance Time | Storage Location | Benefits |
|---|---|---|---|
| No-Bake Bars | Up to 7 days | Refrigerator | Enhanced flavor development |
| Baked Bar Dough | 1 day | Refrigerator | Time-saving convenience |
| Complete Bars | Up to 10 days | Refrigerator | Maximum freshness |
Pre-Cutting Advantages
We find that refrigerating or freezing the bars before cutting ensures they maintain their shape perfectly. This technique prevents the chocolate topping from cracking and creates professional-looking squares. Allow frozen bars to reach room temperature before serving to achieve the ideal texture balance between the creamy peanut butter base and rich chocolate topping.
Planning ahead with these make-ahead strategies ensures our peanut butter bars deliver consistent results every time while reducing day-of preparation stress.
Variations and Substitutions
 6")
We love how adaptable peanut butter bars can be to suit different tastes and dietary needs. These simple swaps and additions allow us to create endless flavor combinations while maintaining the beloved texture and richness of our classic recipe.
Different Chocolate Options
Our chocolate topping offers incredible versatility depending on your sweetness preferences. Dark chocolate creates a sophisticated balance with its slightly bitter notes complementing the sweet peanut butter base perfectly. Semi-sweet chocolate delivers that classic flavor combination most people expect from peanut butter bars. Milk chocolate appeals to those who prefer a sweeter more mellow chocolate experience.
| Chocolate Type | Sweetness Level | Best For |
|---|---|---|
| Dark Chocolate | Low to Medium | Adult palates, sophisticated flavor |
| Semi-Sweet Chocolate | Medium | Classic peanut butter bar taste |
| Milk Chocolate | High | Kid-friendly, sweeter preference |
We can enhance our chocolate topping by melting it with additional peanut butter for an extra rich and creamy finish. Some recipes benefit from using chocolate in buttercream form which creates a more luxurious texture and appearance.
Add-In Ideas
Chopped nuts transform our bars into a more substantial treat with added crunch and protein. Almonds provide a subtle nutty flavor while walnuts offer earthiness that pairs beautifully with peanut butter. Sesame seeds bring an unexpected textural element and slight nuttiness without overwhelming the primary flavors.
Dried fruits like cranberries introduce bursts of tartness that cut through the rich peanut butter base. Raisins add natural sweetness and chewy texture that many find irresistible. Shredded coconut creates tropical notes while contributing to the overall texture profile.
Spices elevate our bars from simple to sophisticated with minimal effort. Cinnamon adds warmth and depth that complements both peanut butter and chocolate beautifully. Vanilla extract enhances the existing flavors without competing for attention. These additions allow us to create signature variations that reflect our personal taste preferences.


Troubleshooting Tips
 7")
Even experienced bakers occasionally encounter challenges when making peanut butter bars. We’ve compiled the most common issues and their proven answers to help you achieve perfect results every time.
Common Issues and Answers
Bars Turn Out Too Gooey or Mushy
When our bars remain too soft even though following the recipe, several factors could be at play. The mixture might have been too warm when we placed it in the refrigerator, preventing proper setting. Insufficient chilling time or inadequate compacting of the mixture also contributes to this problem.
We recommend letting the mixture cool to room temperature before chilling. Press the mixture firmly into the pan to compact it properly. Refrigerate for several hours or overnight, and if the bars remain soft, try freezing them for 30 to 60 minutes.
Base Layer Becomes Crumbly
A crumbly base typically results from too much graham cracker crumb or using overly dry peanut butter. We can remedy this by adding a little more peanut butter or melted butter to moisten the mixture. Measuring ingredients carefully and mixing thoroughly ensures a firm, moist texture that holds together beautifully.
Bars Are Difficult to Slice
Hard chocolate layers or overly cold bars make slicing challenging. We solve this by letting bars sit at room temperature for 10 to 15 minutes before cutting. Using a warm knife dipped in hot water and wiped dry creates cleaner cuts through stubborn chocolate layers.
Mixture Appears Too Runny
Excessive butter or insufficient powdered sugar creates a runny consistency. We fix this by adding more powdered sugar in small increments until the mixture reaches the proper thickness.
Storage and Handling Tips
Proper Storage Methods
We store bars in airtight containers in the refrigerator for up to one week for optimal freshness. For longer storage, bars freeze beautifully for up to three months when we separate layers with parchment paper to prevent sticking.
Professional Techniques
Using creamy peanut butter consistently delivers the best results in our experience. We always line our pans with parchment paper or foil for effortless removal and clean slicing. Properly compacting the mixture in the pan creates a smooth, firm base that supports the chocolate topping perfectly.
| Issue | Cause | Solution |
|---|---|---|
| Gooey/mushy bars | Warm mixture, insufficient chilling | Cool mixture, compact firmly, chill or freeze |
| Crumbly base | Too much crumb, dry peanut butter | Add more peanut butter or butter |
| Hard to slice | Too cold, hard chocolate layer | Let sit at room temperature, use warm knife |
| Runny mixture | Too much butter, insufficient sugar | Add powdered sugar gradually |
Conclusion
These peanut butter bars prove that the best desserts don’t have to be complicated. With simple ingredients and straightforward techniques we’ve shared you’ll create treats that rival any bakery.
Whether you’re making them for a special occasion or just because you’re craving something sweet these bars deliver every time. The combination of creamy peanut butter and rich chocolate creates a flavor profile that’s impossible to resist.
We’re confident that once you try this recipe it’ll become a go-to favorite in your baking repertoire. Your family and friends will be asking for the recipe after just one bite!
Frequently Asked Questions
What ingredients do I need for peanut butter bars?
For the peanut butter base, you’ll need creamy peanut butter, unsalted butter, light brown sugar, an egg, vanilla extract, all-purpose flour, salt, and baking powder. The chocolate topping requires semi-sweet chocolate chips, creamy peanut butter, unsalted butter, and optional chopped peanuts. Most ingredients are likely already in your pantry.
What equipment is essential for making peanut butter bars?
You’ll need an 8-inch or 9-inch square baking pan, parchment paper or non-stick foil, microwave-safe bowls for melting chocolate, and an offset spatula for spreading. A food processor is optional but helpful for mixing. These tools ensure professional results and easy preparation.
How do I properly cut peanut butter bars?
Cut the bars before the chocolate topping fully sets for cleaner results. Use a sharp, heavy-bladed knife and warm it slightly to slice through stubborn chocolate. Allow bars to reach room temperature before cutting to prevent cracking, and cut in traditional square shapes for best structural integrity.
How should I store peanut butter bars?
Store at room temperature for up to one week in an airtight container. For optimal freshness, refrigerate for 7-14 days to achieve firmer texture. For long-term storage, freeze for up to three months with proper wrapping. Always use airtight containers to maintain rich flavor and texture.
Can I make peanut butter bars ahead of time?
Yes! No-bake bars can be made up to seven days in advance, while baked bar dough can be prepared a day ahead. Refrigerate or freeze bars before cutting to maintain shape and prevent chocolate topping from cracking. This helps reduce preparation stress for gatherings.
What variations can I make to the basic recipe?
You can use different chocolate types (dark, semi-sweet, or milk) for the topping based on sweetness preference. Add chopped nuts, dried fruits, or spices to enhance flavor and texture. These substitutions allow you to personalize the recipe while maintaining the beloved texture and richness.
Why are my peanut butter bars too gooey or crumbly?
Gooey bars usually need more cooling time before chilling, while crumbly bases may need firmer compacting or proper ingredient ratios. Ensure you’re following measurements exactly and allow adequate cooling time. Using a warm knife for cutting and proper storage methods also help achieve perfect texture.


