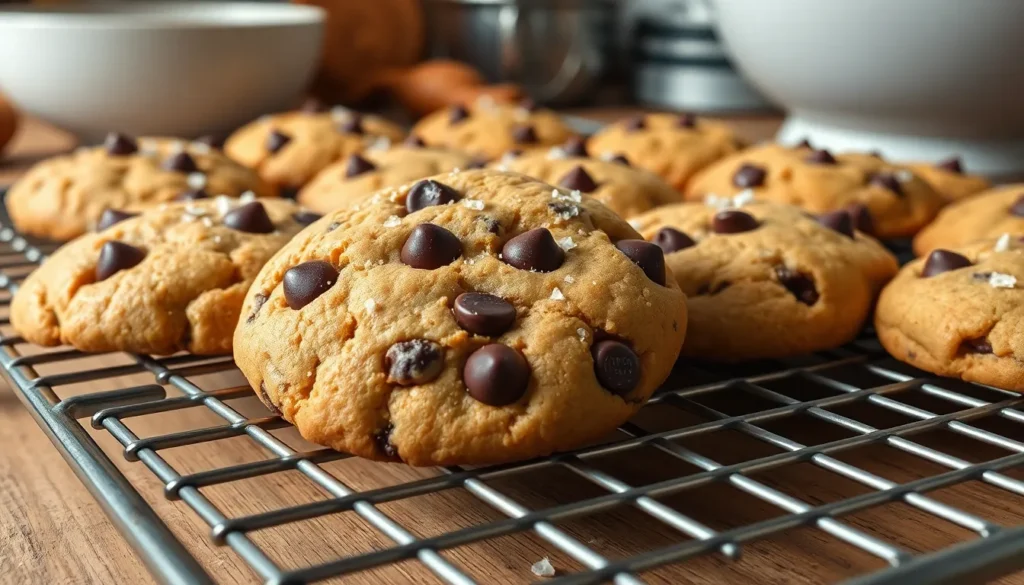
We’ve all been there – craving something sweet that combines the irresistible duo of peanut butter and chocolate. These peanut butter chocolate chip cookies deliver that perfect balance of nutty richness and chocolatey goodness in every single bite. They’re soft, chewy, and loaded with mini chocolate chips that melt beautifully against the creamy peanut butter base.
What makes these cookies truly special is their incredible texture. We’ve perfected the recipe to create cookies that stay soft and tender on the inside while developing just the right amount of chewiness around the edges. The peanut butter doesn’t just add flavor – it creates that signature dense, satisfying bite that cookie lovers crave.
Whether you’re baking for a special occasion or just treating yourself to a homemade indulgence, these cookies come together quickly with simple pantry ingredients. They’re the kind of treat that disappears fast and leaves everyone asking for the recipe.
Ingredients
We’ve carefully selected each ingredient to create the perfect balance of peanut butter richness and chocolate sweetness. These simple pantry staples combine to deliver cookies with an irresistible texture and flavor.
Dry Ingredients
- 2¼ cups all-purpose flour
- 1 teaspoon baking soda
- 1 teaspoon salt
- ½ cup granulated sugar
- ½ cup packed light brown sugar
Wet Ingredients
- 1 cup creamy peanut butter
- ½ cup unsalted butter, softened to room temperature
- 1 large egg
- 2 teaspoons vanilla extract
Mix-ins
- 1½ cups semi-sweet chocolate chips
- 2 tablespoons coarse sea salt for sprinkling (optional)
Equipment Needed
 1")
Creating perfect peanut butter chocolate chip cookies requires having the right tools on hand to ensure consistent results every time. We’ll walk you through each essential piece of equipment that makes the baking process smooth and successful.
Mixing bowls serve as our foundation for combining all ingredients effectively. Large bowls provide ample space for mixing without spillage while smaller bowls help organize ingredients before adding them to the main mixture.
Spatulas become indispensable for scraping bowl sides and folding ingredients together. These flexible tools ensure we capture every bit of our precious cookie dough while preventing waste.
A stand mixer offers an optional but valuable upgrade for creaming butter and sugar to the perfect consistency. Hand mixing works perfectly fine, though the stand mixer saves time and effort when making multiple batches.
Cookie sheets provide the baking surface where our cookies transform from dough to golden perfection. We recommend having at least two sheets to rotate batches efficiently.
Silicone baking mats prevent cookies from sticking while promoting even browning across the bottom. These reusable mats eliminate the need for parchment paper and create consistently shaped cookies.
Cooling racks allow proper air circulation around freshly baked cookies. This prevents soggy bottoms while maintaining the ideal texture we’re aiming for.
A 2-tablespoon cookie scoop ensures uniform cookie sizes that bake evenly. Consistent portioning creates professional looking results and eliminates guesswork.
Baking scales deliver precise ingredient measurements that guarantee consistent results every time. Accurate measurements make the difference between good cookies and exceptional ones.
Instructions
 2")
Follow these step-by-step instructions to create perfectly soft and chewy peanut butter chocolate chip cookies. We’ll walk you through each stage to ensure bakery-quality results every time.
Prep the Dough
Preheat your oven to 350°F (177°C) before beginning the mixing process. Position your oven rack in the center for even heat distribution. Line two cookie sheets with parchment paper or silicone baking mats to prevent sticking.
Mix the Wet Ingredients
Start by combining all wet ingredients in your large mixing bowl:
- 1 cup unsalted butter, softened
- 1 cup creamy peanut butter
- 1 cup granulated sugar
- 1 cup brown sugar
- 2 large eggs
- 2 teaspoons vanilla extract
Beat these ingredients together using a stand mixer or hand mixer on medium speed for 2-3 minutes until the mixture becomes light and fluffy. The butter should be fully incorporated with no visible lumps remaining.
Combine Dry and Wet Ingredients
In a separate bowl, whisk together the dry ingredients:
- 2 cups all-purpose flour
- 1 teaspoon baking soda
- 1 teaspoon baking powder
- 1/2 teaspoon salt
Gradually add the dry ingredient mixture to the wet ingredients, mixing on low speed until just combined. Avoid overmixing to prevent tough cookies. The dough should come together without any streaks of flour visible.
Fold in Chocolate Chips
Add 2 cups of semi-sweet chocolate chips to the dough mixture. Use a wooden spoon or rubber spatula to gently fold the chips throughout the dough, ensuring even distribution. Mix by hand rather than using the mixer to prevent breaking the chocolate chips.
Chill the Dough
Transfer the cookie dough to the refrigerator and chill for at least 1 hour. Extended chilling up to 3 days enhances the flavors and helps the cookies maintain their shape during baking. Cover the bowl with plastic wrap to prevent the dough from drying out.
Shape and Bake
Remove the chilled dough from the refrigerator and use a 2-tablespoon cookie scoop to portion the dough into uniform balls. Place the dough balls on your prepared baking sheets, spacing them 2 inches apart to allow for spreading. Bake for 14-15 minutes until the edges appear lightly golden brown while the centers remain soft. Cool the cookies on the baking sheet for 5 minutes before transferring to wire racks for complete cooling.
Directions for Perfect Results
 3")
Now that our dough is perfectly chilled and ready to bake, we focus on the crucial final steps that make the difference between good cookies and extraordinary ones. These techniques ensure our peanut butter chocolate chip cookies achieve that coveted combination of crispy edges and tender centers.
Achieving the Right Texture
Temperature control determines whether we create soft pillowy cookies or delightfully chewy treats. For soft cookies, we set our oven to 325°F (160°C) and bake for 15 minutes until the edges become firm but the centers still appear slightly underdone. The lower temperature allows gentle heat penetration that keeps moisture locked inside.
When we crave chewier cookies with more substantial bite, we increase the temperature to 350°F (180°C) and reduce baking time to 10-13 minutes depending on cookie size. This higher heat creates caramelization on the exterior while maintaining that perfect chewy interior texture we desire.
Cookie size significantly impacts baking duration. Larger 2-tablespoon portions require the full 13 minutes at 350°F, while smaller cookies finish in just 10 minutes. We watch carefully as edges turn golden brown while centers remain soft and slightly puffed.
Baking Tips for Even Cookies
Proper spacing prevents our cookies from merging into one giant cookie sheet disaster. We place each dough ball exactly 2 inches apart to allow adequate room for spreading during the baking process.
Parchment paper creates the ideal non-stick surface and promotes even browning across the bottom of each cookie. We can clean and reuse the same parchment paper for multiple batches, making our baking process more efficient and environmentally friendly.
Cooling technique affects final texture more than most home bakers realize. We let cookies rest on the hot baking sheet for exactly 3-4 minutes before transferring to wire racks. This brief resting period allows the cookies to finish cooking from residual heat while preventing them from breaking apart during transfer.
Rotating baking sheets halfway through cooking time ensures uniform browning when our oven has hot spots. We swap the position of sheets on different racks and turn them 180 degrees for consistently golden results across every single cookie.
Storage Instructions
 4")
Proper storage techniques ensure our peanut butter chocolate chip cookies maintain their delicious texture and flavor for days or even months. Let’s explore the best methods to keep these treats fresh and ready to enjoy.
Short-term Storage
We recommend storing our freshly baked cookies at room temperature in an airtight container for optimal freshness. Under these conditions our cookies will stay fresh for 3 to 7 days depending on the exact ingredients and recipe variations used.
The texture we desire determines our storage approach. For maintaining soft cookies we keep them sealed tightly in an airtight container. Adding a slice of bread to the container provides extra moisture that keeps cookies tender. When we prefer crunchy cookies we use a loose-fitting lid to prevent moisture buildup. If our cookies lose their crispness we can re-crisp them in a preheated oven for a few minutes.
| Storage Method | Duration | Best For |
|---|---|---|
| Airtight container at room temperature | 3-7 days | All cookie types |
| With bread slice | 3-7 days | Maintaining soft texture |
| Loose-fitting lid | 3-7 days | Maintaining crispy texture |
Freezing Cookie Dough
We can prepare cookie dough ahead of time by scooping it into individual balls before freezing. This method allows us to bake fresh cookies whenever we want them. After scooping the dough we place the balls in a zip-top bag or freezer-safe container.
When we’re ready to bake frozen dough we lower our oven temperature by about 25°F from the original recipe temperature. The baking time increases by a few minutes longer than usual when baking from frozen solid. Our frozen cookie dough maintains its quality for up to 3 months in the freezer.
Freezing Baked Cookies
We must cool our baked cookies completely before freezing to prevent ice crystals from forming. The initial freezing step involves arranging cookies in a single layer on a baking sheet and freezing until solid. This technique prevents the cookies from sticking together during storage.
After the cookies freeze solid we transfer them to an airtight container or freezer bag for long-term storage. Our properly frozen baked cookies maintain their quality for up to 3 months in the freezer. When we’re ready to serve them we thaw the cookies at room temperature or warm them briefly in the microwave.
| Freezing Method | Storage Duration | Thawing Method |
|---|---|---|
| Cookie dough balls | Up to 3 months | Bake at reduced temperature |
| Baked cookies | Up to 3 months | Room temperature or microwave |
Variations and Substitutions
 5")
These peanut butter chocolate chip cookies offer endless possibilities for customization. We can easily adapt our recipe to accommodate different dietary needs and flavor preferences.
Gluten-Free Option
We recommend substituting all-purpose flour with high-quality gluten-free flour blends for delicious gluten-free cookies. Rice flour, almond flour, or certified gluten-free all-purpose flour mixes work exceptionally well in this recipe. Our gluten-free flour blend must contain xanthan gum to ensure proper texture and structure in the finished cookies. We maintain the same flour measurements when making this substitution, and the results taste remarkably similar to the original recipe.
Sugar-Free Alternative
We can create sugar-free versions using popular sugar substitutes like stevia or erythritol. These alternatives replace granulated sugar using the same measurements as the original recipe. For brown sugar substitution, we combine erythritol with a pinch of molasses to achieve that distinctive brown sugar flavor profile. Our sugar-free cookies maintain excellent texture while significantly reducing the overall sugar content.
Different Chocolate Options
We offer several chocolate variations to customize flavor intensity and sweetness levels:
- Dark Chocolate Chips: We use dark chocolate chips to create deeper, richer flavor profiles with less sweetness than traditional options
- White Chocolate Chips: These chips provide creamy, sweet contrast that pairs beautifully with nutty peanut butter flavors
- Milk Chocolate Chips: We choose milk chocolate chips when we want sweeter, creamier taste experiences
Our baking techniques remain consistent regardless of chocolate choice. We can also experiment with different peanut butter types – creamy peanut butter creates smoother textures while crunchy peanut butter adds delightful textural contrast. Baking times may require slight adjustments at 350°F for 8-12 minutes depending on our oven calibration and cookie size preferences. We always allow our cookies to cool completely on wire racks for optimal texture retention.
Troubleshooting Common Issues
 6")
Even experienced bakers encounter challenges when making peanut butter chocolate chip cookies. We’ll walk you through the most common problems and provide proven answers to ensure perfect results every time.
Cookies Spreading Too Much
Temperature control plays the most critical role in preventing excessive spreading. We recommend chilling your dough for at least an hour before baking to maintain structural integrity during the baking process. Room temperature or warm dough lacks the firmness needed to hold its shape in the oven.
Butter and sugar mixing technique significantly impacts cookie structure. Overbeating these ingredients warms the butter and reduces its ability to maintain shape during baking. We suggest creaming them just until light and fluffy without excessive mixing.
Leavening agent proportions require careful attention to prevent spreading issues. Too much baking powder or baking soda causes cookies to rise quickly then deflate and spread across the pan. Follow our recipe measurements precisely for optimal results.
Pan preparation affects cookie behavior more than many bakers realize. Excessive nonstick spray creates a slippery surface that encourages spreading. We recommend using parchment paper or silicone baking mats instead of heavy greasing.
Flattening cookies slightly before baking helps control their final shape. This technique prevents unpredictable spreading while ensuring even thickness throughout each cookie.
Cookies Too Dry or Crumbly
Mixing technique directly influences cookie texture and moisture retention. Overmixing develops gluten strands that create tough and dry cookies. We combine ingredients just until incorporated to maintain tenderness.
Ingredient ratios must balance properly to achieve the right moisture level. Too much flour or insufficient wet ingredients results in crumbly cookies that lack the desired chewy texture. Measuring ingredients accurately prevents this common issue.
Peanut butter quality affects overall cookie moisture and flavor. Using oily or old peanut butter can disrupt the moisture balance in your dough. We recommend using fresh creamy peanut butter for consistent results.
Baking time and temperature monitoring prevents moisture loss during the cooking process. Incorrect oven temperatures or excessive baking times dry out cookies and create undesirable textures. Check your cookies when edges turn golden brown while centers remain soft.
Sugar ratios influence both texture and moisture retention in finished cookies. Maintaining balanced proportions of granulated and brown sugar ensures proper moisture levels and prevents overly dry results.
Conclusion
These peanut butter chocolate chip cookies represent everything we love about homemade treats – they’re simple to make yet deliver extraordinary results. We’ve covered all the essential techniques and tips you’ll need to create cookies that rival any bakery.
Whether you’re baking for a special occasion or simply craving something sweet we’re confident this recipe will become a staple in your kitchen. The combination of creamy peanut butter and rich chocolate chips creates an irresistible flavor that keeps everyone coming back for more.
Now it’s time to preheat your oven and start baking. We guarantee these cookies will fill your home with amazing aromas and create memories that last long after the last crumb disappears.
Frequently Asked Questions
What ingredients do I need for peanut butter chocolate chip cookies?
You’ll need dry ingredients: all-purpose flour, baking soda, salt, granulated sugar, and light brown sugar. Wet ingredients include creamy peanut butter, unsalted butter, one egg, and vanilla extract. Add semi-sweet chocolate chips as mix-ins, with optional coarse sea salt for sprinkling on top.
What equipment is essential for making these cookies?
Key equipment includes mixing bowls, spatulas for folding, cookie sheets, and cooling racks. A stand mixer helps cream butter and sugar effectively. Consider using silicone baking mats, a 2-tablespoon cookie scoop for consistent sizing, and baking scales for precise measurements to achieve professional results.
What’s the ideal baking temperature for these cookies?
Bake at 350°F (177°C) for chewy cookies with golden edges. For softer cookies, reduce temperature to 325°F (160°C). The key is baking until edges are golden brown while centers remain soft. Always preheat your oven and consider rotating baking sheets for uniform results.
How long should I chill the cookie dough?
Chill the dough for at least one hour before baking. This crucial step enhances flavor development, helps cookies maintain their shape during baking, and prevents excessive spreading. Chilled dough also results in better texture with the perfect balance of crispy edges and tender centers.
How should I store these cookies to maintain freshness?
Store freshly baked cookies in an airtight container at room temperature for 3-7 days. For longer storage, freeze baked cookies for up to 3 months. You can also freeze cookie dough balls and bake them directly from frozen, adding 1-2 extra minutes to baking time.
Can I make these cookies gluten-free or sugar-free?
Yes! Substitute all-purpose flour with gluten-free flour blends using the same measurements. For sugar-free versions, replace granulated sugar with stevia or erythritol. Use a mix of erythritol and molasses to replicate brown sugar’s flavor. Baking times may need slight adjustments.
Why are my cookies spreading too much during baking?
Excessive spreading usually results from warm dough or too much butter. Always chill your dough for at least an hour before baking. Ensure proper butter-to-flour ratios and avoid overmixing. Using room temperature (not melted) butter and properly measured ingredients prevents this common issue.
How do I know when the cookies are perfectly baked?
Look for golden brown edges while the centers appear slightly underbaked and soft. Cookies continue cooking on the hot baking sheet after removal from the oven. Let them rest on the baking sheet for 2-3 minutes before transferring to cooling racks.


