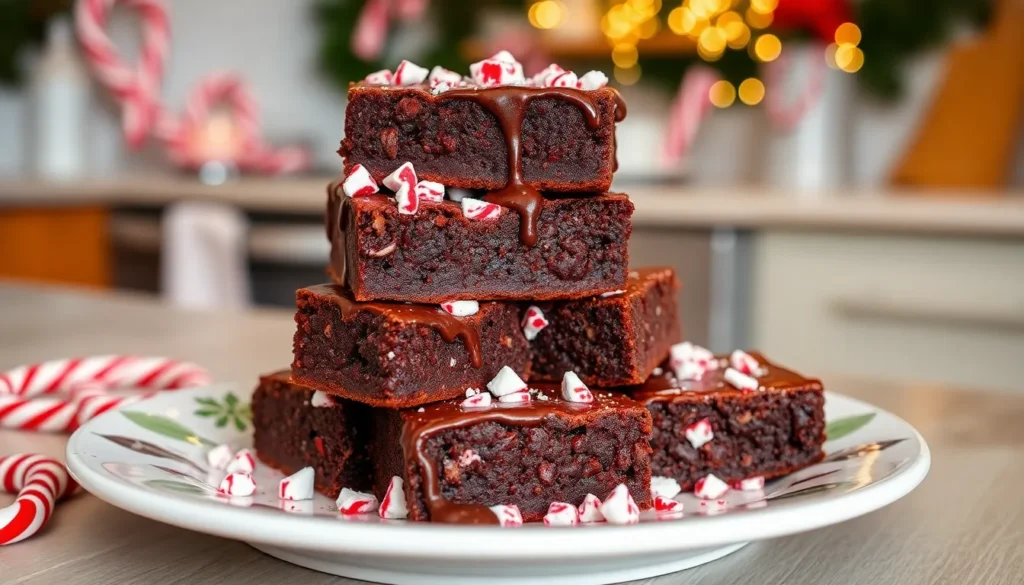
We’re about to transform your ordinary brownie game with these decadent peppermint brownies that’ll have everyone asking for the recipe. These fudgy chocolate squares get a refreshing twist with cool peppermint flavor that creates the perfect balance between rich cocoa and invigorating mint.
The best part? These aren’t just any peppermint brownies – they’re incredibly easy to make and deliver that bakery-quality taste right from your own kitchen. Whether you’re planning for the holidays or simply craving something extraordinary, these brownies hit that sweet spot between indulgent and refreshing.
We’ve perfected this recipe to ensure you get perfectly dense brownies with just the right amount of peppermint punch. Trust us when we say these will become your new go-to dessert for impressing guests or treating yourself to something special.
Ingredients
We carefully selected each ingredient to create the perfect balance of rich chocolate and refreshing peppermint flavor. Our three-layer approach ensures every bite delivers maximum indulgence.
For the Brownies
- 1 cup (2 sticks) unsalted butter
- 8 ounces dark chocolate, chopped
- 1½ cups granulated sugar
- 4 large eggs, room temperature
- 1 teaspoon vanilla extract
- 1 cup all-purpose flour
- ¼ cup unsweetened cocoa powder
- ½ teaspoon salt
For the Peppermint Layer
- 3 cups powdered sugar
- ½ cup (1 stick) unsalted butter, softened
- 3 tablespoons heavy cream
- 1 teaspoon peppermint extract
- 3 drops green food coloring (optional)
- Pinch of salt
For the Chocolate Ganache
- 6 ounces dark chocolate, finely chopped
- ½ cup heavy cream
- 2 tablespoons unsalted butter
- ¼ cup crushed peppermint candies or candy canes for topping


Equipment Needed

Creating our decadent peppermint brownies requires the right tools to achieve bakery-quality results. We’ve carefully selected equipment that ensures perfect texture and easy preparation.
Essential Baking Equipment:
- 8-inch or 9-inch square metal baking pan – Metal pans conduct heat more efficiently than glass alternatives, delivering superior brownie texture with better heat distribution
- Parchment paper – Lines the pan for effortless brownie removal without sticking or breaking
- Stand mixer or hand mixer – Ensures proper batter consistency and smooth ingredient incorporation
- Large mixing bowls – Accommodates all ingredients comfortably during preparation
- Microwave-safe bowl – Perfect for melting chocolate safely and evenly
Preparation Tools:
- Rubber spatula – Essential for spreading batter evenly and melting chocolate without scratching cookware
- Wire cooling rack – Allows proper air circulation for even cooling
- Sharp knife – Cuts clean brownie squares without crumbling
- Measuring cups and spoons – Ensures accurate ingredient proportions for consistent results
Optional but Helpful:
- Double boiler – Alternative method for melting chocolate with gentle, controlled heat
- Offset spatula – Makes spreading the peppermint layer and ganache effortless
- Kitchen scale – Provides precision measuring for professional-level consistency
We recommend gathering all equipment before starting to ensure smooth preparation from mixing to final presentation. Having everything ready streamlines the process and prevents any interruptions during critical steps like tempering chocolate or timing the baking process.


Instructions

These step by step instructions will guide you through creating three delicious layers that transform simple ingredients into an extraordinary dessert. Follow each stage carefully to achieve the perfect balance of rich chocolate and refreshing peppermint flavors.
Prep the Pan and Oven
Preheat your oven to 325°F for optimal brownie texture. Line your 8-inch or 9-inch square baking pan with parchment paper, leaving a 2-inch overhang on all sides for easy removal later. This overhang acts as handles when you lift the finished brownies from the pan. Lightly grease the parchment paper with butter or cooking spray to prevent any sticking during baking.
Make the Brownie Base
Melt the unsalted butter and dark chocolate together in a microwave-safe bowl using 30-second intervals, stirring between each heating cycle until completely smooth. Allow this mixture to cool for 5 minutes before proceeding. Whisk the cocoa powder into the melted chocolate mixture until no lumps remain and the consistency becomes silky.
Beat in the granulated sugar until well combined, then add the eggs one at a time, mixing thoroughly after each addition. Stir in the vanilla extract for enhanced flavor depth. Gradually fold in the all-purpose flour and salt until just combined, being careful not to overmix the batter. Pour the brownie batter into your prepared pan and spread evenly using a rubber spatula. Bake for 25-30 minutes or until a toothpick inserted in the center comes out with just a few moist crumbs attached.
Prepare the Peppermint Layer
Remove the brownies from the oven and let them cool completely in the pan, approximately 2 hours at room temperature. Using your stand mixer or hand mixer, cream the softened butter until light and fluffy, about 3-4 minutes on medium speed. Gradually add the powdered sugar, beating until smooth and well incorporated.
Pour in the heavy cream, peppermint extract, and a pinch of salt, then mix on low speed until combined. Add 2-3 drops of green food coloring if desired for visual appeal, mixing until the color distributes evenly. Spread this peppermint frosting evenly over the cooled brownies using an offset spatula or the back of a spoon.
Create the Chocolate Ganache
Place the finely chopped dark chocolate in a microwave-safe bowl. Heat the heavy cream in 30-second intervals until it just begins to simmer, then pour the hot cream over the chocolate. Let the mixture sit undisturbed for 2 minutes to allow the chocolate to soften completely.
Stir the ganache from the center outward using gentle circular motions until it becomes glossy and smooth. Add the unsalted butter and continue stirring until fully incorporated and the ganache reaches a spreadable consistency. The mixture should coat the back of a spoon when ready.
Assemble the Peppermint Brownies
Pour the warm ganache over the peppermint layer, using a rubber spatula to spread it evenly across the surface. Work quickly as the ganache will begin to set as it cools. Immediately sprinkle the crushed peppermint candies or candy canes over the wet ganache, pressing them gently into the surface to ensure they adhere properly.
Refrigerate the assembled brownies for at least 2 hours or until the ganache sets completely. Use the parchment paper overhang to lift the brownies from the pan, then transfer to a cutting board. Cut into squares using a sharp knife, wiping the blade clean between cuts for neat edges.


Baking Tips for Perfect Peppermint Brownies

Preparation
Setting your oven to 350°F (175°C) before starting ensures even baking throughout the brownie base. We always preheat our oven at least 15 minutes ahead to guarantee consistent temperature. Properly preparing your 8-inch square baking pan makes all the difference in achieving professional results. Butter the pan thoroughly and line it with parchment paper, leaving an overhang for easy removal once the brownies have set.
Brownie Batter
Melting chocolate and butter requires gentle heat to prevent scorching. We combine both ingredients in a microwave-safe bowl and use medium power (50% power) for about 1 minute. Whisking until smooth creates the perfect base for our brownie batter. Sugar, eggs, and the melted chocolate mixture need thorough combining to develop the dense texture we want in our finished brownies.
Baking
| Baking Factor | Specification |
|---|---|
| Temperature | 350°F (175°C) |
| Baking Time | 20-45 minutes |
| Doneness Test | Toothpick insertion |
| Power Level for Melting | 50% power for 1 minute |
Baking time varies from 20 to 45 minutes depending on your batter thickness and desired fudginess. We check doneness with a toothpick inserted into the center, looking for just a few moist crumbs rather than wet batter. Cooling the brownies completely on a wire rack prevents the peppermint layer from melting when applied.
Peppermint Frosting
Creating the pudding base requires whisking sugar, flour, salt, and milk over medium heat until the mixture thickens properly. Cooling this mixture to room temperature prevents it from melting the butter in the next step. We beat butter until light and fluffy before gradually adding the cooled pudding mixture. Peppermint extract gets beaten in last to preserve its bright flavor throughout the frosting.
Spreading the frosting evenly over cooled brownies ensures each bite contains the perfect balance of chocolate and mint flavors.
Decorations
Crushed candy canes or peppermint candies provide the festive finishing touch our brownies need. We apply these decorations immediately after spreading the frosting to ensure they adhere properly. The peppermint layer needs time to set before slicing, typically requiring a few hours at room temperature or about 30 minutes in the refrigerator for faster results.
Storage Instructions

Proper storage keeps our peppermint brownies fresh and maintains their delicious texture for days. We recommend storing these decadent treats using different methods depending on how quickly you plan to enjoy them.
Room Temperature Storage
We can store peppermint brownies in an airtight container at room temperature for optimal freshness. These brownies maintain their quality for up to 5 days when stored properly at room temperature. Parchment paper or plastic wrap prevents the brownies from sticking together and preserves their layered texture.
Refrigerator Storage
Extended storage requires refrigeration for best results. We store our peppermint brownies in an airtight container in the refrigerator for up to 1 week. Cold storage maintains the ganache layer and prevents the peppermint frosting from becoming too soft. Bringing the brownies to room temperature before serving ensures the best texture and flavor experience.
Freezing for Long-Term Storage
Freezing extends the life of our peppermint brownies significantly. We wrap individual slices or the whole batch in plastic wrap before placing them in a freezer-safe container or bag. Properly wrapped peppermint brownies can be frozen for up to 3 months without losing their quality.
| Storage Method | Duration | Container Type |
|---|---|---|
| Room Temperature | Up to 5 days | Airtight container |
| Refrigerator | Up to 1 week | Airtight container |
| Freezer | Up to 3 months | Freezer-safe container/bag |
Thawing and Reheating Tips
Thawing frozen brownies requires patience for optimal results. We thaw frozen peppermint brownies in the refrigerator overnight before serving. Short intervals in the microwave work well for reheating if desired but we avoid overheating to prevent melting the ganache layer.
The ganache must be completely set before freezing to maintain the brownie’s structure. This prevents the chocolate layer from becoming damaged during the freezing process and ensures our peppermint brownies retain their bakery-quality appearance when thawed.


Make-Ahead Tips

We understand that holiday baking can be overwhelming with all the preparations. These peppermint brownies are perfect for advance preparation since they actually improve in flavor when made ahead of time.
Baking in Advance
Our testing shows that peppermint brownies maintain optimal texture and taste when baked up to two days before serving. Allow the brownies to cool completely at room temperature after baking. We recommend transferring them to the refrigerator once they reach room temperature for best results.
Proper Cooling Techniques
Speed up the cooling process by leaving brownies at room temperature for approximately one hour. Move them to the refrigerator for 1 to 2 hours afterward. Complete cooling is essential before adding any decorative toppings or ganache layers.
Strategic Decorating Timeline
We strongly advise decorating peppermint brownies just before serving to preserve the ganache texture and candy topping freshness. Once you add the final layer store them briefly in the refrigerator to help the ganache set properly and secure candy cane pieces in place.
Storage Methods
| Storage Method | Duration | Location |
|---|---|---|
| Airtight container | Up to 5 days | Room temperature |
| Airtight container | Up to 1 week | Refrigerator |
| Wrapped and frozen | Up to 3 months | Freezer |
Store completely cooled brownies in an airtight container at room temperature for maximum convenience. Refrigerator storage extends their life up to one week while maintaining moisture and flavor integrity.
Freezing for Long-Term Storage
Wrap individual brownie squares in plastic wrap before placing them in a freezer-safe container for optimal preservation. This method maintains both flavor and texture allowing you to enjoy fresh-tasting results weeks after baking. Thaw frozen brownies overnight in the refrigerator before serving to ensure even temperature distribution throughout each piece.
Serving Suggestions

Our peppermint brownies shine as a standalone dessert that delivers rich chocolate satisfaction with every bite. The dense fudgy texture and refreshing mint flavor create a perfect balance that needs no accompaniment for pure enjoyment.
Elevate with Ice Cream: We recommend pairing these brownies with vanilla ice cream to create an impressive dessert experience. The creamy coldness contrasts beautifully against the dense chocolate base while the vanilla complements both the chocolate and peppermint flavors.
Add Luxurious Toppings: Whipped cream transforms our brownies into an elegant presentation perfect for dinner parties. Alternatively, we suggest drizzling chocolate sauce over each square to intensify the chocolate experience and add visual appeal.
Embrace Festive Garnishes: Crushed candy canes sprinkled on top provide both visual impact and an extra burst of peppermint flavor. This garnish works especially well during holiday entertaining when presentation matters most.
Temperature Considerations: We serve these brownies both chilled and at room temperature depending on the occasion. Chilled brownies offer a firmer texture that holds up well under toppings while room temperature brownies provide the ultimate fudgy experience.
Clean Presentation Tips: For the cleanest cuts and most professional presentation we chill our brownies in the refrigerator before slicing. This technique prevents the ganache from smearing and ensures each square maintains its beautiful layered appearance.


Conclusion
We’ve shared everything you need to create these show-stopping peppermint brownies that’ll have everyone asking for the recipe. The three-layer combination of fudgy brownie chocolate ganache and refreshing mint creates an irresistible treat that’s perfect for any occasion.
These brownies prove that bakery-quality desserts are absolutely achievable in your own kitchen. With our detailed instructions storage tips and serving suggestions you’re equipped to make these beauties whenever the craving strikes.
Whether you’re planning ahead for the holidays or simply want to treat yourself to something special these peppermint brownies deliver on both flavor and presentation. Your friends and family will be impressed by these professional-looking treats that taste even better than they look.
Frequently Asked Questions
How long do peppermint brownies stay fresh?
Peppermint brownies stay fresh for up to one week when stored at room temperature in an airtight container. For longer storage, they can be refrigerated for up to two weeks or frozen for up to three months. Wrap individual squares before freezing to preserve flavor and texture.
Can I make peppermint brownies ahead of time?
Yes, peppermint brownies actually improve in flavor when made 1-2 days in advance. The layers have time to meld together, creating a more cohesive taste. Store them covered at room temperature and add any final decorative touches just before serving.
What equipment do I need to make peppermint brownies?
You’ll need basic baking equipment including a 9×13 inch baking pan, mixing bowls, an electric mixer, measuring cups and spoons, and a rubber spatula. Line your pan with parchment paper for easy removal and clean cuts.
Should peppermint brownies be served chilled or at room temperature?
Peppermint brownies can be served either way depending on your preference and the occasion. Chilled brownies hold their shape better and are easier to cut cleanly, while room temperature brownies have a softer, more fudgy texture.
What are the best toppings for peppermint brownies?
These brownies are delicious on their own, but popular toppings include vanilla ice cream, whipped cream, chocolate sauce, or crushed candy canes. For holidays, festive garnishes like peppermint bark pieces add visual appeal and extra mint flavor.
How do I get clean cuts when slicing peppermint brownies?
Chill the brownies for at least 2 hours before cutting to firm up the layers. Use a sharp knife and wipe it clean between cuts. The cold temperature helps maintain the distinct layers and prevents the ganache from smearing.
Can I freeze peppermint brownies?
Yes, peppermint brownies freeze excellently for up to three months. Wrap individual squares in plastic wrap, then store in an airtight container. Thaw at room temperature for 30 minutes before serving for the best texture and flavor.


