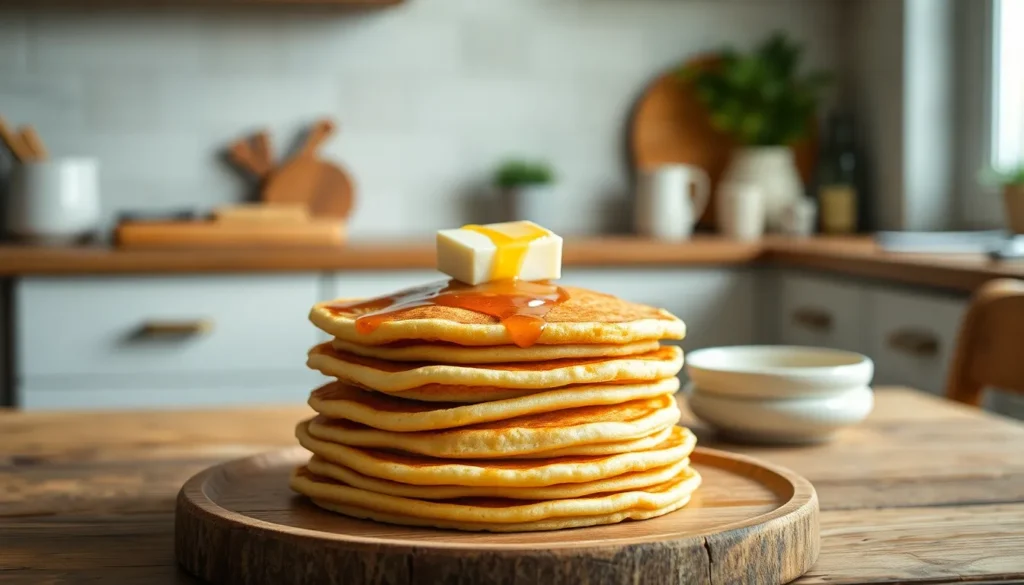
We’ve all craved those perfectly fluffy mini pancakes that melt in your mouth, and pikelets are exactly what you need. These delightful little griddle cakes originated in Britain and have become beloved worldwide for their incredible versatility and irresistible texture. Unlike regular pancakes, pikelets are smaller, thicker, and have a distinctive spongy quality that makes them absolutely addictive.
What makes pikelets truly special is their amazing adaptability – we can enjoy them sweet with honey and butter, or savory with cheese and herbs. They’re perfect for breakfast, afternoon tea, or even a quick snack that’ll satisfy any craving. The best part? They cook up in minutes and require ingredients you probably already have in your pantry.
What Are Pikelets
Pikelets are small griddle cakes that originated in Britain and have become beloved in countries like Australia and New Zealand. We often describe them as mini pancakes, though they possess distinct characteristics that set them apart from their larger counterparts.
These delightful treats measure approximately 3 to 4 inches in diameter and feature a notably thick, spongy texture. We make pikelets using a batter similar to pancakes but with a slightly different consistency that creates their signature fluffy interior and golden exterior.
The key difference between pikelets and regular pancakes lies in their size and cooking method. We cook pikelets on a griddle or heavy skillet without rings or molds, allowing the batter to naturally form small, round shapes. Their thick batter creates a cake that rises beautifully while maintaining a tender crumb.
Traditional pikelets contain simple ingredients we typically have in our pantries: flour, eggs, milk, sugar, and baking powder. We sometimes add a pinch of salt to enhance the flavor profile. The batter should be thick enough to hold its shape when dropped onto the cooking surface yet fluid enough to spread slightly.
We serve pikelets warm, often split open and topped with butter, honey, jam, or cream. Their versatility makes them suitable for both sweet and savory applications. Some regions prefer them plain, while others incorporate ingredients like sultanas or spices directly into the batter.
The cooking process requires moderate heat to ensure the pikelets cook through completely without burning the exterior. We typically cook them for 2 to 3 minutes on each side until they achieve a golden brown color and spring back when lightly touched.
Ingredients

Creating perfect pikelets requires simple pantry staples that work together to achieve their signature fluffy texture. We’ve organized these ingredients into dry and wet components for easier preparation.
Dry Ingredients
- All-purpose flour or self-rising flour – 1 cup forms the base structure
- Baking powder – 1 to 2½ teaspoons provides essential lift (adjust based on flour type)
- Granulated sugar – ¼ to 2 tablespoons adds subtle sweetness
- Salt – ¼ teaspoon enhances overall flavor
- Baking soda – ¼ teaspoon creates additional rise when needed
Wet Ingredients
- Large egg – 1 egg lightly beaten binds ingredients together (optional in some variations)
- Milk – ¾ to 1 cup creates the proper batter consistency (plant-based alternatives work well)
- Melted butter or neutral oil – 1 tablespoon adds richness and prevents sticking
Equipment Needed

We need just a few essential kitchen tools to create perfect pikelets that rival any bakery version. Most home cooks already have these items in their kitchen arsenal.
Non-stick frying pan or griddle serves as our primary cooking surface for achieving evenly golden pikelets. The non-stick coating prevents sticking and allows for easy flipping without breaking these delicate treats. We recommend using a heavy-bottomed pan that distributes heat evenly across the surface.
Mixing bowls help us combine our dry and wet ingredients efficiently. We suggest using at least two bowls to keep ingredients organized and achieve the proper batter consistency. A medium-sized bowl works perfectly for the quantities we’re preparing.
Whisk becomes essential for creating smooth batter without lumps. We rely on this tool to incorporate air into our mixture and ensure all ingredients blend seamlessly together.
Measuring cups or scoops guarantee uniform pikelet sizes and consistent cooking results. We find that using measuring tools creates professional-looking pikelets that cook at the same rate. An ice cream scoop works exceptionally well for this purpose and creates perfectly round shapes.
Paper towels help us manage the cooking surface by wiping excess butter from the pan. This prevents splotchy surfaces and ensures even browning across each pikelet.
We also benefit from having a spatula for flipping and a plate for keeping finished pikelets warm. These additional tools streamline our cooking process and help maintain the quality of our finished product.
Instructions

Now that we have our ingredients ready and tools prepared, let’s walk through the simple process of creating these delightful British treats. Following these step-by-step instructions will ensure your pikelets turn out perfectly fluffy and golden every time.
Prep the Batter
We begin by combining our dry ingredients in a large mixing bowl. Whisk together the flour, baking powder, salt, and sugar until evenly distributed. Create a well in the center of the dry ingredients and add the beaten egg, milk, and melted butter. Mix the ingredients gently using a whisk until we achieve a smooth batter consistency. The batter should be slightly thicker than regular pancake batter but still pourable. Avoid overmixing as this can result in tough pikelets rather than the light, fluffy texture we’re aiming for.
Heat the Pan
We need to preheat our non-stick frying pan or griddle over medium to medium-high heat. Test the temperature by sprinkling a few drops of water onto the surface – they should sizzle and evaporate within seconds. Lightly grease the pan with a small amount of butter or neutral oil, then use a paper towel to wipe away any excess. This creates an even cooking surface that prevents sticking while allowing the pikelets to develop their characteristic golden color. Maintain consistent medium heat throughout the cooking process to ensure even browning.
Cook the Pikelets
We pour approximately 1.5 to 2 tablespoons of batter onto the heated pan for each pikelet, spacing them about 2 inches apart. The batter will naturally spread into small round shapes measuring 3 to 4 inches in diameter. Cook the pikelets for 1.5 to 3 minutes on the first side, watching for bubbles to form on the surface. Once bubbles begin to appear and some start popping, we carefully flip each pikelet using a spatula. Cook for another 1 to 2 minutes on the second side until both sides achieve a beautiful golden brown color.
Check for Doneness
We know our pikelets are ready to flip when bubbles rise to the surface and begin popping, creating small holes that indicate the interior is cooking properly. The bottom should display a golden brown color when we lift the edge slightly with our spatula. After flipping, we look for the same golden brown coloration on the second side, which typically takes 1 to 2 minutes to develop. Properly cooked pikelets will spring back lightly when touched and feel firm but still tender. Transfer finished pikelets to a warm plate and serve immediately for the best texture and flavor.
Serving Suggestions

Pikelets shine when served warm and paired with the right toppings to complement their fluffy texture. We can transform these delightful griddle cakes into sweet treats or savory snacks depending on our mood and occasion.
Sweet Toppings
We recommend serving pikelets with classic jam and cream or butter for a traditional experience that highlights their tender crumb. Fresh fruit creates a vibrant contrast—strawberries, raspberries, or sliced bananas add natural sweetness and beautiful color to each bite.
Syrup and icing sugar elevate pikelets into an indulgent dessert, while sweetened ricotta or yogurt provides a creamy touch that balances their fluffy texture. These toppings work especially well for afternoon tea or weekend breakfast spreads.
We love how pikelets can be enhanced with berries, sultanas, chocolate, or apple and cinnamon mixed directly into the batter for built-in flavor variations. Each addition creates a unique twist while maintaining the signature texture we cherish.
Savory Options
Savory pikelets require omitting sugar from the base batter to create a neutral flavor foundation. We can then top them with smoked salmon, crème fraîche, or avocado for elegant brunch presentations or sophisticated snacks.
Incorporating corn, cheese, or herbs directly into the batter adds varied textures and flavors that transform pikelets into hearty meal components. Sour cream, chives, or ham create satisfying combinations that work perfectly for lunch or light dinner options.
We find that savory pikelets store well for several days in the refrigerator and can be frozen for longer shelf life. They reheat beautifully in a toaster for a crispy texture that makes them ideal for quick meals throughout the week.
Storage Tips

Proper storage keeps our freshly made pikelets delicious and ready to enjoy for days or even months. We recommend following these proven methods to maintain their fluffy texture and golden appearance.
Short-Term Refrigerator Storage
We can store cooked pikelets in an airtight container in the refrigerator for up to 3 to 4 days. This method works perfectly when we plan to enjoy them within the week. Before serving refrigerated pikelets we should warm them in a microwave or toaster to refresh their soft texture and bring back that just-cooked taste.
Freezing for Long-Term Storage
Freezing extends our pikelets’ shelf life significantly allowing us to store them for up to 3 months without quality loss. We have two effective freezing methods to choose from:
Individual Wrapping Method: We wrap each pikelet individually in cling film or place them in a plastic bag before transferring to a freezer-safe container.
Tray Freezing Method: We place pikelets on a tray lined with baking paper and freeze for about an hour. This prevents them from sticking together. After the initial freeze we transfer them to a bag or container for long-term storage.
Storage Guidelines for Best Results
| Storage Method | Duration | Container Type | Notes |
|---|---|---|---|
| Refrigerator | 3-4 days | Airtight container | Reheat before serving |
| Freezer | Up to 3 months | Plastic bag or freezer container | Wrap individually or tray freeze first |
We always store pikelets without toppings unless those toppings require refrigeration. This prevents soggy textures and maintains the pikelets’ original quality.
Reheating Methods
Our stored pikelets regain their original softness through several reheating options. We can use a microwave for quick warming a toaster for crispy edges or a warm pan for even heating. Each method effectively restores the pikelets’ appealing texture making them taste freshly made.
Recipe Variations

Pikelets serve as an excellent canvas for countless flavor combinations. We can transform the basic recipe into sweet treats or savory delights by incorporating different ingredients into the batter.
Blueberry Pikelets
Fresh or frozen blueberries create bursts of sweet tartness in every bite when folded into our pikelet batter. We add 1/2 cup of blueberries directly to the prepared batter after mixing the basic ingredients together. The berries distribute evenly throughout the mixture without breaking apart if we fold them in gently with a spoon.
Frozen blueberries work just as well as fresh ones and don’t require thawing before use. We cook blueberry pikelets using the same method as our basic recipe, allowing bubbles to form on the surface before flipping. These sweet variations pair beautifully with maple syrup, whipped cream, or a light dusting of powdered sugar for an indulgent breakfast or afternoon treat.
Chocolate Chip Pikelets
Chocolate chip pikelets transform our basic recipe into a dessert-worthy treat that appeals to all ages. We stir 1/3 to 1/2 cup of mini chocolate chips into the prepared batter just before cooking. Mini chips distribute more evenly than regular-sized chips and prevent the pikelets from becoming too heavy.
The chocolate melts slightly during cooking, creating pockets of warm, gooey sweetness throughout each pikelet. We serve these warm to maximize the melted chocolate experience, often with a dollop of vanilla ice cream or fresh strawberries. Dark chocolate chips provide a sophisticated flavor profile, while milk chocolate chips offer classic sweetness that children especially enjoy.
Savory Herb Pikelets
Savory herb pikelets eliminate the sugar from our basic batter and incorporate fresh herbs for a sophisticated flavor profile. We omit the granulated sugar entirely and add 2 to 3 tablespoons of finely chopped fresh herbs such as parsley, chives, thyme, or dill to the batter. The herbs should be chopped finely to distribute evenly without creating large pieces that might burn during cooking.
Additional savory options include mixing 1/4 cup of grated cheese, corn kernels, or finely diced vegetables into the herb batter. We cook savory pikelets using the same technique as sweet versions, ensuring the herbs don’t burn by maintaining moderate heat. These versatile pikelets serve as excellent bases for toppings like smoked salmon, avocado, or cream cheese, making them perfect for brunch or light dinner options.
Make-Ahead Instructions

Preparing pikelets in advance transforms busy mornings and spontaneous gatherings into stress-free occasions. We recommend making larger batches when you have time since these delightful mini pancakes store beautifully and reheat to near-fresh quality.
Storage at Room Temperature
Fresh pikelets maintain their fluffy texture for up to two days when stored properly at room temperature. We place completely cooled pikelets in an airtight container to preserve their moisture and prevent them from becoming stale. The key is ensuring they stop steaming before sealing to avoid creating condensation that leads to sogginess.
Refrigerator Storage
For extended freshness we store pikelets in the refrigerator for up to 4 days in an airtight container. This method works particularly well for savory varieties that benefit from the cooler temperature. We always allow refrigerated pikelets to come to room temperature or warm them slightly before serving to restore their tender texture.
Freezing for Long-Term Storage
Our favorite make-ahead method involves freezing pikelets for convenient future meals. We allow the pikelets to cool completely before placing 2 pikelets in individual zip-lock bags for portion control. This packaging method prevents freezer burn while making it easy to grab exactly the amount needed for breakfast or snacks.
Properly frozen pikelets maintain their quality and can be stored for extended periods without losing their signature fluffy interior or golden exterior characteristics.
Reheating Methods
We reheat pikelets using several effective methods that restore their original warmth and texture. The bread toaster provides the quickest option and works directly from frozen without any thawing required. For larger quantities we use a toaster oven or warm skillet over medium-low heat.
When using a skillet we lightly butter the surface and warm the pikelets for about 1 minute per side until heated through. This method particularly suits savory pikelets that benefit from a slightly crispy exterior.
Meal Prep Benefits
Pikelets excel as meal prep components due to their versatility and reheating capabilities. We often prepare a double batch on weekends then package individual servings for weekday breakfasts or lunchbox additions. Their ability to pair with both sweet and savory toppings makes them suitable for various meals throughout the week.
The compact size and sturdy texture mean pikelets travel well and maintain their appeal even after reheating making them perfect for busy families and individuals who value convenient homemade options.
Troubleshooting Tips

Even experienced cooks encounter challenges when making pikelets. We’ve compiled the most common issues and their answers to help you achieve perfect results every time.
Batter Consistency Problems
Getting the right batter texture is crucial for proper pikelet formation. Runny batter spreads too much on the pan and creates thin disappointing results. When your batter flows like water we recommend adding flour one tablespoon at a time until it reaches the proper consistency.
Thick batter presents the opposite challenge and prevents even cooking throughout. Dense mixture won’t spread naturally into proper rounds and often burns on the outside while remaining raw inside. Add milk one tablespoon at a time to achieve the ideal pourable consistency that holds its shape.
Overmixing Issues
Vigorous mixing develops gluten strands and creates tough rubbery pikelets instead of light fluffy ones. We always mix ingredients just until combined even if small lumps remain visible. Stop stirring as soon as the wet and dry ingredients come together. Lumpy batter actually produces better texture than overworked smooth batter.
Heat Control and Cooking Surface
Even cooking requires the right equipment and temperature management. We use nonstick pans or well-seasoned cast iron skillets for consistent heat distribution. Medium heat prevents burning while ensuring thorough cooking. High heat chars the exterior before the interior sets properly.
Burning occurs when the cooking surface gets too hot or when we rush the process. Lower the heat immediately if pikelets brown too quickly. Each side needs adequate time to cook through completely before flipping.
Determining Doneness
Perfect timing makes the difference between raw centers and overcooked pikelets. We watch for bubbles forming and popping on the surface before attempting to flip. This visual cue indicates the bottom has set properly and the interior is nearly cooked through.
Use a thin spatula to flip pikelets gently in one smooth motion. The second side cooks faster and typically needs only 1 to 2 minutes to achieve golden brown color.
Pan Greasing Techniques
Proper greasing prevents sticking without creating excess oil that causes uneven cooking. We lightly brush the pan with melted butter or neutral oil before cooking each batch. Too much grease causes pikelets to fry rather than cook evenly and creates an unpleasant greasy texture.
Wipe excess oil with a paper towel between batches to maintain the ideal cooking surface. The pan should appear lightly glossy but not pooled with oil.
Conclusion
We’ve shown you how these delightful British treats can transform your kitchen routine with their simple preparation and endless versatility. From sweet breakfast indulgences to savory afternoon snacks pikelets adapt to any occasion with ease.
Their forgiving nature makes them perfect for both novice and experienced cooks while their make-ahead friendly qualities suit our busy lifestyles. Whether you’re hosting guests or simply treating your family pikelets deliver homemade goodness without the fuss.
Now it’s time to heat up that griddle and experience the joy of creating these fluffy golden rounds yourself. Your taste buds will thank you for discovering this wonderfully adaptable addition to your recipe collection.
Frequently Asked Questions
What are pikelets and how are they different from regular pancakes?
Pikelets are mini pancakes that originated in Britain, measuring about 3-4 inches in diameter. They’re smaller and thicker than regular pancakes, with a distinctively fluffy, spongy texture. The batter is thicker than traditional pancake batter, creating their signature golden exterior and airy interior when cooked on a griddle without molds.
What ingredients do I need to make pikelets?
You’ll need basic pantry staples: all-purpose or self-rising flour, baking powder, granulated sugar, salt, baking soda, a large egg, milk (or plant-based alternatives), and melted butter or neutral oil. These simple ingredients combine to create the fluffy texture that makes pikelets special.
How long do pikelets take to cook?
Pikelets cook quickly, taking about 1.5-3 minutes on the first side until bubbles form on the surface. After flipping, they need another 1.5-3 minutes until both sides are golden brown. The total cooking time per batch is typically 3-6 minutes, making them perfect for quick breakfasts.
Can pikelets be made ahead and stored?
Yes! Cooked pikelets can be stored in an airtight container in the refrigerator for 3-4 days or frozen for up to 3 months. They reheat beautifully in a toaster or skillet, making them excellent for meal prep and busy mornings when you want homemade breakfast ready quickly.
What are the best toppings for pikelets?
Pikelets are incredibly versatile. For sweet options, try jam and cream, fresh fruit, honey, syrup, or sweetened ricotta. For savory versions, omit sugar from the batter and top with smoked salmon, crème fraîche, avocado, or herbs. They work perfectly for breakfast, afternoon tea, or snacks.
What kitchen tools do I need to make pikelets?
Essential tools include a non-stick frying pan or griddle, mixing bowls, a whisk, measuring cups and spoons, a spatula for flipping, paper towels for pan maintenance, and a plate to keep finished pikelets warm. These basic kitchen items are all you need for perfect results.
How do I know when pikelets are ready to flip?
Look for bubbles forming on the surface of the pikelet and the edges appearing slightly set, usually after 1.5-3 minutes. The bottom should be golden brown when you lift it gently with a spatula. Once flipped, cook until the second side is also golden brown.
Can I make different flavored pikelets?
Absolutely! Popular variations include blueberry pikelets (add fresh or frozen berries), chocolate chip pikelets, or savory herb pikelets with chopped herbs like chives or parsley. You can customize the basic recipe to suit different tastes and occasions while maintaining the signature fluffy texture.


