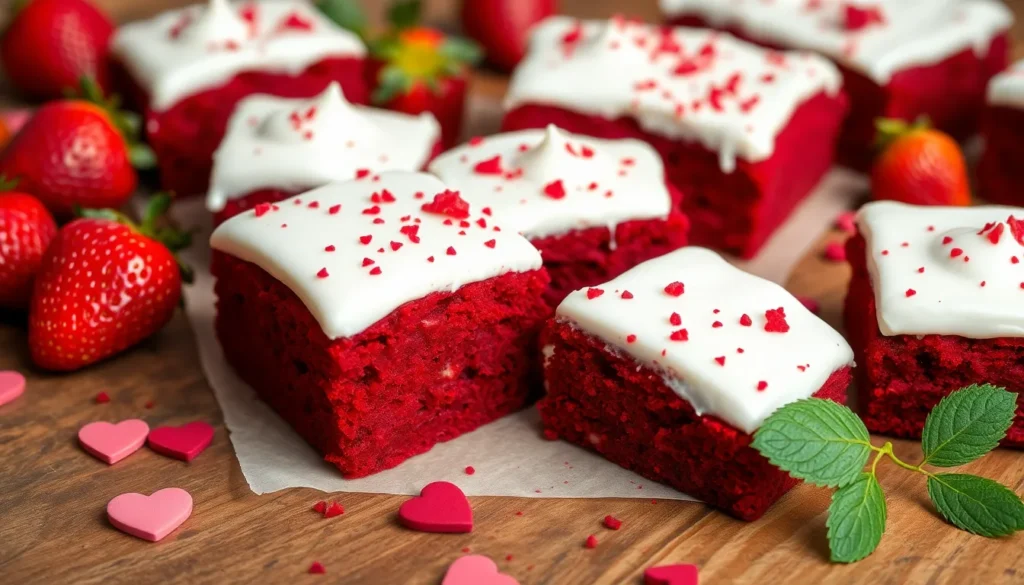
We’ve discovered the perfect marriage between two beloved desserts – the rich fudginess of classic brownies and the iconic tangy sweetness of red velvet cake. These red velvet brownies deliver that signature crimson color and subtle cocoa flavor that makes red velvet so irresistible, all wrapped up in a dense, chewy brownie texture that’ll have you reaching for seconds.
What makes these brownies truly special is their incredible versatility. They’re perfect for Valentine’s Day celebrations, holiday gatherings, or any time you want to impress with something that looks as stunning as it tastes. The hint of vanilla and cream cheese creates that classic red velvet flavor profile we all crave.
We’ve perfected this recipe to ensure you get that beautiful red hue without any artificial aftertaste, plus that perfect balance of sweetness and richness. Trust us – once you try these red velvet brownies, regular brownies will never be quite the same.
Ingredients
We’ve carefully selected each ingredient to create the perfect balance of rich chocolate flavor and vibrant red color. Our recipe combines traditional brownie components with classic red velvet elements for an irresistible dessert experience.
For the Red Velvet Brownies
- 1 cup unsalted butter
- 8 oz dark chocolate chips or chopped dark chocolate
- 1 cup granulated sugar
- 1/2 cup packed light brown sugar
- 4 large eggs at room temperature
- 2 teaspoons vanilla extract
- 1 cup all purpose flour
- 1/4 cup unsweetened cocoa powder
- 1 teaspoon salt
- 2 tablespoons red food coloring
- 1 teaspoon white vinegar
- 1 teaspoon baking soda
For the Cream Cheese Frosting
- 8 oz cream cheese at room temperature
- 1/2 cup unsalted butter at room temperature
- 3 cups powdered sugar sifted
- 1 teaspoon vanilla extract
- 1/4 teaspoon salt
- 2 to 3 tablespoons heavy cream or milk
Equipment Needed

Creating perfect red velvet brownies requires the right tools to achieve that signature fudgy texture and even baking. We recommend gathering these essential pieces of equipment before beginning our recipe.
Baking Pan: An 8×8 inch metal baking pan delivers the best results for even heating and consistent browning. Metal conducts heat more efficiently than glass, ensuring our brownies bake uniformly throughout. The square shape provides the ideal thickness for that perfect chewy bite we want in our red velvet brownies.
Mixing Bowls: Large and small mixing bowls accommodate different stages of our recipe preparation. We use the large bowl for combining wet ingredients and the smaller one for whisking together dry components. Having multiple bowls prevents cross contamination and makes the mixing process smoother.
Whisk and Spatula: A sturdy whisk blends our ingredients thoroughly without overworking the batter. The spatula becomes essential for scraping down bowl sides and ensuring every bit of our precious red velvet mixture gets incorporated. These tools help us achieve the smooth, lump free consistency that makes our brownies irresistible.
Oven Preparation: Preheating our oven to 350°F ensures consistent baking temperature from the moment our brownies enter. This temperature provides the perfect balance for cooking the interior while developing that coveted slightly crispy top layer.
Having these tools ready streamlines our baking process and sets us up for red velvet brownie success. Each piece of equipment plays a exact role in creating the texture and appearance that makes these treats special.
Instructions

We’re ready to transform our carefully selected ingredients into decadent red velvet brownies. Our step-by-step process ensures perfectly fudgy brownies with that signature red velvet flavor and stunning cream cheese frosting.
Prep the Pan and Oven
Preheat your oven to 350°F (180°C) to ensure even baking throughout. Line an 8×8-inch baking pan with parchment paper, leaving some overhang for easy removal. We recommend greasing the parchment lightly with butter to prevent any sticking. This preparation step creates the foundation for perfectly shaped brownies that lift out cleanly.
Make the Brownie Batter
Melt the unsalted butter in a microwave-safe bowl using 30-second intervals until completely smooth. Whisk in both granulated sugar and light brown sugar until the mixture becomes well combined and slightly glossy.
Add the cocoa powder to the butter mixture and whisk vigorously until no lumps remain and the texture appears smooth. Beat in the eggs one at a time, ensuring each is fully incorporated before adding the next. Pour in the red food coloring and mix until the batter achieves an even, vibrant red color throughout.
Gently fold in the all-purpose flour and salt using a spatula, mixing just until the ingredients combine. Avoid overmixing, as this can lead to tough brownies rather than our desired fudgy texture. The finished batter should appear thick and richly colored.
Bake the Brownies
Pour the brownie batter into your prepared pan, spreading it evenly to the corners with a spatula. Bake for 23-25 minutes, watching for a crisp top that springs back lightly when touched. We avoid overbaking to maintain that perfect fudgy interior texture.
Remove the brownies from the oven and allow them to cool completely in the pan before frosting. This cooling period prevents the cream cheese frosting from melting and ensures clean, professional-looking slices.
Prepare the Cream Cheese Frosting
Beat the softened cream cheese and butter together in a large bowl until the mixture becomes completely smooth and fluffy. Gradually add the powdered sugar, mixing on low speed initially to prevent sugar clouds, then increasing to medium speed.
Continue beating until the frosting reaches a creamy, spreadable consistency without any lumps. Add the vanilla extract and beat briefly just until incorporated. The finished frosting should hold its shape while remaining smooth and pipeable.
Assemble and Frost
Spread the cream cheese frosting evenly over the completely cooled brownies using an offset spatula for the smoothest finish. We create gentle swirls or keep it perfectly flat depending on your preferred presentation style.
Slice the frosted brownies into your desired portions using a sharp knife, cleaning the blade between cuts for neat edges. For an elegant finishing touch, sprinkle crushed red velvet crumbs on top of the frosting to reinforce that classic red velvet appearance.
Storage Instructions

Proper storage ensures our red velvet brownies maintain their fudgy texture and rich flavor for days. We recommend different storage methods depending on whether the brownies are frosted or unfrosted.
Room Temperature Storage
Unfrosted red velvet brownies stay fresh when stored in an airtight container at room temperature. We store them this way for 3-4 days to preserve their soft, fudgy texture. Room temperature storage prevents the brownies from drying out and maintains their ideal consistency.
Refrigerated Storage
| Storage Method | Duration | Notes |
|---|---|---|
| Unfrosted brownies (room temp) | 3-4 days | Maintains fudgy texture |
| Unfrosted brownies (refrigerated) | Up to 1 week | May cause drying |
| Frosted brownies (refrigerated) | 5-7 days | Must be covered tightly |
Frosted red velvet brownies with cream cheese frosting require refrigeration due to the perishable dairy content. We cover them tightly and store in the refrigerator for up to 5-7 days. Unfrosted brownies can also be refrigerated for up to a week, though this may cause them to dry out.
Serving Refrigerated Brownies
We allow refrigerated brownies to warm slightly at room temperature before serving for the best taste and texture. This brief warming period restores the brownies’ ideal consistency and enhances their flavor profile.
Freezer Storage
Long-term storage requires freezing our red velvet brownies properly. We wrap each brownie individually in plastic wrap and aluminum foil, or place them in an airtight container. Frozen brownies maintain quality for 2-3 months when stored correctly.
Thawing Frozen Brownies
We thaw frozen brownies at room temperature for natural defrosting. Alternatively, we reheat them gently in a 350°F (175°C) oven for 5-7 minutes to restore freshness and texture.
Storage Tips
We store brownies individually for easy portioning and to avoid repeated thawing of the entire batch. Cream cheese frosting should be stored separately if not serving immediately, kept in an airtight container in the refrigerator for up to a week and reapplied before serving. We avoid dusting brownies with cocoa powder before storage, adding this garnish just before serving to keep the topping neat.
Serving Suggestions

We recommend several delicious ways to serve these red velvet brownies that will enhance their rich flavor and stunning presentation. The most classic pairing involves topping the brownies with cream cheese frosting, where the tangy cream cheese beautifully balances the sweetness of the red velvet base.
For an indulgent dessert experience, we suggest serving warm brownies alongside vanilla ice cream and hot fudge sauce. This combination creates a delightful temperature contrast that makes each bite memorable. The warmth from the brownies slightly melts the ice cream while the hot fudge adds an extra layer of chocolate richness.
Creating red velvet cheesecake brownies offers another spectacular serving option. We achieve this by adding a creamy cheesecake layer that provides textural contrast against the dense brownie base. This variation transforms the dessert into an extra rich treat perfect for special occasions.
These brownies shine on dessert tables during themed events like weddings or Valentine’s Day celebrations. Their vibrant red color adds festive flair and creates an eye-catching display that guests will remember. We position them strategically on dessert spreads to maximize their visual impact.
Temperature preferences vary among dessert lovers, so we serve these brownies either at room temperature or chilled based on guest preferences. Room temperature brownies offer the full fudgy texture while chilled versions provide a firmer bite that some people prefer.
| Serving Style | Best Occasion | Temperature |
|---|---|---|
| Cream Cheese Frosted | Everyday dessert | Room temperature |
| Ice Cream & Hot Fudge | Cozy dinner | Warm brownie, cold ice cream |
| Cheesecake Layer | Special celebrations | Chilled |
| Themed Display | Weddings, Valentine’s Day | Room temperature |
We garnish the brownies with crushed red velvet crumbs or a light dusting of powdered sugar to enhance their elegant appearance. Fresh berries also complement the red velvet flavor while adding natural sweetness and visual appeal.
Tips for Perfect Red Velvet Brownies

Use Quality Ingredients for Rich Flavor
We recommend using high-quality cocoa powder to achieve the best chocolate flavor in your red velvet brownies. Dutch-processed cocoa powder provides the subtle chocolate taste that makes these brownies exceptional. The combination of unsalted butter and vegetable oil creates both rich flavor and that coveted gooey texture we all love in brownies.
Master the Sugar Blend
Regular white sugar paired with light brown sugar adds depth and moisture to our red velvet brownies. This combination contributes to the fudgy texture that sets these brownies apart from ordinary ones. The brown sugar brings additional richness while helping maintain that perfect chewy consistency.
Perfect Your Egg Technique
Large eggs plus an extra egg yolk enhance the overall richness of these brownies. We find that this combination creates the ideal binding while adding to the luxurious texture. Vanilla extract or vanilla bean paste rounds out the flavors beautifully and complements the subtle cocoa notes.
Time Your Baking Precisely
| Brownie Style | Baking Time | Key Indicator |
|---|---|---|
| Fudgy | 24-28 minutes | Center no longer jiggles |
| Cakey | 29-36 minutes | Additional 5-8 minutes beyond fudgy timing |
Baking for 24-28 minutes or until the center no longer jiggles ensures perfectly fudgy brownies. For those who prefer cakey brownies, we suggest baking for an additional 5-8 minutes. Avoid overbaking to maintain that desired fudgy texture that makes red velvet brownies so irresistible.
Cool Properly for Best Results
Cooling for about 5 minutes in the pan allows the brownies to set without becoming too firm. Transfer them to a wire rack to finish cooling completely. This cooling method prevents overcooking while ensuring clean cuts when slicing.
Enhance with Strategic Add-ins
Chopped almonds, walnuts, or pecans add delightful nutty crunch to complement the smooth brownie base. Extra chocolate chips on top provide additional chocolate flavor for those who crave more richness. These enhancements should be added during the final mixing stage to distribute evenly.
Complete with Cream Cheese Frosting
Cream cheese frosting completes the red velvet flavor profile and adds a tangy contrast that balances the sweetness. This classic pairing transforms ordinary brownies into an extraordinary dessert experience. The frosting should be applied only after the brownies have cooled completely to prevent melting.
Adjust for Your Oven
We recommend adjusting baking time based on your oven’s performance and your desired level of gooeyness. Every oven bakes differently, so start checking at the minimum time and add minutes as needed. The brownies are done when a toothpick inserted in the center comes out with just a few moist crumbs attached.
Variations

We can transform our basic red velvet brownie recipe into exciting alternatives that suit different preferences and occasions. These variations maintain the signature red velvet flavor while adding unique twists that enhance both texture and taste.
Cream Cheese Swirl Brownies
We create these decadent treats by marbling cream cheese throughout the brownie batter. Beat 8 ounces of softened cream cheese with 1/4 cup sugar and 1 egg until smooth. Pour half the brownie batter into our prepared pan then dollop the cream cheese mixture on top. Add the remaining brownie batter and use a knife to create swirl patterns. This variation provides a tangy contrast to the sweet brownie base while maintaining our fudgy texture.
Red Velvet Cheesecake Brownies
We layer a rich cheesecake topping over our brownies for an extra indulgent dessert. Prepare the brownie base as directed then mix 16 ounces cream cheese with 1/2 cup sugar 2 eggs and 1 teaspoon vanilla. Spread this mixture over the partially baked brownies and continue baking for 25-30 minutes until the cheesecake layer sets. These brownies require refrigeration and create an impressive two-layer dessert perfect for special occasions.
Cake Mix Brownies
We simplify our recipe using red velvet cake mix for busy bakers. Combine one box of red velvet cake mix with 1/2 cup melted butter 2 eggs and 1/4 cup water until just mixed. Press into our prepared pan and bake for 20-22 minutes. This variation reduces preparation time while delivering consistent results and maintains the characteristic red velvet flavor profile.
White Chocolate Chip Variation
We enhance our brownies by folding 3/4 cup white chocolate chips into the batter before baking. The creamy white chocolate complements the cocoa flavor while adding textural interest. We can also drizzle melted white chocolate over the cooled brownies for additional visual appeal and sweetness.
Heart-Shaped Valentine’s Brownies
We create festive shapes using heart-shaped cookie cutters after the brownies cool completely. Cut the brownies into hearts then frost each piece individually. Decorate with red sprinkles or mini chocolate chips for a romantic presentation perfect for Valentine’s Day celebrations.
| Variation Type | Baking Time Adjustment | Key Addition |
|---|---|---|
| Cream Cheese Swirl | Same (23-25 minutes) | 8 oz cream cheese mixture |
| Cheesecake Layer | Extended (25-30 minutes) | 16 oz cheesecake topping |
| Cake Mix | Reduced (20-22 minutes) | Red velvet cake mix |
| White Chocolate | Same (23-25 minutes) | 3/4 cup white chocolate chips |
Fudgy Texture Enhancement
We achieve an ultra-fudgy texture by slightly underbaking our brownies and adding an extra egg yolk to the batter. Remove the brownies when a toothpick inserted in the center comes out with moist crumbs rather than completely clean. This technique creates brownies with an almost truffle-like consistency that melts in your mouth.
Conclusion
These red velvet brownies offer everything we love about both classic desserts rolled into one irresistible treat. We’ve shown you how to achieve that perfect balance of fudgy texture and vibrant color while keeping the process straightforward and enjoyable.
Whether you’re baking for a special occasion or simply satisfying a sweet craving these brownies deliver on both taste and visual appeal. The cream cheese frosting takes them to the next level but they’re equally delicious on their own.
We’re confident that once you try this recipe you’ll find yourself returning to it again and again. The combination of rich chocolate flavor stunning red color and that signature tangy cream cheese element makes these brownies a true crowd-pleaser that’s sure to become a staple in your baking repertoire.
Frequently Asked Questions
What makes red velvet brownies different from regular brownies?
Red velvet brownies combine the signature crimson color and subtle cocoa flavor of red velvet cake with the dense, chewy texture of classic brownies. They feature a hint of vanilla and are often topped with cream cheese frosting, creating a perfect balance of sweetness and richness that elevates the traditional brownie experience.
What ingredients do I need to make red velvet brownies?
The key ingredients include unsalted butter, dark chocolate, eggs (plus an extra yolk for richness), red food coloring, vinegar, Dutch-processed cocoa powder, and a blend of white and brown sugars. For the cream cheese frosting, you’ll need cream cheese, butter, powdered sugar, and vanilla extract.
What equipment is essential for making perfect red velvet brownies?
You’ll need an 8×8 inch metal baking pan for consistent browning, large and small mixing bowls for wet and dry ingredients, a sturdy whisk for thorough blending, and a spatula for smooth mixing. Preheating your oven to 350°F is crucial for achieving ideal baking conditions and the perfect fudgy texture.
How long should I bake red velvet brownies?
Bake the brownies for 23-25 minutes at 350°F until they achieve a crisp top and fudgy interior. For ultra-fudgy brownies, slightly underbake them. For a more cake-like texture, bake for an additional 2-3 minutes. Always adjust baking times based on your individual oven performance.
How should I store red velvet brownies?
Unfrosted brownies can be stored at room temperature in an airtight container for 3-4 days or refrigerated for up to a week. Frosted brownies require refrigeration due to the perishable cream cheese frosting and last 5-7 days when tightly covered. For long-term storage, wrap individually and freeze for 2-3 months.
Can I make variations of red velvet brownies?
Yes! Popular variations include Cream Cheese Swirl Brownies with marbled cream cheese, Red Velvet Cheesecake Brownies with a rich cheesecake layer, White Chocolate Chip variations, and Heart-Shaped Valentine’s Brownies using cookie cutters. Each variation maintains the signature red velvet flavor while adding unique twists.
When should I apply the cream cheese frosting?
Always apply cream cheese frosting only after the brownies have cooled completely. This prevents the frosting from melting and ensures a smooth, professional appearance. You can also store the frosting separately and apply it just before serving to maintain optimal freshness and texture.
What occasions are red velvet brownies perfect for?
Red velvet brownies are ideal for Valentine’s Day, weddings, holiday gatherings, and any themed events where their vibrant crimson color adds festive flair. Their elegant appearance and rich flavor make them perfect for special occasions, romantic celebrations, or whenever you want to impress guests with a stunning dessert.


