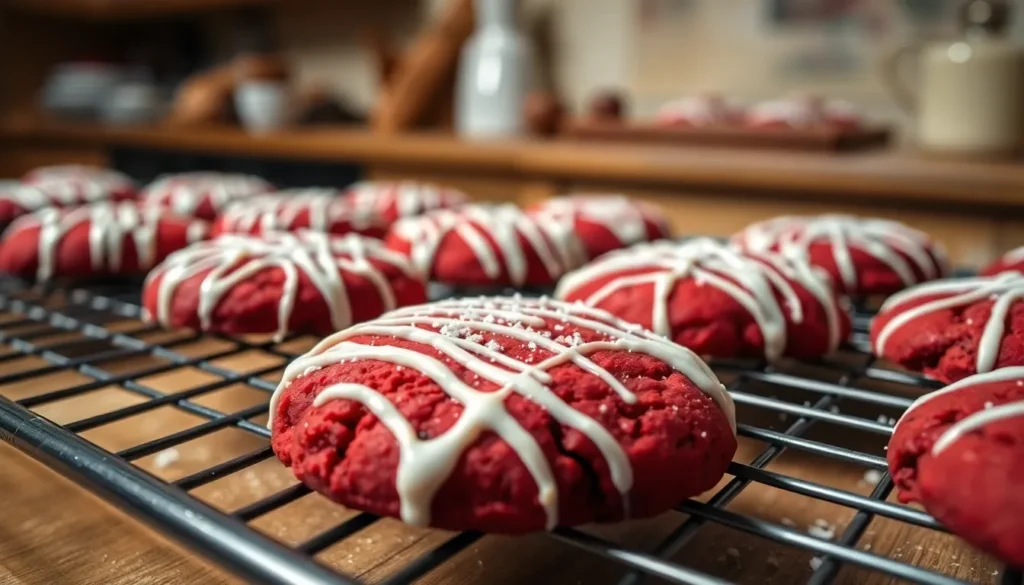
We’ve discovered the perfect shortcut to satisfy your red velvet cravings without the fuss of making an entire cake. These red velvet cake mix cookies transform a simple box of cake mix into irresistibly soft and chewy treats that’ll have everyone asking for the recipe.
The best part? You probably already have most ingredients in your pantry right now. These cookies deliver all the classic red velvet flavors you love – that subtle cocoa taste and stunning crimson color – but in a convenient handheld form that’s perfect for parties, lunch boxes, or late-night snacking.
What makes these cookies truly special is their incredibly soft texture and rich flavor that rivals any bakery creation. We’ll show you exactly how to achieve that perfect chewy consistency while maintaining the signature red velvet taste that makes these cookies absolutely addictive.
Ingredients
We keep our red velvet cake mix cookies simple by using just six pantry staples that deliver maximum flavor with minimal effort. These ingredients work together to create the perfect balance of moisture and chewiness that makes our cookies irresistible.
For the Cookie Base:
- 1 box (15.25 oz) red velvet cake mix
- 2 large eggs, room temperature
- 1/3 cup vegetable oil
- 2 tablespoons all-purpose flour
For Enhanced Flavor:
- 1 teaspoon vanilla extract
- 1/2 cup white chocolate chips (optional)
Our recipe starts with a standard box of red velvet cake mix as the foundation. We prefer Duncan Hines or Betty Crocker brands for their consistent results and vibrant color. The eggs provide structure and richness while the vegetable oil keeps our cookies soft and chewy rather than dry and crumbly.
We add extra flour to prevent the cookies from spreading too much during baking. This small addition ensures our cookies maintain their shape and develop that perfect chewy texture we’re after. The vanilla extract amplifies the cake mix’s existing flavors and adds depth to each bite.
White chocolate chips complement the subtle cocoa notes beautifully, though we consider them optional based on personal preference. We measure all ingredients at room temperature for the best mixing results and even distribution throughout our cookie dough.


Equipment Needed

Making these red velvet cake mix cookies requires minimal kitchen equipment that most home bakers already have on hand. We’ve streamlined this list to focus on the essentials that will help you achieve perfectly soft and chewy cookies every time.
Large mixing bowl serves as our primary workspace for combining all ingredients thoroughly. The spacious design allows us to mix the cake mix dough without making a mess on our countertops.
Silicone spatula becomes indispensable for scraping down the sides and bottom of the bowl during mixing. This tool ensures we incorporate every bit of cake mix and prevents any dry pockets from forming in our cookie dough.
Cookie scoop or spoon helps us create uniformly sized cookies that bake evenly. A medium cookie scoop works best for achieving that perfect balance between crispy edges and soft centers.
Cookie sheets provide the foundation for baking our red velvet treats. We recommend using light colored baking sheets to prevent the bottoms from browning too quickly.
Parchment paper or silicone baking mats create a non stick surface that makes cookie removal effortless. These liners also promote even browning and prevent our cookies from spreading too much during baking.
Wire cooling rack allows air to circulate around our freshly baked cookies as they cool. This prevents the bottoms from becoming soggy and maintains that ideal chewy texture we’re after.
Small bowl comes in handy if you plan to roll your cookies in powdered sugar or prepare any additional toppings. While optional for the basic recipe this extra bowl keeps our workspace organized and efficient.


Instructions

We’ll walk you through three simple steps to create these irresistible red velvet cake mix cookies. Our straightforward method delivers bakery-quality results every time.
Prep the Dough
We start by combining our dry and wet ingredients in a large mixing bowl. Add the entire box of red velvet cake mix along with 2 large eggs and 1/3 cup vegetable oil. Using our silicone spatula, we mix these ingredients until they form a cohesive dough that holds together well.
Next, we incorporate 2 tablespoons of all-purpose flour to help maintain the cookies’ shape during baking. We fold in 1 teaspoon of vanilla extract for enhanced flavor depth. The dough should feel slightly sticky but manageable at this point.
White chocolate chips get folded in last if we’re using them. We gently mix until the chips distribute evenly throughout the dough without overmixing.
Shape the Cookies
We use our cookie scoop or spoon to portion the dough into uniform balls. Each cookie should measure approximately 2 tablespoons of dough for consistent baking results. Rolling the dough between our palms creates perfectly round shapes.
Our cookie sheets get lined with parchment paper or silicone mats before we place each dough ball. We space the cookies about 2 inches apart to allow for spreading during baking. The light-colored cookie sheets we recommended prevent the bottoms from browning too quickly.
Bake the Cookies
We preheat our oven to 350°F and position the rack in the center for even heat distribution. The prepared cookie sheets go into the preheated oven for 10 to 12 minutes. We watch for edges that appear set while centers remain slightly soft.
Our cookies finish baking when the edges look firm but the centers still appear slightly underdone. We remove them from the oven and let them cool on the baking sheet for 5 minutes before transferring to our wire cooling rack. This cooling method preserves the chewy texture we’re aiming for.


Cream Cheese Frosting

While these red velvet cookies are delicious on their own, adding cream cheese frosting creates the perfect finishing touch. This classic pairing brings together the tangy richness that makes red velvet desserts truly special.
Frosting Ingredients
- 8 ounces cream cheese, softened
- 1/2 cup unsalted butter, softened
- 1 teaspoon vanilla extract
- 2 cups powdered sugar
Frosting Instructions
Beat the softened cream cheese and butter together in a large bowl until the mixture becomes smooth and well combined. We recommend using an electric mixer for the best results, though hand mixing works if you prefer.
Add the vanilla extract to the creamy mixture and blend thoroughly to distribute the flavor evenly. The vanilla enhances the overall taste and complements the red velvet cookies perfectly.
Gradually incorporate the powdered sugar into the mixture, adding it in small batches to prevent lumps from forming. Continue mixing until the frosting reaches a smooth and creamy consistency that spreads easily.
Chill the cookies completely before applying the frosting to ensure they maintain their shape during the decorating process. Spread the cream cheese frosting generously on each cooled cookie using an offset spatula, or pipe it decoratively using a pastry bag fitted with your favorite tip.


Assembly and Finishing

Now we focus on bringing our red velvet cake mix cookies together with proper assembly techniques and finishing touches that elevate these treats to bakery quality.
Shaping and Positioning
We use a cookie scoop to portion our dough into uniform 2-tablespoon balls for consistent baking results. The dough should feel slightly sticky but manageable at room temperature. Rolling each portion between our palms creates perfectly round cookies that bake evenly.
We space the dough balls approximately 2 inches apart on our parchment-lined baking sheets to allow for spreading during the baking process. This spacing prevents the cookies from merging together while ensuring they maintain their individual shape and texture.
Baking Process
Our preheated 350°F oven provides the ideal temperature for achieving that perfect balance of set edges and soft centers. We bake the cookies for 10 to 12 minutes, watching carefully as the edges become firm while the centers remain slightly underbaked. The cookies should not appear completely set when we remove them from the oven since they continue cooking on the hot baking sheet.
| Baking Stage | Time | Temperature | Visual Cue |
|---|---|---|---|
| Initial Bake | 10-12 minutes | 350°F | Edges set, centers soft |
| Cooling on Sheet | 3-5 minutes | Room temp | Firms up slightly |
| Wire Rack | 15-20 minutes | Room temp | Completely cooled |
Cooling and Final Touches
We allow our cookies to rest on the baking sheet for 3 to 5 minutes before transferring them to a wire cooling rack. This brief cooling period prevents the cookies from breaking apart while ensuring they maintain their desired chewy texture.
For an elegant finishing touch, we can drizzle melted white chocolate over the completely cooled cookies using a fork or squeeze bottle. The contrast between the deep red cookies and bright white chocolate creates an visually appealing presentation that matches the classic red velvet aesthetic.
Another popular finishing option involves rolling the raw cookie dough balls in powdered sugar before baking. This technique creates a beautiful crackled appearance as the powdered sugar contrasts against the red dough during baking, mimicking the look of traditional red velvet crinkle cookies.


Storage Tips

Once we finish baking these delicious red velvet cake mix cookies, proper storage becomes essential for maintaining their soft and chewy texture. We can keep our cookies fresh using several storage methods that preserve their flavor and prevent them from becoming stale.
Room Temperature Storage
We recommend storing our red velvet cookies in an airtight container at room temperature for optimal freshness. This method works perfectly for 3 to 7 days, allowing us to enjoy our cookies throughout the week. The airtight container prevents moisture loss and keeps the cookies from absorbing odors from other foods in our kitchen.
Refrigerated Storage
For extended freshness, we can store our cookies in the refrigerator using an airtight container. This method extends our storage time to up to 1 week, making it ideal when we want to prepare cookies ahead of time for special occasions or weekly meal prep.
Freezer Storage Options
Freezing provides us with the longest storage solution, keeping our cookies or cookie dough fresh for up to 3 months. We have two excellent freezing options depending on our needs and preferences.
Freezing Baked Cookies: We start by allowing our cookies to cool completely before freezing. Next, we place them in a single layer on a baking sheet and freeze until solid. Once frozen, we transfer the cookies to a freezer-safe bag or container for long-term storage.
Freezing Cookie Dough: We can also freeze our unbaked cookie dough for future baking sessions. First, we line a tray with parchment paper and arrange our raw cookie balls in a single layer. After freezing the dough balls for about 1 hour, we transfer them to an airtight container for storage.
Baking Frozen Cookie Dough
When we’re ready to bake our frozen cookie dough, we simply add 1 to 2 extra minutes to the original baking time. This adjustment ensures our cookies bake evenly and achieve the same soft and chewy texture as freshly made dough.
| Storage Method | Duration | Container Type |
|---|---|---|
| Room Temperature | 3-7 days | Airtight container |
| Refrigerator | Up to 1 week | Airtight container |
| Freezer (cookies or dough) | Up to 3 months | Freezer-safe bag or container |
Recipe Variations

Transform our basic red velvet cake mix cookies into exciting new treats with these creative variations. Each option builds on our foundation recipe while adding unique flavors and textures.
White Chocolate Chip Version
White chocolate chips create the perfect complement to red velvet’s subtle cocoa notes. We add 1 cup of white chocolate chips to our basic dough after mixing the cake mix, oil, and eggs together.
The creamy sweetness of white chocolate balances beautifully against the tangy undertones typical of red velvet flavor. Fold the chips gently into the dough to ensure even distribution without overmixing.
For best results, we recommend using high-quality white chocolate chips that maintain their shape during baking. The chips create delightful pockets of sweetness in every bite while improving the cookies’ visual appeal with bright white specks against the deep red background.
Sandwich Cookie Style
Create an indulgent sandwich cookie by transforming our basic recipe into a filled treat. We prepare the dough following our standard method, then shape slightly smaller cookies to accommodate the filling.
After the cookies cool completely, we place a small dollop of cream cheese frosting or buttercream between two cookies. Press gently to create a secure seal without forcing the filling to overflow.
Our cream cheese frosting works exceptionally well for this variation, echoing traditional red velvet cake flavors. Allow assembled sandwich cookies to chill in the refrigerator for 30 minutes before serving to help the filling set properly.
For a festive presentation, we can roll the exposed frosting edges in chopped pecans or mini white chocolate chips. This technique adds texture while creating an elegant finished appearance that rivals professional bakery treats.


Troubleshooting Tips

Sticky Dough Issues
When our red velvet cake mix cookie dough becomes too sticky to handle, we need to refrigerate it for 30 minutes before shaping. This chilling process firms up the butter and makes the dough manageable for scooping. We can also lightly dust our hands with flour when rolling the dough into balls.
Cookies Spreading Too Much
Excessive spreading typically occurs when our dough is too warm or when we skip the flour addition. We should ensure our cookie dough stays chilled and always include the recommended amount of all-purpose flour to help maintain structure during baking. Room temperature ingredients mix better, but the final dough should be cool when we shape it.
Cookies Coming Out Too Hard
Overbaking is the primary culprit when our cookies lose their signature soft and chewy texture. We must remove them from the oven when the edges are set but the centers still appear slightly soft and underdone. The cookies continue cooking on the hot baking sheet after removal from the oven.
Uneven Cookie Sizes
Using a cookie scoop ensures uniform cookies that bake evenly. When we hand-roll our cookies, size variations cause some to overbake while others remain underdone. A 2-tablespoon cookie scoop creates perfectly consistent results every time.
Cookies Sticking to Baking Sheet
Proper preparation prevents sticking issues entirely. We should line our baking sheets with parchment paper or silicone mats before placing the cookie dough. Light-colored cookie sheets work best as they prevent the bottoms from browning too quickly.
Frosting Won’t Stay on Cookies
Warm cookies cause cream cheese frosting to melt and slide off. We need to cool our cookies completely on a wire rack before applying any frosting. Chilled cookies hold frosting better and create a more professional appearance.
Color Not Vibrant Enough
Different cake mix brands produce varying color intensities. Duncan Hines and Betty Crocker typically provide the most vibrant red coloring. We can enhance the color by avoiding overbrowning during baking and using light-colored baking sheets.
Conclusion
These red velvet cake mix cookies prove that amazing homemade treats don’t require hours in the kitchen. With just six simple ingredients and minimal equipment we can create bakery-quality cookies that capture all the beloved flavors of classic red velvet cake.
Whether we’re making them for a special occasion or simply satisfying a sweet craving these cookies deliver every time. The versatility of the recipe means we can customize them with white chocolate chips create elegant sandwich cookies or add that signature cream cheese frosting for an extra indulgent touch.
We’ve equipped you with all the knowledge needed to avoid common pitfalls and achieve perfect results. From proper storage techniques to creative variations these cookies are bound to become a favorite in your baking repertoire.
Frequently Asked Questions
What ingredients do I need for red velvet cake mix cookies?
You only need six simple pantry staples: a box of red velvet cake mix, eggs, vegetable oil, all-purpose flour, vanilla extract, and optional white chocolate chips. Duncan Hines or Betty Crocker cake mixes work best for consistent results. All ingredients should be at room temperature for optimal mixing.
How long do I bake red velvet cake mix cookies?
Bake the cookies at 350°F for 10 to 12 minutes. The edges should be set while the centers remain slightly soft. Avoid overbaking to maintain their chewy texture. Let them cool on the baking sheet for 3-5 minutes before transferring to a wire rack.
Can I store red velvet cake mix cookies for later?
Yes! Store cookies in an airtight container at room temperature for 3-7 days, or refrigerate for up to 1 week. For longer storage, freeze baked cookies or unbaked dough for up to 3 months. Thaw frozen cookies at room temperature before serving.
How do I make cream cheese frosting for these cookies?
Beat softened cream cheese and unsalted butter until smooth, then add vanilla extract and gradually mix in powdered sugar until creamy. Chill the cookies before frosting to maintain their shape. Use an offset spatula or pastry bag for decorative application.
What equipment do I need to make these cookies?
You’ll need basic kitchen tools: a large mixing bowl, silicone spatula, cookie scoop or spoon, light-colored cookie sheets, parchment paper or silicone mats, and a wire cooling rack. A small bowl for optional toppings like powdered sugar is also helpful.
How do I prevent my cookies from spreading too much?
Keep your dough cool and include the proper amount of flour as specified in the recipe. Use a cookie scoop for uniform 2-tablespoon portions and space them 2 inches apart on parchment-lined baking sheets. Refrigerate sticky dough before shaping.
Can I add variations to the basic recipe?
Absolutely! Add 1 cup of white chocolate chips to the dough for extra sweetness. Create sandwich cookies by filling two cookies with cream cheese frosting and rolling the edges in chopped pecans or mini chocolate chips for an elegant presentation.
Why are my cookies not staying soft and chewy?
Avoid overbaking – remove cookies when edges are set but centers are still soft. Use vegetable oil instead of butter for moisture, and don’t skip the cooling process on the baking sheet. Store properly in airtight containers to maintain texture.


