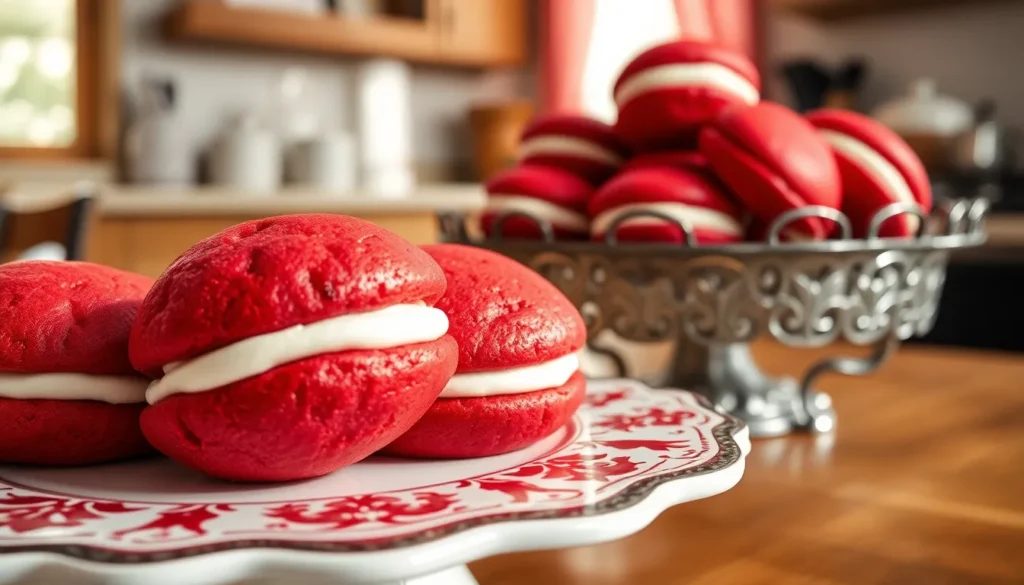
We’ve taken the beloved classic red velvet cake and transformed it into something even more irresistible – red velvet whoopie pies. These pillowy soft sandwich cookies combine the rich cocoa flavor and stunning crimson color of traditional red velvet with a luscious cream cheese filling that’ll make your taste buds dance.
Originally hailing from Pennsylvania’s Amish country, whoopie pies have become a treasured American treat. Our red velvet version elevates this nostalgic dessert with that signature tangy sweetness and velvety texture we all crave. The contrast between the tender cake-like cookies and the smooth, creamy center creates the perfect bite every time.
What Makes Red Velvet Whoopie Pies Special
Red velvet whoopie pies combine the beloved characteristics of two iconic American desserts into one irresistible treat. The signature cocoa flavor creates a subtle chocolate foundation that distinguishes these cookies from ordinary vanilla whoopie pies. We love how the buttermilk adds a gentle tang that enhances the overall complexity of each bite.
The stunning crimson color captures attention immediately and makes these whoopie pies perfect for special occasions. Food coloring transforms simple cake-like cookies into visually striking desserts that photograph beautifully for social media sharing. This vibrant appearance sets red velvet whoopie pies apart from traditional chocolate or vanilla versions.
Texture plays a crucial role in what makes these treats extraordinary. The cookies maintain a tender crumb that yields perfectly to pressure without being too soft or too firm. Our cream cheese filling provides a luxurious contrast with its smooth richness that balances the slight density of the red velvet cookies.
The flavor profile offers multiple layers of taste that develop as you eat. We notice how the initial sweetness gives way to subtle cocoa notes followed by the tangy cream cheese finish. This progression creates a more sophisticated dessert experience compared to standard whoopie pies.
Versatility makes red velvet whoopie pies suitable for many occasions throughout the year. Valentine’s Day celebrations benefit from their romantic red appearance while Christmas gatherings appreciate their festive color scheme. We find they work equally well for birthdays casual gatherings and elegant dinner parties.
Essential Equipment and Tools

Creating perfect red velvet whoopie pies requires exact kitchen tools that ensure consistent results and professional presentation. We recommend gathering all equipment before starting to streamline your baking process.
Stand Mixer serves as the foundation for our whoopie pie success. This powerful tool creates the smooth batter consistency needed for tender cookies while incorporating air for optimal texture. We find that stand mixers also excel at preparing the cream cheese filling, ensuring no lumps remain in the final product.
Baking Sheets provide the essential surface for our red velvet cookies. We suggest using heavy duty aluminum sheets that distribute heat evenly and prevent hot spots. Light colored pans work best since they reflect heat and prevent over browning of our delicate red velvet cookies.
Piping Bag transforms filling application from messy to masterful. This tool allows us to control the exact amount of cream cheese frosting between each cookie pair. We recommend using a large round tip for even distribution and professional appearance.
Cooling Rack prevents soggy bottoms while our whoopie pies reach room temperature. Proper air circulation underneath each cookie ensures they maintain their tender texture without becoming dense. We always allow complete cooling before adding filling to prevent melting.
Measuring Cups and Spoons guarantee accuracy in our red velvet recipe. Precise measurements become crucial for achieving the perfect balance of cocoa, flour, and leavening agents. We suggest using dry measuring cups for flour and liquid measuring cups for buttermilk to ensure proper ratios.
| Equipment | Primary Function | Impact on Final Result |
|---|---|---|
| Stand Mixer | Batter and filling preparation | Smooth consistency and proper texture |
| Baking Sheets | Cookie baking surface | Even heat distribution |
| Piping Bag | Filling application | Professional appearance |
| Cooling Rack | Temperature regulation | Prevents soggy texture |
| Measuring Tools | Ingredient accuracy | Consistent flavor balance |
Additional tools enhance our whoopie pie making experience. Cookie scoops create uniform cookie sizes while parchment paper prevents sticking. We also recommend having mixing bowls in various sizes for ingredient preparation and a rubber spatula for folding techniques.
Ingredients

Creating these irresistible red velvet whoopie pies requires two sets of carefully measured ingredients. We’ve organized them by component to ensure smooth preparation and optimal results.
For the Red Velvet Cookies
- 2 cups all-purpose flour, spooned and leveled (250g)
- 3 tablespoons to 1/4 cup unsweetened cocoa powder (15-25g)
- 1 teaspoon baking soda
- 1/2 teaspoon salt
- 1/2 cup unsalted butter, room temperature (113g)
- 1 cup packed light brown sugar (200g)
- 1 large egg, room temperature
- 2/3 to 3/4 cup buttermilk, room temperature (160-180ml)
- 1 teaspoon to 2 tablespoons vanilla extract
- 1 teaspoon red gel food coloring
For the Cream Cheese Filling
- 6 to 8 ounces cream cheese, block-style, room temperature (170-225g)
- 1/4 cup unsalted butter, room temperature (56g)
- 1 1/2 to 2 cups confectioners’ sugar, sifted (180-240g)
- 1/2 teaspoon vanilla extract
- Pinch of salt (optional, if using unsalted butter)
Instructions

These step-by-step instructions will guide you through creating perfect red velvet whoopie pies from start to finish. We’ll break down each component to ensure consistent results every time.
Preparing the Cookie Batter
We begin by whisking together 2 cups all-purpose flour, 3 tablespoons unsweetened natural cocoa powder, 1 teaspoon baking soda, and 1/2 teaspoon salt in a medium bowl. Set this dry mixture aside while we prepare the wet ingredients.
In our stand mixer bowl, cream together 1/2 cup softened unsalted butter and 1 cup packed light brown sugar until light and fluffy, about 3-4 minutes. Beat in 1 large egg until fully incorporated, followed by 2/3 cup buttermilk and 2 teaspoons pure vanilla extract.
Add red gel food coloring gradually while mixing, starting with a small amount and adding more until we achieve our desired vibrant red color. The gel coloring provides better color saturation than liquid alternatives without thinning the batter.
Gradually fold the dry ingredients into the wet mixture, alternating in three additions and mixing just until combined. Overmixing will result in tough cookies, so we stop as soon as the flour disappears.
Baking the Red Velvet Cookies
Preheat our oven to 350°F and line heavy-duty baking sheets with parchment paper. Using a cookie scoop or tablespoon, portion the dough into balls containing 1 to 2 tablespoons each.
Space the dough balls about 2 inches apart on our prepared baking sheets to allow for spreading. This spacing prevents the cookies from merging together during baking.
Bake for 9 to 12 minutes, watching carefully for doneness indicators. The cookies are ready when they spring back lightly when touched and appear set around the edges.
Transfer the baking sheets to cooling racks and allow cookies to cool on the pans for 5 minutes before moving them directly to the racks. Complete cooling is essential before filling to prevent melting.
Making the Cream Cheese Filling
Beat 6-8 ounces full-fat cream cheese in our stand mixer until completely smooth and free of lumps, about 2-3 minutes. Room temperature cream cheese mixes more easily and creates a silkier texture.
Add 1/4 to 1/2 cup softened unsalted butter and continue beating until the mixture becomes light and fluffy. The butter adds richness while helping stabilize the filling.
Gradually incorporate 1 to 4 cups powdered sugar, starting with less and adding more to reach our preferred sweetness level. Beat in 1/2 teaspoon pure vanilla extract until the filling holds its shape when piped.
Taste and adjust sweetness as needed, keeping in mind that the filling should complement rather than overpower the subtle cocoa flavor of the cookies.
Assembling the Whoopie Pies
Transfer our cream cheese filling to a piping bag fitted with a round tip for precise application. Alternatively, we can use a zip-top bag with one corner snipped off.
Select cookies of similar sizes to create uniform whoopie pies. Turn half of the cookies bottom-side up to create our bases for assembly.
Pipe a generous dollop of filling onto the center of each base cookie, leaving about 1/4 inch border around the edges. The filling will spread slightly when we add the top cookie.
Gently press a second cookie on top of each filled base, creating a sandwich. Apply just enough pressure to spread the filling to the edges without squeezing it out completely.
Store assembled whoopie pies in an airtight container in the refrigerator, where they’ll keep fresh for up to one week and actually improve in texture as the flavors meld together.
Pro Tips for Perfect Red Velvet Whoopie Pies

Use Block-Style Cream Cheese for Superior Filling
We recommend choosing block-style cream cheese rather than spreadable varieties for our filling. Block cream cheese creates a thick and stable frosting that holds its shape beautifully and resists melting when sandwiched between cookies. This consistency ensures our whoopie pies maintain their structure throughout storage and serving.
Bring Buttermilk to Room Temperature
Room temperature buttermilk incorporates more evenly into our batter and produces fluffier cookies. We suggest removing buttermilk from the refrigerator about 30 minutes before beginning our recipe. This simple step prevents lumps and creates a smoother batter that bakes into tender cookies.
Mix Dry Ingredients Separately First
We always combine our flour, cocoa powder, baking soda, and salt in a separate bowl before adding them to our butter and sugar mixture. This technique promotes even distribution of leavening agents and prevents overmixing when we incorporate the dry ingredients into our wet mixture.
Avoid Overmixing the Batter
Gentle mixing keeps our cookies soft and tender. We stir just until ingredients combine completely, then stop immediately. Overmixed batter develops too much gluten and results in dense, flat cookies rather than the light and cakey texture we desire.
Choose Pure Vanilla Extract for Clean Flavor
Pure vanilla extract delivers the best flavor for both our cookies and cream cheese filling. We use clear vanilla extract in our frosting to maintain the pristine white color that contrasts beautifully with the red cookies. This attention to detail enhances both taste and visual appeal.
Weigh Ingredients for Accuracy
Kitchen scales provide the most accurate measurements for consistent results. When using measuring cups, we spoon flour into the cup without packing and level with a knife. Accurate measurements ensure our cookies have the proper texture and our filling achieves the right consistency.
Cool Cookies Completely Before Filling
We allow our cookies to cool completely on wire racks before adding any filling. Warm cookies cause cream cheese frosting to melt and create messy, unstable whoopie pies. Patience during this cooling period rewards us with perfectly assembled treats.
Select Natural Unsweetened Cocoa Powder
Natural cocoa powder provides the acidic base that reacts with baking soda to create lighter, fluffier cookies. We avoid Dutch-process cocoa for this recipe because it lacks the acidity needed for proper leavening. This choice significantly impacts our final texture and rise.
Pipe Frosting for Professional Results
We pipe or carefully spoon our cream cheese frosting onto the flat bottom of one cookie, then gently press a second cookie on top. This method creates evenly filled whoopie pies with attractive, uniform appearance. Consistent filling distribution ensures every bite delivers the perfect cookie-to-frosting ratio.
Storage and Make-Ahead Instructions

Proper storage ensures your red velvet whoopie pies maintain their soft texture and fresh flavor for days after baking. We recommend storing these delicate treats based on when you plan to serve them and how long you need them to last.
Room Temperature Storage
Store completed whoopie pies in an airtight container at room temperature for optimal texture and convenience. This method works best for short-term storage up to 3 days. The cookies maintain their soft consistency while the cream cheese filling stays perfectly spreadable without becoming too firm.
Refrigerator Storage
Keep your whoopie pies fresh longer by storing them in an airtight container in the refrigerator. Unassembled cookies stay fresh for up to 1 week using this method. Assembled whoopie pies maintain their quality for 3 to 4 days when refrigerated properly. The cool temperature helps preserve the cream cheese filling while preventing spoilage.
Freezing Options
Extend the shelf life of your baked whoopie pies by freezing them for up to 3 months. Wrap each cookie individually in plastic wrap or parchment paper before placing them in freezer bags. Thaw frozen whoopie pies overnight in the refrigerator when you’re ready to serve them. This method works exceptionally well for meal planning and batch preparation.
Make-Ahead Preparation
Plan your baking schedule by preparing components in advance for stress-free entertaining. Cover the prepared batter tightly and refrigerate it for up to 3 days before baking. Allow the chilled batter to come to room temperature before scooping and baking for best results.
Create the cream cheese filling ahead of time and store it in an airtight container in the refrigerator until assembly. This advance preparation saves time on serving day while ensuring fresh flavors throughout your whoopie pies.
Assembly Timing
Assemble your whoopie pies just before serving for the freshest presentation and optimal texture contrast. Alternatively store assembled whoopie pies in the refrigerator for up to a few days when advance preparation is necessary.
| Storage Method | Duration | Best For |
|---|---|---|
| Room Temperature | Up to 3 days | Immediate serving |
| Refrigerator (assembled) | 3-4 days | Short-term storage |
| Refrigerator (unassembled) | Up to 1 week | Extended freshness |
| Freezer | Up to 3 months | Long-term storage |
| Batter (refrigerated) | Up to 3 days | Make-ahead baking |
Serving Suggestions

We recommend serving red velvet whoopie pies at room temperature to achieve the optimal texture and flavor experience. The cream cheese filling reaches its ideal consistency when it warms slightly from refrigeration allowing the flavors to meld beautifully with the soft cookie layers.
Presentation and Plating
Arrange whoopie pies on a decorative serving platter with parchment or wax paper between layers to prevent the cream cheese filling from sticking to other surfaces. Individual paper doilies beneath each whoopie pie create an elegant presentation perfect for special occasions. We suggest dusting the tops lightly with powdered sugar for an added visual appeal that photographs beautifully.
Seasonal Serving Ideas
Valentine’s Day celebrations benefit from the vibrant red color and romantic appeal of these treats. Display them alongside white chocolate covered strawberries or pink macarons for a stunning dessert table. During Christmas gatherings we recommend pairing them with hot cocoa or spiced cider to complement the subtle cocoa flavors.
Beverage Pairings
Coffee enthusiasts will appreciate how the tangy cream cheese filling balances perfectly with bold espresso or rich dark roast coffee. Cold milk provides a classic accompaniment that enhances the nostalgic whoopie pie experience. We also suggest serving them with vanilla ice cream for an indulgent dessert course.
Storage During Service
Keep whoopie pies covered with a damp cloth if serving over extended periods to maintain their soft texture. Room temperature service ensures the filling spreads easily when bitten without being too firm or too soft. For outdoor events we recommend keeping them in a cool shaded area to prevent the cream cheese filling from becoming too warm.
Troubleshooting Common Issues

Even experienced bakers encounter challenges when making red velvet whoopie pies. We’ve compiled answers to the most common problems that arise during preparation.
Cookies Not Rising Properly
Fresh baking soda serves as the foundation for properly risen cookies. Check your baking soda’s expiration date before beginning the recipe. We recommend testing baking soda freshness by adding a small amount to white vinegar—it should fizz vigorously if active.
Room temperature ingredients create better chemical reactions during mixing. Remove eggs and buttermilk from the refrigerator 30 minutes before baking. Cold ingredients prevent proper leavening and result in dense cookies.
Cookies Too Crumbly or Dry
Butter temperature significantly affects cookie texture. Partially melted butter creates more tender cookies than cold butter straight from the refrigerator. We suggest softening butter until it yields slightly to pressure but maintains its shape.
Overmixing the batter develops gluten strands that create tough cookies. Mix ingredients just until combined for optimal texture.
Frosting Consistency Problems
Runny frosting requires immediate attention to prevent messy assembly. Refrigerate the cream cheese frosting for 30 minutes before using. Add powdered sugar gradually until the frosting holds its shape when piped.
Thick frosting becomes difficult to spread evenly between cookies. Incorporate small amounts of softened butter or room temperature cream cheese to achieve spreadable consistency. Beat the mixture until smooth after each addition.
Uneven Cookie Sizes
Cookie scoops ensure uniform whoopie pie sizes for professional presentation. We recommend using a 2-tablespoon cookie scoop for consistent results. This method produces cookies that bake evenly and create balanced assembled pies.
Baking Time and Temperature Issues
Oven temperatures vary significantly between appliances. Use an oven thermometer to verify accuracy. Cookies should bake until edges are set and centers remain slightly soft. Overbaking creates dry cookies that crack when assembled.
| Issue | Solution | Prevention |
|---|---|---|
| Flat cookies | Check baking soda freshness | Store baking soda properly sealed |
| Crumbly texture | Use partially melted butter | Soften ingredients to room temperature |
| Runny frosting | Refrigerate 30 minutes | Use block cream cheese, not whipped |
| Thick frosting | Add small amounts of butter | Measure ingredients accurately |
| Uneven sizes | Use cookie scoop | Maintain consistent portioning |
Temperature control extends beyond oven settings to ingredient preparation. Cold buttermilk prevents proper mixing and affects final texture. Allow all refrigerated ingredients to reach room temperature for best results.
Conclusion
These red velvet whoopie pies offer the perfect way to elevate your dessert game with minimal effort. We’ve shown you how to create bakery-quality treats that’ll impress at any gathering while keeping the process manageable for home bakers.
The beauty of this recipe lies in its versatility and make-ahead potential. Whether you’re planning for a special occasion or simply want to treat yourself, these whoopie pies deliver consistent results every time.
With proper storage techniques and our troubleshooting tips, you’ll avoid common pitfalls and achieve that perfect soft texture. The combination of rich cocoa flavor and tangy cream cheese filling creates a dessert that’s both nostalgic and sophisticated.
We encourage you to experiment with presentation ideas and seasonal variations to make these treats uniquely yours. Your guests will be asking for the recipe before they finish their first bite.
Frequently Asked Questions
What are red velvet whoopie pies?
Red velvet whoopie pies are soft sandwich cookies that combine the classic red velvet cake flavor with the beloved American whoopie pie format. They feature tender, cocoa-flavored cookies with vibrant red color, sandwiched together with creamy cream cheese filling. Originally from Pennsylvania’s Amish country, these treats offer the perfect balance of tangy sweetness and velvety texture.
How long do red velvet whoopie pies stay fresh?
Red velvet whoopie pies stay fresh for 3 days at room temperature in an airtight container for optimal texture. When refrigerated, they remain fresh for 3-4 days if assembled, or up to a week if stored unassembled. For long-term storage, freeze them for up to 3 months. The flavors actually improve as they meld together over time.
Can I make red velvet whoopie pies ahead of time?
Yes, you can prepare components in advance for stress-free entertaining. The cookie batter can be refrigerated for up to 3 days, and the cream cheese filling can be made ahead of time. However, it’s best to assemble the whoopie pies just before serving to maintain optimal texture and presentation.
What makes red velvet whoopie pies different from regular whoopie pies?
Red velvet whoopie pies feature a subtle cocoa flavor foundation that distinguishes them from vanilla whoopie pies, plus buttermilk that adds gentle tang and complexity. The signature crimson color makes them perfect for special occasions, and the cream cheese filling provides a more sophisticated flavor profile with multiple taste layers.
What equipment do I need to make red velvet whoopie pies?
Essential equipment includes a stand mixer for smooth batter and filling, heavy-duty baking sheets for even heat distribution, piping bags for precise filling application, and cooling racks to prevent soggy bottoms. Additional helpful tools include cookie scoops, parchment paper, accurate measuring tools, and mixing bowls for professional results.
Why are my red velvet whoopie pies not rising properly?
Poor rising is usually caused by expired baking soda or incorrect ingredient temperatures. Check that your baking soda is fresh and active. Ensure buttermilk and other ingredients are at room temperature for proper mixing. Avoid overmixing the batter, which can deflate the cookies and prevent proper rising during baking.
What’s the best way to store red velvet whoopie pies?
Store assembled whoopie pies in an airtight container at room temperature for up to 3 days for best texture, or refrigerate for longer freshness. Keep them away from direct sunlight and heat. If serving outdoors, maintain cool storage to preserve the soft texture of both cookies and cream cheese filling.
Can I freeze red velvet whoopie pie batter or cookies?
Yes, you can freeze the baked cookies (unassembled) for up to 3 months in airtight containers. The batter can be refrigerated for up to 3 days but shouldn’t be frozen as it may affect texture. Assembled whoopie pies can also be frozen for up to 3 months, though texture may slightly change upon thawing.


