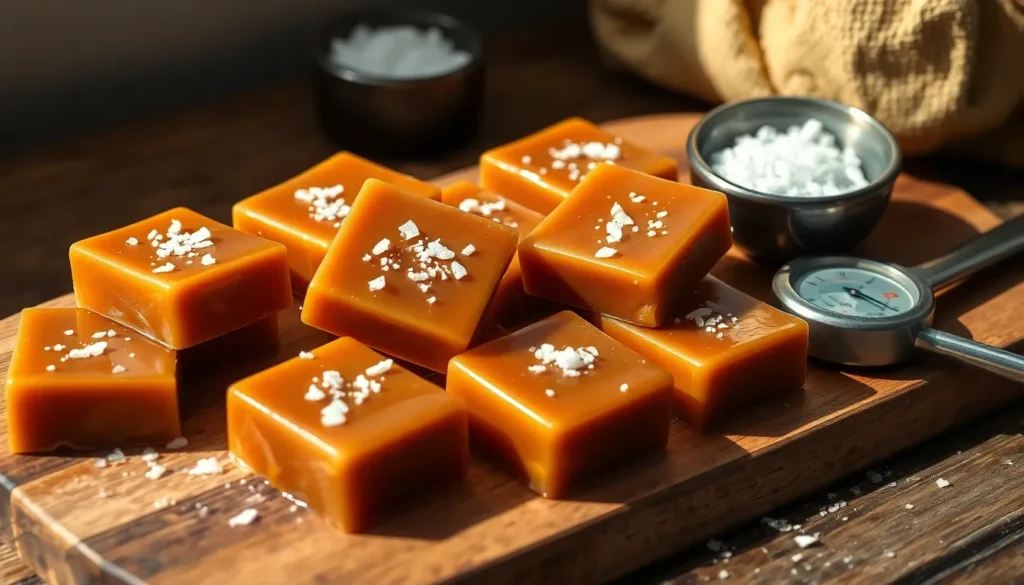
We’ve all experienced that moment when sweet meets salty in perfect harmony – and there’s no better example than homemade salted caramel candy. This irresistible treat combines rich buttery caramel with a hint of sea salt that transforms ordinary sugar into something extraordinary.
Salted caramel candy isn’t just a trendy flavor – it’s a culinary revelation that’s been captivating taste buds for decades. The contrast between the deep sweetness of caramelized sugar and the bright pop of salt creates an addictive combination that’s impossible to resist.
Making your own salted caramel candies at home means you control every ingredient from the quality of butter to the type of salt used. We’ll show you how to achieve that perfect chewy texture and balanced flavor that rivals any gourmet candy shop – all from your own kitchen.
Equipment Needed
Creating perfect salted caramel candy requires exact tools that ensure consistent results and safe handling of hot caramel. We recommend gathering all equipment before starting since caramel cooking moves quickly once temperatures rise.
Heavy-bottomed saucepan serves as our most critical piece of equipment. We need at least a 3-quart capacity to prevent dangerous boiling over when cream is added. Stainless steel or enameled cast iron works best for even heat distribution.
Candy thermometer provides precision for achieving the perfect caramel stage. We attach clip-on digital thermometers to the pan side for hands-free monitoring. Traditional analog thermometers work equally well when positioned correctly in the caramel without touching the pan bottom.
Wooden spoon or heat-resistant silicone spatula handles the intense heat without melting. We avoid metal utensils that conduct heat and can cause burns during stirring.
8×8 inch baking pan creates uniform candy thickness for consistent cutting. We line ours with parchment paper extending over the edges for easy removal after cooling.
Pastry brush removes sugar crystals from pan sides during cooking. We keep this tool and a small bowl of water nearby to prevent crystallization that ruins smooth caramel texture.
Sharp knife cuts cooled caramel into clean squares. We warm the blade slightly for easier cutting through the firm candy.
Small fine-mesh strainer removes any lumps or impurities from the finished caramel before pouring. This extra step ensures professional-looking results.
Having these tools ready streamlines the candy-making process and helps us achieve bakery-quality salted caramel candy at home.


Ingredients
 2")
Creating exceptional salted caramel candy requires carefully selected ingredients that work together to achieve the perfect balance of sweet and salty flavors. We’ve organized our ingredient list into two categories to help you prepare everything needed for this delicious treat.
For the Caramel
- 1 cup granulated sugar – provides the essential sweetness and caramelization base
- 1/4 cup light corn syrup – prevents crystallization and ensures smooth texture
- 2 tablespoons water – assists in the caramelization process
- 6 tablespoons heavy cream – creates the rich, creamy consistency
- 4 tablespoons high-quality butter (salted or unsalted) – adds richness and depth of flavor
- 1 teaspoon vanilla extract or vanilla paste – enhances the overall flavor profile
For the Salted Topping
- 1-2 teaspoons flaky sea salt – Maldon, fleur de sel, or other coarse sea salts work perfectly for the finishing touch


Instructions
 4")
We’ll guide you through each step of creating perfect salted caramel candy at home. This process requires careful attention to temperature and timing to achieve the ideal texture.
Prep Work
Line your 8×8 inch baking pan with parchment paper and coat it lightly with butter to ensure easy release. Set up your candy thermometer by clipping it to the side of your heavy-bottomed saucepan. Keep all ingredients measured and within reach since the process moves quickly once we begin cooking. Have your wooden spoon and pastry brush ready for stirring and crystal removal.
Making the Caramel Base
Combine the granulated sugar and light corn syrup in your prepared saucepan. Add the 2 tablespoons of water to help dissolve the sugar evenly. Stir the mixture gently until the sugar begins to dissolve. Attach your candy thermometer to monitor the temperature throughout the cooking process.
Cooking the Caramel to Perfect Temperature
Place the saucepan over medium heat and bring the mixture to a boil without stirring. Watch for the temperature to climb steadily on your candy thermometer. Use the pastry brush dipped in water to wash down any sugar crystals that form on the sides of the pan. Continue cooking for 20-30 minutes until the mixture reaches the Firm Ball Stage between 245°F and 248°F.
| Temperature Stage | Range | Cooking Time |
|---|---|---|
| Firm Ball Stage | 245°F – 248°F | 20-30 minutes |
Adding Butter and Cream
Remove the saucepan from heat immediately when the temperature reaches 248°F. Carefully pour in the heavy cream while stirring constantly with your wooden spoon. The mixture will bubble vigorously so keep your face away from the steam. Add the butter one tablespoon at a time until fully incorporated. Stir in the vanilla extract until the mixture becomes smooth and glossy.
Pouring and Setting
Pour the hot caramel mixture into your prepared pan immediately while it remains fluid. Use your wooden spoon to spread it evenly if needed. Allow the caramel to cool completely at room temperature for several hours until it sets firm. Avoid refrigerating as this can cause the texture to become too hard.
Adding the Salt Finish
Sprinkle 1-2 teaspoons of flaky sea salt evenly over the cooled caramel surface. Press the salt gently into the surface using the back of a spoon. Cut the caramel into squares using a sharp knife dipped in warm water between cuts for clean edges.


Directions for Cutting and Storing
 6")
Once our salted caramel candy has cooled and set properly, we need to cut it into individual pieces and store them correctly to maintain their perfect texture and flavor. These final steps ensure our homemade candy stays fresh and gift-ready for weeks.
Cutting the Candy
We begin by allowing our caramel slab to cool and set either at room temperature for several hours or in the refrigerator for a few hours until firm but not brittle. If the caramel becomes too cold and hard, we let it sit at room temperature for a few minutes before cutting to achieve the ideal consistency.
Next, we lift the set caramel out of the pan using the parchment or wax paper, then remove the paper and place the slab on a clean cutting board. Using a large, sharp knife, we cut the caramel into strips first, then cut each strip into equal-sized squares or rectangles.
For traditional “tootsie roll” shapes, we cut the slab into thirds, then divide each third into 15 pieces. We can trim off any uneven edges for a more uniform appearance that looks professionally made.
Wrapping Individual Pieces
We prepare our wrapping material by tearing or cutting strips of wax or parchment paper, typically 4½ inches wide. These strips get cut into thirds for appropriately sized wrappers that will completely encase each piece.
Each caramel piece gets placed in a wrapper, folded tightly, and twisted at the ends to seal completely. This wrapping method prevents the caramels from sticking together and maintains their shape during storage.
Storage Instructions
We store our wrapped caramels in an airtight container or resealable plastic bag to prevent moisture exposure. Room temperature storage keeps our caramels at their ideal texture—soft and chewy—and properly wrapped caramels can last up to 2-3 weeks in an airtight container.
| Storage Method | Duration | Temperature | Texture Result |
|---|---|---|---|
| Room Temperature | 2-3 weeks | 68-72°F | Soft and chewy |
| Refrigerated | Extended freshness | 35-40°F | Firmer (return to room temp before eating) |
For extended freshness, we may refrigerate our caramels, though we allow refrigerated pieces to come to room temperature before eating for the softest texture. The container should be kept in a cool, dry place away from direct sunlight to prevent melting or unwanted stickiness.
We lightly sprinkle coarse sea salt on top of each caramel before wrapping for added visual appeal and enhanced flavor. Our individually wrapped caramels make excellent gifts and can be stored for several weeks without losing their quality.


Tips for Perfect Salted Caramel Candy
 8")
Mastering salted caramel candy requires attention to exact details that separate good caramels from exceptional ones. We’ve compiled the most crucial techniques to help you achieve bakery-quality results every time.
Temperature Control
Achieving the perfect texture depends entirely on reaching precise temperatures during cooking. We recommend using a candy thermometer to monitor the mixture throughout the entire process for consistent results.
Soft Chewy Caramels: Cook the mixture to 240-245°F (115-118°C) for caramels with a tender bite that melts smoothly on your tongue. This temperature range creates the ideal balance between firmness and chewiness.
Firmer Caramels: Target 245-250°F (118-120°C) when you prefer caramels with more structure that hold their shape better. These temperatures work particularly well for wrapped individual pieces or gifts.
| Temperature Range | Texture Result | Best Use |
|---|---|---|
| 240-245°F (115-118°C) | Soft and chewy | Immediate consumption |
| 245-250°F (118-120°C) | Firmer texture | Wrapping and gifting |
Using a heavy-bottomed saucepan ensures even heat distribution throughout the cooking process. This prevents hot spots that can cause uneven caramelization or burning.
Troubleshooting Common Issues
Even experienced candy makers encounter challenges when crafting salted caramel. We’ve identified the most frequent problems and their answers to help you avoid disappointment.
Caramel Too Hard: Overcooking past the target temperature creates brittle caramels that crack when bitten. Reduce your cooking temperature by 5-10 degrees or decrease the cooking time slightly on your next batch.
Caramel Too Soft: Undercooking leaves caramels that won’t hold their shape and may stick together. Increase your cooking time gradually until you reach the proper temperature range for your desired texture.
Caramel Not Setting: Over-stirring during the cooling process can prevent proper crystallization. Allow the caramel to cool completely without disturbance before attempting to cut or handle.
Preventing Sticking: Store finished caramels in an airtight container at room temperature to maintain their ideal texture. Proper cooling before cutting eliminates most sticking issues between individual pieces.
We recommend testing a small portion of your caramel mixture on a cold plate to check consistency before committing to the final pour. This simple step saves entire batches from texture disappointments.
Make-Ahead Instructions
 10")
We love that salted caramel candy makes an excellent make-ahead treat for holidays, gifts, or special occasions. Our homemade caramels maintain their perfect texture and flavor when stored properly using the right techniques.
Room Temperature Storage
At room temperature, our wrapped caramels stay fresh for up to two weeks when stored correctly. We wrap each individual piece in wax paper or parchment paper to prevent sticking and maintain the ideal chewy texture. Store the wrapped candies in an airtight container away from direct sunlight and heat sources.
| Storage Method | Duration | Temperature |
|---|---|---|
| Room Temperature | Up to 2 weeks | 68-72°F |
| Refrigerator | 4-6 weeks | 35-38°F |
| Freezer | Up to 3 months | 0°F |
Refrigerator Storage
We recommend refrigerator storage for longer freshness periods when making large batches ahead of time. The cool environment helps maintain the caramels’ structure and prevents them from becoming too soft in warmer climates. Before serving refrigerated caramels, we bring them to room temperature for about 30 minutes to restore their optimal chewy consistency.
Freezer Storage
For extended storage periods, we freeze individually wrapped caramels in freezer bags for up to three months. Label the bags with the preparation date to track freshness. When ready to enjoy, we thaw the caramels at room temperature for 2-3 hours before unwrapping.
Cutting and Wrapping Tips
Once our caramel has cooled and firmed completely, we cut it into neat squares using a sharp knife or pizza cutter. Lightly greasing the blade or warming it under hot water makes cutting smoother and prevents sticking. We wrap each piece immediately after cutting to maintain freshness and prevent the caramels from sticking together.
The finishing sea salt should be sprinkled over the caramel surface before it cools completely to ensure proper adhesion and enhanced flavor distribution throughout storage.
Serving Suggestions
 12")
Our homemade salted caramel candy offers incredible versatility that transforms simple treats into gourmet experiences. We’ve discovered countless ways to enjoy these rich, buttery confections beyond simply unwrapping and eating them straight from the jar.
As a Standalone Treat
We love presenting our salted caramel candies in decorative tins or elegant gift bags for special occasions. The individual wrapped pieces make perfect after-dinner mints or coffee companions. Each bite delivers that perfect balance of sweet caramel and savory sea salt that guests always remember.
Paired with Complementary Snacks
Pretzels create an exceptional pairing with our salted caramel candy. We often arrange both treats on serving platters for parties, allowing guests to alternate between the crunchy saltiness of pretzels and the smooth sweetness of our homemade caramels. This classic combination never fails to impress.
Incorporated into Desserts
Our salted caramel candy elevates countless dessert recipes when chopped and folded into batters or melted into sauces. We frequently chop the cooled candies into chunks for brownies, cheesecakes, and layer cakes. The pieces add bursts of concentrated flavor and interesting texture contrasts throughout each dessert.
As Gourmet Toppings
Ice cream becomes restaurant quality when we warm our salted caramel candies with a splash of cream to create an instant sauce. Popcorn transforms into a sophisticated snack when we melt the candies and drizzle the warm caramel over freshly popped kernels. Both applications showcase the candy’s ability to enhance simple treats.
For Special Presentations
We use our salted caramel candy as decorative elements on cakes and pies, arranging whole pieces around cake borders or pressing chopped candy into frosting designs. The golden color and glossy finish add visual appeal while promising incredible flavor in every bite.


Conclusion
We’ve shown you everything you need to create bakery-quality salted caramel candy right in your own kitchen. With the right tools temperature control and quality ingredients you’ll be amazed at how simple it is to create these irresistible treats.
The beauty of homemade salted caramel candy lies in its endless possibilities. Whether you’re gifting them during the holidays incorporating them into desserts or simply enjoying them as an afternoon indulgence you now have the skills to create something truly special.
Start your candy-making journey today and discover why this perfect balance of sweet and salty has captured hearts for generations. Your family and friends will be impressed by your newfound confectionery expertise.
Frequently Asked Questions
What equipment do I need to make salted caramel candy at home?
You’ll need a heavy-bottomed saucepan, candy thermometer, wooden spoon or heat-resistant spatula, 8×8 inch baking pan, parchment paper, pastry brush, sharp knife, and fine-mesh strainer. These tools ensure safe handling of hot caramel, precise temperature monitoring, and consistent results. Having everything ready before starting streamlines the process and helps achieve bakery-quality candy.
What ingredients are required for homemade salted caramel candy?
For the caramel: 1 cup granulated sugar, 1/4 cup light corn syrup, 2 tablespoons water, 6 tablespoons heavy cream, 4 tablespoons high-quality butter, and 1 teaspoon vanilla extract. For topping: 1-2 teaspoons flaky sea salt like Maldon or fleur de sel. These carefully selected ingredients create the perfect balance of sweet and salty flavors.
What temperature should I cook the caramel mixture to?
Cook the sugar mixture to the Firm Ball Stage, which is 245°F to 248°F. For softer, chewier caramels, aim for 240-245°F, while firmer caramels require 245-250°F. Use a candy thermometer for accuracy and avoid stirring during cooking to prevent crystallization. Temperature control is crucial for achieving the desired texture.
How should I store homemade salted caramel candy?
Wrap each piece individually in wax or parchment paper to prevent sticking. Store wrapped caramels in an airtight container at room temperature for 2-3 weeks, refrigerate for 4-6 weeks, or freeze for up to 3 months. If refrigerated, bring to room temperature before eating for the best texture and flavor.
Can I make salted caramel candy ahead of time?
Yes, salted caramel candy is excellent for make-ahead preparation. It’s perfect for holidays, gifts, and special occasions. When properly wrapped and stored, the candy maintains its texture and flavor for weeks. Cut the cooled caramel with a sharp, lightly greased knife and wrap immediately to preserve freshness.
How can I serve and use salted caramel candy?
Present candies in decorative tins or gift bags for special occasions. Pair with pretzels for snacking, incorporate into brownies and cheesecakes, or use as gourmet toppings for ice cream and popcorn. They also make excellent decorative elements for cakes and pies, enhancing both visual appeal and taste of various treats.
What should I do if my caramel doesn’t turn out right?
Common issues include overcooking or undercooking due to temperature problems. Use a heavy-bottomed saucepan for even heat distribution and test a small portion on a cold plate to check consistency before the final pour. If the mixture crystallizes, avoid stirring during cooking and use a pastry brush to remove sugar crystals from pan sides.