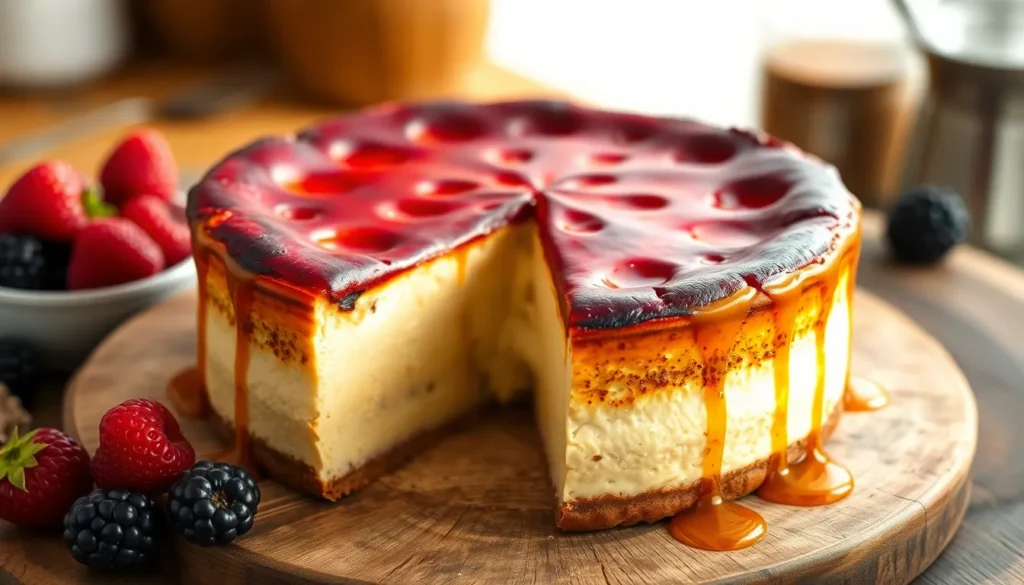
We’ve fallen head over heels for San Sebastian cheesecake, and once you try this burnt Basque beauty, you’ll understand why it’s taken the dessert industry by storm. This isn’t your typical New York-style cheesecake—it’s deliberately burnt on top with a creamy, almost custard-like center that’ll make your taste buds dance with joy.
Born in the pintxos bars of San Sebastian, Spain, this rustic cheesecake breaks all the traditional rules. There’s no graham cracker crust, no water bath, and definitely no fear of that gorgeous caramelized top. We love how forgiving this recipe is—the more golden and cracked it looks, the more authentic it becomes.
What makes this cheesecake absolutely irresistible is its contrast of textures. The deeply caramelized exterior gives way to an incredibly silky interior that’s somewhere between cheesecake and crème brûlée. We’re confident this recipe will become your new go-to dessert for impressing guests or treating yourself to something extraordinary.
What Makes San Sebastian Cheesecake Special
San Sebastian cheesecake stands apart from traditional cheesecakes through its distinctive burnt top that creates an almost caramelized shell. We love how this dramatic appearance immediately signals something extraordinary is waiting beneath the surface. The high-temperature baking method produces deep golden brown spots across the surface that might look overdone to novice bakers but actually represent perfect execution.
This Basque dessert embraces imperfection as part of its charm. We appreciate how the irregular burnt patches and slightly wobbly center create rustic elegance that feels both sophisticated and approachable. Traditional cheesecakes demand precision with their water baths and careful temperature control while San Sebastian cheesecake thrives on bold heat and confident timing.
The texture profile offers remarkable contrast within each bite. We find the exterior develops a slightly firm consistency that gives way to an incredibly creamy interior with custard-like qualities. Many describe this interior as somewhere between classic cheesecake and silky crème brûlée which creates an unforgettable mouthfeel experience.
Another defining characteristic involves the absence of a traditional crust. We skip the graham cracker base entirely and rely on parchment paper lining to create natural edges that become part of the dessert’s presentation. This crustless approach allows the cream cheese filling to take center stage without competing flavors or textures.
The flavor development occurs through controlled caramelization during the high-heat baking process. We notice how the sugars in the cream cheese mixture develop complex nutty and slightly bitter notes that balance beautifully with the rich dairy components. This natural caramelization process cannot be replicated through lower temperature methods or artificial flavoring additions.
Essential Equipment and Tools

Creating the perfect San Sebastian cheesecake requires exact equipment that ensures success in achieving that signature burnt top and creamy interior. We’ve compiled the essential tools you’ll need to master this Basque dessert.
Basic Mixing Equipment
Large Mixing Bowl serves as our foundation for combining all ingredients smoothly. The bowl should accommodate the full volume of cream cheese mixture without spillage during mixing.
Whisk or Electric Mixer handles the blending process effectively. While a manual whisk works perfectly for this forgiving recipe, we recommend using a stand mixer or electric hand mixer for effortless preparation and consistent results.
Rubber Spatula becomes invaluable for scraping bowl sides and ensuring every bit of cream cheese incorporates into our mixture.
Baking Essentials
Springform Pan traditionally measures 8 or 9 inches for authentic San Sebastian cheesecake proportions. We can substitute with a regular cake pan when lined properly with parchment paper.
Parchment Paper prevents sticking and enables easy removal of our finished cheesecake. This tool proves essential given the high temperature baking method that creates the characteristic caramelized exterior.
Precision Tools
| Tool | Purpose | Benefit |
|---|---|---|
| Digital Kitchen Scale | Precise ingredient measurements | Ensures consistent results |
| Measuring Cups | Accurate volume measurements | Maintains proper ratios |
| Measuring Spoons | Small quantity precision | Perfect seasoning balance |
Digital Kitchen Scale provides the accuracy needed for professional results. Measuring ingredients by weight rather than volume eliminates variables that can affect our cheesecake’s final texture.
Measuring Cups and Spoons offer backup measurement options and handle liquid ingredients effectively when scales aren’t available.
Storage Considerations
Airtight Container maintains freshness after baking and cooling. Proper storage in the refrigerator preserves the creamy interior texture while keeping the caramelized exterior from becoming soggy.
The high temperature baking method that creates San Sebastian cheesecake’s signature burnt effect requires reliable equipment that can withstand intense heat. Our tools should support the bold approach this dessert demands while ensuring we achieve that perfect balance between caramelized exterior and silky interior.
Ingredients

The beauty of San Sebastian cheesecake lies in its remarkably simple ingredient list that creates extraordinary results. We need just a few high-quality components to achieve that signature burnt top and creamy interior.
For the Cheesecake
- 600-800g (24-28 oz) full-fat cream cheese – Philadelphia brand works exceptionally well, brought to room temperature
- 200-250g (1 cup) granulated sugar – creates the perfect sweetness and aids in caramelization
- 4-5 large eggs (200-250g) – room temperature, lightly whisked for smooth incorporation
- 200-300ml (1-1¼ cups) heavy cream – room temperature for optimal mixing
- 20-40g all-purpose flour or cornstarch – acts as our thickening agent
- ½ teaspoon fine sea salt – enhances all flavors and balances the sweetness
- 1 teaspoon vanilla extract or vanilla paste – adds aromatic depth to the custard base
Optional Toppings
- Fresh berries – strawberries, raspberries, or blueberries provide bright acidity
- Caramel sauce or dulce de leche – enhances the burnt caramel notes
- Whipped cream or crème fraîche – offers a cooling contrast to the rich cheesecake
- Chocolate drizzle – adds indulgent richness for chocolate lovers
Instructions

We’ll walk through each step to create this stunning burnt Basque cheesecake that delivers incredible results with minimal effort. The process focuses on achieving that signature caramelized top while maintaining the silky interior texture.
Prep the Pan and Oven
We begin by preheating our oven to the crucial high temperature of 200°C to 205°C (390°F to 400°F). This intense heat creates the characteristic burnt top that defines authentic San Sebastian cheesecake. Line our 9-inch springform pan generously with parchment paper, allowing the paper to extend up and over the sides. The parchment creates a rustic collar effect and prevents the delicate interior from sticking to the pan walls.
Position the oven rack in the center to ensure even heat distribution throughout the baking process. We want consistent exposure to the high temperature that transforms the surface into that beautiful caramelized shell.
Make the Cheesecake Batter
We start with our 800g of room temperature cream cheese in a large mixing bowl. Beat the cream cheese with 250g of granulated sugar until completely smooth and no lumps remain. The mixture should appear light and fluffy after proper beating.
Add our 5 large eggs one at a time, ensuring each egg incorporates fully before adding the next. This gradual addition prevents curdling and creates the silky base texture we desire. Pour in 300g to 360ml of heavy cream along with 1 teaspoon of vanilla paste, mixing until just combined.
Sift 20g to 60g of all-purpose flour directly into the mixture to eliminate any potential lumps. Add our pinch of fine sea salt and fold everything together until the batter appears uniform. We avoid overmixing at this stage to maintain the tender final texture.
Bake the Cheesecake
Pour the prepared batter into our lined springform pan, filling it completely. The high sides accommodate the generous amount of filling that creates the signature thick profile.
Bake for 40 to 45 minutes, watching for the edges to set while the center maintains a slight jiggle when gently shaken. The top should develop deep golden brown spots and darker burnt areas that signal proper caramelization. These seemingly overdone patches indicate perfect execution rather than a baking mistake.
Resist the urge to open the oven door frequently, as consistent high heat maintains the ideal baking environment for achieving that coveted burnt exterior.
Cool and Serve
Allow the cheesecake to cool completely in the pan at room temperature. The center will continue setting as the temperature drops, creating the perfect custard-like consistency throughout.
Once cooled, we can serve directly from the springform pan or carefully transfer to a serving plate. The rustic parchment collar adds to the authentic presentation that makes this dessert so visually striking. Slice with a sharp knife wiped clean between cuts to maintain clean edges that showcase the beautiful contrast between the caramelized exterior and creamy interior.
Pro Tips for Perfect San Sebastian Cheesecake

Mastering San Sebastian cheesecake requires understanding a few key techniques that separate exceptional results from ordinary ones. We’ve gathered essential tips to help you achieve that perfect balance of burnt exterior and silky interior.
Achieving the Signature Burnt Top
High Oven Temperature remains crucial for developing the characteristic caramelized surface. We recommend maintaining 400°F (200°C) throughout most of the baking process to create that deep golden brown color. For an even more dramatic effect, we suggest increasing the temperature or using the broiler setting during the final minute of baking.
Baking Time plays a critical role in achieving the perfect burnt appearance. We’ve found that baking for 45 to 55 minutes creates the ideal well-browned top that signals proper caramelization. The surface should display irregular dark spots and patches that indicate the sugars have properly caramelized.
| Temperature Setting | Baking Time | Result |
|---|---|---|
| 400°F (200°C) | 45-55 minutes | Well-browned top |
| 400°F + Broiler | 44-54 minutes + 1 minute broil | Enhanced burnt effect |
Preventing Cracks and Ensuring Smooth Texture
Proper Preparation starts with lining your pan correctly using parchment paper with sufficient overhang. We ensure the parchment extends beyond the rim for easy removal and prevents the cheesecake from sticking to the sides.
Even Mixing prevents lumps and ensures a silky texture throughout the finished dessert. We recommend combining ingredients thoroughly and adding eggs one at a time to maintain smoothness. Quality ingredients make a important difference, so we always use high-quality cream cheese and heavy cream for optimal flavor and texture.
Cooling Process requires patience to achieve the best results. We allow the cheesecake to cool completely at room temperature before transferring it to the refrigerator. This gradual cooling prevents sudden temperature changes that commonly cause cracking.
Refrigeration enhances the texture and allows flavors to develop fully. We chill our cheesecakes for at least 4 to 6 hours, though overnight refrigeration produces even better results. Before baking, we gently tap the pan to remove air bubbles that could lead to cracking during the cooking process.
Storage and Make-Ahead Instructions

Refrigeration Storage
We recommend storing your San Sebastian cheesecake in an airtight container in the refrigerator to maintain its signature creamy texture and rich flavor. Your cheesecake will stay fresh for different durations depending on storage conditions:
| Storage Method | Duration | Notes |
|---|---|---|
| Refrigerator (airtight container) | Up to 1 week | Best quality maintained |
| Refrigerator (covered) | Up to 3 days | Minimum recommended storage |
| Room temperature | Maximum 2-3 hours | Due to cream cheese content |
Freezing Options
Whole Cheesecake Storage
Allow your cheesecake to cool completely before freezing. Wrap the entire cheesecake tightly in plastic wrap followed by aluminum foil to prevent freezer burn. Store in the freezer for up to 3 months while maintaining optimal taste and texture.
Individual Slice Storage
We suggest wrapping individual slices in plastic wrap and aluminum foil before placing them in a freezer bag. This method allows you to thaw only the portions you need and extends storage life up to 3 months.
Make-Ahead Preparation
Prepare your San Sebastian cheesecake ahead of time by baking and cooling it fully before your planned serving date. This advance preparation actually enhances the flavors as they develop and meld together during refrigeration.
Thawing Instructions
Thaw frozen cheesecake overnight in the refrigerator for best results. Alternatively bring frozen slices to room temperature for a few hours before serving if you need them more quickly.
Essential Storage Tips
Avoid leaving your cheesecake at room temperature for extended periods due to its high cream cheese content. The dairy components require consistent refrigeration to prevent spoilage and maintain food safety standards. Plan your serving schedule accordingly to keep the cheesecake properly chilled until ready to enjoy.
Serving Suggestions

Our San Sebastian cheesecake shines brightest when served with thoughtful accompaniments that complement its rich, creamy interior and caramelized exterior. The dessert’s naturally sweet and slightly burnt flavors create the perfect canvas for both simple and sophisticated pairings.
Fresh fruit transforms this indulgent dessert into a balanced treat. We recommend serving with sour cherries, which provide a delightful sweet and tart contrast that cuts through the richness of the cream cheese. Berries like strawberries, raspberries, and blueberries also work beautifully, adding vibrant color and natural acidity to each bite.
Wine pairing elevates the entire dessert experience. Traditionally, we serve this cheesecake with a glass of sweet Pedro Ximénez wine, creating a sophisticated dessert course that highlights the caramelized notes in both the cheesecake and the fortified wine. The wine’s rich, syrupy texture complements the creamy custard-like center perfectly.
Temperature preferences significantly impact the eating experience. We enjoy serving our San Sebastian cheesecake at room temperature for the creamiest, most luxurious texture that melts on the tongue. Alternatively, serving it chilled creates a firmer consistency that some prefer, especially during warmer months.
Presentation options range from rustic to refined. We often serve individual slices directly from the springform pan, allowing guests to appreciate the dramatic contrast between the burnt exterior and pale interior. For special occasions, we transfer slices to individual dessert plates and add a drizzle of honey or a dollop of lightly sweetened whipped cream.
Seasonal variations keep this dessert interesting year-round. During summer, we pair it with fresh stone fruits like peaches or apricots. Winter calls for warming spices like cinnamon or a drizzle of caramel sauce that enhances the burnt sugar flavors already present in the cheesecake.
Troubleshooting Common Issues

Even the most experienced bakers encounter challenges when making San Sebastian cheesecake. We’ve compiled answers to the most frequent problems that arise during the baking process to help you achieve perfect results every time.
Liquid or Runny Center
A runny center indicates underbaking, which is the most common issue we see with this style of cheesecake. We recommend increasing your baking time if the center appears too liquid after cooling. Your San Sebastian cheesecake should maintain a slight jiggle in the center when you remove it from the oven, but it should never remain runny after proper chilling time.
| Problem | Cause | Solution |
|---|---|---|
| Liquid center | Underbaking | Increase baking time |
| Runny after chilling | Insufficient baking | Add 5-10 minutes to baking time |
We suggest testing doneness by gently shaking the pan. The center should wobble like set gelatin rather than flow like liquid batter.
Grainy or Curdled Texture
Grainy texture typically results from overheating your oven or overbaking the cheesecake beyond the optimal window. We advise adjusting your oven temperature down by 25°F if you notice this texture developing consistently. Alternatively, reduce your baking time by 5 to 10 minutes while monitoring the top for proper caramelization.
Room temperature ingredients create the smoothest possible batter, preventing graininess from developing during the mixing process. We always bring our cream cheese and eggs to room temperature before beginning.
Cracking Issues
Cracks appear when we overmix the batter or open the oven door during the critical baking period. We recommend mixing just until ingredients combine smoothly, avoiding excessive beating that incorporates too much air. Never open your oven door during baking, as temperature fluctuations cause the cheesecake surface to contract and crack.
Most cracks naturally close as the cheesecake cools, so we don’t panic when we see them initially forming. The cooling process allows the proteins to relax and settle back together.
Seeping Liquid
Some liquid seepage is completely normal with San Sebastian cheesecake due to its high moisture content. We expect to see small amounts of liquid around the edges after baking. Excessive moisture, but, signals underbaking that requires additional oven time.
We transfer our finished cheesecake to a paper towel immediately after cooling to absorb any excess liquid. This simple step prevents soggy bottoms and maintains the proper texture contrast we desire.
Prevention Techniques
Line your springform pan with parchment paper extending up the sides to prevent sticking and ensure easy removal. We find this technique essential for maintaining the cheesecake’s rustic appearance without damage.
Chill your completed cheesecake for at least 4 hours before serving to achieve the firmest possible texture. We prefer overnight chilling for optimal results, as it allows the flavors to develop fully while the texture sets properly.
Conclusion
San Sebastian cheesecake proves that sometimes the best culinary creations embrace imperfection. This remarkable dessert challenges everything we think we know about cheesecake making with its bold approach to temperature and timing.
We’ve discovered that achieving that signature burnt top isn’t just about aesthetics—it’s the key to unlocking complex flavors that simply can’t be replicated any other way. The high-heat baking method creates a beautiful contrast between the caramelized exterior and silky interior that makes every bite extraordinary.
Whether you’re a seasoned baker or just starting your culinary journey this forgiving recipe offers endless possibilities for creativity. From seasonal fruit pairings to elegant wine combinations the San Sebastian cheesecake adapts beautifully to any occasion while maintaining its rustic charm that continues to captivate dessert lovers worldwide.
Frequently Asked Questions
What is San Sebastian cheesecake and how is it different from regular cheesecake?
San Sebastian cheesecake is a Basque-style dessert known for its distinctive burnt top and creamy, custard-like center. Unlike traditional cheesecakes, it has no graham cracker crust and isn’t baked in a water bath. It’s baked at high temperatures (400°F) to create a caramelized exterior while maintaining a silky, wobbly interior that resembles a blend of cheesecake and crème brûlée.
Why does San Sebastian cheesecake have a burnt top?
The burnt top is the signature feature of San Sebastian cheesecake, created by baking at high temperatures (400°F/200°C). This caramelization develops complex nutty and slightly bitter notes that balance the rich dairy components. The deep golden brown spots indicate perfect execution, not overcooking. This unique flavor development cannot be replicated through lower temperature baking methods.
How long should I bake San Sebastian cheesecake?
Bake San Sebastian cheesecake for 45-55 minutes at 400°F (200°C). The edges should be set while the center remains slightly jiggly. For enhanced burnt effect, use the broiler for the final minute. The high temperature throughout most of the baking process is essential for achieving the signature caramelized top and proper texture contrast.
Can I make San Sebastian cheesecake ahead of time?
Yes, San Sebastian cheesecake is perfect for making ahead. Refrigerate for at least 4-6 hours, or overnight for best results, allowing flavors to develop fully. Store in an airtight container in the refrigerator for up to one week. You can also freeze whole cheesecakes or individual slices for up to three months with proper wrapping.
What ingredients do I need for San Sebastian cheesecake?
You need full-fat cream cheese, granulated sugar, eggs, heavy cream, flour or cornstarch, sea salt, and vanilla extract. All ingredients should be at room temperature for smooth mixing. Optional toppings include fresh berries, caramel sauce, whipped cream, or chocolate drizzle to enhance flavor and presentation.
How do I fix a runny or liquid center in my San Sebastian cheesecake?
A runny center usually indicates underbaking. Extend baking time by 10-15 minutes while monitoring the top to prevent over-browning. The center should be slightly jiggly but set around the edges. Ensure your oven temperature is accurate using an oven thermometer. Proper chilling for at least 4-6 hours also helps firm up the texture.
Should I serve San Sebastian cheesecake at room temperature or chilled?
Both options work well depending on preference. Room temperature offers a creamier, more custard-like texture, while chilled provides a firmer consistency. For best results, remove from refrigerator 15-30 minutes before serving if you prefer the creamier texture. Pair with fresh berries or sweet wines like Pedro Ximénez to complement the caramelized flavors.
How do I prevent my San Sebastian cheesecake from cracking?
Use room temperature ingredients and avoid overmixing the batter. Gradual cooling is essential – let the cheesecake cool in the turned-off oven with the door slightly open before transferring to room temperature, then refrigerate. Proper preparation and even mixing help prevent cracks. The rustic nature of this cheesecake embraces some imperfections, so minor cracks are acceptable.


