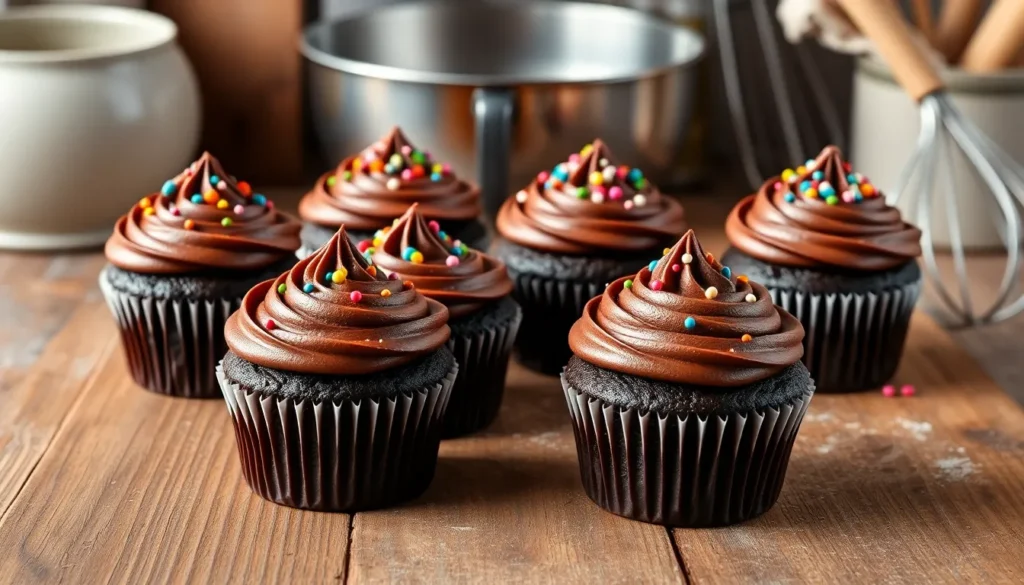
We know the struggle all too well – that sudden chocolate craving hits but you don’t want to make an entire batch of 24 cupcakes that’ll tempt you for days. That’s exactly why we created this small batch chocolate cupcakes recipe that yields just 6 perfectly portioned treats.
These aren’t your average boxed-mix cupcakes either. We’ve crafted a recipe that delivers intensely rich chocolate flavor with an incredibly moist crumb that rivals any bakery creation. The best part? You can whip these up in under an hour using ingredients you likely already have in your pantry.
Whether you’re baking for a cozy date night or simply want to satisfy your sweet tooth without the commitment of leftovers, these small batch chocolate cupcakes are your answer. They’re also perfect for testing frosting flavors or trying new decorating techniques without wasting ingredients on a full batch.
What Makes Small Batch Chocolate Cupcakes Special
Small batch baking transforms the way we approach dessert making by eliminating waste and maximizing flavor. We love how this recipe delivers bakery quality results without the commitment of making dozens of cupcakes that might go stale before we can enjoy them all.
The beauty of baking just six cupcakes lies in the precision and attention each one receives. Every cupcake benefits from careful measurement and optimal baking conditions that larger batches sometimes compromise. We achieve consistently moist centers and perfectly domed tops when we focus our energy on a smaller quantity.
Fresh ingredients make their biggest impact in small batch recipes. Vanilla extract tastes more vibrant and chocolate flavors develop more complexity when we use premium ingredients in smaller quantities. Our cocoa powder and chocolate chips don’t sit in the pantry for months between baking sessions.
Temperature control becomes much easier with fewer cupcakes in the oven. We notice more even browning and consistent texture across all six cupcakes compared to crowded pans that create hot spots and uneven results. The reduced baking time also means we can monitor progress more closely and pull them at the perfect moment.
Small batches encourage experimentation without fear of failure. We can test new frosting combinations or try different mix ins knowing that we’re only investing in six cupcakes worth of ingredients. This freedom leads to more creative baking and helps us perfect techniques before scaling up for special occasions.
The portability factor sets small batch cupcakes apart from larger desserts. Six cupcakes travel perfectly to dinner parties or office gatherings without the bulk of carrying multiple dozen. We appreciate how easy it becomes to share homemade treats when the quantity feels just right for intimate settings.
Essential Equipment for Small Batch Baking
 1")
Creating perfect small batch chocolate cupcakes requires the right tools to achieve bakery quality results. We’ve compiled our essential equipment list to help you bake with precision and confidence.
Mixing Equipment
Mini Stand Mixer forms the foundation of our small batch baking arsenal. The KitchenAid 3.5 Quart Artisan Mini Mixer efficiently handles smaller quantities of batter without overworking the ingredients. Handheld Electric Mixer serves as our versatile backup for quick mixing tasks and provides excellent control when working with delicate batters.
Mini Food Processor proves invaluable for grinding nuts or creating smooth ingredient blends for toppings and fillings. This compact tool ensures consistent textures in our flavor additions.
Baking Essentials
6-cup Muffin Pan delivers the perfect vessel for our small batch cupcakes. We recommend investing in a quality pan that distributes heat evenly for consistent browning. 6-inch Round Cake Pan offers an alternative option when you prefer a different presentation style.
Silicone Baking Mats prevent sticking while making cleanup effortless. These reusable mats eliminate the guesswork from release and protect your pans from scratches.
Precision Tools
Digital Food Scale ensures accuracy in every measurement. Small batch baking demands precise ratios, and volumetric measurements can lead to inconsistent results.
| Equipment | Purpose | Benefit |
|---|---|---|
| Digital Food Scale | Accurate measurements | Consistent results in small batches |
| Oven Thermometer | Temperature verification | Even browning and proper texture |
| Cookie Scoop | Uniform portioning | Equal sized cupcakes |
Oven Thermometer guarantees your oven maintains the correct temperature throughout the baking process. Temperature fluctuations can ruin small batches more quickly than large ones.
Cookie Scoop or Small Ice Cream Scoop creates uniform cupcake portions. This tool ensures each cupcake bakes evenly and presents beautifully.
Supporting Equipment
Pyrex Bowl Set provides reliable mixing vessels that withstand temperature changes and resist staining. Glass bowls allow us to monitor mixing progress clearly.
7-inch Sheet Pan expands your baking possibilities when you want to create sheet cakes or small cookie batches alongside your cupcakes.
Ingredients
 2")
Our carefully curated ingredient list ensures each cupcake delivers maximum chocolate flavor with minimal waste. These common pantry staples combine to create bakery quality results every time.
Dry Ingredients
- 2/3 cup all-purpose flour (about 80g) – forms the cupcake structure
- 1/4 cup unsweetened cocoa powder (about 25g) – provides rich chocolate base
- 1/2 teaspoon baking powder – creates lift and fluffy texture
- 1/2 teaspoon baking soda – enhances rise and tenderness
- 1/4 teaspoon salt – balances sweetness and enhances chocolate flavor
- 1/2 cup granulated sugar – sweetens and maintains moisture
Wet Ingredients
- 1 large egg – binds ingredients and adds richness
- 1/4 cup vegetable oil – ensures moist crumb texture
- 1/4 cup whole milk – creates tender cake structure
- 1 teaspoon vanilla extract – complements chocolate notes
- 1/4 cup hot water – blooms cocoa powder for deeper flavor
Optional Toppings and Frosting
Chocolate Buttercream:
- 1/2 cup unsalted butter (softened)
- 1 1/4 cups powdered sugar
- 3 tablespoons unsweetened cocoa powder
- 2-3 tablespoons heavy cream
- 1/2 teaspoon vanilla extract
- 1/2 teaspoon espresso powder – intensifies chocolate taste
- Chocolate chips or sprinkles – for decoration
| Ingredient Category | Prep Time Impact | Flavor Contribution |
|---|---|---|
| Dry Ingredients | 5 minutes | Foundation chocolate flavor |
| Wet Ingredients | 10 minutes | Moisture and binding |
| Frosting Components | 15 minutes | Enhanced richness |
Instructions
 3")
Our step by step process transforms simple pantry ingredients into bakery quality chocolate cupcakes in just 40 minutes. Each stage builds upon the previous one to create consistently moist centers and perfectly domed tops.
Prep
We begin by preheating our oven to 350°F (180°C) to ensure even heat distribution throughout the baking process. Line 6 muffin cups with paper liners or generously grease each cup with butter or cooking spray to prevent sticking. Position the muffin pan in the center of our oven rack for optimal air circulation around each cupcake.
Mix the Batter
We whisk together our dry ingredients first by combining 80g all-purpose flour with 20g cocoa powder in a medium bowl. Add 1 teaspoon baking powder and 1/4 teaspoon salt to this mixture and set aside. In a separate bowl we beat together 100g granulated sugar with 1 large egg until the mixture becomes pale and slightly thickened. Pour in 1/4 cup milk along with 59g canola oil and 56g sour cream to create our wet ingredient base. Gradually fold the dry ingredients into the wet mixture using a spatula until just combined. The batter should appear smooth and chocolatey with no visible flour streaks remaining.
Bake
We fill each prepared muffin cup about 2/3 full with batter to allow proper rising without overflow. Place the muffin pan in our preheated oven and bake for 15-20 minutes until the tops spring back when lightly touched. Insert a toothpick into the center of one cupcake to check for doneness. The toothpick should emerge clean or with just a few moist crumbs attached.
Cool
We allow the cupcakes to cool in the pan for exactly 5 minutes to prevent breaking while still warm. Carefully transfer each cupcake to a wire cooling rack using a gentle twisting motion to release them from the pan. Let the cupcakes cool completely for 30-45 minutes before applying any frosting to prevent melting.
Chocolate Buttercream Frosting
 4")
Our rich chocolate buttercream transforms these small batch cupcakes into an irresistible dessert experience. This silky smooth frosting complements the moist chocolate cupcakes with its perfect balance of cocoa and sweetness.
Frosting Ingredients
- ½ cup unsalted butter, softened
- 1–1½ cups powdered sugar (125–180g)
- ¼ cup unsweetened cocoa powder (20g)
- ⅛–¼ teaspoon salt
- 1 teaspoon vanilla extract
- 1–2 tablespoons heavy whipping cream or milk (to adjust consistency)
Frosting Instructions
Beat Butter: We start by using a hand mixer or stand mixer to beat the softened unsalted butter on medium-high speed. Continue beating for 1–2 minutes until the butter becomes smooth and creamy with a light, fluffy texture.
Add Dry Ingredients: Sift the powdered sugar, cocoa powder, and salt directly into the beaten butter. Pour in the vanilla extract and mix on low speed until all ingredients combine thoroughly without creating dust clouds.
Adjust Consistency: Gradually add heavy whipping cream or milk one tablespoon at a time while mixing on low speed. For thicker frosting that holds its shape when piped, use less cream. When you prefer a smoother, more spreadable consistency, add more liquid gradually until you achieve the desired texture.
Frost Cupcakes: Pipe or spread the finished frosting generously onto completely cooled cupcakes. We recommend using a piping bag fitted with your favorite tip for professional-looking results, or simply spread with an offset spatula for a rustic finish.
| Frosting Component | Measurement | Weight (if applicable) |
|---|---|---|
| Unsalted butter | ½ cup | – |
| Powdered sugar | 1–1½ cups | 125–180g |
| Cocoa powder | ¼ cup | 20g |
| Salt | ⅛–¼ teaspoon | – |
| Vanilla extract | 1 teaspoon | – |
| Heavy cream/milk | 1–2 tablespoons | – |
Remember to ensure all ingredients reach room temperature before beginning for the smoothest frosting texture. Store frosted cupcakes in an airtight container to maintain freshness and prevent the frosting from drying out.
Assembly and Decoration
 5")
We begin the decoration process by ensuring our chocolate cupcakes have cooled completely on a wire rack. Attempting to frost warm cupcakes causes the buttercream to melt and slide off the surface.
Preparing the Frosting Application
Our cupcakes are ready for decoration once they reach room temperature after approximately 30 minutes of cooling. We recommend testing the surface with our fingertip to confirm no warmth remains before proceeding with frosting application.
Frosting Techniques
We can apply our chocolate buttercream using two primary methods. The first involves spreading frosting directly onto each cupcake using an offset spatula for a rustic homemade appearance. We start with approximately 2 tablespoons of frosting per cupcake and work from the center outward in smooth circular motions.
Piping creates a more professional presentation for our small batch cupcakes. We fill a piping bag fitted with a star tip and apply steady pressure while creating rosettes or swirls on each cupcake surface. Starting from the outer edge and spiraling inward produces the most visually appealing results.
Final Decoration Elements
We enhance our frosted cupcakes with optional toppings that complement the rich chocolate flavor. Chocolate shavings add textural contrast and visual appeal when sprinkled over the buttercream surface. Colorful sprinkles provide a festive touch for special occasions.
| Decoration Option | Amount per Cupcake | Visual Effect |
|---|---|---|
| Chocolate shavings | 1 teaspoon | Elegant texture |
| Rainbow sprinkles | 1/2 teaspoon | Festive color |
| Mini chocolate chips | 1/2 teaspoon | Classic appeal |
Assembly Best Practices
We ensure uniform presentation by using a cookie scoop or large spoon to measure consistent frosting portions across all six cupcakes. This approach creates professional looking results while maintaining portion control.
Storage becomes important once decoration is complete. We place our finished cupcakes in an airtight container and refrigerate for up to 3 days. The frosted cupcakes should rest at room temperature for 15 minutes before serving to achieve optimal texture and flavor.
Storage Tips
 6")
We’ve perfected our storage methods to keep these small batch chocolate cupcakes fresh and delicious for days after baking. Proper storage techniques ensure that our carefully crafted treats maintain their moist texture and rich chocolate flavor.
Room Temperature Storage
Our unfrosted cupcakes stay fresh in an airtight container at room temperature for 2–5 days. The storage duration depends on your exact recipe and ambient kitchen conditions. We recommend consuming them within the first couple of days for optimal texture and flavor.
| Storage Method | Duration | Container Type |
|---|---|---|
| Room Temperature (Unfrosted) | 2-5 days | Airtight container |
| Room Temperature (Frosted) | 2-3 days | Airtight container |
| Refrigerator (Frosted) | Up to 5 days | Tightly sealed container |
| Freezer (Frosted or Unfrosted) | Up to 3 months | Airtight container or freezer bag |
We notice that cupcakes stored longer than a couple of days may develop slightly sticky tops and begin to lose their ideal texture. For frosted cupcakes at room temperature, we consider the stability of our frosting and recommend refrigeration if our kitchen environment becomes warm or humid.
Refrigerated Storage
We store our frosted cupcakes in the refrigerator when we need extended freshness or when dealing with heat-sensitive frostings. Our chocolate buttercream frosting benefits from refrigeration in warm conditions, maintaining its structure and preventing melting.
Refrigerated frosted cupcakes remain fresh for up to 5 days in a tightly sealed container. We avoid refrigerating unfrosted cupcakes when possible, as they tend to dry out faster in cold conditions.
Freezer Storage
We freeze our cupcakes (frosted or unfrosted) for up to 3 months when we want to prepare them well in advance. Our freezing process involves placing cupcakes on a baking sheet until they become solid, then transferring them to an airtight container or freezer bag.
We thaw frozen cupcakes at room temperature for approximately 2 hours before serving, or overnight in the refrigerator for a more gradual thaw. This method preserves the texture and prevents condensation from forming on the frosting.
Handling Storage Issues
We address sticky cupcake tops by allowing them to sit uncovered for about 30 minutes before applying frosting. This technique helps restore the surface texture and prevents frosting from sliding off.
For transportation or extended storage, we use sturdy boxes or shallow plastic storage containers that provide additional protection, especially for our decorated cupcakes. We store leftover chocolate buttercream frosting in an airtight container in the refrigerator for up to 1 week.
We achieve optimal freshness by making our cupcakes unfrosted in advance and applying frosting just before serving. Always check for signs of spoilage before consuming stored cupcakes, regardless of the storage method used.
Recipe Variations
 7")
Our base small batch chocolate cupcake recipe serves as the perfect foundation for creative adaptations. We can easily transform these 6 cupcakes into exciting new flavors with simple ingredient swaps and additions.
Double Chocolate Version
We elevate our chocolate cupcakes to the next level by folding chocolate chips directly into the batter. This addition creates pockets of melted chocolate throughout each cupcake while intensifying the overall chocolate flavor. Add a handful of mini chocolate chips or regular chocolate chips to the prepared batter just before dividing it among the muffin cups. The chips will distribute evenly during baking and provide delightful bursts of concentrated chocolate in every bite.
Mocha Cupcakes
We create sophisticated mocha cupcakes by incorporating coffee elements that enhance the chocolate’s natural depth. Add 1 teaspoon of instant espresso powder to the dry ingredients for a subtle coffee note that makes the chocolate taste more pronounced. Alternatively, we can substitute 62 grams of the liquid ingredients with strong brewed coffee for a more intense mocha flavor. The coffee doesn’t overpower the chocolate but instead creates a complex flavor profile that appeals to coffee and chocolate lovers alike.
Gluten-Free Option
We make our small batch chocolate cupcakes accessible to gluten-free bakers by replacing the all-purpose flour with a high-quality gluten-free flour blend. Choose a blend that contains xanthan gum or add ¼ teaspoon xanthan gum per cup of flour to maintain the cupcakes’ tender texture. All other ingredients remain unchanged in this variation. The resulting cupcakes maintain the same moist crumb and rich chocolate flavor as the original recipe.
| Variation Type | Key Modification | Result |
|---|---|---|
| Double Chocolate | Add chocolate chips to batter | Intensified chocolate flavor with melted pockets |
| Mocha | Add 1 tsp espresso powder or 62g coffee | Enhanced chocolate depth with coffee notes |
| Gluten-Free | Replace flour with GF blend + xanthan gum | Same texture and flavor without gluten |
Troubleshooting Common Issues
 8")
Even with our carefully crafted small batch chocolate cupcakes recipe, baking challenges can arise. We’ve compiled the most common problems and their answers to help you achieve perfect results every time.
Sunken Centers
Centers that collapse after baking typically result from three main culprits. Overmixing develops too much gluten in the batter, causing structural instability during cooling. Insufficient baking time leaves the interior undercooked and unable to support itself. Incorrect oven temperature creates uneven heat distribution that affects the cupcakes’ ability to set properly.
We recommend mixing only until ingredients combine without visible streaks of flour. Bake for the full 15-20 minutes recommended in our recipe, testing with a toothpick for doneness. Verify your oven temperature with a thermometer since many ovens run hot or cold.
Dense or Holey Cupcakes
Texture problems often stem from mixing technique and ingredient quality issues. Overmixing creates tough, dense cupcakes by developing excess gluten strands. Poor leavening from expired baking powder produces flat, heavy results. Using bread flour instead of all-purpose flour creates too much structure for tender cupcakes.
Cake flour produces the most tender texture, though all-purpose flour works well for our recipe. Check expiration dates on baking powder and baking soda, replacing them every 6-12 months. Fold ingredients gently using a spatula rather than aggressive mixing with electric beaters.
Shrinking Cupcakes
Cupcakes that deflate or shrink after cooling usually indicate sugar-related problems. Poor quality sugar contains impurities that affect the cupcakes’ structure during baking. Excessive sugar creates an unstable batter that collapses when cooled.
Our recipe calls for exactly 150g of granulated or caster sugar for optimal results. Use high-quality sugar brands and measure precisely using a digital scale. Avoid substituting different sugar types without adjusting the recipe accordingly.
Soggy Bottoms
Moisture problems typically develop during the cooling process. Cooling cupcakes in the muffin tin traps steam underneath, creating soggy bottoms that never fully set.
Remove cupcakes from the muffin tin within 5 minutes of baking completion. Transfer them immediately to a wire cooling rack for proper air circulation. This prevents condensation buildup and ensures crispy bottoms that complement the moist interior.
| Common Issue | Primary Cause | Quick Solution |
|---|---|---|
| Sunken Centers | Overmixing/Underbaking | Mix gently, bake 15-20 minutes |
| Dense Texture | Wrong flour type | Use cake flour or all-purpose |
| Shrinking | Poor quality sugar | Use high-quality granulated sugar |
| Soggy Bottoms | Cooling in pan | Transfer to wire rack immediately |
Our small batch approach makes troubleshooting easier since you’re working with just six cupcakes. Each adjustment you make has immediate visible results, helping you perfect your technique quickly. Temperature control becomes more manageable with smaller quantities, reducing the likelihood of uneven baking that causes many common problems.
Make-Ahead Instructions
 9")
Planning ahead transforms our small batch chocolate cupcakes into convenient treats ready when we need them most. We can prepare both the cupcakes and frosting in advance to streamline our baking schedule.
Preparing Cupcakes in Advance
Baking our cupcakes ahead of time saves precious hours on busy days. We should bake the cupcakes completely and allow them to cool to room temperature before storing. An airtight container keeps unfrosted cupcakes fresh at room temperature for up to 3 days without compromising their moist texture.
Freezing extends our storage options significantly. We wrap each cooled cupcake individually in plastic wrap before placing them in a freezer-safe container or bag. Properly wrapped cupcakes maintain their quality for up to 2 months in the freezer. Thawing occurs naturally at room temperature within 1-2 hours.
Frosting Preparation Timeline
Our chocolate buttercream frosting benefits from advance preparation as well. We can prepare the frosting up to 3 days before serving and store it in an airtight container in the refrigerator. The cold temperature keeps the butter stable while preserving the frosting’s smooth consistency.
Before using refrigerated frosting we must return it to room temperature. This process takes approximately 30-60 minutes depending on room temperature. We then re-whip the frosting with an electric mixer for 1-2 minutes to restore its light and fluffy texture.
Assembly Strategy
Smart timing maximizes our efficiency when serving these cupcakes. We recommend frosting the cupcakes on the day of serving for optimal appearance and taste. This approach prevents the frosting from absorbing moisture from the cupcakes while maintaining that fresh-from-the-kitchen appeal.
Storage containers should accommodate the height of frosted cupcakes without damaging their decorative tops. We use containers with sufficient headroom or cupcake carriers designed specifically for transporting decorated treats.
Conclusion
These small batch chocolate cupcakes prove that you don’t need to make dozens to enjoy bakery-quality treats at home. With just six perfectly portioned cupcakes you’ll satisfy your chocolate cravings while avoiding the temptation of endless leftovers.
We’ve equipped you with everything from essential tools to troubleshooting tips that guarantee success every time. The beauty of small batch baking lies in its flexibility – whether you’re experimenting with new frosting techniques or adapting the recipe to dietary needs.
Now it’s time to preheat that oven and create your own batch of these indulgent chocolate cupcakes. Your kitchen will smell amazing and you’ll have the perfect sweet ending to any day.
Frequently Asked Questions
How many cupcakes does this small batch recipe make?
This small batch chocolate cupcakes recipe yields exactly 6 cupcakes. This quantity is perfect for satisfying chocolate cravings without creating excessive leftovers, making it ideal for date nights, small gatherings, or when you want to experiment with frosting techniques without waste.
How long does it take to make these chocolate cupcakes?
The entire process takes under an hour from start to finish. This includes preparation time, mixing the batter, baking, and cooling. The quick timeline makes these cupcakes perfect for spontaneous dessert cravings or last-minute entertaining needs.
What equipment do I need for small batch baking?
Essential equipment includes a 6-cup muffin pan, mini stand mixer, digital food scale, and cookie scoop for uniform portions. Optional tools like a mini food processor, oven thermometer, and offset spatula can enhance your results and make the process more efficient.
How should I store the finished cupcakes?
Unfrosted cupcakes stay fresh in an airtight container at room temperature for 2-5 days. Frosted cupcakes last 2-3 days at room temperature or up to 5 days refrigerated. For longer storage, freeze both frosted and unfrosted cupcakes for up to 3 months.
Can I make these cupcakes ahead of time?
Yes! Bake cupcakes up to 3 days in advance and store at room temperature, or freeze for up to 2 months. The chocolate buttercream can be made 3 days ahead and refrigerated. For best results, frost cupcakes on the day you plan to serve them.
What recipe variations can I try?
Popular variations include Double Chocolate (add chocolate chips), Mocha (add espresso powder or brewed coffee), and Gluten-Free (substitute with gluten-free flour blend). Each variation maintains the original’s moist texture while offering unique flavor profiles.
Why are my cupcakes sinking in the center?
Sunken centers typically result from overmixing the batter, incorrect oven temperature, or opening the oven door too early. Mix ingredients just until combined, verify your oven temperature with a thermometer, and avoid opening the door during the first 15 minutes of baking.
How do I achieve professional-looking frosting?
Allow cupcakes to cool completely before frosting to prevent melting. Use an offset spatula for a rustic look or a piping bag for professional results. Apply frosting in smooth, even layers and consider adding toppings like chocolate shavings or sprinkles for extra appeal.


