We know that craving for warm gooey cinnamon rolls doesn’t always come with a crowd to feed. That’s exactly why we’ve perfected this small batch cinnamon rolls recipe that makes just 6 perfectly portioned rolls – enough to satisfy your sweet tooth without overwhelming your kitchen or waistline.
There’s something magical about the aroma of cinnamon and brown sugar wafting through your home on a quiet weekend morning. Our scaled-down version delivers all the comfort and indulgence of traditional cinnamon rolls without the commitment of making dozens. We’ve streamlined the process to be beginner-friendly while maintaining that bakery-quality taste and texture you’re craving.
Whether you’re cooking for two or simply want fresh cinnamon rolls without leftovers sitting around for days this recipe is your answer. We’ll walk you through every step to create these irresistible treats that prove good things really do come in small batches.
Ingredients
We’ve carefully measured each ingredient to create the perfect small batch of six cinnamon rolls. Our recipe uses common pantry staples that combine to deliver exceptional flavor and texture.
For the Dough
- 1½ cups all-purpose flour
- 1 tablespoon granulated sugar
- 1 teaspoon instant yeast
- ½ teaspoon salt
- ¼ cup warm milk (110°F)
- 2 tablespoons unsalted butter, melted
- 1 large egg, room temperature
For the Cinnamon Filling
- 2 tablespoons unsalted butter, softened
- ¼ cup packed light brown sugar
- 1 teaspoon ground cinnamon
- Pinch of salt
For the Cream Cheese Glaze
- 2 oz cream cheese, softened
- 2 tablespoons powdered sugar
- 1 tablespoon milk
- ¼ teaspoon vanilla extract
Equipment Needed
 1")
Making our small batch cinnamon rolls requires only basic kitchen tools that most home bakers already have on hand. We designed this recipe to be accessible without requiring any fancy equipment or expensive gadgets.
Essential Tools
Our recipe calls for standard baking equipment that makes the process straightforward and enjoyable. We need mixing bowls for combining ingredients, measuring cups and spoons for accuracy, and a spatula or wooden spoon for stirring. A rolling pin helps us achieve the perfect dough thickness, while a baking pan or dish holds our six rolls during baking.
Helpful Additions
Several optional tools can enhance our baking experience without being necessary. An instant read thermometer ensures our milk reaches the ideal temperature for activating yeast. Parchment paper or a silicone mat prevents sticking and makes cleanup easier. A kitchen scale provides precision if we prefer measuring ingredients by weight.
Cutting and Shaping Tools
We recommend having a sharp knife or pizza cutter ready for slicing our rolled dough into individual portions. Unflavored dental floss offers an alternative cutting method that creates clean slices without compressing the delicate dough layers.
Stand Mixer Considerations
While a stand mixer with dough hook or paddle attachment can simplify mixing and kneading, we emphasize that it remains completely optional. Our small batch recipe works perfectly with hand mixing, making it accessible to bakers without specialized equipment. Most preparation steps can be completed entirely by hand using basic tools.
This minimal equipment approach ensures that anyone can create bakery-quality cinnamon rolls without investing in expensive kitchen gadgets or requiring important counter space.
Instructions
 2")
We’ll walk through each step to create these tender, fragrant cinnamon rolls that deliver bakery-quality results in a perfectly sized batch. Follow our detailed process to ensure success from mixing to serving.
Prep the Dough
We start by warming our milk to the optimal temperature range of 105–115°F using an instant-read thermometer for accuracy. In a large mixing bowl, we whisk together the warm milk, instant yeast, and granulated sugar until the mixture becomes frothy. Add the melted butter, room temperature egg, and salt to this mixture, whisking until well combined.
Pour the flour into the wet ingredients and stir with a wooden spoon or spatula until a sticky dough forms. Turn the dough onto a lightly floured surface and knead by hand for 10–15 folds until the dough becomes smooth and elastic. The dough should feel slightly tacky but not overly sticky when properly kneaded.
Make the Cinnamon Filling
In a small bowl, we combine the light brown sugar, ground cinnamon, and pinch of salt, stirring until evenly distributed. Set this cinnamon sugar mixture aside for later use.
Melt the 2 tablespoons of butter in a microwave-safe bowl or small saucepan, ensuring it’s completely liquefied but not hot. Keep the melted butter nearby for spreading on our rolled dough.
Roll and Shape the Cinnamon Rolls
On a floured surface, we roll the risen dough into a rectangle measuring approximately 5×15 inches using our rolling pin. Brush the melted butter evenly across the entire surface of the dough rectangle, leaving a small border along one long edge.
Sprinkle the cinnamon sugar mixture over the buttered dough, distributing it evenly with our hands. Starting from the short end, we roll the dough tightly into a log shape, keeping the roll as uniform as possible.
Using a sharp serrated knife or unflavored dental floss, we cut the log into 6 even pieces. Place each cut roll into our greased baking dish with the spiral side facing up.
First Rise
Cover the arranged rolls with a clean kitchen towel or plastic wrap to prevent drying. We let the rolls rise in a warm place until they appear puffed and have nearly doubled in size.
This rising process typically takes 45–90 minutes depending on the ambient temperature of our kitchen. The rolls are ready when they spring back slowly when gently pressed with a finger.
Bake the Cinnamon Rolls
We preheat our oven to 375°F while the rolls complete their final rise. Remove the covering from the rolls and place the baking dish in the preheated oven.
Bake the cinnamon rolls for 20–25 minutes until they turn golden brown on top and sound hollow when tapped. The internal temperature should reach approximately 190°F when measured with an instant-read thermometer.
Prepare the Glaze
While our cinnamon rolls bake, we prepare the cream cheese glaze by combining the softened cream cheese, powdered sugar, milk, and vanilla extract in a medium bowl. Whisk the ingredients together until the mixture becomes completely smooth and free of lumps.
The glaze should have a pourable consistency that will spread easily over the warm rolls. If needed, we can adjust the thickness by adding small amounts of milk or powdered sugar.
Assemble and Serve
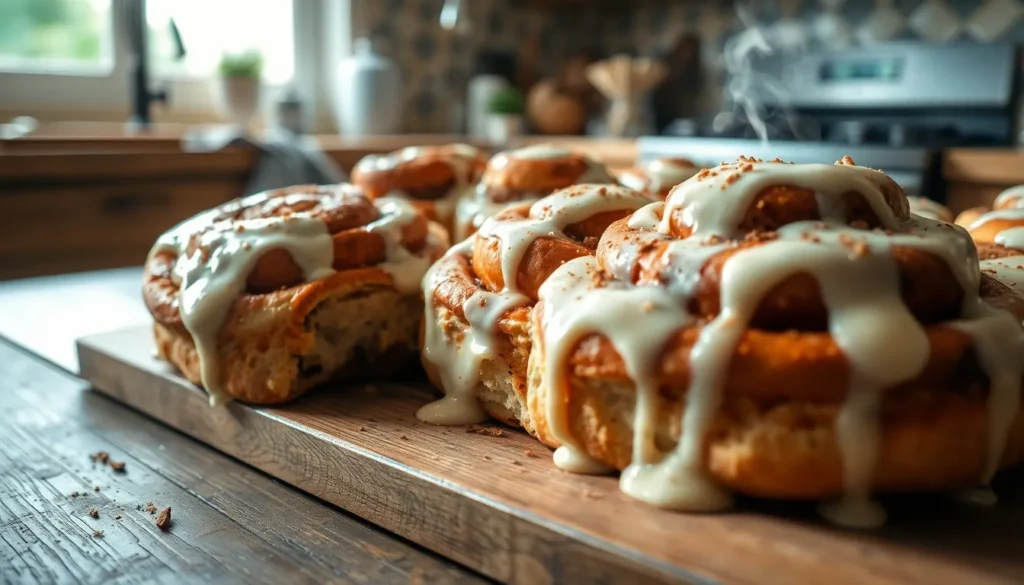
We remove the baked cinnamon rolls from the oven and let them cool for 3–5 minutes to prevent the glaze from melting completely. Drizzle or spread the cream cheese glaze generously over the warm rolls using a spoon or offset spatula.
Serve the glazed cinnamon rolls immediately while they’re still warm for the best texture and flavor experience. The contrast between the warm, tender rolls and the cool, creamy glaze creates the perfect bite every time.
Make-Ahead Instructions
 3")
We love how this small batch cinnamon roll recipe adapts perfectly to busy schedules through strategic make-ahead planning. These preparation methods allow us to enjoy fresh rolls with minimal morning effort.
Overnight Dough Preparation
We can prepare the dough the night before and let it rise slowly in the refrigerator. After mixing and kneading the dough following our standard recipe steps, place it in a lightly oiled bowl and cover tightly with plastic wrap. The cold fermentation develops deeper flavors while we sleep, creating an even more delicious final product.
Complete Roll Assembly
For maximum convenience, we recommend assembling the entire recipe the night before baking. Roll out the chilled dough, spread the cinnamon filling, shape the rolls, and arrange them in our prepared baking dish. Cover the assembled rolls tightly with plastic wrap and refrigerate overnight. This method ensures we wake up to rolls ready for their final rise and baking.
Morning Baking Process
Remove the assembled rolls from the refrigerator 30 minutes before baking to allow them to come to room temperature. The rolls will complete their second rise during this time, puffing up beautifully before going into the oven. Bake according to our standard instructions while preparing the cream cheese glaze.
Freezing Instructions
Our baked cinnamon rolls freeze exceptionally well for up to 3 months when stored properly. Wrap individual rolls tightly in plastic wrap, then place them in a freezer-safe container or bag. To serve frozen rolls, thaw them overnight in the refrigerator and warm in a 300°F oven for 5-7 minutes before adding fresh glaze.
| Preparation Method | Storage Duration | Best Use |
|---|---|---|
| Overnight dough | 24 hours refrigerated | Next day baking |
| Assembled rolls | 12-24 hours refrigerated | Weekend mornings |
| Baked rolls | 3 months frozen | Future treats |
| Room temperature | 2-3 days covered | Immediate consumption |
Storage Tips
 4")
Proper storage ensures our small batch cinnamon rolls maintain their soft texture and delicious flavor for days after baking. We recommend allowing the rolls to cool completely before storing them to prevent condensation that could make them soggy.
Room Temperature Storage
Fresh cinnamon rolls stay soft and delicious when stored in an airtight container at room temperature for 2–3 days. We find this method works best when the rolls are completely cooled and the container seals tightly to maintain moisture.
Refrigerator Storage
For longer freshness, we store our cinnamon rolls in the refrigerator where they remain fresh for up to 5–7 days. Wrap each roll individually in plastic wrap before placing them in a sealed bag or airtight container. The exact storage time depends on your exact recipe and frosting type.
| Storage Method | Duration | Best Practices |
|---|---|---|
| Room Temperature | 2–3 days | Airtight container, completely cooled |
| Refrigerator | 5–7 days | Plastic wrap + sealed bag |
| Freezer (baked) | Up to 2 months | Individual wrapping, freezer bags |
| Freezer (unbaked) | Up to 2 months | Freeze on sheet, transfer to bags |
Freezing Instructions
We recommend freezing baked cinnamon rolls for storage up to 2 months. Wrap each roll tightly in plastic wrap before placing them in an airtight or freezer-safe bag. When ready to serve, thaw the rolls at room temperature and warm them in the microwave or oven for that fresh-baked taste.
Unbaked Dough Storage
Assembled unbaked cinnamon rolls offer excellent make-ahead convenience. We wrap them tightly and refrigerate overnight, then remove them from the fridge 1–2 hours before baking to allow proper rising at room temperature. For longer storage, freeze the assembled rolls on a baking sheet for 3–4 hours before transferring them to freezer bags. Thaw completely, allow them to rise, and bake as usual.
Frosting Storage Guidelines
We store cream cheese frosting or glaze separately in the refrigerator or freezer to maintain the best texture. Always frost the rolls just before serving rather than storing them already frosted. This prevents the frosting from becoming too soft or separating during storage.
Additional Storage Tips
Additional layers of plastic wrap and foil help maintain moisture when storing rolls in their original baking pans. We always ensure our cinnamon rolls are completely cooled before wrapping to prevent steam buildup that could affect their texture and freshness.
Recipe Variations
 5")
Our small batch cinnamon rolls offer endless customization possibilities. We’ve developed several delicious variations to suit different flavor preferences and baking styles.
Different Glaze Options
We believe the perfect glaze transforms good cinnamon rolls into extraordinary ones. Our cream cheese frosting remains the most popular choice, combining 2 oz softened cream cheese with 2 tablespoons powdered sugar, 1 tablespoon milk, and ¼ teaspoon vanilla extract for that classic tangy sweetness.
Vanilla buttercream frosting provides a sweeter alternative that uses butter, powdered sugar, vanilla, and a touch of cream or milk for an irresistibly smooth finish. We love how this option creates a beautiful contrast against the warm cinnamon spices.
For something truly special, we recommend our brown butter cream cheese glaze. This variation combines the nutty richness of brown butter with traditional cream cheese elements, creating a sophisticated flavor profile that elevates the entire experience.
Filling Alternatives
The filling defines the character of our cinnamon rolls, and we’ve perfected several variations to match different taste preferences. Our classic cinnamon filling blends softened butter with brown sugar and ground cinnamon for the traditional flavor everyone expects.
Brown sugar and cinnamon filling takes the classic approach further by using dark brown sugar instead of light brown sugar. We find this creates a deeper, more complex flavor that pairs beautifully with the yeast dough.
Our buttery cinnamon filling adds an extra generous amount of melted butter to the standard mixture. This variation produces incredibly moist rolls with rich flavor that melts perfectly into every bite.
Each filling option works seamlessly with our small batch recipe, ensuring consistent results regardless of which variation you choose to create.
Troubleshooting Tips
 6")
Even experienced bakers encounter challenges when making small batch cinnamon rolls. We’ve compiled answers to the most common issues to help ensure your rolls turn out perfectly every time.
Dough Problems
Dough Not Rising Properly
Temperature plays a crucial role in yeast activation. We recommend checking that your milk and butter mixture stays between 100-110°F to avoid killing the yeast. Create a warm draft-free environment for rising by placing the bowl in a slightly warmed oven or near a heat source.
Dough Consistency Issues
Sloppy or overly wet dough requires patience during the kneading process. Keep kneading until the butter incorporates fully into the dough even though this process can be time-consuming. The extra effort results in better dough consistency and texture.
Filling and Shaping Challenges
Filling Leaks During Baking
Overfilling creates the dreaded “great cinnamon sugar exodus” during baking. We suggest spreading the filling evenly while avoiding excessive amounts. Roll the dough log tightly enough to contain the filling and allow the shaped rolls to rise properly before baking to minimize leaks.
Uneven Roll Distribution
Spread the cinnamon filling evenly across the rolled dough surface. Fill each roll just enough to maintain structure without causing spillage during the baking process.
Baking and Equipment Answers
Pan Size Considerations
Using an appropriately sized pan prevents rolls from pressing against each other during rising and baking. An 8-inch pan works exceptionally well for small batches of six rolls.
Essential Equipment for Success
| Equipment Type | Purpose | Benefit |
|---|---|---|
| Stand Mixer | Kneading enriched dough | Reduces manual effort |
| Rolling Pin | Even dough rolling | Consistent thickness |
| Parchment Paper | Pan lining | Prevents sticking and eases cleanup |
Ingredient Quality Matters
Use instant or rapid rise yeast for reliable results. High-quality butter and fresh spices significantly impact the final flavor profile of your cinnamon rolls.
Timing and Storage Answers
Rise Time Adjustments
Fast rise yeast typically requires 2.5 to 3 hours for proper rising. Monitor your dough’s progress rather than relying solely on time measurements.
Freezing Strategy
Slightly underbake rolls before freezing to prevent overcooking when reheating. Defrost completely and refresh in the oven before adding frosting for the best texture and taste.
Conclusion
We’ve designed this small batch cinnamon roll recipe to bring bakery-quality results right to your kitchen without any of the usual hassle or waste. Whether you’re baking for a quiet morning at home or treating someone special these six perfectly portioned rolls deliver maximum flavor with minimal effort.
The beauty of this recipe lies in its flexibility and forgiving nature. You can prepare everything ahead of time customize the fillings and glazes to your taste and even freeze extras for future cravings. With simple ingredients and basic equipment you’ll have warm fragrant cinnamon rolls ready in just a few hours.
Now it’s time to roll up your sleeves and start baking. Trust us – once you smell that incredible aroma filling your kitchen you’ll understand why small batch baking is such a game-changer for home bakers everywhere.
Frequently Asked Questions
How many cinnamon rolls does this small batch recipe make?
This recipe makes exactly 6 cinnamon rolls, making it perfect for couples or small households who want fresh homemade rolls without leftovers. The small batch size allows you to satisfy your cinnamon roll cravings without the commitment of making a full dozen.
Can I make the dough ahead of time?
Yes! You can prepare the dough the night before and let it rise slowly in the refrigerator, which actually enhances the flavor. You can also assemble the entire rolls the night before baking, cover tightly, and refrigerate. Just bring them to room temperature before the final rise and baking.
What kitchen equipment do I need to make these cinnamon rolls?
You only need basic kitchen tools: mixing bowls, measuring cups and spoons, a spatula or wooden spoon, rolling pin, and a baking pan. Optional tools like an instant-read thermometer, parchment paper, and kitchen scale can help, but they’re not necessary. No fancy equipment required!
How should I store leftover cinnamon rolls?
Store cooled rolls in an airtight container at room temperature for 2-3 days or refrigerate for 5-7 days wrapped individually in plastic wrap. For longer storage, freeze baked rolls for up to 2 months. Store cream cheese frosting separately and apply just before serving.
Can I customize the filling and glaze?
Absolutely! You can try different glazes like vanilla buttercream or brown butter cream cheese glaze. For fillings, experiment with extra brown sugar for deeper flavor or add more butter for enhanced moisture. Each variation works seamlessly with this small batch recipe.
What should I do if my dough isn’t rising properly?
Ensure your milk is warm (around 110°F) but not hot, as high temperatures can kill the yeast. Find a warm, draft-free spot for rising, such as near a warm oven or in a slightly heated oven turned off. Proper temperature is crucial for successful rising.
Can I freeze unbaked cinnamon rolls?
Yes! You can freeze assembled unbaked rolls after shaping. Wrap them tightly and freeze for up to 3 months. When ready to bake, thaw overnight in the refrigerator, bring to room temperature, allow final rise, then bake as directed.


