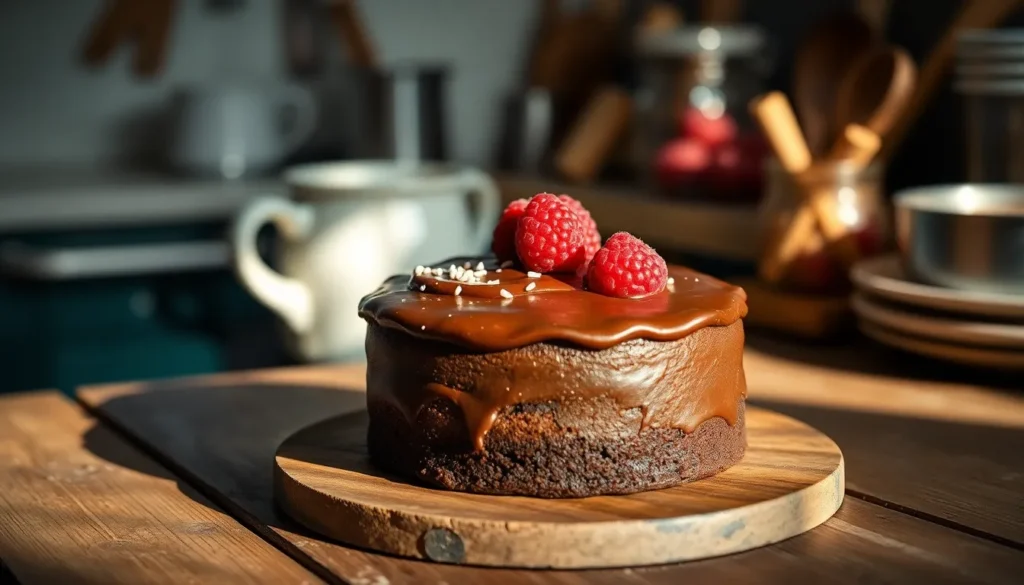
Sometimes we crave that perfect chocolate indulgence but don’t want to commit to a massive cake sitting on our counter for days. That’s exactly why we fell in love with this small chocolate cake recipe – it delivers all the rich, decadent flavors you’re craving in a perfectly portioned size.
This isn’t just any ordinary chocolate cake. We’ve perfected a recipe that creates an incredibly moist, fudgy texture with deep chocolate flavor that rivals any bakery creation. The best part? You can whip this up in under an hour using simple pantry ingredients you probably already have on hand.
Whether you’re baking for a romantic dinner, treating yourself after a long day, or need a quick dessert for unexpected guests, this small chocolate cake hits every mark. It’s proof that bigger isn’t always better – sometimes the most satisfying treats come in smaller packages.
Ingredients
We’ve carefully selected simple pantry staples that create maximum chocolate impact in this small but mighty cake. These measured ingredients ensure perfect results every time.
For the Cake
- 1/2 cup all-purpose flour
- 1/4 cup unsweetened cocoa powder
- 1/2 cup granulated sugar
- 1/2 teaspoon baking powder
- 1/4 teaspoon salt
- 1/4 cup vegetable oil
- 1/4 cup whole milk
- 1 large egg
- 1/2 teaspoon vanilla extract
- 1/4 cup boiling water
For the Chocolate Frosting
- 1/4 cup unsalted butter, softened
- 1/4 cup unsweetened cocoa powder
- 1 1/2 cups powdered sugar
- 3-4 tablespoons whole milk
- 1/2 teaspoon vanilla extract
- Pinch of salt


Equipment Needed

Creating our perfect small chocolate cake requires minimal equipment that most home bakers already have in their kitchens. We’ve streamlined this list to include only the essentials needed for professional results.
Essential Baking Equipment:
- 6-inch or 8-inch round cake pan – Perfect size for serving 2-6 people
- Mixing bowls (medium and large sizes)
- Whisk or electric hand mixer – For smooth batter consistency
- Measuring cups and spoons – Accurate measurements ensure perfect texture
- Rubber spatula – Essential for gentle folding and scraping bowls clean
- Fine mesh sifter – Creates lump-free dry ingredients
- Cake tester or wooden toothpick – Critical for checking doneness
Preparation and Finishing Tools:
- Wire cooling rack – Prevents soggy bottoms and ensures even cooling
- Small offset spatula – Makes pan removal and frosting application effortless
- Parchment paper – Guarantees easy cake release
- Small saucepan – Needed for heating the boiling water component
Optional but Helpful:
- Kitchen scale – For the most precise ingredient measurements
- Bench scraper – Useful for transferring ingredients and cleaning surfaces
Most home bakers find they already own 90% of these tools. The 6-inch pan creates the ideal portion size while the basic mixing equipment ensures our batter achieves that signature moist, fudgy texture. Proper equipment preparation sets the foundation for bakery-quality results in our own kitchen.


Instructions

Let’s transform our carefully measured ingredients into a stunning small chocolate cake that delivers maximum flavor in every bite. We’ll guide you through each step to ensure bakery-quality results in your own kitchen.
Prep the Pan and Oven
We start by preheating our oven to 350°F (177°C) to ensure even baking throughout. Grease our 6-inch or 8×8-inch pan thoroughly with butter or cooking spray. Line the bottom with parchment paper for effortless removal later. Place all measured ingredients within easy reach on our counter before beginning the mixing process.
Make the Cake Batter
We combine all dry ingredients in a large mixing bowl: flour, sugar, cocoa powder, baking soda, and salt. Whisk these ingredients until completely blended and no lumps remain. In a separate bowl, we mix our wet ingredients: oil, egg, buttermilk, and vanilla extract until smooth. Pour the wet mixture into our dry ingredients and stir gently until just combined. Avoid overmixing to maintain our cake’s tender texture.
Bake the Cake
We pour the batter into our prepared pan and smooth the top with a rubber spatula. Place the pan in our preheated oven and bake for 25-30 minutes for a 6-inch cake or 28-30 minutes for an 8×8-inch pan. Test doneness by inserting a toothpick into the center; it should come out clean or with just a few moist crumbs. Allow the cake to cool in the pan for 10 minutes before transferring to a wire rack for complete cooling.
Prepare the Frosting
We beat room temperature butter in a mixing bowl until light and creamy. Gradually add powdered sugar, cocoa powder, salt, and vanilla extract while mixing continuously. Beat until the frosting reaches a smooth, spreadable consistency. Add milk one tablespoon at a time if needed to achieve our desired texture. Set the frosting aside until our cake cools completely.
Assemble and Frost
We place our completely cooled cake on a serving plate or cake stand. Apply a small dab of frosting underneath to secure the cake in place. Spread frosting evenly across the top and sides using an offset spatula. Create smooth surfaces by holding the spatula at a slight angle and rotating the plate. Add decorative swirls or patterns as desired to complete our beautiful small chocolate cake.


Baking Tips for Success

Small chocolate cakes require exact techniques to achieve that perfect balance of moisture and richness we all crave. Our experience shows that following these professional baking tips transforms ordinary ingredients into extraordinary results.
Temperature control forms the foundation of successful small chocolate cake baking. We always preheat our oven to 350°F (175–177°C) before beginning any mixing process. This ensures even heat distribution throughout the smaller cake structure. Room temperature ingredients blend more effectively than cold ones. We recommend removing eggs, butter, and milk from the refrigerator 30-60 minutes before starting our recipe.
Accurate measurements make the difference between dense disappointment and fluffy perfection. We use proper measuring cups for dry ingredients and liquid measuring cups for wet components. This precision becomes especially critical in small batch baking where ingredient ratios have greater impact.
| Measurement Type | Tool Required | Temperature Guideline |
|---|---|---|
| Dry Ingredients | Dry measuring cups | Room temperature |
| Wet Ingredients | Liquid measuring cups | Room temperature |
| Butter | Kitchen scale (preferred) | 68-70°F |
| Eggs | Large size standard | Room temperature |
Sifting eliminates lumps that create uneven texture in our finished cake. We combine flour, cocoa powder, baking soda, baking powder, and salt in a fine mesh sifter before whisking together. This step promotes uniform distribution and creates the smooth crumb structure we desire.
Mixing technique determines our cake’s final texture. We combine ingredients just until incorporated, avoiding overmixing that develops tough gluten strands. The batter should look slightly lumpy rather than perfectly smooth.
Pan preparation prevents the heartbreak of stuck cake layers. We grease our pans thoroughly and line them with parchment paper for foolproof release. Small cakes are more delicate than large ones, making proper pan prep essential.
Air bubbles create uneven baking and collapsed centers. We gently tap filled pans on the counter 2-3 times to release trapped air before sliding them into the preheated oven.
Doneness testing requires a light touch with small cakes. We insert a toothpick into the center at the minimum baking time. The cake is ready when the tester emerges with just a few moist crumbs clinging to it. Clean toothpicks often indicate overbaking in chocolate cakes.
Cooling prevents structural collapse and makes frosting application easier. We let our cakes rest in their pans for exactly 10 minutes before turning them onto wire racks. For faster cooling, we place the racks in the freezer for 15-20 minutes.
Level surfaces create professional looking results. We use a long serrated knife to remove any dome from our cooled cake layers before frosting. This simple step ensures even frosting distribution and picture perfect presentation.
Storage timing preserves freshness when we’re not serving immediately. We wrap completely cooled unfrosted cakes in plastic wrap and freeze them for up to three months. Frozen cakes actually frost more easily than fresh ones and maintain superior moisture levels.
Storage Instructions

Proper storage techniques ensure our small chocolate cake maintains its moist texture and rich flavor for days after baking. We recommend different storage methods based on whether the cake has frosting and what type of frosting we’ve used.
Room Temperature Storage
Our small chocolate cake stays fresh at room temperature for 3 to 5 days when stored in an airtight container or cake carrier. This method works best for cakes with buttercream or similar stable frostings. We must ensure the cake is completely cooled before placing it in storage to prevent condensation.
Unfrosted cake layers require different handling. We wrap them tightly in plastic wrap and store at room temperature for up to 2 days. This approach preserves the cake’s moisture while preventing it from drying out.
Important exception: Cakes with cream cheese frosting need refrigeration within 2 hours due to dairy content and should not be stored at room temperature.
Refrigerator Storage
Frosted small chocolate cakes belong in the refrigerator when we need longer storage periods. We place the cake in an airtight container and refrigerate for 3 to 5 days maximum. This method works for all frosting types and helps maintain food safety standards.
| Storage Method | Duration | Container Type | Temperature |
|---|---|---|---|
| Room Temperature (Buttercream) | 3-5 days | Airtight container | 68-72°F |
| Room Temperature (Unfrosted) | 2 days | Plastic wrap | 68-72°F |
| Refrigerated (All frostings) | 3-5 days | Airtight container | 35-38°F |
| Frozen (Unfrosted layers) | 2-3 months | Plastic wrap + foil | 0°F |
| Frozen (Buttercream frosting) | 2 months | Airtight container | 0°F |
Freezing for Long Term Storage
We freeze unfrosted cake layers for maximum flexibility and longest storage life. First we ensure the layers are completely cooled then wrap them tightly in plastic wrap followed by aluminum foil. Finally we place the wrapped layers in an airtight container or freezer bag where they stay fresh for 2 to 3 months.
Buttercream frosting freezes separately in airtight containers for up to 2 months. We thaw frozen frosting in the refrigerator then rewhip it to restore the original smooth consistency before applying to our cake.
Thawing Instructions
Frozen cake layers thaw overnight in the refrigerator or at room temperature for faster results. We never rush this process with heat as it can create uneven texture and moisture loss. Thawed frosting requires rewhipping to achieve the proper spreading consistency we need for beautiful cake decoration.
These storage methods help us enjoy our small chocolate cake at peak quality whether we’re planning ahead or preserving leftovers for later enjoyment.


Variations and Substitutions

We’ve designed this small chocolate cake recipe to be incredibly flexible. You can easily customize it to match your taste preferences and dietary needs without compromising the rich chocolate flavor.
Flavor Variations
Espresso Enhancement: We recommend adding 1-2 teaspoons of instant espresso powder to your dry ingredients or substituting hot coffee for the boiling water. This combination enhances the chocolate’s depth and creates a more sophisticated flavor profile that coffee lovers will appreciate.
Vanilla Boost: Increase the vanilla extract to 2 teaspoons in both the cake batter and frosting. This extra vanilla complements the chocolate beautifully and adds warmth to each bite.
Nutty Additions: Fold in ½ cup of chopped almonds or walnuts into the batter just before baking. These nuts provide delightful texture contrast and pair wonderfully with chocolate’s richness.
Fruity Twist: Gently fold in ½ cup of fresh raspberries or chopped strawberries for a bright flavor balance. The fruit’s tartness cuts through the chocolate’s intensity perfectly.
Mint Infusion: Add ½ teaspoon of peppermint extract to create a refreshing chocolate mint cake. Crush a few peppermint candies on top of the frosting for extra visual appeal.
Dietary Substitutions
Gluten-Free Option: Replace the all-purpose flour with a 1:1 gluten-free flour blend. We’ve found that blends containing xanthan gum work best for maintaining the cake’s tender texture.
Vegan Transformation: Substitute the egg with 1 flax egg (1 tablespoon ground flaxseed mixed with 3 tablespoons water) or ¼ cup unsweetened applesauce. Replace whole milk with almond milk or soy milk and use vegan butter in the frosting.
Lower Sugar Alternative: Reduce the granulated sugar by ¼ cup and add 2-3 tablespoons of honey or maple syrup. This substitution maintains sweetness while reducing overall sugar content.
Dairy-Free Adaptation: Use plant-based milk instead of whole milk and replace butter in the frosting with vegan butter or coconut oil. The cake will maintain its moist texture with these swaps.
Egg-Free Version: Beyond the flax egg option we can substitute the egg with ¼ cup of unsweetened applesauce or mashed banana for binding power.


Conclusion
We’ve shown you how easy it is to create a bakery-quality small chocolate cake that delivers maximum flavor without the fuss of larger desserts. This recipe proves that you don’t need to compromise on taste or texture when baking in smaller portions.
Whether you’re celebrating a special moment or simply treating yourself to something sweet this versatile cake adapts to any occasion. The straightforward ingredients and simple techniques make it accessible for bakers of all skill levels.
From proper storage methods to creative variations we’ve equipped you with everything needed to master this delightful dessert. Your kitchen is now ready to produce consistently delicious results that’ll satisfy any chocolate craving with minimal effort and maximum satisfaction.
Frequently Asked Questions
What size pan should I use for this small chocolate cake?
Use a 6-inch or 8-inch round cake pan for best results. A 6-inch pan creates a taller, more intimate cake perfect for 2-4 people, while an 8-inch pan yields a slightly thinner cake that serves 4-6 people. Make sure to properly grease and flour your pan to prevent sticking.
How long does it take to make this chocolate cake from start to finish?
This small chocolate cake takes under an hour to complete. The actual baking time is 25-30 minutes at 350°F, plus about 15 minutes for preparation and mixing, and 15-20 minutes for cooling before frosting. It’s perfect when you want homemade cake without a big time commitment.
Can I make this cake ahead of time?
Yes! An unfrosted cake can be stored wrapped in plastic wrap for up to 2 days at room temperature or frozen for 2-3 months. Frosted cakes stay fresh in an airtight container for 3-5 days at room temperature, or longer if refrigerated. This makes it perfect for meal prep.
What makes this cake so moist and fudgy?
The combination of vegetable oil, whole milk, and boiling water creates the signature moist texture. The oil keeps it tender longer than butter, while the hot water helps bloom the cocoa powder for deeper chocolate flavor. Using the right ratio of wet to dry ingredients is crucial.
Can I make this recipe gluten-free or vegan?
Absolutely! For gluten-free, substitute all-purpose flour with a 1:1 gluten-free flour blend. For vegan, replace the egg with a flax egg, use plant-based milk, and ensure your sugar is vegan. The cake maintains its rich chocolate flavor with these simple substitutions.
Do I need special equipment to make this cake?
Most home bakers already own 90% of the needed tools. Essential items include mixing bowls, measuring cups, a whisk or hand mixer, and a cake pan. Optional but helpful tools include a fine mesh sifter, offset spatula, and wire cooling rack for professional-looking results.
How should I store leftover cake?
Store frosted cake in an airtight container at room temperature for 3-5 days. For longer storage, refrigerate for up to a week. Unfrosted layers can be wrapped in plastic wrap and stored for 2 days at room temperature or frozen for up to 3 months.
Can I customize the flavors in this recipe?
Yes! Popular variations include adding 1 teaspoon espresso powder for mocha flavor, incorporating chopped nuts or berries, or adding mint extract. You can also experiment with different frosting flavors like peanut butter or cream cheese while maintaining the base chocolate cake recipe.


