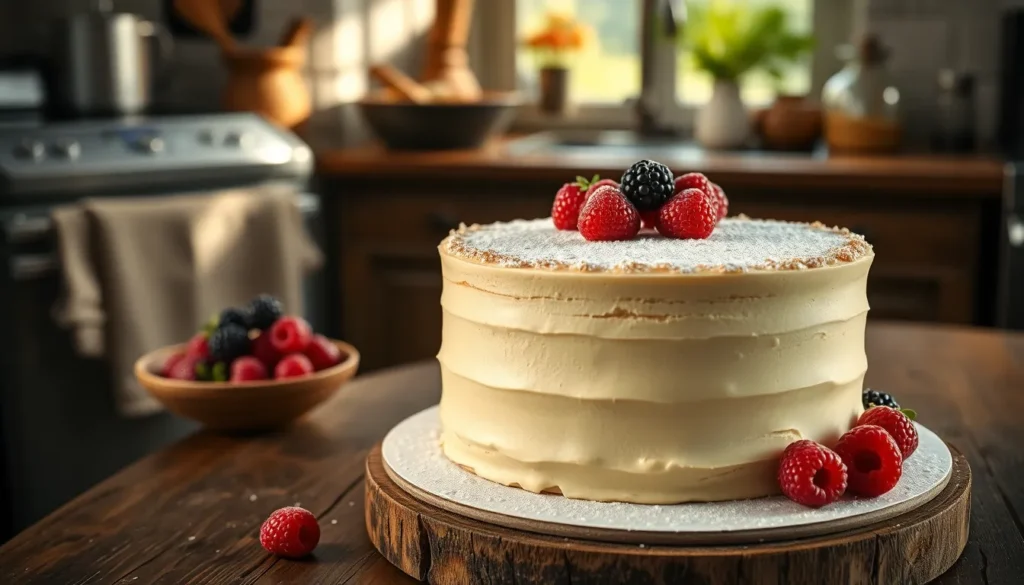
There’s something magical about a perfectly sized vanilla cake that captures our hearts every single time. While towering layer cakes certainly have their place we’ve discovered that small vanilla cakes offer the perfect solution for intimate celebrations or when you’re craving homemade sweetness without the commitment of leftovers.
Our foolproof small vanilla cake recipe delivers all the classic flavors you love in a compact 6-inch format that’s ideal for couples date nights or small family gatherings. The tender crumb and rich vanilla aroma will fill your kitchen with warmth while creating just enough cake to satisfy without overwhelming.
What makes this recipe truly special is its versatility – you can dress it up with elegant buttercream for special occasions or keep it simple with a dusting of powdered sugar for everyday indulgence. We’ve perfected every detail to ensure your small vanilla cake turns out moist fluffy and absolutely irresistible every time.
Ingredients
We’ve carefully selected each ingredient to create our perfect small vanilla cake with optimal flavor and texture. These simple pantry staples combine to deliver exceptional results in our compact 6-inch cake.
For the Cake
- 1 cup all-purpose flour, sifted
- 3/4 cup granulated sugar
- 1 1/2 teaspoons baking powder
- 1/2 teaspoon salt
- 1/3 cup unsalted butter, softened at room temperature
- 1/2 cup whole milk, at room temperature
- 1 large egg, at room temperature
- 2 teaspoons pure vanilla extract
- 2 tablespoons vegetable oil
For the Vanilla Buttercream Frosting
- 1/2 cup unsalted butter, softened at room temperature
- 2 cups powdered sugar, sifted
- 2 tablespoons heavy cream or whole milk
- 1 teaspoon pure vanilla extract
- 1/8 teaspoon salt


Equipment Needed
 - Moist & Easy for Any Occasion 2")
Creating the perfect small vanilla cake requires exact tools that ensure consistent results and professional quality. We recommend gathering all equipment before starting to streamline the baking process.
Essential Mixing Tools
Our recipe relies on proper aeration for that signature light texture. An electric mixer serves as the cornerstone of successful cake making, whether you choose a handheld or stand mixer model. Large mixing bowls provide ample space for combining ingredients without spillage during the creaming process.
Precise Measuring Equipment
Accuracy determines the difference between cake success and disappointment. Standard measuring cups and spoons ensure proper ingredient ratios that create our desired tender crumb. We emphasize using dry measuring cups for flour and liquid measuring cups for milk to maintain precision.
Specialized Baking Pans
The 6-inch round cake pans with 2-inch high sides create the ideal portion size for intimate gatherings. These compact dimensions allow even heat distribution while producing the perfect serving size for 2 to 4 people.
Supporting Tools
A flexible spatula helps scrape bowl sides thoroughly and prevents ingredient waste during mixing. Wire cooling racks ensure proper air circulation around the finished cake, preventing soggy bottoms that can ruin texture.
Optional Preparation Items
Parchment paper simplifies cake removal and reduces sticking concerns. Nonstick cooking spray or butter provides additional release insurance for delicate cake layers.
| Equipment Category | Exact Items | Purpose |
|---|---|---|
| Mixing | Electric mixer, mixing bowls | Proper aeration and combining |
| Measuring | Measuring cups and spoons | Ingredient accuracy |
| Baking | 6″ round pans (2″ high) | Optimal size and heat distribution |
| Finishing | Wire rack, spatula | Cooling and mixing efficiency |


Instructions
 - Moist & Easy for Any Occasion 4")
Now that we have our ingredients measured and equipment ready, let’s walk through each step to create our perfect 6-inch vanilla cake. These detailed instructions will guide us through every stage of the baking process.
Prep the Pan and Oven
We start by preheating our oven to 350°F (180°C standard or 160°C fan-forced). While the oven warms up, we lightly grease our 6-inch round cake pan with non-stick spray or butter, ensuring complete coverage of the bottom and sides. Next, we line the bottom with a fitted parchment paper circle to guarantee easy removal after baking. This preparation step prevents sticking and creates the foundation for our perfectly shaped cake.
Make the Cake Batter
In a medium bowl, we beat together ¼ cup (55g) softened unsalted butter and ½ cup (100g) granulated sugar with our electric mixer until the mixture becomes light and fluffy, approximately 1-2 minutes. We then add 1 large egg and 1 teaspoon vanilla extract, beating until everything combines smoothly.
| Ingredient | Amount | Weight |
|---|---|---|
| All-purpose flour | 1½ cups | 180-195g |
| Baking powder | 1 teaspoon | – |
| Baking soda | ½ teaspoon | – |
| Salt | ¼ teaspoon | – |
In a separate small bowl, we whisk together the dry ingredients listed in the table above. We alternate adding the dry ingredients and ½ cup (120ml) milk to our wet mixture, mixing until just combined after each addition. This alternating method ensures our batter develops the perfect texture without overmixing.
Bake the Cake
We pour the batter into our prepared pan and smooth the top with a spatula for even distribution. The cake bakes for 24-39 minutes, depending on our exact oven characteristics. We test for doneness by inserting a cake tester or toothpick into the center; it should come out clean when the cake is ready. After removing from the oven, we let the cake cool for 10 minutes in the pan before transferring it to a wire rack to cool completely.
Prepare the Frosting
While our cake cools, we prepare the vanilla buttercream by beating ½ cup (115g) softened butter until creamy and smooth. Gradually, we add 2-3 cups powdered sugar, 1 teaspoon vanilla extract, and 1-2 tablespoons heavy cream or milk, beating continuously until the frosting becomes light and fluffy. We adjust the consistency by adding more cream for a softer texture or more powdered sugar for firmer frosting.
Assemble and Frost the Cake
Once our cake has cooled completely, we place it on our serving plate. Using an offset spatula or knife, we spread the frosting over the top first, then work our way down the sides with smooth, even strokes. For the best presentation, we can chill the frosted cake briefly to firm the frosting, then apply a second coat for professional-looking results. The finished cake stores at room temperature, covered, for up to 3 days and can be decorated with sprinkles, fruit, or piped designs using a pastry bag.


Directions for Serving
 - Moist & Easy for Any Occasion 6")
Once your small vanilla cake has cooled completely and received its frosting finishing touches, proper serving ensures every bite delivers maximum flavor and visual appeal. We recommend removing the cake from the refrigerator 15-20 minutes before serving to allow the buttercream to soften slightly for easier cutting.
Portioning Your Cake
A 6-inch vanilla cake typically serves 4-6 people with generous slices or up to 8 people with smaller portions. Use a sharp knife warmed under hot water and wiped clean between cuts to create clean slice edges through the buttercream. We find that marking the cake lightly with a knife tip helps ensure even portions before making full cuts.
Presentation Options
| Serving Style | Best For | Portions |
|---|---|---|
| Generous slices | Small gatherings | 4-6 people |
| Dessert portions | Dinner parties | 6-8 people |
| Individual mini servings | Tea time | 8-10 small pieces |
For elegant presentation, we suggest placing each slice on chilled dessert plates and adding a light dusting of powdered sugar around the plate edges. Fresh berries or a small dollop of whipped cream complement the vanilla flavors beautifully without overwhelming the cake’s delicate taste.
Storage and Freshness
Your small vanilla cake maintains optimal freshness when stored at room temperature for up to 5 days when properly covered. We recommend using a cake dome or wrapping individual slices in plastic wrap to preserve moisture. For longer storage, wrapped slices freeze well for up to 3 months and thaw perfectly at room temperature within 2-3 hours.
Serving Temperature
Room temperature serving brings out the full vanilla aroma and ensures the cake’s tender crumb texture shines. Cold cake from refrigerated storage tends to feel denser and masks the subtle vanilla notes we’ve carefully developed in this recipe.


Storage Instructions
 - Moist & Easy for Any Occasion 8")
Proper storage keeps our small vanilla cake fresh and delicious for days after baking. We recommend following exact guidelines based on how long you plan to keep the cake and whether it’s frosted or unfrosted.
Room Temperature Storage
We can store unfrosted small vanilla cakes at room temperature for up to one day when placed in an airtight container. This method works best for cakes that will be consumed quickly and don’t have perishable frosting ingredients.
Refrigerator Storage
Our small vanilla cakes stay fresh in the refrigerator for 2 to 4 days depending on the exact recipe and frosting type. Frosted vanilla cakes require refrigeration and can be stored for up to one week in an airtight container. We suggest covering any cut sections with leftover frosting to maintain moisture and prevent the cake from drying out.
| Storage Method | Duration | Container Type |
|---|---|---|
| Room Temperature | 1 day | Airtight container |
| Refrigerated (unfrosted) | 2-4 days | Airtight container |
| Refrigerated (frosted) | Up to 1 week | Airtight container |
Freezing for Long Term Storage
We can freeze individual cake slices for extended storage by wrapping each piece individually in plastic wrap and placing them in an airtight freezer bag. Frozen slices maintain their quality for up to three months when properly wrapped and stored.
Thawing Guidelines
Frozen cake slices need proper thawing to restore their original texture. We recommend allowing frozen pieces to thaw at room temperature for several hours or placing them in the refrigerator overnight before serving.
Storage Best Practices
Always use airtight containers to prevent our cake from drying out and absorbing unwanted odors from other refrigerator items. We keep cakes away from direct sunlight to avoid drying and potential discoloration. These simple storage techniques ensure our small vanilla cake maintains its tender crumb and rich vanilla flavor until we’re ready to enjoy every last bite.


Make-Ahead Tips
 - Moist & Easy for Any Occasion 10")
We understand the value of preparing components ahead of time to streamline your baking process and ensure perfect results. Planning ahead transforms this small vanilla cake into an even more convenient dessert option for busy schedules or special occasions.
Cake Layers in Advance
Our cake layers freeze beautifully and actually benefit from advance preparation. We recommend baking your 6-inch vanilla cake layers up to three months ahead of time. Wrap each cooled layer tightly in plastic wrap, then place in a freezer-safe bag or container. This method preserves moisture and prevents freezer burn while maintaining the cake’s tender crumb structure.
When ready to use, transfer frozen layers to the refrigerator overnight to thaw completely. The layers will taste remarkably fresh and maintain their original texture. We find that frozen and thawed cake layers are often easier to frost since they’re firmer and produce fewer crumbs during assembly.
Frosting Preparation
Vanilla buttercream frosting stores exceptionally well and can be prepared several days in advance. We make our frosting up to one week ahead and store it in the refrigerator in an airtight container. Before using, let the frosting come to room temperature and rewhip it with an electric mixer to restore its smooth, fluffy consistency.
Leftover frosting from decorated cakes keeps for future baking projects. Store excess buttercream in the freezer for up to three months, then thaw and rewhip as needed for cupcakes or other desserts.
Optimal Storage Timeline
| Storage Method | Duration | Best Practices |
|---|---|---|
| Room Temperature (decorated cake) | 1-2 days | Airtight container, cool location |
| Refrigerated (frosted cake) | Up to 1 week | Covered container, away from strong odors |
| Frozen (cake layers) | Up to 3 months | Double wrapped, labeled with date |
| Frozen (frosting) | Up to 3 months | Airtight container, portion as needed |
Assembly Strategy
We recommend assembling your cake the day before serving for optimal flavor development. The frosting settles into the cake layers overnight, creating better adhesion and more cohesive flavors. Store the assembled cake in the refrigerator, then bring to room temperature 15-20 minutes before serving to enhance the vanilla aroma and achieve the perfect texture contrast between the tender cake and smooth frosting.
Conclusion
We’ve shown you that mastering the perfect small vanilla cake doesn’t require extensive baking experience or complicated techniques. With our straightforward recipe and detailed guidance you’ll create a dessert that’s both elegant and satisfying.
The beauty of this 6-inch cake lies in its versatility and convenience. Whether you’re celebrating a quiet anniversary or simply treating yourself to something special this recipe delivers consistent results every time.
Remember that the key to success is in the details – from proper ingredient measurements to allowing your cake to reach room temperature before serving. With these techniques in your arsenal you’re ready to create memorable moments one perfect slice at a time.
Frequently Asked Questions
What size cake does this recipe make?
This recipe creates a 6-inch vanilla cake, perfect for intimate celebrations and small gatherings. The compact size serves 4-6 people with generous slices or up to 8 people with smaller portions, making it ideal for date nights, small family gatherings, or when you want fresh cake without excessive leftovers.
How long does it take to bake a 6-inch vanilla cake?
The baking time for a 6-inch vanilla cake varies depending on your oven, but typically takes around 25-35 minutes at the recommended temperature. Test for doneness by inserting a toothpick into the center – it should come out clean or with just a few moist crumbs attached.
Can I make this vanilla cake ahead of time?
Yes, you can make this cake ahead of time. Unfrosted cake layers can be baked up to three months in advance and frozen. The vanilla buttercream frosting can be prepared several days ahead and stored in the refrigerator. For best results, assemble the cake the day before serving.
How should I store leftover vanilla cake?
Store unfrosted cake at room temperature for up to one day in an airtight container. Frosted cakes should be refrigerated and can last 2-4 days or up to one week in an airtight container. Individual slices can be frozen for up to three months when properly wrapped.
What equipment do I need to make a 6-inch vanilla cake?
Essential equipment includes an electric mixer, large mixing bowls, standard measuring cups and spoons, a 6-inch round cake pan, flexible spatulas, and wire cooling racks. Optional items like parchment paper and nonstick cooking spray help with cake removal and prevent sticking.
How do I achieve the perfect texture in my vanilla cake?
For optimal texture, alternate adding dry ingredients with milk when making the batter. Use room temperature ingredients for better mixing, and don’t overmix the batter. Proper measuring and following the ingredient ratios exactly will ensure a moist, fluffy, and tender crumb every time.
When should I remove the cake from the refrigerator before serving?
Remove frosted vanilla cake from the refrigerator 15-20 minutes before serving. This allows the cake to come to room temperature, which enhances the vanilla aroma and improves the texture, ensuring the best possible eating experience for your guests.
Can I customize the vanilla buttercream frosting?
Yes, the vanilla buttercream frosting is versatile and can be customized. You can adjust the consistency by adding more heavy cream or milk for a softer texture, or more powdered sugar for firmer frosting. The vanilla extract can be adjusted to taste preferences.