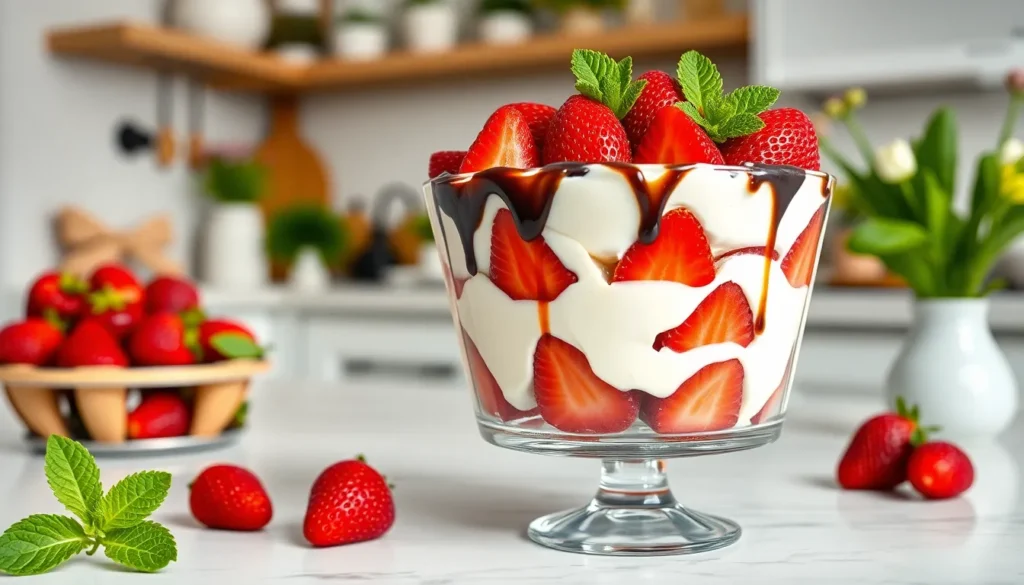
We’ve taken the beloved Italian classic and given it a fresh berry twist that’ll make your taste buds sing. Our strawberry tiramisu combines the creamy decadence of traditional mascarpone layers with bright juicy strawberries that add natural sweetness and vibrant color.
This no-bake dessert transforms the coffee-soaked ladyfingers into delicate strawberry-kissed layers that melt in your mouth. We’re replacing the bold espresso with sweet strawberry syrup while maintaining that signature tiramisu texture you crave. The result? A lighter more refreshing version that’s perfect for spring gatherings and summer dinner parties.
What makes this strawberry tiramisu truly special is how the fresh berries complement the rich mascarpone without overwhelming the delicate balance. We’ll show you exactly how to create those Instagram-worthy layers that taste even better than they look.
Ingredients
We’ve organized our strawberry tiramisu ingredients by layers to make preparation straightforward and ensure perfect results. Each component plays a crucial role in creating the balanced flavors and textures that make this dessert exceptional.
For the Strawberry Layer
- 2 pounds fresh strawberries hulled and sliced
- 1/3 cup granulated sugar
- 2 tablespoons fresh lemon juice
- 1 tablespoon balsamic vinegar
- 1/4 cup water
- 2 tablespoons cornstarch
- 30 ladyfinger cookies
For the Mascarpone Cream
- 16 ounces mascarpone cheese at room temperature
- 1 cup heavy whipping cream cold
- 3/4 cup powdered sugar
- 1 teaspoon vanilla extract
- 1/4 teaspoon salt
- 3 large egg yolks
- 1/3 cup granulated sugar for yolks
For Assembly
- 1/2 cup strawberry syrup reserved from cooking
- 2 tablespoons strawberry liqueur optional
- 1 cup fresh strawberries sliced for garnish
- Fresh mint leaves for decoration
- Powdered sugar for dusting
Equipment Needed

Creating the perfect strawberry tiramisu requires the right tools to achieve those signature smooth textures and professional looking layers. We recommend gathering your equipment before starting to ensure a seamless preparation process.
Stand mixer or hand mixer becomes essential for whipping the mascarpone cream to the proper consistency. The mixer helps incorporate air into the mixture while preventing overmixing that could cause the mascarpone to separate.
Blender works perfectly for creating the strawberry puree and syrup that replaces traditional espresso. This tool ensures we achieve a smooth consistency without lumps that could affect the final texture.
Wide bowl provides ample space for mixing the mascarpone cream and folding ingredients together gently. The extra room prevents spillage and allows for proper incorporation of all components.
13×9 inch baking dish serves as the ideal vessel for assembling and chilling the tiramisu. This size accommodates multiple layers while providing the perfect depth for presentation.
Measuring cups and spoons guarantee accurate ingredient quantities that are crucial for achieving the proper balance of flavors. Precision in measurements directly impacts the dessert’s final taste and texture.
Spatula facilitates gentle folding of the cream mixture and helps spread each layer evenly. The flexible edge ensures we can scrape bowls clean and create smooth surfaces between layers.
Additional helpful tools include a fine mesh strainer for removing seeds from strawberry puree and plastic wrap for covering the dish during the essential chilling period. These basic kitchen essentials streamline the preparation process and contribute to the dessert’s professional appearance.
Prep Work

Before we begin assembling our strawberry tiramisu, we need to prepare the key components that will create those beautiful layers. Let’s start with the strawberries and create our strawberry syrup mixture.
Preparing the Strawberries
We begin by washing and hulling 2 pounds of fresh strawberries. Slice half of the strawberries into thin pieces and set them aside for layering between our mascarpone cream.
The remaining strawberries get transformed into a luscious syrup. We blend these berries with 1/4 cup sugar and 2 tablespoons milk until smooth. This mixture serves as our strawberry base that will infuse every bite with fresh berry flavor.
For an even richer strawberry experience, we can also prepare strawberry preserves by cooking sliced strawberries with sugar until they break down into a jam-like consistency. This gives us multiple strawberry elements to work with throughout our dessert.
Making the Coffee Mixture
Traditional tiramisu relies on coffee to moisten the ladyfingers, but our strawberry version takes a different approach. We skip the coffee entirely and use our homemade strawberry syrup instead.
We take our blended strawberry mixture and thin it slightly with water if needed to achieve the perfect consistency for dipping. The syrup should be liquid enough to penetrate the ladyfingers quickly without making them soggy.
Some recipes call for adding a splash of strawberry liqueur to this mixture for extra depth of flavor. We dip each ladyfinger into this strawberry syrup for just a few seconds before placing them in our baking dish. This process ensures our cookies absorb the strawberry essence while maintaining their structural integrity for clean layers.
Instructions

We’ll create this beautiful strawberry tiramisu by working in three main stages: preparing the creamy mascarpone layer, getting our ladyfingers ready for assembly, and then bringing everything together into stunning layers. The process requires some patience but delivers spectacular results.
Making the Mascarpone Cream
We start by combining the mascarpone cheese, heavy cream, sugar, and vanilla extract in a medium mixing bowl. Using our stand mixer or hand mixer, we whip the heavy cream separately with powdered sugar and vanilla extract until it forms medium to stiff peaks. The key is achieving the right consistency without overwhipping.
Next, we gently fold about one third of the whipped cream into the mascarpone mixture to lighten the texture. This technique prevents the cream from becoming too dense. We then fold in the remaining whipped cream using gentle motions until everything combines smoothly. The final mixture should be light, airy, and perfectly smooth.
Preparing the Ladyfingers
Our ladyfingers need the strawberry treatment to replace the traditional coffee soaking. We dip each ladyfinger into our prepared strawberry jam or syrup for just a few seconds on each side. The timing is crucial here because we want them to absorb the strawberry flavor without becoming too soggy.
We work quickly but carefully, ensuring each cookie gets an even coating of the strawberry mixture. The ladyfingers should feel slightly softened but still maintain their structure for clean, defined layers in our final dessert.
Assembling the Tiramisu
We begin our assembly by arranging half of the dipped ladyfingers in a tight, even layer across the bottom of our 13×9 inch baking dish. We spread additional strawberry jam directly over these ladyfingers to intensify the berry flavor throughout each bite.
Our first layer of mascarpone cream goes on next, spreading it evenly over the jam-covered ladyfingers. We add our sliced fresh strawberries over this cream layer, distributing them evenly for consistent flavor in every serving.
We repeat this entire process with our remaining ladyfingers, jam, and mascarpone cream to create our second layer. The remaining fresh strawberries get reserved for the final presentation layer that we’ll add just before serving.
The assembled tiramisu needs to chill in the refrigerator for at least 8 hours or overnight. This resting time allows all the flavors to meld together and gives the dessert its signature creamy texture that makes each spoonful perfect.
Chilling and Setting Time

Chilling transforms our assembled strawberry tiramisu from separate layers into a cohesive dessert where flavors meld beautifully. The mascarpone cream needs time to set while the ladyfingers absorb the strawberry syrup to achieve that perfect balance between softness and structure.
We recommend chilling our strawberry tiramisu for a minimum of 4 to 6 hours. This timeframe allows the ladyfingers to soften as they absorb the strawberry juices while maintaining enough structure to create clean layers when we slice the dessert.
For optimal results, we prefer chilling overnight or for 8 hours. Extended chilling time enhances the flavor development as all components have more time to integrate. The mascarpone cream layer becomes perfectly set during this longer period, making our tiramisu easier to slice and serve with professional-looking portions.
| Chilling Duration | Texture Result | Best For |
|---|---|---|
| 1-4 hours | Slight ladyfinger crunch | Quick serving needs |
| 4-6 hours | Balanced softness | Standard preparation |
| 8+ hours/overnight | Fully integrated flavors | Optimal results |
During the chilling process, we cover our tiramisu tightly with plastic wrap to prevent it from absorbing other refrigerator odors. The dessert develops its signature creamy texture as the ladyfingers continue absorbing moisture from both the strawberry syrup and the mascarpone layer above.
We can store our finished strawberry tiramisu in an airtight container in the refrigerator for 1 to 2 days. The dessert tastes best when enjoyed fresh or within the first day after preparation, as the strawberries maintain their vibrant flavor and the mascarpone stays at peak creaminess.
Before serving, we add fresh strawberry garnishes and mint leaves to maintain their bright appearance and crisp texture. These final touches preserve the visual appeal that makes our strawberry tiramisu as beautiful as it is delicious.
Serving Suggestions

After our strawberry tiramisu has chilled to perfection, we can transform the final presentation into something truly spectacular. We recommend garnishing each serving with fresh sliced strawberries arranged in an overlapping pattern across the top surface. A light drizzle of melted chocolate creates an elegant contrast against the vibrant red berries and adds a sophisticated touch that elevates the visual appeal.
For entertaining guests, we love serving this dessert in individual portions using mini cups or tall shot glasses. This approach typically yields 16-20 servings and makes the dessert much easier to manage at parties or gatherings. The individual presentations also allow each guest to enjoy perfectly portioned layers while maintaining the beautiful visual structure of our carefully assembled tiramisu.
We can easily customize this recipe by swapping strawberries for other seasonal fruits. Blueberries create a stunning purple hue, while raspberries add tartness that complements the sweet mascarpone. Peaches bring a summery flavor profile that works exceptionally well with the creamy base. Each fruit variation maintains the same preparation method while offering completely different flavor experiences.
Additional toppings can enhance both flavor and presentation. Orange or lemon zest brightens the overall taste profile, while a light dusting of cocoa powder adds depth and visual contrast. Elderflower syrup creates floral notes that pair beautifully with the strawberry flavors. We can also prepare a simple strawberry sauce by pureeing fresh berries with a touch of sugar to drizzle around the plate edges.
For restaurant-style plating, we place a generous spoonful of strawberry puree on each serving plate before adding a slice of our tiramisu on top. This technique creates a professional presentation that showcases the dessert’s colors while adding an extra burst of strawberry flavor with each bite. Fresh mint leaves provide the perfect finishing touch, adding both color contrast and a subtle aromatic element that complements the fruit flavors beautifully.
Storage Tips

Our strawberry tiramisu requires proper storage techniques to maintain its fresh flavors and creamy texture. We recommend storing this delicate dessert in the refrigerator covered for up to 3 days for optimal quality and food safety.
Refrigerator Storage
We store our completed strawberry tiramisu by covering it tightly with plastic wrap or aluminum foil. The mascarpone cream maintains its rich consistency when kept at proper refrigeration temperatures. Fresh strawberry layers preserve their vibrant flavor and texture within this timeframe.
| Storage Method | Duration | Notes |
|---|---|---|
| Refrigerator (covered) | Up to 3 days | Optimal texture and flavor |
| Freezer | Up to 1 month | Softer texture after thawing |
| Individual jars | 1 to 2 days | Refrigerated storage only |
Freezing Options
We can extend storage by freezing our strawberry tiramisu for up to 1 month. The texture becomes softer upon thawing due to ice crystal formation in the cream layers. We recommend thawing frozen portions gradually in the refrigerator for best results.
Assembly Timing
We achieve the freshest results by assembling our strawberry tiramisu just before serving. This technique preserves the strawberry layers’ optimal texture and prevents excess moisture from affecting the ladyfingers. We briefly dip our ladyfingers in strawberry sauce to avoid sogginess while ensuring proper flavor absorption.
Individual Serving Storage
We create individual portions using jars that hold at least seven ounces for proper layering. These single servings store well in the refrigerator for 1 to 2 days. We find this method particularly useful for entertaining since guests can enjoy perfectly portioned desserts.
Optimal Chilling Time
We chill our assembled tiramisu for at least 1 to 4 hours to allow flavors to meld properly. Overnight chilling produces softer ladyfingers and deeper flavor integration. We always use fresh strawberries for layering since frozen strawberries become mushy when thawed and compromise the dessert’s texture.
Recipe Variations

We can transform our classic strawberry tiramisu into exciting variations that suit different occasions and preferences. These adaptations maintain the dessert’s signature creamy texture while offering new ways to enjoy this delightful treat.
Individual Strawberry Tiramisu Cups
Creating individual servings transforms our strawberry tiramisu into elegant personal desserts perfect for entertaining. We layer ladyfingers and mascarpone mixture in small serving dishes or glass cups to achieve beautiful individual presentations. This approach provides excellent portion control for parties and gatherings where guests prefer their own servings.
The assembly process mirrors our traditional method but requires breaking ladyfingers to fit smaller containers. We start by placing broken ladyfinger pieces at the bottom of each cup then add a layer of mascarpone cream followed by sliced strawberries. Individual cups allow us to customize each serving with different toppings or flavor combinations based on guest preferences.
Storage becomes more manageable with individual portions since we can refrigerate cups for 1 to 2 days while maintaining optimal texture and flavor. These personal servings eliminate the need for cutting and serving from a large dish making them ideal for buffet style events or outdoor gatherings.
No-Coffee Version
Our strawberry tiramisu naturally omits coffee making it a distinct variation from traditional tiramisu recipes. Most strawberry tiramisu versions focus entirely on strawberry sweetness and mascarpone creaminess without any coffee elements. This alcohol free approach makes the dessert suitable for all ages including children and those who prefer caffeine free desserts.
Instead of coffee soaking liquid we use strawberry syrup or jam mixture to moisten the ladyfingers. We can substitute raspberries or blueberries for strawberries to create different fruit profiles while maintaining the coffee free foundation. Some recipes incorporate orange zest or orange liqueur for added flavor depth without relying on traditional coffee notes.
The absence of coffee allows the natural strawberry flavors to shine through each layer. We enhance sweetness using strawberry jam or preserves combined with granulated sugar rather than balancing against coffee’s bitter notes. This variation appeals to those seeking a lighter dessert experience focused on fresh fruit flavors rather than the bold coffee taste of classic tiramisu.
Conclusion
This strawberry tiramisu proves that classic desserts can evolve beautifully with seasonal ingredients. We’ve created a dessert that captures summer’s essence while maintaining the indulgent creaminess that makes tiramisu so beloved.
The versatility of this recipe means you’ll never run out of ways to impress your guests. Whether you choose individual servings or go with the traditional layered approach the results are consistently stunning and delicious.
We’re confident this strawberry twist will become your go-to dessert for warm weather entertaining. The combination of fresh fruit bright flavors and creamy textures creates an unforgettable finale to any meal that’ll have everyone asking for the recipe.
Frequently Asked Questions
What makes strawberry tiramisu different from traditional tiramisu?
Strawberry tiramisu replaces the classic espresso with sweet strawberry syrup and incorporates fresh strawberries throughout the layers. This creates a lighter, fruitier dessert that’s perfect for spring and summer, while still maintaining the creamy mascarpone base that makes tiramisu so beloved.
How long does strawberry tiramisu need to chill before serving?
The dessert needs to chill for at least 8 hours to allow the flavors to meld properly. For best results, you can chill it for 1-4 hours minimum, but overnight chilling ensures the ladyfingers absorb the strawberry syrup and the layers set perfectly.
Can I make strawberry tiramisu ahead of time?
Yes, strawberry tiramisu can be made up to 3 days in advance when stored covered in the refrigerator. For longer storage, it can be frozen for up to 1 month, though the texture may soften slightly upon thawing.
What equipment do I need to make strawberry tiramisu?
Essential equipment includes a stand mixer for the mascarpone cream, a blender for the strawberry syrup, and a 13×9 inch baking dish for assembly. You’ll also need basic kitchen tools like measuring cups, a whisk, and mixing bowls.
Can I substitute other fruits for strawberries in this recipe?
Absolutely! This recipe works well with other seasonal fruits like raspberries, peaches, or mixed berries. Simply replace the strawberries with your preferred fruit and adjust the sugar content based on the fruit’s natural sweetness.
How should I store leftover strawberry tiramisu?
Store covered in the refrigerator for up to 3 days for optimal quality. Individual portions in jars can be stored for 1-2 days. Always keep it refrigerated and covered to maintain the creamy texture and prevent the dessert from absorbing other flavors.
Can I make individual portions of strawberry tiramisu?
Yes, individual strawberry tiramisu cups make elegant personal servings perfect for entertaining. This approach allows for easier portion control, customization, and storage while maintaining the same delicious flavors as the full-sized version.
Is there a version without coffee for kids?
The strawberry tiramisu naturally focuses on fruit flavors rather than coffee, making it suitable for all ages. The strawberry syrup replaces traditional espresso, creating a kid-friendly dessert that emphasizes the natural sweetness of strawberries and creamy mascarpone.


