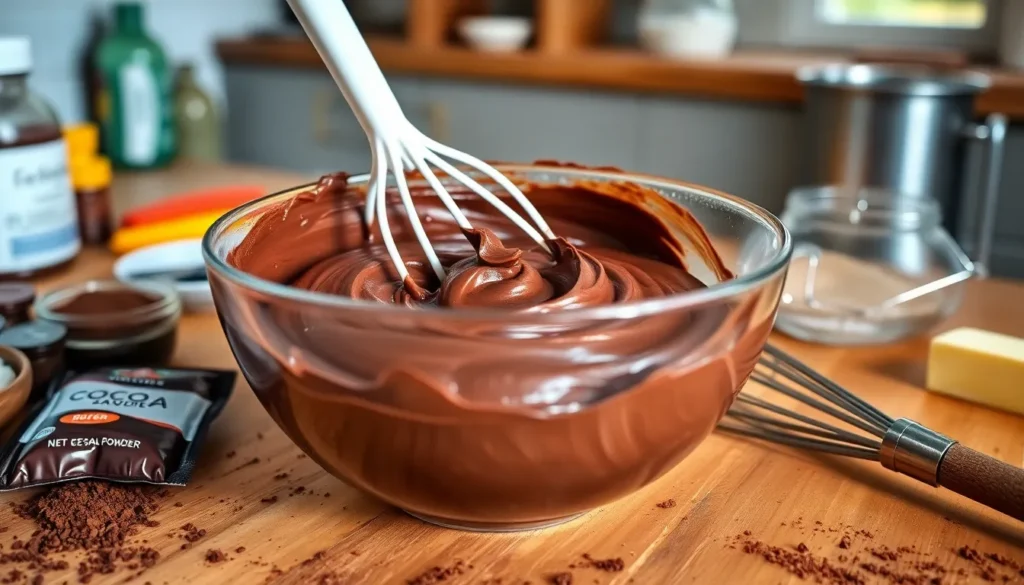
Nothing transforms a simple cake into a show-stopping dessert quite like rich, velvety chocolate frosting. We’ve spent countless hours perfecting this recipe to create what we believe is truly the best chocolate frosting you’ll ever make. This isn’t your average store-bought substitute – it’s a decadent, from-scratch creation that’ll have everyone asking for your secret.
What makes our chocolate frosting stand out from the rest? It’s all about the perfect balance of premium cocoa powder, real butter, and just the right amount of sweetness. The texture is impossibly smooth and pipes beautifully, whether you’re decorating cupcakes or covering a layer cake.
This foolproof recipe comes together in just minutes and delivers consistently amazing results every time. We’ll walk you through each step to ensure your frosting turns out perfectly creamy, rich, and absolutely irresistible. Trust us – once you try this homemade version, you’ll never go back to anything else.
Ingredients
Our rich chocolate frosting requires just a handful of quality ingredients that you likely have in your pantry. We’ve carefully selected each component to ensure the perfect balance of chocolate flavor and creamy texture.
For the Chocolate Frosting
- 1 cup (2 sticks) unsalted butter, room temperature
- 3½ cups powdered sugar, sifted
- ¾ cup unsweetened cocoa powder, sifted
- ½ cup heavy cream
- 2 teaspoons pure vanilla extract
- ½ teaspoon salt
- 3 ounces dark chocolate, melted and cooled slightly
Optional Add-ins
- 1 tablespoon instant espresso powder for enhanced chocolate flavor
- 2 tablespoons bourbon or rum for adult versions
- ½ teaspoon almond extract for nutty undertones
- 2 tablespoons peanut butter for chocolate peanut butter frosting
- 1 teaspoon orange zest for citrus brightness
- ¼ cup mini chocolate chips for extra texture


Equipment Needed
 1")
Creating our perfect chocolate frosting requires exact tools that ensure smooth blending and professional results. We recommend gathering these essential pieces before starting the mixing process.
Stand mixer or handheld electric mixer serves as the foundation for achieving our signature velvety texture. The powerful motor handles the dense butter and sugar combination while incorporating air for that coveted light consistency.
Large bowl provides ample space for mixing without spillage. We prefer using a bowl that accommodates all ingredients comfortably while allowing room for the mixer attachments to work effectively.
Measuring cups and spoons guarantee precise ingredient ratios every time. Accuracy becomes crucial when balancing the sweetness of powdered sugar with the intensity of cocoa powder.
Whisk or spatula helps scrape down bowl sides during mixing. This tool ensures every bit of butter gets incorporated and prevents lumps from forming in our finished frosting.
Small bowl for cocoa paste offers an optional preparation method that some bakers prefer. Mixing cocoa powder with boiling water creates a smooth paste that eliminates any grittiness in the final product.
| Equipment | Purpose | Essential Level |
|---|---|---|
| Stand/handheld mixer | Cream butter and blend ingredients | Required |
| Large bowl | Mixing container | Required |
| Measuring tools | Ingredient accuracy | Required |
| Whisk/spatula | Scraping and smoothing | Required |
| Small bowl | Cocoa paste preparation | Optional |
Having the right equipment ready streamlines our frosting process and delivers consistently smooth results that spread beautifully on any cake or cupcake.


Instructions
 2")
Now that we have all our ingredients and equipment ready, let’s walk through the simple process of creating this exceptional chocolate frosting. Follow these steps carefully to achieve the perfect texture and flavor.
Prep the Ingredients
Start by bringing the butter to room temperature until it’s soft enough to easily press with your finger. Sift the powdered sugar through a fine mesh strainer to eliminate any lumps that could create a gritty texture. Measure out the heavy cream and let it come to room temperature for easier mixing. If using melted dark chocolate, prepare it now by melting in 30-second intervals in the microwave or using a double boiler method until smooth.
Make the Base
Beat the softened butter in your mixing bowl using a stand mixer or handheld mixer on medium speed for 2-3 minutes until light and fluffy. Gradually add the sifted cocoa powder while mixing on low speed to prevent a cocoa cloud from forming. Mix until the butter and cocoa powder combine into a smooth, uniform mixture that resembles chocolate butter.
Add the Chocolate
Pour in the melted dark chocolate if using, ensuring it’s slightly cooled to prevent melting the butter base. Beat on medium speed for 1-2 minutes until fully incorporated. The mixture should develop a deeper, richer chocolate color and become more cohesive.
Whip to Perfection
Alternate between adding the sifted powdered sugar and heavy cream, beginning and ending with the powdered sugar. Add the sugar in three additions and cream in two additions, beating well after each addition. Pour in the vanilla extract and salt, then increase mixer speed to medium-high. Whip for 3-4 minutes until the frosting becomes light, fluffy, and holds its shape when the beaters are lifted.
Adjust Consistency
Evaluate the frosting’s texture and consistency. Add an additional tablespoon of heavy cream if the frosting appears too thick for spreading. Incorporate more powdered sugar, one tablespoon at a time, if the frosting seems too thin for piping. Beat for an additional 30 seconds after each adjustment until you achieve the perfect spreadable consistency that holds its shape.


Tips for the Best Chocolate Frosting
 3")
Creating professional-quality chocolate frosting requires attention to key details that make the difference between good and exceptional results. These essential techniques will help you achieve bakery-worthy frosting every time.
Choosing the Right Chocolate
We recommend using unsweetened cocoa powder as your foundation for the deepest chocolate flavor. High-quality dark chocolate provides richness when melted and incorporated into the base. Milk chocolate works beautifully if you prefer a sweeter profile that appeals to children and those who enjoy milder chocolate notes.
The cocoa powder should be Dutch-processed for optimal color and smooth texture. Premium brands deliver more intense flavor than standard grocery store varieties. We always sift our cocoa powder to eliminate any lumps that could create a grainy texture in the finished frosting.
Temperature Matters
Room temperature ingredients blend seamlessly together to create our signature velvety texture. Butter should feel soft to the touch but not melted or oily when pressed. Cold butter creates lumps that resist mixing no matter how long you beat the frosting.
Heavy cream flows better at room temperature and incorporates without shocking the butter mixture. We recommend removing all ingredients from the refrigerator 30 minutes before starting your frosting preparation. This simple step prevents the mixture from seizing or becoming too stiff during the mixing process.
Achieving the Perfect Texture
The ideal ratio creates a frosting that holds its shape while remaining spreadable and pipeable. We use the standard proportion of 1 cup butter to 3 cups confectioners’ sugar and 1/2 cup cocoa powder as our starting point.
| Ingredient | Amount | Purpose |
|---|---|---|
| Butter | 1 cup | Base and creaminess |
| Confectioners’ sugar | 3 cups | Sweetness and structure |
| Cocoa powder | 1/2 cup | Chocolate flavor |
| Heavy cream | 3-4 tablespoons | Consistency adjustment |
Liquid content requires careful attention during mixing. We add milk or heavy cream gradually while the mixer runs on low speed. Too little liquid results in stiff frosting that tears cake layers during application. Excessive liquid creates thin frosting that slides off cakes and refuses to hold decorative shapes.
Whipping the mixture properly incorporates air and ensures smooth application. We beat our frosting until it becomes light and fluffy with no visible streaks of cocoa powder. The finished texture should spread easily with an offset spatula while maintaining enough body for piping borders and rosettes.
Variations
 4")
Our chocolate frosting recipe serves as the perfect foundation for creating different textures and flavors to suit any dessert or dietary preference. These variations maintain the same rich chocolate base while offering unique characteristics that complement various cakes and occasions.
Rich Fudge Frosting
We transform our base recipe into a luxurious fudge-like consistency by incorporating dark chocolate and adjusting the cream content. Melt 4 ounces of dark chocolate with 2 tablespoons of butter and 3 tablespoons of heavy cream in a double boiler until completely smooth. Allow this mixture to cool slightly before beating it into our standard frosting base along with an additional cup of powdered sugar. The result delivers an intensely chocolatey flavor with a dense, velvety texture that spreads beautifully on layer cakes. This variation works exceptionally well for special occasions when you want maximum chocolate impact and a frosting that holds decorative shapes perfectly.
Light and Fluffy Version
Creating a lighter texture requires reducing the butter content while increasing the powdered sugar ratio for better structure. We use 6 tablespoons of softened butter instead of the full 8 tablespoons and increase the powdered sugar to 4 cups. Beat the reduced butter with our cocoa powder for 3 minutes until extremely light and airy before gradually incorporating the powdered sugar. Add heavy cream one tablespoon at a time until you achieve a spreadable consistency that feels noticeably lighter than our standard recipe. This version provides the same chocolate flavor while offering a more delicate mouthfeel that pairs beautifully with vanilla cupcakes or delicate sponge cakes.
Dairy-Free Option
Our dairy-free variation maintains the same rich flavor profile using plant-based alternatives that blend seamlessly. Replace the butter with an equal amount of vegan butter or high-quality margarine that has been softened to room temperature. Substitute the heavy cream with your preferred non-dairy milk such as almond, soy, or oat milk, adding it gradually to achieve the desired consistency. We recommend using full-fat coconut milk for the richest results, though any plant-based milk works effectively. The mixing process remains identical to our original recipe, ensuring you achieve the same smooth, pipeable texture that dairy-sensitive guests will appreciate without compromising on taste or presentation.


Storage and Make-Ahead Instructions
 5")
Our chocolate frosting maintains its rich texture and deep flavor when stored properly. We recommend following these guidelines to ensure your frosting stays fresh and ready to use whenever you need it.
How to Store
Refrigerator storage works best for short-term needs. We store our frosting in an airtight container in the refrigerator for up to 5 days, though it can last several weeks when properly sealed. Before using refrigerated frosting, we remove it from the fridge and allow it to reach room temperature. Whisking the frosting well helps restore its fluffy texture and smooth consistency.
Room temperature storage is only suitable for immediate use within the same day. We never leave our chocolate frosting at room temperature for extended periods due to the butter content.
Freezing Guidelines
Long-term storage requires freezing in airtight, freezer-safe containers. We freeze our chocolate frosting for up to 3 months without compromising quality or taste.
| Storage Method | Duration | Container Type |
|---|---|---|
| Refrigerator | Up to 5 days | Airtight container |
| Refrigerator (extended) | Several weeks | Airtight container |
| Freezer | Up to 3 months | Freezer-safe, airtight container |
Proper sealing prevents freezer burn and maintains the frosting’s integrity. We always label our containers with the date and contents for easy identification. Tightly sealed containers ensure the frosting thaws with the same smooth texture we originally created.
Thawing process requires overnight refrigeration before use. We never thaw frosting at room temperature, as this can create uneven texture and potential separation.
Bringing to Room Temperature
Timing is crucial for achieving the perfect consistency. We remove our frosting from the refrigerator 30 minutes to one hour before use, depending on room temperature conditions.
Restoration techniques help return the frosting to its original state. We whisk gently to restore smooth and fluffy texture, ensuring even distribution throughout. Sometimes we microwave the mixture for a few seconds if it becomes too stiff after refrigeration, which helps the ingredients combine smoothly.
Final preparation always includes thorough whisking before application. We test the consistency by spreading a small amount to ensure it pipes and spreads beautifully on our cakes and cupcakes.


Troubleshooting Common Issues
 6")
Even the most experienced bakers encounter occasional challenges when making chocolate frosting. We’ll walk you through the most common problems and their simple answers to ensure your frosting turns out perfectly every time.
Too Thick or Too Thin
Achieving the perfect consistency requires balancing your liquid and dry ingredients carefully. When your frosting becomes too thick to spread smoothly add milk one tablespoon at a time while beating until you reach the desired texture. We recommend starting with just one tablespoon since adding too much liquid at once can quickly turn your frosting too thin.
For frosting that’s too runny or won’t hold its shape gradually incorporate additional powdered sugar in ¼ cup increments. Beat the mixture thoroughly after each addition to properly distribute the sugar before assessing whether more is needed. Room temperature ingredients blend more easily and help maintain the proper consistency throughout the mixing process.
Grainy Texture
Grainy frosting typically results from improperly dissolved powdered sugar or ingredients at different temperatures. We always sift our powdered sugar before adding it to eliminate lumps that create an unpleasant sandy texture. Using room temperature butter ensures all ingredients blend smoothly without forcing the mixture.
Beat your frosting for at least 3-4 minutes after adding all ingredients to fully dissolve the sugar crystals. Cold ingredients resist proper mixing and often leave undissolved sugar particles that create grittiness. If graininess persists after thorough beating add one tablespoon of heavy cream and continue mixing until the texture becomes completely smooth.
Not Sweet Enough
Sweetness levels in chocolate frosting depend on personal preference and the cocoa powder’s intensity. We adjust sweetness by adding powdered sugar in small ¼ cup increments rather than large amounts that can throw off the consistency. Taste your frosting after each addition since it’s easier to add sweetness than to remove it.
Different cocoa powders vary in bitterness with some requiring more sugar to balance their intense chocolate flavor. Natural cocoa powder tends to be more acidic and may need additional sweetening compared to Dutch-processed varieties. Beat thoroughly after each sugar addition to ensure proper incorporation before making your final sweetness assessment.


What to Use This Frosting For
 7")
This rich chocolate frosting transforms ordinary desserts into memorable treats that impress family and guests alike. We recommend using it across various baked goods to maximize its versatility and exceptional flavor profile.
Cakes and Cupcakes serve as the perfect canvas for our chocolate frosting. The smooth consistency makes decorating effortless while maintaining professional-looking results. Layer cakes benefit from the frosting’s stability between tiers, and cupcakes showcase beautiful piped swirls that hold their shape throughout serving.
Cookies and Muffins gain an indulgent upgrade when topped with this frosting. Sugar cookies become gourmet treats, while chocolate muffins receive a double dose of cocoa richness. The frosting adheres well to these baked goods without sliding off or becoming messy.
Cheesecakes and Brownies reach new heights of decadence with our chocolate frosting. Cheesecakes pair beautifully with the frosting’s creamy texture, creating a harmonious blend of tangy and sweet flavors. Dense brownies become bakery-quality desserts when crowned with a generous layer of this velvety topping.
Beyond traditional applications, we love using this frosting for sandwich cookies, whoopie pies, and even as a dip for fresh strawberries. Birthday cakes, wedding desserts, and holiday treats all benefit from the professional appearance and rich taste this frosting delivers consistently.
| Dessert Type | Best Application | Texture Benefit |
|---|---|---|
| Layer Cakes | Between layers and exterior coating | Smooth spreading and sharp edges |
| Cupcakes | Piped decorations | Holds peaks and swirls |
| Cookies | Dolloped or spread topping | Adheres without sliding |
| Brownies | Thick coating layer | Creates bakery-style finish |
| Cheesecakes | Decorative piping | Complements creamy base |
The frosting’s versatility extends to temperature serving preferences as well. Room temperature application works beautifully for immediate serving, while chilled frosting creates firmer decorative elements that photograph exceptionally well for special occasions.


Conclusion
This chocolate frosting recipe transforms ordinary desserts into extraordinary treats that’ll have everyone asking for seconds. We’ve shared everything you need to create that perfect balance of rich chocolate flavor and silky-smooth texture that makes homemade frosting so much better than store-bought alternatives.
Whether you’re frosting a birthday cake decorating cupcakes or trying one of our creative variations this recipe delivers consistent results every time. The troubleshooting tips and storage guidance ensure you’ll feel confident tackling any frosting challenge that comes your way.
Now it’s time to grab your mixer and start creating that show-stopping chocolate frosting your desserts deserve. Your friends and family will taste the difference that quality ingredients and proper technique make.
Frequently Asked Questions
What ingredients do I need for this chocolate frosting recipe?
You’ll need unsalted butter, powdered sugar, unsweetened cocoa powder, heavy cream, vanilla extract, salt, and melted dark chocolate. Optional add-ins include instant espresso powder, bourbon or rum, almond extract, peanut butter, orange zest, and mini chocolate chips to customize the flavor to your preferences.
How long can I store chocolate frosting?
Chocolate frosting can be refrigerated in an airtight container for up to 5 days or several weeks when properly sealed. For long-term storage, freeze it in airtight, freezer-safe containers for up to 3 months. Always ensure proper sealing to prevent freezer burn and maintain quality.
What equipment do I need to make perfect chocolate frosting?
Essential equipment includes a stand or handheld mixer for achieving velvety texture, a large mixing bowl, measuring cups and spoons for precise ratios, and a whisk or spatula for scraping. A small bowl is optional for preparing cocoa paste to eliminate grittiness.
How do I fix runny chocolate frosting?
If your frosting is too runny, gradually add more powdered sugar until you reach the desired consistency. Always add small amounts at a time and mix thoroughly between additions. Make sure your butter isn’t too warm, as this can cause runny frosting.
How do I fix thick chocolate frosting?
For thick frosting, gradually add small amounts of heavy cream or milk while mixing until you achieve the perfect spreadable consistency. Add liquid slowly to avoid making it too thin. Room temperature ingredients help create smoother blending.
Can I make dairy-free chocolate frosting?
Yes! You can create a dairy-free version by substituting plant-based butter and non-dairy milk alternatives. This maintains the rich chocolate flavor while accommodating dietary restrictions, ensuring a smooth, pipeable texture without compromising taste or presentation quality.
What’s the best cocoa powder to use?
Use high-quality unsweetened cocoa powder for the best flavor depth. Dutch-processed cocoa is recommended for optimal color and texture. Avoid sweetened cocoa powders as they can affect the frosting’s consistency and overall sweetness balance.
How do I prevent grainy chocolate frosting?
Prevent graininess by sifting powdered sugar before use and ensuring all ingredients are at room temperature. This helps create smooth blending. If grittiness occurs, you can prepare a cocoa paste in a small bowl to eliminate texture issues.
What desserts work best with this chocolate frosting?
This versatile frosting works perfectly on layer cakes, cupcakes, cookies, muffins, cheesecakes, and brownies. It’s also great for sandwich cookies, whoopie pies, and as a dip for fresh strawberries. Its smooth consistency makes decorating effortless.
How do I thaw frozen chocolate frosting?
Avoid thawing at room temperature to prevent texture issues. Instead, transfer frozen frosting to the refrigerator and let it thaw slowly. Once thawed, whisk the frosting to restore its fluffy consistency and test spreadability before using.


